Below is the version of the Comms Link manual used from 1989, when the Comms
Link was updated to make use of the LZ model's larger screen. Note that it
is still compatible with the CM and XP models. This manual is also available
in German. The previous version of the
manual used until 1988 can be found here:
Comms Link Manual (1987-88)
Copyright Psion PLC 1989
All rights reserved. This manual and the programs referred to herein are copyrighted works of Psion PLC, London, England. Reproduction in whole or in part including utilisation in machines capable of reproduction or retrieval, without the express written permission of Psion PLC is prohibited. Reverse engineering is also prohibited.
The information in this document is subject to change without notice.
Psion and the Psion logo are registered trademarks of Psion PLC. Psion Organiser II, Datapak and Rampak are trademarks of Psion PLC.
All references in this manual to PCs are to the IBM PC, IBM XT and IBM AT, which are registered trademarks of International Business Machines Corp.
All references in this manual to Macintosh are to the Apple Macintosh range of computers. Apple and Macintosh are registered trademarks of Apple Computer Inc.
VAX and VMS are trademarks of Digital Equipment Corp.
Lotus, 1-2-3 and Symphony are registered trademarks of Lotus
Development Corp. DIF is a trademark or Software Arts Inc.
Hayes is a trademark of Hayes Microcomputer Products Inc.
VI(February 92)
Part No. 6100-0071
Introduction Setting up 1 Fitting the Comms Link Cable 2 Communications parameters Connecting to your application 3 Connecting to an IBM PC/XT/AT or compatible 4 Connecting to a Macintosh 5 Connecting to any other computer 6 Connecting to a printer 7 Terminal emulation Further use 8 Comms Link and OPL Appendices A ASCII Control characters B The Comms Link Interface C Parity, Bits and Stop Index
The Psion Comms Link connects your Organiser II to a printer, desktop computer, modem, or any device which has an RS232 serial port. What you can do with Comms Link depends on the device that it connects to. Common uses are:
If you wish to connect to an IBM PC/XT/AT or compatible, or a Macintosh, the Comms Link package includes special software (on the floppy disk) for one of these computers. If you wish to communicate with any other kind of computer you will need a communications program for that computer.
When using Comms Link, you may be doing a variety of things on the Organiser. You may be:
Each of these has its advantages. Using the Comms menu is fast and direct: you can print and transmit files simply by selecting an item from a menu. With OPL you have greater control and access to operations selecting which records in a data file are printed and controlling the print layout.
If you are working on the Pocket Spreadsheet (available as a separate product) you are now capable of loading and saving Lotus 1-2-3, Symphony and DIF files from an attached Apple Macintosh, IBM PC/XT/AT or compatible.
When you select Comms from the top level menu you are presented with the Comms menu. The items it contains have a variety of functions. They are covered in detail in later chapters, but below is an overview. On model LZ the Comms menu is displayed like this:
On models CM and XP this menu appears like this:
TRANSMIT RECEIVE SETUP TERM AUTO CAPTURE BOOT
Comms link server all models of the Organiser II, as does this manual.
Because Comms Link can be used for very different tasks, there are separate chapters on linking to a printer, a desktop computer and through terminal emulation. But certain features of preparing the connection for use are the same whatever your application. These are covered in Chapters 1 and 2, and you should read these first.
Chapter 8, 'Comms Link and OPL' is relevant for all applications, and additional technical information is provided in the appendices.
At one end of the Comms Link cable is the industry standard 25-pin RS232 socket; this plugs into your printer/computer/modem. At the other end of the cable is a moulded fitting which plugs into your Organiser. This plug contains the additional software which the organiser needs to use Comms Link.
To plug the cable into the Organiser:
A new menu option, Comms, will have been inserted into the main Organiser menu, just before the last option, Off. Press ON/CLEAR again if it hasn't.
If Comms doesn't appear in the menu, you may not have inserted the plug fully.
OUT OF MEMORY message? - there isn't enough internal memory (4K approximately) left on your Organiser to load the Comms Link software.
If you get the same error message, clear some more memory.
If you have a Rampak, you are advised to remove it before fitting the Comms Link cable. Follow this procedure:
If you have a Mains Adaptor, a good time to use it is while using Comms Link, especially when receiving files to a Datapak. To connect the Mains Adaptor, simply plug it into the socket on the Comms Link fitting.
The software will still be stored in memory, however. To remove this:
The Comms option should now have disappeared from the main menu - and the memory used by Comms Link freed for other uses.
Don't unplug the cable while the Organiser is switched on. This could cause electrical damage to the Organiser and Comms Link. (A DEVICE MISSING error would be reported if you were using the Comms option at the time.)
Because there is no absolutely standard hardware communications interface, you may need to prepare your machine before it can connect with the Organiser.
The Comms Link plug is female, so it needs a male serial port to connect to (see below].
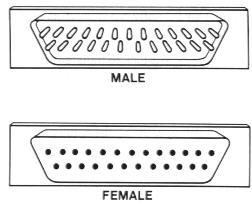
If the gender of your printer or desktop computer port is female, you will definitely need an adaptor.
If you have an IBM PC, XT or compatible, you won't need an adaptor. The following will require an adaptor:
Psion provides suitable adaptors for some of these.
If you have an Adaptor and it physically fits the port on your printer/computer:
If you use a modem, use the cable that connects the computer to the modem to connect the computer with the Comms Link.
If you wish to connect with a modem, you will need a modem adaptor to fit between the Comms Link cable and the modem itself.
Modem adaptors are available from Psion. For further details of modem adaptors see Appendix B.
Before the Organiser and your printer, desktop computer or modem can communicate, certain basic communications parameters must be matched between the Organiser and the other machine. For each application, only certain changes need to be made from the set-up which Comms Link starts with:
First make sure that the Organiser and your machine are fully connected via the Comms Link cable.
You are presented with a list of the communications parameters, given in full in the table overleaf.
| Name | Default | Options | Parameter function | How to change | |
|---|---|---|---|---|---|
| BAUD | 9600 | 50, 75, 110, 150, 300, 600, 1200, 2400, 4800, 9600 | Baud rate - rate at which data is transferred |
| |
| PARITY | NONE | NONE, ODD, EVEN, MARK, SPACE | Parity | Determine control bits added to character for transmission | |
| BITS | 8 | 7, 8 | No. of data bits | ||
| STOP | 1 | 1, 2 | No. of stop bits | ||
| HAND | XON | NONE, XON, RTS, XON+RTS,DTR, XON+DTR, RTS+DTR, ALL | Type of handshaking used | ||
| PROTOCOL | NONE | NONE, XMODEM, PSION | File transfer protocol | ||
| ECHO | HOST | LOCAL, HOST | Whether transmitted characters are displayed | ||
| WIDTH | NONE | NONE, an integer between 1 and 250 | Used to limit the number of characters in a single line |
| |
| TIMEOUT | NONE | NONE, an integer between 1 and 255 | Time after which a failed operation will be abandoned and error reported | ||
| REOL | <CR><LF> | NONE, 1 or 2 characters (in ASCII code) | Which received character(s) indicate the end of a line | ||
| REOF | <SUB> | NONE, 1 or 2 characters (in ASCII code) | Which received character(s) indicate the end of a file | ||
| RTRN | NONE | NONE, 1 or 2 characters (in ASCII code) | Which character is to replace a specified received character | ||
| TEOL | <CR><LF> | NONE, 1 or 2 characters (in ASCII code) | Which transmitted character(s) indicate the end of a line | ||
| TEOF | <SUB> | NONE, 1 or 2 characters (in ASCII code) | Which transmitted character(s) indicate the end of a file | ||
| TTRN | NONE | NONE, 1 or 2 characters (in ASCII code) | Which character is to replace a specified character before transmission | ||
When you select Setup, the parameter names are listed down the left of me screen, and their settings down the right:
| Baud → 9600 Parity NONE Bits 8 Stop 1 | or |
BAUD → 9600 PARITY NONE |
| (model LZ) | (models XP and CM) |
The → sign indicates the current parameter - i.e. the one whose setting is currently being changed.
When you change the settings, not all the parameters behave in the same way. This is because some parameters have a large range of allowed values, others a restricted range (see opposite). The method of selection is appropriate for the size of the range:
For Baud down to Echo:
For Width down to Ttrn:
If the new value is accepted it is displayed. If the value is invalid, the data is cleared and you return to the editor, where you can type, correct and enter another value.
Those parameters which have a restricted range of allowed values are presented as a list - like a menu which you cycle through, and from which you select one item.
The other parameters accept too wide a range of values to be presented in this way, and so you type in the value directly. The value entered is a number, but what the number signifies is different for different parameters:
Width - number of characters
Timeout - number of seconds
Reol, Reof, Rtrn, Teol, Teof, Ttrn - ASCII code.
ASCII codes are used so that a full character set, not just the characters on the Organiser keyboard, are available to you.
E.g. entering 42 displays an asterisk, since the ASCII code for * is 42.
Control characters (codes 0 to 31 and 127) have their ASCII names shown in angle brackets - e.g. 13,10 as <CR><LF>. Appendix A in this manual gives the names of the ASCII control codes.
Characters with codes greater than 127 display as a hexadecimal value in angle brackets - e.g. 128 as <$0D>.
The numbers you enter are interpreted as decimal numbers unless they are prefixed by a dollar sign ($), when they are taken to be hexadecimal (base 16). For example, the ASCII carriage return code may be entered as 13 or as $D. (Counting in hexadecimal is like this: 1 2 3 4 5 6 7 8 9 A B C D E F 10 11 12 13 ... where 10 is equivalent to 16 in decimal.)
Once you have set the parameters to their correct values, press MODE to enter the setup menu. On model LZ this is displayed along the top line of the screen:
Exit Abandon Edit S→ ____________________ Parity NONE Bits 8
The → sign on the top line indicates that more items follow.
On models XP and CM the menu is displayed like this:
EXIT ABANDON EDIT SAVE LOAD DIR ERASE RESET
The menu contains the following items:
| Exit | Exits Setup menu, implementing any changes. |
|---|---|
| Abandon | Exits Setup menu, discarding any changes. |
| Edit | Returns to the parameter list to continue editing. |
| Save | Saves the current Setup list. |
| Load | Loads a previously saved Setup list. |
| Dir | Read the directory of saved Setups. |
| Erase | Erases a previously saved setup list. |
| Reset | Resets to the default setup settings. |
You select from the menu in the same way as from other menus.
Whilst you are viewing the setup menu you cannot edit the parameter settings. Select Edit to do this.
When you Exit the setup menu and not before, the current parameter settings used by the Comms Link software are replaced by the settings in the displayed list. If you choose to Abandon the edit, you return to the Comms menu but the parameters actually used are not changed.
The only time that the parameters actually used change is when you Exit the setup option after editing the values. It is therefore not necessary to use Setup each time you remove and insert the Comms Link cable. The parameters are reinitialised to their default values only in the following cases:
The parameters are not re-initialised when you select Reset in the Setup menu - unless you then select Exit to implement the changes.
The Setup option effectively makes a copy of the current parameters which you can view, modify and then implement if you choose.
With the Save, Load, Dir and Erase commands in the Setup menu, you can create and maintain parameter setting files to fit your personal requirements.
For example, you might save one Setup list for connecting directly with your desktop computer and one for connecting via a modem. Then you could prepare the Comms link in each case simply by loading the file containing your tested settings.
Selecting either Exit or Abandon returns to the Comms menu. Selecting Edit returns to the parameter editor.
The remaining commands return to the Setup menu on completion.
When you select Save, Load or Erase from the Setup menu, the screen shows a prompt like this:
Save A: Load A:
or
Erase A:
Press the MODE key to change the device, if you wish, and then enter the desired Setup file name in the usual way. (On model LZ, press EXE or ↓ to get a directory list of files - with Load and Erase commands only.)
Load, Save and Erase do not affect the parameter values currently being used by the Comms Link software. They replace only the parameters displayed in the Setup list. Select Exit from the menu to implement the settings.
To view a directory of Setup files select the Dir option from the Setup menu. Press MODE to change the current device, if necessary. Press EXE as usual to view the names of Setup files which are stored on the specified device. Press ON/CLEAR to return to the Setup menu.
This Chapter assumes that your Organiser and your PC have been physically connected as explained in Chapter 1. This Chapter describes the process of transferring files between an Organiser and an IBM PC/XT/AT or compatible which is running the supplied Comms Link software.
The advantages of using this software compared to some other communications program are:
Before installing Comms Link, make a copy of the disk in case it becomes corrupted. Keep the original as a backup and install Comms Link from the copy.
If you have a hard disk, you may find it convenient to create a sub-directory in which to store the Comms Link files. Then use the DOS command PATH to set up a path to the Comms Link directory. If you use PATH in your AUTOEXEC.BAT file you can run Comms Link from any directory. See your DOS manual for details on how to do this.
When running the Comms Link program from a floppy disk, you should not remove the floppy disk containing the Comms Link program at any time. You may find it convenient to make this floppy disk an operating system disk as well, so that it can run on its own without your having to keep inserting another system disk.
The process of transferring a file from the Organiser to a PC, or vice versa, is extremely straightforward, because:
This section uses the example of sending a procedure file from the Organiser to the PC, and then receiving it back to the Organiser. The easiest way to get familiar with Comms Link is probably to follow this example through, and then experiment with transmitting and receiving different types of files.
To run the Comms Link program:
If you've set a PATH to this directory, go to the directory to which you want to send Organiser files. This will make it easier to specify file names later on.
The program display appears: "Organiser II Comms Link Server (C) Psion ...". This message is all that is displayed on the PC until it starts receiving or sending a file. From this point on, the PC is controlled from the Organiser.
While the Comms Link program is running, the PC continually sends signals to the Organiser. If you turn your Organiser off, these signals will turn the Organiser back on again after a few seconds.
This is the only change that needs to be made in Comms Link's default settings. This is because PSION protocol and the Comms Link program automatically match all the other parameters.
Once you've selected either Transmit or Receive, you are presented with a menu of file types.
On models XP and CM this is the menu:
FILE PROCEDURE
FILE stands for data file and PROCEDURE for procedure. These are the two types of file which you can transfer between the Organiser and the PC.
On model LZ these are the menu items:
File Procedure Notes
Notes stands for Notepad files. Procedure stands for procedures. File stands for both data files and Diary Files (but not files from the diary on models XP or CM). The top line of the display confirms that you are Transmitting, with PSION protocol.
Once you've selected a file type, you are asked for the name of the file you want to send from the Organiser:
Send A:
(On model LZ, press ↓ to get a directory list of available procedures. Use ↑ and ↓ to scan through this list, and EXE to select the name which the cursor is highlighting.)
Once you've entered a name, you are asked for the name you want the procedure to have on the PC. As a default, the same name is offered as that of the Organiser procedure you're sending.
If you don't include a pathname, the procedure will be sent by default to the directory from which you run the Comms Link program. To specify the pathname:
For example, /DIRA/TOOLS/PROC%5 would create the file PROC_5.OPL in subdirectory TOOLS of directory DIRA. During the transmission, Comms Link automatically adds the PC file type extension .OPL and translates / and % to \ and _ respectively. (If you do use the / character, the appropriate directory must exist on the PC, or you will get a SERVER FAILURE error when you try to send the file.)
The transfer begins. During the transfer, the Organiser shows the message 'Sending' with a count of the blocks so far sent.
On completion, the Organiser returns to the prompt: Send A: - ready for you to enter the name of another procedure to transmit. The procedure you just sent is suggested as a default.
or
Say you wanted to transfer this procedure back to the Organiser.
You are asked for the name you want the procedure to have on the Organiser:
Receive A:NAME
The file name you last used is suggested as a default. (On model LZ, the top line of the display confirms that you have Chosen to receive a procedure. No directory list is available by pressing ↓.)
If you enter the name of a procedure which already exists on the Organiser, when you press EXE you get the message:
A:NAME EXISTS DELETE Y/N
You would get a similar warning if you tried to send a procedure to the PC which already existed there.
If you pressed N you would return to Receive A:NAME where you could enter a new name.
Once you have entered the name for the procedure on the Organiser, you are asked for the name of the procedure on the PC that you want to receive:
From:NAME
The name you selected for the procedure on the Organiser is suggested as a default.
When you press EXE, a 'Receiving' message is displayed, with a count of the blocks so far received. On completion of the file transfer, you are returned to
Receive A:NAME
for you to choose another procedure to receive.
To see what happened to the procedure, press ON/CLEAR again and select Prog. Get a directory list. The name of the received procedure has been added to the end of the list.
But try to run the received procedure and you will get a MISSING PROC error. This is because the received procedure file is a plain text file, which the Organiser cannot run. To create the object code:
To transfer the object code to the PC, you would have to write an OPL procedure. See Chapter 8 for details.
Transferring a data file, an LZ diary file or an LZ notepad file is as easy as transferring a procedure file. Simply select the relevant type from the menu presented after you select Transmit or Receive. From that point on the transfer process is the same as when transferring a procedure file, as above.
However, on model LZ note that:
For all models, the following sections give details of specific features of the different file types which affect how you view and write files which are to be transferred. These notes cover most of the points which could give you unexpected results.
All the files that can be transferred with Transmit and Receive are text files (ASCII) which you can edit in your usual wordprocessor or editor. However, when you save one of these files after viewing it, make sure that it is still in a format acceptable to the Organiser.
The file must be a plain text file, with no control characters (i.e. with ASCII codes less than 32) other than Reol/Reof sequences (as set in the Setup list - see the table on page 2-2) and <TAB>s.
<TAB>s are received differently by different files:
Data files consist of a number of records each split into a number of fields. LZ diary files consist of records only. Data file records may contain up to 254 characters. LZ diary file records up to 64 characters.
Records are separated by <CR> and fields are separated by <TAB>.
So if you want to write a data file on the PC and have it appear in the usual way on the Organiser, press the <TAB> key where you use ↓ to make a new line when entering a record on the Organiser. Then press ↵ to begin a new record. (Blank lines in the PC's text file are removed by the Comms Link software: an organiser record may not be empty.)
Alternatively, use Ttrn or Rtrn to translate <TAB>s to a more convenient character - e.g. a comma.
To convert <TAB>s (ASCII 9) on the Organiser to commas (ASCII 44) on the PC and vice versa, set Ttrn and Rtrn in the Setup list, like this:
Rtrn and Ttrn replace the first character with the second. If you enter only one character, it is removed. Rtrn works on received characters, Ttrn on those to be transmitted. Their default setting is NONE.
If, when receiving a data or LZ diary file to the Organiser, you select a file name which already exists on the specified device on the Organiser, you are presented with this menu:
Erase Append
Appending an existing file means 'add the contents of the received file onto the end of the contents of the existing file'. Erasing an existing file means that the old file is deleted and the new file takes its place.
You cannot append a file which you send to a PC with Transmit. (You can if you use the OPL commands explained in Chapter 8.) You will erase the file unless you choose another name. You are given a warning that the file name already exists on the PC.
File names on the Organiser may be up to 8 alpha- numeric characters long, and must start with a letter.
Comms Link automatically gives files an extension during file transfer - .OPL for procedure files, .NTS for LZ notepad files, .ODB for data and LZ diary files. If your wordprocessor changes this extension when you save the file, either:
or
When you create a procedure under Prog on the Organiser, the file name and procedure name are the same, except that the procedure name has a colon.
If you want to write Organiser procedures on a PC, include the procedure name, with colon, as the first line of the file. If the file's first line is not recognised by the Organiser as the procedure name, the file name given in the Receive is used as the procedure name, inserted as the first line of the procedure.
The following error numbers may be reported to the PC screen during file transfer. Both these errors usually indicate that the physical connection has broken. The file transfer is abandoned.
| -63 | TIMEOUT |
| -66 | LINK NOW DISCONNECTED |
Comms Link includes features for advanced use:
The following types of files cannot be transferred using Transmit and Receive:
They can be transferred if you write an appropriate OPL program. See Chapter 8 for full details.
Boot is one of the options in the Comms menu. It will work only when the Organiser is connected to an IBM PC/XT/AT or compatible running the supplied communications program Comms Link.
It is used to run Organiser applications, such as MAKE in the Developer (available as a separate product), written in the Organiser processor's machine code but stored as files on the PC. Comms Link is not supplied with any applications of this type, but the Boot command provides a 'hook' for applications (particularly communications applications) to be provided on floppy disk alone.
When you enter the Boot command, Comms Link prompts for the name of the application to run. The subsequent behaviour of the command depends upon the application.
If you accidentally enter the Boot command, press ON/CLEAR to abandon the prompt for the application name and return to the Comms menu.
If you enter a name when you are not connected to a PC running CL, or if the application does not exist on the PC, you will get an error message after a few seconds' wait. You can then press SPACE to return to the Comms menu.
A typical connection between a computer and an Organiser via a telephone is illustrated opposite.
Modems are necessary to convert the data from the computer and the Organiser into a form suitable for transmission over a phone line. The Comms Link cable needs a modem adaptor to connect to the modem.

An arrangement like this, where the computer is attached to a modem and a telephone line, at the office, say, allows you to dial in to the computer from another telephone and transfer files between the computer and your Organiser. In this case, you would:
Because of the nature of the Comms Link software, you should ring up the PC from the Organiser, not the Organiser from the PC. The modem which is connected to the Organiser may be an 'acoustic coupled modem' (where the connection to the telephone line is made via a pair of rubber cups which fit over the telephone handset) or it may plug directly into a telephone socket.
At your computer keyboard, run the Comms Link program as described above, except that when you come to type
CL ↵
you must add some extra parameters:
CL [BAUD, PORT, MODE, STRING] ↵
where you may omit trailing parameters. Information about these parameters is provided in the file 'Readme.doc' on your Comms Link disk.
The parameters are:
Remember to set the baud rate in the Setup list on the Organiser as well.
0 (the default) for direct connection - Comms Link immediately attempts to link with the Organiser.
1 or 2 should be used when connected to a modem in auto-answer mode. When MODE is 1, Comms Link waits until DSR is asserted before it attempts to link. When MODE is 2, Comms Link waits until DCD is asserted before it attempts to link.
1 Use the secondary port in a direct connection:
CL 9600,2
2 Use an auto-answer modem, waiting for Carrier Detect:
CL 1200,1,2
3 Configure a Hayes command set compatible modem, resetting the modem and then setting it to auto-answer after 3 rings:
CL 1200,1,2,ATZ\ATS0=3\
In the Setup list on the Organiser, set Hand to RTS+DTR.
(This will work with both direct Connection and via a modem. But since the Comms Link protocol contains its own flow control, handshaking is active only in modem control - so leave Hand at its default value if you are not using modems.)
To configure the modem attached to the Comms Link cable, either:
or
Once the connection via modems is set up, you can transfer files as if you had a straight hardware connection - using Transmit and Receive or an OPL procedure.
On single floppy disk systems, drives A: and B: refer to the same drive, but with A: and B: representing different disks. If an access is made to one drive when the last access was to the other, DOS will prompt you to change the floppy disk. If you are using the PC as an unattended server which is connected to an auto-answer modem, this prompting for a disk change will lock the server up (as you are not there to press a key).
You can avoid this situation by using the ASSIGN command before you leave the PC, like this:
ASSIGN B=A
ASSIGN reroutes all floppy drive references for drive B: to drive A:.
When you issue this command:
See your DOS manual for more details on the ASSIGN command.
This Chapter assumes that your Organiser and your Apple Macintosh have been physically connected as explained in Chapter 1. This Chapter describes the process of transferring files between an Organiser and a Macintosh which is running the supplied Comms Link software.
The advantages of using this software compared to some other communications program are:
Before installing Comms Link, make a copy of the disk in case it becomes corrupted. Keep the original as a backup and install Comms Link from the copy.
Copy the Comms Link folder and the 'SysErrs.Err' file to either:
or
on either a floppy or hard disk.
When running the Comms Link program from a floppy disk, you should not remove the floppy disk containing the Comms Link program at any time.
You may find it convenient to make this floppy disk an operating system disk as well, so that it can run on its own without your having to keep inserting another system disk.
The process of transferring a file from the Organiser to an Apple Macintosh, or vice versa, is extremely straightforward, because:
This section uses the example of sending a procedure file from the Organiser to the Macintosh, and then receiving it back to the Organiser. The easiest way to get familiar with Comms Link is probably to follow this example through, and then experiment with transmitting and receiving different types of files.
For normal file transfers, this is all the preparation necessary on the Macintosh.
The menu items along the top of the display are explained in full in a later section of this Chapter. The only item you need to use frequently is Quit, in the File menu. To select this item:
Alternatively, just click in the 'close' box at the top left of the Comms Link window.
The Organiser assumes that you have plugged the Comms Link lead (via the adaptor) into the modem port. If you used the printer port instead, either:
or
This is the only change that needs to be made to Comms Link's default settings. This is because PSION protocol and the Comms Link program on the Macintosh automatically match all the other parameters.
Once you've selected either Transmit or Receive, you are presented with a menu of file types.
On models XP and CM this is the menu:
FILE PROCEDURE
FILE stands for data file and PROCEDURE for procedure. These are the two types of file which you can transfer between the Organiser and the Macintosh.
On model LZ these are the menu items:
File Procedure Notes
Notes stands for Notepad files. Procedure stands for procedures. File stands for both data files and Diary files (but not files from the diary on models XP or CM). The top line of the display confirms that you are Transmitting, with PSION protocol.
Once you've selected a file type, you are asked for the name of the file you want to send from the Organiser.
Send A:
(On model LZ, press ↓ to get a directory list of available procedures. Use ↑ and ↓ to scan through this list, and EXE to select the name that the cursor is highlighting.
Once you've entered a name, you are asked for the name you want the procedure to have on the Macintosh. As a default, the same name is offered as that of the Organiser procedure you're sending.
If you don't specify the folder to which you want the procedure to be sent, it will be sent by default to the folder from which you ran the Comms Link program. To specify drive and folder:
For example, HDISK:TOOLS/PROC%5 would create the file PROC_5.OPL in the TOOLS folder on drive HDISK. During the transmission, Comms Link automatically adds the file type extension .OPL and translates / and % to \ and _ respectively.
If you do use the / character, the appropriate folder must exist on the Macintosh, or you will get a SERVER FAILURE error when you try to send the file. For the limit on how many folders can be nested inside each other see your Macintosh documentation. The whole name, including drive and folder names, must be no longer than 32 characters in order to be accepted by the Organiser.
NB: on 'flat file' disk systems you cannot specify drive and folder. Files can be sent to or accessed from only the top-level folder of the drive from which Comms Link is being run.
The transfer begins. During the transfer, the Organiser shows the message 'Sending', with a count of the blocks so far sent.
On completion, the Organiser returns to the prompt: Send A: - ready for you to enter the name of another procedure to transmit. The procedure you just sent is suggested as a default.
or
To view the received procedure, on the Macintosh:
If you click on the procedure file icon you will probably get a message saying that no application can be found to open the document. So enter the wordprocessor package first and then load the procedure in. It is a simple text file, which you could now edit.
Say you wanted to transfer this procedure back to the Organiser.
You are asked for the name you want the procedure to have on the Organiser: Receive A:NAME. The file name you last used is suggested as a default. (On model LZ, the top line of the display confirms that you have chosen to receive a procedure. No directory list is available by pressing ↓.)
If you enter the name of a procedure which already exists on the Organiser, when you press EXE you get the message:
A:NAME EXISTS DELETE Y/N
You would get the same warning if you tried to send a procedure to the Macintosh which already existed there.
If you pressed N you would return to Receive A:NAME where you could enter a new name.
Once you have entered the name for the procedure on the Organiser, you are asked for the name of the procedure on the Macintosh that you want to receive:
From:NAME
The name you selected for the procedure on the Organiser is suggested as a default.
When you press EXE, a 'Receiving' message is displayed, with a count of the blocks so far received. On completion of the file transfer, you are returned to
Receive A:NAME
for you to choose another procedure to receive.
To see what happened to the procedure, press ON/CLEAR again and select Prog. Get a directory list. The name of the received procedure has been added to the end of the list.
But try to run the received procedure and you will get a MISSING PROC error. This is because the received procedure file is a plain text file, which the Organiser cannot run. To create the object code:
To send the object code to the Macintosh, you will have to write an OPL procedure. See Chapter 8 for details,
Transferring a data file, an LZ diary file or an LZ notepad file is as easy as transferring a procedure file. Simply select the relevant type from the menu presented after you select Transmit or Receive. From that point on the transfer process is the same as when transferring a procedure file, as above.
However, on model LZ note that:
For all models, the following sections give details of specific features of the different file types which affect how you view and write files which are to be transferred. These notes cover most of the points which could give you unexpected results.
All the tiles that can be transferred with Transmit and Receive are text files (ASCII) which you can edit in your usual wordprocessor or editor. However, when you save one of these files after viewing it, make sure that it is still in a format acceptable to the Organiser.
The file must be a plain text file, with no control characters (i.e. with ASCII codes less than 32) other than Reol/Reof sequences (as set in the Setup list - see the table on page 2-2) and <TAB>s.
<TAB>s are received differently by different files:
Data files consist of a number of records each split into a number of fields. LZ diary files consist of records only. Data file records may contain up to 254 characters. LZ diary file records up to 64 characters.
Records are separated by <CR> and fields are separated by <TAB>.
So if you want to write a data file on the Macintosh and have it appear in the usual way on the Organiser, press the <TAB> key where you use ↓ to make a new line when entering a record on the Organiser. Then press ↵ to begin a new record. (Blank lines in the Macintosh text file are removed by the Comms Link software; an Organiser record may not be empty.)
Alternatively, use Ttrn or Rtrn to translate <TAB>s to a more convenient character - e.g. a comma.
To convert <TAB>s (ASCII 9) on the Organiser to commas (ASCII 44) on the Macintosh and vice versa, set Ttrn and Rtrn in the Setup list, like this:
Rtrn and Ttrn replace the first character with the second. If you enter only one character, it is removed. Rtrn works on received characters, Ttrn on those to be transmitted. Their default setting is NONE - no translation occurs.
If, when receiving a data or LZ diary file to the Organiser, you select a file name which already exists on the specified device on the Organiser, you are presented with this menu:
Erase Append
Appending an existing file means 'add the contents of the received file onto the end of the contents of the existing file'. Erasing an existing file means that the old file is deleted and the new the takes its place.
You cannot append a file which you send to a Macintosh with Transmit. (You can if you use the OPL commands explained in Chapter 8.) You will erase the file unless you choose another name. You are given a warning that the tile name already exists on the Macintosh.
File names on the Organiser may be up to 8 alphanumeric characters long, and must start with a letter.
Comms Link automatically gives files an extension during file transfer - .OPL for procedure files, .NTS for LZ notepad files, .ODB for data and LZ diary files. If your wordprocessor changes this extension when you save the file, either:
or
When you create a procedure under Prog on the Organiser, the file name and procedure name are the same, except that the procedure name has a colon.
If you want to write Organiser procedures on a Macintosh, include the procedure name, with colon, as the first line of the file. If the file's first line is not recognised by the Organiser as the procedure name, the file name given in the Receive is used as the procedure name, inserted as the first line of the procedure.
The following error numbers may be reported to the Macintosh screen during file transfer. Both these errors usually indicate that the physical connection has broken. The file transfer is abandoned.
| -63 | TIMEOUT |
| -66 | LINK NOW DISCONNECTED |
Comms Link includes features for advanced use:
The following types of files cannot be transferred using Transmit and Receive:
They can be transferred if you write an appropriate OPL program. See Chapter 8 for full details.
Boot is one of the options in the Comms menu. It is designed to run applications written in the Organiser processor's machine code but stored as files on the other computer. Comms Link is not supplied with any applications of this type.
If you accidentally enter the Boot command, press ON/CLEAR to abandon the prompt for the application name and return to the Comms menu.
A typical connection between a computer and an Organiser via a telephone is illustrated below.
Modems are necessary to convert the data from the computer and the Organiser into a form suitable for transmission over a telephone line. The Comms Link cable requires a modem adaptor to connect to the modem.
An arrangement like this, where the computer is attached to a modem and a telephone line, say, at the office, allows you to dial in to the computer from another telephone and transfer files between the computer and your Organiser.
Because of the nature of the Comms Link software, you should always ring up the Macintosh from the Organiser. In this case, you should:
The modem which is connected to the Organiser may be an acoustic coupled modem (where the connection to the telephone line is made via a pair of rubber cups which fit over the telephone handset) or it may plug directly into a telephone socket.
The Comms Link application contains the following pull-down options:
| Dial | Lets you send commands to a modem. |
|---|---|
| Setup | A list of communications parameters. |
| File | Various options |
'Revert to saved' and 'Save' in the File option refer to the list contained in the Setup option. To change one of the settings in this list:
Changes made to the Setup list are not actually implemented until the list has been Saved.
Only one Setup list can be saved at a time. The Setup last saved is the Setup which you are returned to when you start up the Comms Link program again after a break.
RTS/CTS handshaking is suitable for use with an auto-answer modem, with the DCD pin of the modem connected to the CTS pin of the Macintosh. On the Organiser, RTS/CTS stops Comms Link from transmitting any data until the modem attached to the Macintosh detects an incoming call. (RTS+DTR will also work in direct connection, but the PSION protocol actually ignores the Hand setting.)
The DIAL facility is used to configure a modem from the Macintosh - e.g. to prepare it to auto-answer. Whilst running the Comms Link program, this is your means of communicating with an attached modem:
A 'Sending dial string...' message is displayed while the string is sent to the modem. It is sent regardless of any handshaking in use.
All the characters available on your keyboard can be typed in directly (upper and lower case are ignored).
E.g. to send ATD237<CR> set the dial string to ATD237$13
Remember to Save the Macintosh Setup whenever you change the handshaking, the port or the dial string.
Remember to change the Setup list on the Organiser every time you change the setup on the Macintosh.
To configure the modem attached to the Organiser, either:
or
Once the connection via modems is set up, you can transfer files as if you had a straight hardware connection - using Transmit and Receive or an OPL procedure.
Before reading this chapter you should have read Chapters 1 and 2, which explain how to fit the Comms Link cable and about the setting of communications parameters. This chapter describes how Comms Link may be used to connect to any computer which has an RS232 port.
Apple Macintoshes and the IBM PC/XT/AT and compatibles fall into this category, and everything in this Chapter does apply to these computers. However, you are much better off using the supplied Comms Link software, as described in Chapters 3 and 4.
Before you can transfer files between your computer and the Organiser, you will need communications software for your computer. This software should support one or preferably both of the following services:
These services may be provided by a specialised communications program or as part of an integrated software package.
Instead of terminal emulation, you may be able to configure the serial port and then copy to and from it using the operating system commands - if your operating system is sufficiently advanced.
There are no standard settings across the different types of computers. Therefore Comms Link's default parameter settings may not be correct for your computer, though there is a chance that they are.
It is not possible for this manual to give specific details for every make of computer. Instead, this Chapter gives general information, which will be sufficient provided that you have a reasonable knowledge of your other computer.
There are two ways to find out what parameter settings you need:
Once you have determined the correct settings, it is recommended that you Save your Setup, to a pack if possible, as explained in Chapter 2. You then have a backup in case you wish to experiment with some other settings or in case the Setup list gets reinitialised (in one of the circumstances listed in Chapter 2).
When the connection is working, continue with the section 'Transferring files'.
On the following pages information is given on:
If this is not the case, some of the communications parameters are set incorrectly.
Auto works by sending to the other computer a line of text under first one combination of parameters, then another, then another. The line of text that is sent is a message stating what the parameter settings were for that text transmission.
So if the text actually gets printed on the screen without corruption you know that the settings which are displayed are the correct ones to use.
Auto immediately begins transmitting. The Organiser display continuously shows the combination of parameters which is currently being sent. Auto continues until every combination has been tried, when you are returned to the Comms menu.
More than one set of values may be printed correctly on your computer screen. Try the connection with each of them in turn.
Auto works out only the Baud, Parity, Bits and Stop parameters. For full details of the last three of these, see Appendix C of this manual.
If Auto falls to print any correct parameter settings, it is probably because Hand is set incorrectly. In this case, either:
or
Which type of handshaking is suitable is determined largely by the computer you are connecting to and the communications software you are running. XON/XOFF handshaking is ignored by XMODEM (and PSION) protocol.
A quick way to test whether the handshaking you are using is correct is to:
Because all characters transmitted in Term are displayed on the Organiser screen when Echo is LOCAL, you know that if no characters are displayed your handshaking must be wrong.
Once you have established basic communications between the Organiser and the computer, you can transfer files between the two.
On the Organiser, the transfer involves nothing more than selecting items from menus and typing in appropriate file names. This makes it very straightforward.
On the other computer, you prepare either to receive or transmit, with the commands which that computer uses - e.g. transmit might be called Send.
Whether you prepare the receiving or transmitting computer first depends on how you set Protocol.
If you don't transfer in the right order, part of the beginning of the file may be lost.
On models CM and XP you can transfer:
On model LZ you can transfer:
On all models, you can transfer only text files. You need PSION protocol to transfer other types of files, and this will work only on Apple Macintoshes and the IBM PC/XT/AT and compatibles.
Before proceeding with this Chapter, if you have any doubts about receiving and sending a file from your other computer, see the relevant file transfer documentation.
Once you have selected either to transmit or receive, you are asked for the type of file. On models CM and XP this is the menu presented:
FILE PROCEDURE
Select FILE to send a data file, PROCEDURE to send a procedure.
On model LZ the top line of the display confirms your choice of Transmit and Receive, and which Protocol you are using. The menu of file types is like this:
File Procedure Notes
Select File to send a data or LZ diary file. Select Procedure to send a procedure. Select Notes to send a Notepad file.
Once you have selected a file type, you are prompted for the name of the file you wish to transfer:
Send A:
or
Receive A:
If you have already transferred some files, the name of the last file you transferred will be given as a default.
(On model LZ, the top line confirms your choice of file type. When you are transmitting, pressing ↓ gives you a directory list of available files.)
How the transmission sequence proceeds depends on which Protocol you are using.
When receiving to the Organiser
The Organiser merely waits once it has accepted the destination file name, displaying a 'Waiting for data' message.
The received data is displayed on the Organiser screen at the same time as it is saved. At the higher baud rates this will not be readable, but it does let you know that data transfer is going ahead.
When transmitting from the Organiser
The other computer should simply wait while you prepare the Organiser.
When you press EXE the transfer begins. During the transfer the transmission data is displayed on the Organiser screen, but may or may not be displayed on the other computer's screen.
After the transfer has completed - whether you were transmitting or receiving on the Organiser - you are returned to the prompt:
Send A:
or
Receive A:
for you to select another file to transfer.
With this protocol, the computer you set first simply waits whilst the other computer is prepared - either to transmit or receive.
On the Organiser a 'Connecting...' message is displayed when the file name on the Organiser has been accepted, whether you are receiving or transmitting.
Then, when you have prepared the other computer, or immediately if it was already prepared, a message shows that the transfer is going ahead:
Receiving block nn
or
Sending block nn
where nn indicates the number of blocks successfully received or transmitted.
If all goes well, the block count will steadily increase, until a 'Receive OK' or 'Send OK' message is displayed. Then press any key to exit the completed transfer procedure.
You can use this to end the transfer if the communications program on the other computer cannot be set to send an Reof character. In that case the computers would hang if you didn't do this.
The following XMODEM error messages may be shown:
| Error in nn | An error was detected while receiving block nn. |
| Duplicate nn | Received a duplicate of a block already received. |
| Failed in nn | A fatal error was detected. |
| Resending nn | Resending an unacknowledged block. |
The other computer display may provide further details of any failure.
Once you have selected the relevant file type from the menu presented after the Transmit/Receive menu, the transfer process is the same for all file types. However on model LZ note that:
For all models of the Organiser, the following sections give details of specific features of the different file types which affect how you view and write files which are to be transferred. These notes cover most of the points which could give you unexpected results,
All the files that can be transferred with Transmit and Receive are text files (ASCII) which you can edit in your usual wordprocessor or editor, however, when you save one of these files after viewing it, make sure that it is still in a format acceptable to the Organiser.
The file must be a plain text file, with no control characters (i.e. with ASCII code less than 32) other than Reol/Reof sequences (as set in the setup list - see the table on page 2-2) and <TAB>s.
<TAB>s are received differently by different files:
Data files consist of a number of records each split into a number of fields. LZ diary files consist of records only. Data file records may contain up to 254 characters. LZ diary file records up to 64 characters.
Records are separated by <CR> and fields are separated by <TAB>.
So if you want to write a data file on your other computer and have it appear in the usual way on the Organiser, press the <TAB> key where you use ↓ to make a new line when entering a record on the Organiser. Then press ↵ to begin a new record. (Blank lines in the text file are removed by the Comms Link software: an Organiser record may not be empty.)
Alternatively, use Ttrn or Rtrn to translate <TAB>s to a more convenient character - e.g. a comma.
To convert <TAB>s (ASCII 9) on the Organiser to commas (ASCII 44) on your other computer and vice versa, set Ttrn and Rtrn in the Setup list, like this:
Rtrn and Ttrn replace the first character with the second. If you enter only one character, it is removed. Rtrn works on received characters, Ttrn on those to be transmitted. Their default setting is NONE - no translation occurs.
When transmitting from the Organiser, an error message will appear if the file you want to send can't be found.
When receiving to the Organiser, if a file already exists under the name you have specified to Receive to, you are asked for confirmation of what to do:
If the file is a procedure or LZ notepad file you are prompted by the Organiser:
A:NAME EXISTS DELETE Y/N
where NAME is the file specified.
If the file is a data file or LZ diary file you get this menu:
Erase Append
Appending an existing file means 'add the contents of the received file onto the end of the contents of the existing file'. Erasing an existing file means that the old file is deleted and the new file takes its place.
You cannot append a file which you send to another computer with Transmit. (You can if you use the OPL commands explained in Chapter 8.) You will erase the file unless you choose another name. You are not given any warning that the file name already exists on the other computer.
File names on the Organiser may be up to 8 alpha- numeric characters long, and must start with a letter.
Comms Link automatically gives files an extension during file transfer - .OPL for procedure files, .NTS for LZ notepad files, .ODB for data and LZ diary files. If your wordprocessor changes this extension when you save the file, either:
or
When you create a procedure under Prog on the Organiser, the file name and procedure name are the same, except that the procedure name has a colon.
If you want to write Organiser procedures on your other computer, include the procedure name, with colon, as the first line of the file. If the file's first line is not recognised by the Organiser as the procedure name, the file name given in the Receive is used as the procedure name, inserted as the first line of the procedure.
In principle, there is no reason why the Organiser and the other computer should not be connected over a dial-up line using a pair of modems. However, in practice, this may be inconvenient because when Protocol is set to either NONE or XMODEM (you cannot use PSION protocol), you have to type on both the Organiser and the other computer when performing a file transfer. Since you obviously cannot type on both machines yourself, you would normally need an accomplice who would enter the necessary commands for you at the other end.
If you do use modems, bear in mind that:
Before reading this Chapter you should have read Chapters 1 and 2, which explain how to fit the Comms Link cable and about the setting of communications parameters. This chapter covers:
It is assumed that the Organiser and printer are physically connected, as explained in Chapter 1.
There are no standard settings across the different types and makes of printers. Therefore the default values for the parameters may well not be correct for your printer.
The parameters which must be set correctly are the first five in the list: Baud, Parity, Bits, Stop and Hand. There are two ways in which you can find out what values you need:
Once you have determined the correct settings, it is recommended that you Save your Setup, to a pack if possible, as explained in Chapter 2. You then have a backup in case you wish to experiment with some other settings or in case the Setup list gets reinitialised (in one of the circumstances listed in chapter 2).
When the connection is working, continue with the section 'Printing with Comms Link'.
On the following pages information is given on:
The default settings of the other parameters in the Setup list probably don't need to be changed. However, at the end of this Chapter are details of the parameters which you may need to change for the particular printer you're using or for a certain printing operation.
Parameters which you may find useful are:
Auto works by sending to the printer a line of text under first one combination of parameters, then another, then another. The line of text that is sent is a message stating what the parameter settings were for that text transmission.
So if the text actually gets printed without corruption you know that the settings which are printed are the correct ones to use.
Auto begins transmitting as soon as you select it from the Comms menu. During the transmission, the Organiser display continuously shows the combination of parameters which is currently being sent. Auto continues until every combination has been tried, when you are returned to the Comms menu. So:
Auto works out only the first 4 parameters in the list. These are the only essential ones, apart from Hand.
If Auto fails to print any correct parameter settings, it is probably because Hand is set incorrectly. Either:
or
Sets the Organiser to terminal emulation mode - where key presses directly transmit characters down the cable, turning your Organiser and connected printer into a sort of typewriter. Terminal emulation is really designed for other uses, but it is the most immediate way of testing the printer connection.
To test whether your handshaking is wrong:
Because all characters transmitted in Term are displayed on the screen when Echo is LOCAL, you know that If no characters are displayed your handshaking must be wrong.
Some particularly common printer settings are:
Baud 1200, 2400, 4800 or 9600
Stop 2
Bits 8, Parity NONE, or Bits 7, Parity ODD,
or Bits 7, Parity EVEN
Using a faster baud rate will not necessarily speed up printing; there is simply a limit to how fast printers can print. For example, 1200 baud corresponds to about 120 characters per second, which is a lot faster than most printers are able to print. (Handshaking enables the printer to still cope with data at this speed.)
If you get the Bits and Parity settings wrong, the printer should still print something; but some characters (often about half) may print incorrectly. Appendix C gives full details of these parameters.
Handshaking (or 'flow control') is needed because printers cannot keep up with the rate at which the Organiser transmits data. There needs to be a means of holding the Organiser up when the internal memory of the printer (its buffer) fills up. The handshaking method used is set by Hand.
DTR and XON are the only two types of handshaking commonly used by serial printers.
DTR handshaking sets the Data Terminal Ready control pin high when the printer is ready to receive data, and low when its buffer is full.
XON/XOFF handshaking: the printer sends an XOFF control character to pause the Organiser whenever its buffer is full. It send an XON when it is ready for more. (Also known as DCT/DC3 handshaking.)
The methods of printing, and the things you are likely to print out, are slightly different on different models of the Organiser.
The following applications each contain a 'Print' Item in their menus:
To print out a procedure, for example, simply:
When you press EXE the procedure is sent to the printer. Press ON/CLEAR to interrupt the printing.
Printing from any of the other menus involves the same process. This should fulfil most of your printing requirements. To print from an application supplied on a Psion program pack, e.g. the Pocket Spreadsheet, see the relevant section in the manual.
On these models of the Organiser you can print out procedures, data files, individual records and notes.
To print a procedure simply:
This method of printing data files does not require any programming in OPL. However, the appearance of the printout can be improved if you write an appropriate procedure - see 'Printing from OPL' below.
FILE PROCEDURE
SEND A:
If you have previously specified a file to be printed, that file's name is suggested as a default. Otherwise, A:MAIN is suggested.
To enter another file name:
When you press EXE the file is sent to the printer. If the file is found and transmitted successfully you are returned to the COMMS menu. Any errors are reported to the screen.
Data files are stored in the Organiser using a <TAB> character to separate adjacent fields within records. When you print a file, the <TAB> character will be printed in between the fields in each record. Depending on the content of your data file and the way your printer responds to <TAB>s, this may produce an undesirable layout.
You can change the way data files appear on the printed page by setting TTRN such that <TAB> characters are translated into another character (see 'Optional parameters', below).
If you want to prepare and then print a message without having to save it as an individual data file, use the capture buffer (normally used for other purposes). To prepare the message:
CAPTURE:
Your message remains in memory even when you press ON/CLEAR to return to the CAPTURE menu. To print the contents of the capture buffer:
The contents of the capture buffer are sent to the printer (provided you haven't changed PROTOCOL to PSION or XMODEM). You return to the CAPTURE menu. Press ON/CLEAR to return to the COMMS menu.
The easiest way to print your data files is to use TRANSMIT and FILE, as explained above. By using LPRINT statements in an OPL procedure, however, you can control how the text is positioned on your printout, and select which records and which fields to print.
Details of printing from OPL are given in the relevant sections of your main Organiser manual. For full details of using OPL with Comms Link see Chapter 8 of this manual.
Below is an example program to print the data file named 'MAIN'. (This is the file, in the internal memory of the Organiser or on a Datapak or Rampak, used by the top-level FIND and SAVE facilities.) The procedure prints the data file, with:
When the program is run, it first prompts for the letter of the device which contains the MAIN file. Enter A, B or C (without the colon).
MPRINT: LOCAL A$(1) PRINT "Device: "; INPUT A$ OPEN A$+":MAIN",A,F1$,F2$,F3$,F4$,F5$,F6$,F7$,F8$ DO IF LEN(A.F1$) :LPRINT A.F1$ :ENDIF IF LEN(A.F2$) :LPRINT A.F2$ :ENDIF IF LEN(A.F3$) :LPRINT A.F3$ :ENDIF IF LEN(A.F4$) :LPRINT A.F4$ :ENDIF IF LEN(A.F5$) :LPRINT A.F5$ :ENDIF IF LEN(A.F6$) :LPRINT A.F6$ :ENDIF IF LEN(A.F7$) :LPRINT A.F7$ :ENDIF IF LEN(A.F8$) :LPRINT A.F8$ :ENDIF LPRINT NEXT UNTIL EOF CLOSE
This program is designed for printing out an unstructured data file, where the number of fields and the meaning of each field varies from record to record. This is often the case for the MAIN file. The program assumes that no record contains more than eight fields. Blank fields are not printed.
You can use the program either directly or as a basis for a more refined program better suited to the structure of your data. For example, you may wish to change the maximum number of fields, or to include a selection criterion to print only those records which satisfy a particular condition.
The following parameters are those which you may need to change for your particular printer or for a certain print job.
Set Width to 70 and the Organiser will insert <CR> after 70 characters (if the line gets that long). Width can be set to between 1 and 250.
Width works with:
It doesn't work with Transmit from the Comms menu.
Width's default setting is NONE - i.e. no checks are made on the length of a transmitted line, and no <CR> is inserted.
Your printer may automatically stop printing when it gets to the edge of the paper - or you may never output lines that long. In this case, you can leave Width set to NONE.
For normal use, this is acceptable. You may always escape by:
or
However, you can use the Timeout parameter to make print operations (for example the OPL command LPRINT) fail after the printer has been paused for a specified timeout interval. This is useful in an OPL program which will inform the program user when the printer has been paused for a suspiciously long time.
The value you enter for Timeout must be an integer between 1 and 255. This specifies an approximate timeout interval in seconds.
It is possible that your printer will be set to perform a line feed automatically whenever it receives a carriage return. In this case you will get two line feeds at the end of each line - and your printed output will be double spaced - unless you change the default setting, say to just ASCII 13.
This is the most common use of Ttrn, since the <TAB> character is used to separate fields in Organiser data files. Initially, Ttrn is set to NONE - i.e. no characters are changed.
To remove characters without replacing them with another, only give one value to the Ttrn parameter. E.g. to remove all <TAB> characters type 9 EXE.
In terminal emulation the Organiser does not seek to compete with devices with full displays. However, an Organiser with Comms Link and a portable modem can be carried with you, to access electronic mail services when you are away from your desk.
Comms Link provides advanced terminal faculties. You can:
So you could log on to an electronic mail system, view your mail and then log off again. Whilst 'off-line' you could edit the 'transcription' of the on-line session, removing unwanted system messages or prompts. Then, at a later time, send the contents of the capture buffer to a printer or to your desktop PC.
If you want to prepare a message - e.g. a telex - before logging on, you can do this in one of your Notepads (model LZ), or in the empty capture buffer (models CM and XP). This will be stored until you are ready to transmit it.
In this Chapter it is assumed, where necessary, that you are already familiar with using a modem and/or logging on to your electronic mail (or other) system from a terminal or desktop computer.
Before you continue with this Chapter you should have read Chapters 1 and 2, which explain how to fit the Comms Link cable and about the setting of communications parameters.
The parameters which must he set correctly and which will possibly involve a change from the default settings are: Baud, Hand, Teol and Reol.
It isn't possible to set a different rate for transferred and received data on the Organiser. If you wish to communicate with a split speed host (e.g. using the V23 75/1200 standard) use a modem which buffers the data and presents a single speed at the RS232 interface.
The Teol default setting (<CR><LF>) is usually not suitable for terminal emulation. Change to just <CR>. It is very important that you set this parameter correctly, otherwise you will almost certainly be unable to log on to a remote system.
If Reol is set wrongly, you will notice it in the following cases:
So you might get records or procedure lines joining up, or extra <CR>s or <LF>s treated as literal characters. This would cause a BAD PROCEDURE error in a received procedure file.
Try using Ttrn and Rtrn to delete any stray incoming <CR> or <LF>.
The following parameters are those which may need changing for your particular application or which give you extra flexibility.
When Echo is LOCAL, transmitted as well as received characters are displayed on the Organiser (and recorded in the capture buffer if Capture is enabled). If you see every character twice, set Echo to HOST. This stops the characters transmitted by the Organiser from being 'echoed' back by the host.
E.g. setting Width to 16 (the width of the Organiser display - or 20 for model LZ) will cause a received line longer than 16 (20) characters to be continued on a new display line rather than scrolled horizontally.
This parameter does not affect transmitted lines. The maximum Width that you can specify is 250.
Roof and Teof work only with Transmit and Receive from the Comms menu.
The correct values for Reof and Teof depend on the host and the software which it is running, but the default settings are probably correct.
Rtrn and Ttrn are typically used to translate <TAB> characters in data files, where they separate adjacent fields in records, to a more convenient field delimiter for use on the host. For example, you might wish to convert a <TAB> on the Organiser to a comma on the host. To convert <TAB>s (ASCII 9) to commas (ASCII 44) and vice versa, set Ttrn and Rtrn like this:
If your modem has auto-dial facilities:
If the modem doesn't have auto-dial facilities:
Once the call has been connected (the 'carrier' indicator on your modem will have lit up):
If all seems to be working but the host mysteriously will not accept your log on, check that Teol is correctly set for your system.
As data is received by the Organiser, the lower display line scrolls horizontally when the line length exceeds the width of the screen - 16 characters on models XP and CM, 20 on model LZ.
If an end of line sequence (as set by Reol) is received, or if the line width (as set by Width) is exceeded, the display scrolls vertically to show the first 16 (20) characters of the line on the upper display line, the remaining characters on the lower line.
A horizontal or vertical scroll delay is applied where necessary to give you a chance to view the data received. You can avoid horizontal scrolling by setting the Width parameter to 16 (20).
Received ASCII characters with numbers below 32 are displayed as ^A for ASCII 1, ^B for ASCII 2, ^C for ASCII 3 and so on, with two exceptions:
A received Reol scrolls the display, and is then discarded. A received Reof is also discarded. If you see the same control characters at the beginning or end of each line this may indicate that you have set Reol incorrectly.
Comms Link terminal emulation ignores escape codes.
In terminal emulation, SHIFT, CAP and NUM allow the usual full range of upper and lower case letters, numbers, operators and punctuation to be produced. However, the cursor keys behave differently to normal:
The ← key acts like the CONTROL key on a PC keyboard, enabling you to send control characters such as <SUB> for end of file. <DC3> for pause, etc.
The full range of additional characters is given in the table opposite. Note that on models XP and CM the ASCII \ character is displayed as a Yen sign (Y) and the ~ character as a right arrow.
You will not lose any data when you exit and re-enter terminal emulation, provided that you are using the correct handshaking.
During terminal emulation, the Organiser must always be able to receive characters from the host. Because of this, the Organiser cannot employ its usual power-conserving technique of switching off the ports when waiting for a key press. Unless you are using a Mains Adaptor, avoid leaving the Organiser for long periods within terminal emulation.
| with LEFT arrow | with RIGHT arrow | |||||
| ASCII no. | ASCII char. | ASCII char. | ASCII no. | |||
| 01 | SOH | ← | A | → | ESC | 1B |
| 02 | STX | B | FS | 1C | ||
| 03 | ETX | C | GS | 1D | ||
| 04 | EOT | D | RS | 1E | ||
| 05 | ENQ | E | US | 1F | ||
| 06 | ACK | F | ! | 21 | ||
| 07 | BEL | G | # | 23 | ||
| 08 | BS | H | & | 24 | ||
| 09 | HT | I | ' | 27 | ||
| 0A | LF | J | ? | 3F | ||
| 0B | VT | K | @ | 40 | ||
| 0C | FF | L | [ | 5B | ||
| 0D | CR | M | \ | 5C | ||
| 0E | SO | N | ] | 5D | ||
| 0F | SI | O | ^ | 5E | ||
| 10 | DLE | P | _ | SF | ||
| 11 | DC1(XON) | Q | ' | 60 | ||
| 12 | DC2 | R | { | 7B | ||
| 13 | DC3(XOFF) | S | | | 7C | ||
| 14 | DC4 | T | } | 7D | ||
| 15 | NAK | U | ~ | 7E | ||
| 16 | SYN | V | DEL | 7F | ||
| 17 | ETB | W | ? | 3F | ||
| 18 | CAN | X | ? | 3F | ||
| 19 | EM | Y | ? | 3F | ||
| 1A | SUB | Z | ? | 3F | ||
When you select CAPTURE from the COMMS menu, this sub-menu is presented.
| TERM | Enter terminal emulation with capture enabled. |
|---|---|
| EDIT | Enter the capture buffer editor. |
| SAVE | Sace capture buffer data to a file. |
| TRANSMIT | Transmit the data in the capture buffer. |
| CLEAR | Clear the capture buffer. |
To exit from the CAPTURE menu back to the COMMS menu, press ON/CLEAR while the capture menu is displayed.
SAVE, TRANSMIR and CLEAR will operate only when the capture buffer contains data. A BUFFER IS EMPTY message will be displayed if this is not the case.
Pressing ON/CLEAR returns to the CAPTURE menu.
Using TERM under CAPTURE can rapidly consume your free memory. Don't be too casual about leaving large amounts of data in the capture buffer or you may find that various operations elsehwhere on the Organiser will fail with an OUT OF MEMORY meddage.
You may take the opportunity to release some memory (e.g. by deleting some o all of the data in the capture buffer) before returning to terminal emulation. Provided that handshaking is in use, you will not miss any data in the meantime.
Additionally
Received <TAB> characters are displayed with the special <TAB> graphic. MODE returns to the CAPTURE menu.
The EDIT option can be used to prepare data 'off line' for subsequent transfer to a host. Select Edit from the CAPTURE menu before you have captured any data. The screen will show:
CAPTURE:
The capture buffer is empty, and you may enter text into it. The capture buffer can hold as much data as the free memory of the Organiser can hold.
Press EXE and the save proceeds. The data remains in the capture buffer even after the Save has finished.
If you intend to save the contents of the buffer to the internal memory of the organiser (A: rather than a pack), the buffer must not occupy more than half of the available free memory of the machine. Otherwise, when attempting to save the contents of the buffer an OUT OF MEMORY message will be displayed and the Save will be abandoned.
TEOL, TEOF and TTRN are all applied to the transmitted data. For details of how the PROTOCOL setting affects the transmission, see Chapter 6.
If you don't CLEAR the buffer it will retain its contents indefinitely.
If there is data in the buffer and you exit from the COMMS option altogether (even if you remove the Comms Link plug and software from the Organiser) the capture buffer will still remain intact.
This means that you can download some data, say from an electronic mail service, then disconnect. unplug the cable and return home or to the office, then print out the contents of the capture buffer when convenient.
When you select Capture from the Comms menu you immediately enter the capture buffer editor, with this prompt when the buffer is empty:
Capture:
The capture buffer editor has the same features as the Notes editor.
Received <TAB> characters are displayed with the special <TAB> graphic.
You can use the empty capture buffer to prepare data 'off line' for subsequent transfer to a host (using Transmit from the Capture menu).
The capture buffer will hold as much data as the free memory of the Organiser can hold.
| Term | Enters terminal emulation with capture enabled. |
|---|---|
| Find | Finds occurrences of the string entered. |
| Save | Saves capture buffer data to a file. |
| Transmit | Transmits the contents of the capture buffer. |
| Home | Moves you to the top of the buffer. |
| End | Moves you to the end of the buffer. |
| Clear | Clears the capture buffer. |
When you leave the buffer, its contents remain intact (held in the internal memory). When you return to the capture buffer, you return to the editor at the position from where you left.
Save, Transmit and Clear will give a BUFFER IS EMPTY message if there is no data in the buffer.
Pressing ON/CLEAR returns to the Capture menu.
Using Term under Capture can rapidly consume your free memory. Don't be too casual about leaving large amounts of data in the capture buffer or you may find that various operations elsewhere on the Organiser will fail with an OUT OF MEMORY message.
If you get an OUT OF MEMORY message during the capture of data to the buffer, terminal emulation is abandoned. Press SPACE to exit to the Capture menu.
You may take the opportunity to release some memory (e.g. by deleting some of the data in the capture buffer) before returning to terminal emulation. Provided that handshaking is in use, you will not miss any data in the meantime.
File Procedure Notes
You are prompted for the name to save the file under on the Organiser:
Save A:
A default name will be suggested if you have already saved from the capture buffer to a file.
If the file name you entered already exists on the selected device, you are asked:
DELETE Y/N?
If the file was a procedure or notes file, or get this menu if the file was a data file:
Erase Append
If you select Erase, an 'Erasing' message appears. During the Save process, a 'Saving' message is shown. On completion, you return to the capture buffer editor. The data remains in the capture buffer even after it has been saved.
If you intend to save the contents of the buffer to the internal memory of the Organiser (A: rather than a pack in B: or C:), the buffer must not occupy more than half of the available free memory. Otherwise you'll get an OUT OF MEMORY message and the Save will be abandoned.
The transmission is affected by the current settings in the Setup list, just like Transmit in the Comms menu. Teol, Teof and Ttrn are all applied to the transmitted data. The transmission process also depends upon which Protocol is set - e.g. PSION protocol can only be used when the connected computer is running the Comms Link program. With no protocol, the receiving computer should be prepared first. For details of these protocols, see Chapter 6.
If you don't Clear the buffer it will retain its contents indefinitely.
If there is data in the buffer and you exit from the Comms option altogether (even if you remove the Comms Link plug and software from the Organiser) the capture buffer will still remain intact.
This means that you can download some data, say from an electronic mail service, then disconnect, unplug the cable and return home, then print out the capture buffer when convenient.
As well as Transmit/Receive in the Capture menu, you can use Transmit/Receive from the Comms menu in conjunction with terminal emulation to transfer files between the Organiser and a host. You may or may not be using modems.
In the following example, a data file stored n a Digital Equipment Corp. VAX mini computer running VMS is received to the Organiser. This is just one example of what can be done with terminal emulation. It illustrates some of the uses of the communications parameters discussed above.
The Organiser file types that you can send or receive to are:
and additionally on model LZ:
These are all text files. If you want to transfer binary files, see Chapter 8. For further information on these file types, see the relevant section in Chapter 5.
When connected to a VAX, the Organiser keyboard controls not only the Organiser but the VAX command line. On the Organiser the command to 'transmit' consists merely in your selecting an item from the Comms menu (and then a file name). On the VAX, however, you must type the command word - whatever it is in the software the VAX is running - including the proper file name and followed by 'enter', e.g. type fred.doc Enter
Receive/Transmit in the Comms menu is the mode in which you are communicating with the Organiser: Term is the mode in which you are communicating with the VAX. Obviously you cannot be in both modes at once, so you have to find a way to prepare first one computer and then the other.
If the VAX is the source it will try to send the requested file immediately - i.e. before you have returned to the Comms menu and prepared the Organiser. The way to get around this is to type a 'pause' signal at the end of the file name when you are in Term, then go back to Comms and prepare the Organiser; when you press EXE a 'continue' signal is sent and the VAX will immediately send the requested file.
The following Setup is suitable for VAX terminal emulation generally.
| Ttrn | 8,127 The VAX uses <DEL> (ASCII 127) where the Organiser uses <BS> (backspace: ASCII 8). |
|---|---|
| Teol | <CR> |
| Reol | <LF> |
| Rtrn | <CR> The VAX sends <CR><LF><CR> as its end of line signal. Rtrn cuts out the extra <CR>s, leaving the single <LF> as the signal for Teol. |
Because Echo is set correctly you will see on the Organiser screen what you are typing to the VAX.
When you press EXE and the VAX receives the line, ←S works as an XOFF signal, pausing the host - provided you have XON/XOFF handshaking activated. If you didn't add this, the host would immediately transmit the file to the Organiser screen, not to an Organiser file.
On models CM and XP, select procedure for a procedure file or File for a data file. On model LZ you can also choose File for an LZ diary file or Notes for an LZ notepad file.
The file transfer begins. The EXE key sent an XON signal to the host, allowing the command you typed in (suspended with the XOFF) to be processed.
During the transfer the received data is displayed on the Organiser screen. At higher baud rates this may be too fast to read, but it does let you know that the transfer is going ahead.
At the end of the file the Organiser expects to receive an Reof signal. One way of arranging this is to include ^Z (<SUB>, or whatever you have Reof set to) in the file on the VAX. If the Organiser receives no Reof signal, it will simply wait. When data has stopped displaying an the screen, press ON/CLFAR to quit.
Pressing ON/CLEAR at any time during the transfer abandons it, saving all the information so far received.
This Chapter assumes that you are familiar with the Organiser programming language, OPL, described in detail in the Organiser manual.
Whilst Comms Link is fitted to the Organiser, it adds to OPL a number of procedures. These enable you to open and read files on an attached computer, or transfer files between the Organiser and the computer.
These 'communications procedures' are called in exactly the same way that you would call your own procedures. They are stored in the Comms Link device. Do not give any of your own procedures the same name as any of the procedures described here. Having 2 procedures with the same name could confuse both you and the Organisers operating system.
The procedures fall into two groups. The following can be used in connection with any computer:
| LSET: | Sets the communications parameters. |
|---|---|
| LINPUT$: | Receives a line of data. |
| TRIG$: | Transmits data then receives a line of data. |
Also, the standard LPRINT command can be used.
LPRINT, LINPUT$: and TRIG$: can be abandoned whilst running by pressing ON/CLEAR. This feature can be disabled by using the ESCAPE OFF command.
The remaining procedures are protocol-based.
If the Organiser is not connected to a computer which is running Comms Link (for convenience this will be referred to simply as a PC) the procedure will fail with a DEVICE READ ERR after a few seconds. When the procedure finishes, it returns Protocol to whatever setting it was previously.
These are the protocol-based procedures:
| XTSEND: | Sends a file to a PC. |
|---|---|
| XTRECV: | Receives a file from a PC. |
| XFOPEN: | Opens a file. |
|---|---|
| XFCLOSE: | Closes the open file. |
| XFEOF: | Returns end of file status. |
| XFPOS: | Sets the current file position. |
| XFGET$: | Reads data from the open file. |
| XFPUT: | Writes data to the open file. |
Don't use any of these names for your own procedures. Nor any of the following, which are used internally:
XLCON: XLDIS: XLPUT: XLGET$: XMLOAD:
You can change the communications parameters from within a program - you don't have to leave Prog and go into the Comms menu to enter the Setup option. Use LSET:
LSET:(Baud%,Parity%,Bits%,Stop%,Hand%, Echo%,Width%,Reol$,Reof$,Rtrn$,Teol$, Teof$,Ttrn$,Timeout%,Protocol%)
E.g. LSET:(-1,-1,-1,-1,-1,-1,-1,-1,-1,-1,-1,-1,-1,3,-1)
sets TIMEOUT to 3 seconds without affecting the
current setting of any of the other Setup parameters.
E.g. LSET:(-1,-1,-1,-1,-1,-1,-1,-1,-1,-1,-1,-1,-1,3)
has the same effect as the previous example.
As in Setup, the communications parameters may take their value only from a list of allowed values. The values to give the procedure parameters are as follows:
| Parameter | Range |
|---|---|
| Baud% | 50, 75, 110, 150, 300, 600, 1200, 2400, 4800, 9600 |
| Parity% | 0 (NONE) 1 (ODD) 2 (EVEN) 3 (MARK) 4 (SPACE) |
| Bits% | 7 (7 BIT DATA) 8 (8 BIT DATA) |
| Stop% | 1 (1 STOP BIT) 2 (2 STOP BITS) |
| Hand% | 0 (NONE) 1 (XON) 2 (RTS) 3 (XON+RTS) 4 (DTR) 5 (XON+DTR) 6 (RTS+DTR) 7 (ALL) |
| Echo% | 0 (LOCAL) 1 (HOST) |
| Protocol% | 0 (NONE) 1 (XMODEM) 2 (PSION) |
E.g. LSET:(9600,2,8,1)
sets the communications parameters to 9600 baud,
even parity, 8 data bits and 1 stop bit.
For the string parameters any characters represented on the Organiser keyboard can be entered in quotes ("*", "G"). For any other characters enter their ASCII code number with the CHR$ function. For a two character string, separate the characters with a + sign. A zero length string ("") corresponds to the Setup value NONE.
E.g. LSET:(-1,-1,-1,-1,, 1,-1,-1,-1,-1,"/"+CHR$(9),-1,-1,CHR$(9)+"/")
sets Rtrn and Ttrn such that "/" is converted to <TAB>
on input and <TAB> to "/" on output.
LPRINT is an OPL command built into the language. LPRINT has the same syntax as the PRINT command and operates in the same way, except that output is transmitted to the connected device instead of to the display. So LPRINT will fail if there is no other device connected via Comms Link. PRINT and LPRINT are described in the Organiser manual.
Any occurrences of <CR> and <SUB> are automatically converted to Teol and Teof sequences respectively. (A <CR> is added by the LPRINT command if the command line does not end with a semicolon.)
LPRINT ignores the settings of Echo, Protocol, Reol, Reof and Rtrn, but the transmitted data is subject to Ttrn processing.
Receives data from the connected device. You must specify the number of characters you wish to receive, e.g.
data$=LINPUT$:(n%)
- where n% is an integer in the range 0 to 254.
Typically, you might match n% with the length allocated to data$ when it was declared. If the Connected device returns less than n% characters, the LINPUT$: will wait, expecting the remaining characters to arrive. To avoid this, supply another parameter:
data$=LINPUT$:(n%,t%)
- where t% specifies a timeout in seconds.
If you have the choice, it is safer to use a one character Reol and Reof. A two character Reol/Reof might get split if the first character of the sequence happens to arrive as the last character allowed by n%.
LINPUT$: ignores the settings of Echo, Protocol, Teol. Teof, Ttrn and Width.
TRIG$: is the same as LINPUT$: except that a string is first transmitted before waiting for received data.
data$=TRIG$:(n%,a$) or
data$=TRIG$:(n%,t%,a$)
The parameters n% and t% are as for LINPUT$: above. The parameter a$ is the string to be transmitted before waiting for received data. a$ is subject to Ttrn processing. <CR> and <SUB> are automatically converted to Teol and Teof sequences respectively.
TRIG$: is equivalent to an LPRINT followed by an LINPUT$:. It is slightly faster. TRIG$: ignores the setting of Echo and Protocol.
These have the syntax:
XTSEND:(remote$,local$,type%) XTRECV:(remote$,local$,type%)
XTSEND: sends the Organiser file with file name local$ and of type type% to the PC, giving it the pathname remote$. Any existing file on the PC of the same name is replaced.
XTRECV: restores the PC file with file name remote$ of type type% to the Organiser, giving the created file the file name local$. Any existing file on the Organiser of the same name is replaced.
Include the device name (A:, B: or C:) in the same way as, for example, the OPL OPEN command. On model LZ there are the following restrictions on local$:
May or may not include pathname and file extension.
You must include a value for type%.
The parameter types and their default extensions on the PC are as follows:
| type% | file type | default PC extension |
|---|---|---|
| 0 | data file, LZ diary files (text) | .ODB |
| 1 | procedure files (text) | .OPL |
| 2 | XP, CM diary files | .OB2 |
| 3 | procedure files | .OB3 |
| 4 | Comms Link setup files | .OB4 |
| 5 | Spreadsheet files | .OB5 |
| 6 | Pager setup file | .OB6 |
| 7 | LZ Notepad files | .OB7 |
| 8-15 | Unspecified | .OB8-F |
| 16 | LZ Notepad files (text) | .NTS |
File types 0, 1 and 16 produce text files on the PC (a translation process occurs during the file transfer). The files produced can be manipulated directly on the PC. For example, you can edit a .OPL procedure file on the PC using your normal editor or word processor.
XTSEND: and XTRECV: with file types 0, 1 or 16 perform the same functions as Transmit and Receive in the Comms menu. When you select either Transmit or Receive, the menu items presented then correspond to these type numbers:
| File | 0 |
| Procedure | 1 |
| Notes (on model LZ) | 16 |
Procedure files on the Organiser are made up of two halves: 'source' code and 'object' code. You can choose to transmit either all or just the source (text) part - creating either .OPL or .OB3 files on the PC.
On model LZ, you can send a notes file as a binary backup, by using 7 for type%, creating a .OB7 file on the PC. To create a file that will be editable on the PC, use 16 for type% - creating a .NTS file on the PC. You can't send password protected notes files. You will get a PAK NOT COPYABLE error if you try.
On the Organiser model LZ, the DIRW$ function allows you to obtain a directory listing of all the files of a certain type stored on your Organiser. This function uses file type extensions. The table below shows how these extensions correspond to the value for the type% parameter and to the default PC file extensions.
| type% | file type | default extension on PC | extension used for DIRW$ |
|---|---|---|---|
| 0 | data file or model LZ diary file (text) | .ODB | .ODB |
| 1 | procedure file (text) | .OPL | .OPL |
| 2 | model XP/CM diary files | .OB2 | .DIA |
| 3 | procedure file | .OB3 | .OPL |
| 4 | Comms Link setup file | .OB4 | .COM |
| 5 | Pocket Spreadsheet file | .OB5 | .PLN |
| 6 | Pager setup file | .OB6 | .PAG |
| 7 | Notepad files | .OB7 | .NTS |
| 8-15 | Unspecified | .OB8-F | .TY8-F |
| 16 | LZ Notepad files (text) | .NTS | .NTS |
Because you can't use wildcards in local$ in XTSEND: or XTRECV:, it would seem that you are limited to sending only one file at a time. But with a combination of DIRW$ and a loop, you can provide successive file names of the required type for local$, and so send all the files of that type.
The example program below illustrates this. Note that it is necessary to:
A null string ("") is provided for the remote file name in XTSEND:. XTSEND: automatically gives the file on the PC the name local$, with the PC extension appropriate for type%.
Sendall: LOCAL remote$(8),local$(14),b$(4) LOCAL type%,len% local$=DIRW$("A:*.*") WHILE local$<>"" b$=RIGHT$(local$,4) len%=LEN(local$)-4 local$=LEFT$(local$,len%) remote$=RIGHT$(local$,(len%-2)) IF b$=".ODB" type%=0 ELSEIF b$=".OPL" type%=1 ELSEIF b$=".DIA" type%=2 ELSEIF b$=".COM" type%=4 ELSEIF b$=".PLN" type%=5 ELSEIF b$=".PAG" type%=6 ELSEIF b$=".NTS" type%=7 ENDIF PRINT "Send",local$;b$ XTSEND:(remote$,local$,type%) local$=DIRW$("") ENDWH CLS :PRINT "Job done" :GET
If you want to send procedure and notepad files as binary instead of text, change type%=1 to type%=3 and type%=7 to type%=16. A program to restore all Organiser files from the PC would have to sort out which files in the directory are Organiser type files. To do this, you could use XFGET$: to read the directory.
You can access files on an attached computer only one at a time. XFOPEN: opens a file, but XFCLOSE: must be used before:
The procedure will fail with the FILE IN USE error if a remote file is already open.
XFCLOSE: has no parameters and is harmless; it reports no error if there is no open file.
XFOPEN: has the syntax:
XFOPEN:(remote$,amode%,ftype%)
- where remote$ is the pathname of the file on the
PC, amode% specifies the file access mode, and
ftype% specifies the remote file type.
or
| 0 | BINARY |
| 1 | TEXT |
| 2 | DIRECTORY |
Binary files are random access files which consist of a byte stream and have no record structure.
Text files are variable-length record sequential files. Where each record normally contains characters with ASCII codes greater than 31 (although this is not enforced). The maximum record length (excluding any record terminator) is 254 bytes - the maximum string length in OPL. On the PC, it is assumed each record ends with <CR><LF>.
Directory files behave like sequential files which may be read only. The path name remote$ specifies a normal PCDOS directory search string - e.g. you could give remote$ the value C:/dirA/tools/*.doc (the / character is automatically translated to \ during transfer.) Each record in a directory file is the name of one file found in the path and directory given in remote$. When the last record has been accessed and "EOF" returned, the file is automatically closed.
| 0 | READ |
| 1 | CREATE/REPLACE |
| 2 | REPLACE |
| 3 | CREATE |
| 4 | UPDATE |
READ - the remote file is opened for reading only. XFOPEN: will fail only if the file cannot be found.
CREATE/REPLACE - a new file is created for reading and writing. Any existing file of the same name is deleted.
REPLACE - behaves as for CREATE/REPLACE except that it will fail if the file does not already exist.
CREATE - behaves as for CREATE/REPLACE except that it will fall if the file already exists.
UPDATE - the file is opened for reading and writing. XFOPEN: will fail if the file does not already exist. The following, conditions apply:
XFEOF: tells you whether you are at the end of a file or not. XFEOF: returns zero (false) if a file is open and non-zero (true) if a file is closed.
A file closes automatically when you have read its final bytes.
XFPOS: sets the current file position and returns the new position. It will work only with binary files - i.e. it will fail if ftype% was not 0 in XFOPEN:. The syntax is:
newpos=XFPOS:(mode%,pos)
mode% and pos specify the new position. mode% determines what the movement is relative to:
0 Relative to the start of the file 1 Relative to the current position 2 Relative to the end of the file
pos specifies the number of bytes to move along, e.g. setting pos to 155 would move the current position 155 bytes. A negative number means going backwards. pos is a floating point number, since this lets you quote numbers greater than the 32768 limit on integers. Making pos zero leaves the current position unchanged.
The XFGET$: procedure reads data from the current position in the file and returns the data as a string The syntax is:
data$=XFGET$:(len%)
- where the returned string is of length len% or less.
The parameter len% may be between 0 and 255
(bytes) inclusive.
If the file is a binary file (ftype% was 0 in XFOPEN:) XFGET$: reads len% bytes from the file and advances the file position by len% bytes. Unless the end of file is reached, the returned string is of length len%.
When an end of file is encountered, less than len% bytes may be read and a string which is shorter than len% will be returned. The file is then closed and the XFEOF: procedure will return non-zero (true).
If the file is a text file or a directory file (i.e. ftype% was 1 or 2 in XFOPEN:) XFGET$: reads a single record from the file (provided it is not longer than the value specified by len%) and positions to the next record. The returned record data does not include the <CR><LF> end of record sequence.
If XFGET$: is called alter the last record has been read, an error is returned - since the file has automatically been closed. In your program it is sensible to call the XFEOF: procedure before any attempt to read a file, to see whether you are at the end of the file yet. The program at the end of this Chapter shows this.
The XFPUT: procedure writes data to the current position in the open file on the PC. The syntax is:
XFPUT:(data$)
XFPUT: will fail if the file is open for reading only (i.e. amode% was 0 in XFOPEN:).
When the file is a text file (ftype% was 1 in XFOPEN:), you may append an existing file or begin a new file:
XFPUT: positions to the end of the string it inserted.
If an error occurs in any of the Comms Link procedures, an error is 'raised' in the normal way. See the Organiser manual for a description of OPL error-handling facilities.
When using the protocol-based procedures (those beginning with an X) the error may be generated by the software on the PC (the server) rather than on the Organiser. For example, the server might fall with a DISK FULL error. When this happens, the error number will have a value from 190 downwards and an error message will be displayed on the PC screen. But there are no error messages stored in the Organiser corresponding to these error numbers, so although the OPL function ERR will correctly return the error number, ERR$ will return only "***ERROR***" rather than a specific error message.
If the OPL program does not trap errors, the program will terminate when an error occurs, displaying an error message which corresponds to the error number.
If you do trap errors (using the TRAP and ONERR commands) you can arrange for an informative error message to be displayed, not just the error number, by looking up what error has the given number in the list below and printing the relevant message to the screen.
185 (RECORD TOO LONG) - XTRECV: or XFGETS: failed while reading a record which is longer than the maximum record length specified by len%.
186 (DISK FULL) - XTSEND: or XFPUT: failed to find room on the remote disk.
187 (FILE ALREADY EXISTS) - amode% is 3 and the tile with pathname remote$ already exists.
188 (SERVER ERROR) - a miscellaneous server error has occurred, e.g. a disk door was open.
189 (FILE NOT FOUND) - XTRECV: or XFGETS: could not find the file with pathname remote$ or the file with that name is of the wrong type: amode% is 0, 2 or 4 and XFOPEN: could not find the file with pathname remote$.
190 (BAD PARAMETER) - the pathname remote$ is illegal or amode% or ftype% is invalid.
All these procedures work only with a computer running the Comms Link program.
For models CM and XP only. To transfer LZ diary files simply select Transmit from the Comms menu and then select File as the file type.
When the following procedure is rum it presents a two-item menu: Backup or Restore. When you have made your selection it prompts for the local (Organiser) and remote (PC/Macintosh) file names, in the appropriate order. For the local name, you should enter the device (A:, B: or C: with its colon) and the saved diary file name.
To save the current contents of the diary to a file use the Save option in the Diary menu (see the Organiser manual for more details).
Pressing ON/CLEAR during the input stage will abandon the program.
DBACK: LOCAL lname$(8),rname$(8),m% m%=MENU("Backup,Restore") IF m%=1 PRINT "From:"; TRAP INPUT lname$ IF ERR:206 :RETURN :ENDIF PRINT "To:"; TRAP INPUT rname$ IF ERR=206 :RETURN :ENDIF XTSEND:(rname$,lname$,2) ELSEIF m%=2 PRINT "TO:"; TRAP INPUT lname$ IF ERR=206 :RETURN :ENDIF PRINT "From:"; TRAP INPUT rname$ IF ERR=206 :RETURN :ENDIF XTRECV:(rname$,lname$,2) ENDIF
This procedure shows how to log on to a HAYES modem. The procedure has been broken into sections only to make the commentary easier; it should be entered consecutively.
The first section sets the parameters settings to those suitable for communicating with the modem:
COMM: LOCAL a$(254),i% LSET:(1200,0,8,1,0,-1,-1,chr$(13)+chr$(10), chr$(26),"",chr$(13),chr$(26),"",10,0) REM 1200 baud,no parity,8 bit,1 stop,no hand REM reol=<cr><lf>,reof=<sub> REM teol=<cr>,teof=<sub> REM no translates,timeout=10,protocol:none
The next section clears the Organisers receive buffer of all characters, including error characters. It does this by assigning characters from the buffer to a$ then overwriting this value with another chunk of characters. When no characters are left in the buffer the empty string is assigned to a$, the loop breaks and continues with the next section of the procedure.
REM clear buffer ONERR jnk:: WHILE 1 JNK:: a$=LINPUT$:(254,1) IF a$="" :BREAK :ENDIF ENDWH ONERR OFF
The next section logs on to the modem. Firstly the command is sent to the modem with TRIG$: to reset itself: ATZ<CR><LF>. The following LINPUT$: ((1)) overwrites the modem's echo of this command with its confirmation (OK<CR><LF>) that it has reset itself. The next TRIG$: tells the modem to dial up number 237 (replace with the number you wish to dial). The next LINPUT$: ((2)) overwrites the echo of this command with the <CR><LF> which the modem sends when it has got through to the computer at the other end (it is allowed 120 seconds to do this). Because <CR><LF> is the Reol sequence, and the Reol sequence always forces the end of the LINPUT$:, another LINPUT$: ((3)) is needed to capture the modem's response.
a$=TRIG$:(254,10,"ATZ"+CHR$(13)) a$=LINPUT$:(254,10) (1) IF a$="OK"+CHR$(13)+CHR$(10) a$=TRIG$:(254,10,"ATD237"+CHR$(13)) a$=LINPUT$:(254,120) (2) a$=LINPUT$:(254,10) (3) IF a$="CONNECT"+CHR$(13)+CHR$(10) OR a$="CONNECT 1200"+CHR$(13)+CHR$(10) XTSEND:("COMM","COMM",1) PRINT "sent ok" ELSEIF a$="NO CARRIER"+CHR$(13)+CHR$(10) PRINT "Cant find" PRINT "remote modem" ENDIF GET ENDIF
Once it is confirmed at (3) that the correct response (CONNECT<CR><LF> or CONNECT 1200<CR><LF>) has been returned, you are safely linked up to the PC or Macintosh and can send and receive as many files as you want.
N.B. The string operation for recognising the modem's responses "CONNECT", "CONNECT 1200", "OK" and "NO CARRIER" is case dependent.
This procedure simply sends a copy of itself to the other computer. One way to make the program easier to use would be to replace "COMM" in the XTSEND: with a parameter which you pass to the procedure from another procedure, which prompts you for the names of the files you wish to transfer or receive, say.
For specialist applications only, a device driver for the IBM PC/XT/AT is available by contacting:
PSION Technical Support
PSION House
Harcourt Street
London W1H IDT
This procedure simply opens a file, reads a series of strings from it (up to 10 strings, each 80 bytes long) and then closes the file. Before each read it checks that the end of the file has not yet been reached. If an error occurs on the PC or Macintosh the appropriate error number is printed to the Organiser screen.
READ: LOCAL b$(10,80),i% i%=1 ONERR panic:: XFOPEN:("remote.doc",0,0) WHILE 1 b$(i%)=XFGET$:(80) IF XFEOF: BREAK ENDIF i%=i%+1 IF i%=11 PRINT "Too many records" GET CLS :BREAK ENDIF ENDWH XFCLOSE: panic:: IF ERR<=190 PRINT "Remote error" PRINT "number",ERR ELSE PRINT ERR$(ERR) ENDIF GET
The names of the ASCII control characters are shown below. For the full printable ASCII character set, see the relevant Appendix in the Organiser manual.
| 0 | NUL | 16 | DLE | |
| 1 | SOH | 17 | DC1 (XON) | |
| 2 | STX | 18 | DC2 | |
| 3 | ETX | 19 | DC3 (XOFF) | |
| 4 | EOT | 20 | DC4 | |
| 5 | ENQ | 21 | NAK | |
| 6 | ACK | 22 | SYN | |
| 7 | BEL | 23 | ETB | |
| 8 | BS | 24 | CAN | |
| 9 | HT | 25 | EM | |
| 10 | LF | 26 | SUB | |
| 11 | VT | 27 | ESC | |
| 12 | FF | 28 | FS | |
| 13 | CR | 29 | GS | |
| 14 | SO | 30 | RS | |
| 15 | SI | 31 | US | |
| 127 | DEL | |||
This Appendix describes the hardware interface which is presented by the Comms Link cable and contains technical information which may be required for advanced communications applications or for building your own adaptor.
The Organiser presents an interface suitable for connecting easily to another computer, since this is what the majority of users require. This interface is actually like a modem's - i.e. a DCE, as defined by the RS232 standard.
The RS232 standard is based on the assumption that communicating devices communicate via a pair of modems, as in figure 1.

Figure 1: connecting via modems
In the RS232 standard;
If the DCE and DTE have standard RS232 sockets, the DTE will have a 25 pin D-type male connector and the DCE will have the corresponding female connector. The RS232 cable between the two is a regular 'straight through' connector which is male at one end and female at the other. (In fact, you only need a cable at all because the connectors are usually mounted on the chassis of the equipment and cannot be physically brought together.)
In practice, the RS232 standard is often used over short distances where there is no need for a pair of modems and the computers (or DTEs) are connected 'back to back' - as in the figure below.
Figure 2: direct connection
The cable between the DTEs is not a simple 'straight through' cable, as exists between the DCE (modem) and DTE (computer) in figure 1. The cable in figure 2 replaces the pair of modems and is called a 'null modem cable'. A standard null modem cable is female at both ends and is wired to simulate the effect of a modem link.
In the Organiser a null modem cable is 'built in' such that the Comms Link cable will plug directly into most computers without requiring additional leads or adaptors. So to a DTE (e.g. a computer] the Organiser 25 pin D-type female connector emulates a DCE (modem) interface.
Emulating a DCE works when the Organiser is connecting to a DTE conforming strictly to the RS232 standard - which includes most computers and some printers. For example, the IBM PC/XT and most compatibles conform to the standard, and the Comms Link connecter will plug directly into these computers. However, the IBM AT and Apple Macintosh, for example, use 9 pin connectors. Other DTEs, particularly printers, may use a standard 25 pin connector but with a non-standard gender (female rather than male).
When the device you are trying to connect to does not present a 25 pin male UTE interface, either because it is a non-standard DTE or a DCE, you need an adaptor.
An adaptor consists of two connectors which are wired back to back. One of the connectors is a 25 pin D-type male connector which plugs into the female connector on the Comms Link cable; the other end of the adaptor plugs into your computer, printer or modem. According to the application, the wiring between the connectors may:
Although there are 25 pins on the D-type socket, only eight are connected through to the Organiser. Because the built-in null modem cable swaps the active lines, it is easy to get confused about the names of the lines, depending on whether you are looking from the Organiser's or the DTE's point of view. Figure 3 shows the pin assignments on the Comms Link socket, the signal names from both points of view and the direction of signal flow for each pin.
| Organiser | DTE | ||
|---|---|---|---|
| pin | pin no. | pin | |
| FG | 1 | FG | |
| SG | 7 | SG | |
| RD | 2 | TD | |
| TD | 3 | RD | |
| CTS | 4 | CTS | |
| RTS | 5 | RTS | |
| DSR | 20 | DSR | |
| DTR | 6 | DTR | |
Figure 3: pin assignments
| Key | ||
|---|---|---|
| FG | Frame Ground (earth) | |
| SG | Signal Ground (common return) | |
| TD | Transmitted Data | \ carry the data signals |
| RD | Received Data | / |
| RTS | Request To Send | \ control RTS/CTS handshaking |
| CTS | Clear To Send | / |
| DTR | Data Terminal Ready | \ control DTR/DSR handshaking |
| DSR | Data Set Ready. | / |
Although the Organiser can read pin 20 (DSR), it cannot drive pin 6 (DTR). However, pin 6 is connected to pin 20 via the Organiser so that if the DTE drives pin 20 it will see an 'asserted' pin 6.
Pin 20 on the Organiser is connected so that it has the same effect as the ON/CLEAR key. The Organiser can be switched on by asserting pin 20 and it will not switch off while pin 20 is held high. The main application of this feature is when the Organiser is connected to an auto-answer modem which is waiting to be dialled (see below).
If the connector on your computer is a 25 pin female, rather than a male, you need a male-to-male gender changer. Gender changers which connect all 25 lines are widely available. If you make your own, you need only connect, with no swapping, the 8 pins (1-7 and 20) used by the Organiser. Psion supplies a suitable gender changer in the form of the printer adaptor described below.
If the connector is not a standard 25 pin D-type, you could buy a modem cable. This would be a suitable adaptor for the Organiser, and would double as a modem adapter for your computer.
If you want to build your own adaptor, start with a 25 pin male connector and a connector which plugs into your computer. Then match the names in the right hand column of figure 3 with the correspondingly labelled pins on the RS232 interface on your computer. Your computer manual (or the manual which came with your serial card) should have a diagram which gives the pin assignments.
The IBM AT uses a 9 pin miniature D type male connector. Psion supplies an adapter for the IBM AT which is based on figure 4.
| Organiser (25 pin male) | IBM AT (9 pin female) | |||
|---|---|---|---|---|
| pin | pin no. | pin no. | pin | |
| RD | 2 | 3 | TD | |
| TD | 3 | 2 | RD | |
| CTS | 4 | 7 | RTS | |
| RTS | 5 | 8 | CTS | |
| DTR | 6 | 6 | DSR | |
| SG | 7 | 5 | SG | |
| DSR | 20 | 4 | DTR | |
Figure 4: IBM AT adaptor
Apple Macintosh uses a 9-pin miniature D-type female connector. The Mac Plus has a different connector, but an adaptor which presents the same interface as the regular Macintosh is normally supplied with the Mac Plus. Psion supplies an adaptor for the Apple Macintosh which is based on figure 5.
| Organiser (25 pin male) | Macintosh (9 pin male) | |||
|---|---|---|---|---|
| pin | pin no. | pin no. | pin | |
| RD | 2 | 3 | TD | |
| TD | 3 | 9 | RD | |
| CTS | 4 | 6 | DTR | |
| RTS | 5 | 7 | DSR | |
| SG | 7 | 3,4 | SG,TD | |
Figure 5: Apple Macintosh adaptor
The Macintosh hardware does not support the RTS and CTS lines, but it does support DSR/DTR handshaking in the sense that the Macintosh can be paused when it sees its DSR asserted (DTR on the Macintosh is a constant +12 Volts or SPACE state). Since the Organiser cannot drive DTR, DSR/DTR is swapped to RTS/CTS on the Macintosh adaptor so that hardware handshaking will take place if the Organiser has RTS/CTS handshaking enabled.
Many printers present a DTE connector, but female rather than male. In these cases a gender changer will often suffice. However, some printers also require DCD (Data Carrier Detect) to be asserted. A printer adaptor can do this by connecting pin 8 to pin 5. The printer adaptor supplied by Psion is based on figure 6 and is reversible.
| Organiser (25 pin male) | Printer (as DTE) (25 pin male) | |||
|---|---|---|---|---|
| pin | pin no. | pin no. | pin | |
| FG | 1 | 1 | FG | |
| RD | 2 | 2 | TD | |
| TD | 3 | 3 | RD | |
| CTS | 4 | 4 | RTS | |
| RTS | 8,5 | 5,8 | CTS+DTD | |
| DTR | 6 | 6 | DSR | |
| SG | 7 | 7 | SG | |
| DSR | 20 | 20 | DTR | |
Figure 6: Printer adaptor
To connect the Comms Link interface to a modem, or to another Organiser, you need to swap the signal lines from a DCE interface to a DTE interface (a DCE can't connect directly with another DCE.) The other connections in your adaptor depend on whether you want to originate Calls on the Organiser or if you want to have an auto-answer modem.
(a) If you wish to dial from the Organiser, you have to stop the modem from expecting the DTR line to be driven, since the Organiser cannot drive this line. There should be a configuration switch on the modem to do this. The modem will then assume it is always connected to a DTE.
For simple modem use, it is advisable that pins 6 and 20 are not connected, as in the adaptor which Psion supplies, based on figure 7 below.
| Organiser (25 pin male) | Modem (25 pin male) | |||
|---|---|---|---|---|
| pin | pin no. | pin no. | pin | |
| FG | 1 | 1 | FG | |
| RD | 2 | 3 | RD | |
| TD | 3 | 2 | TD | |
| CTS | 4 | 5 | CTS | |
| RTS | 5 | 4 | RTS | |
| DTR | 6 | 20 | DTR | |
| SG | 7 | 7 | SG | |
| DSR | 20 | 6 | DSR | |
Figure 7: Modem adaptor
(b) You may wish to connect the Organiser to an auto-answer modem so that the Organiser can wait in an 'off' state (where it uses very little power) and be woken up when the modem answers a call. First set the modem to auto-answer mode, with a configuration switch. Then in the adaptor connect the modem's DCD pin to the DSR pin on the Organiser. Now, when the modem receives a call it asserts its DCD pin and the Organisers DSR pin internally connected to the ON/CLEAR key, and so wakes up the Organiser. This adaptor will not be reversible and you should label the ends appropriately.
To switch the Organiser off and wait until DSR is asserted by the modem when it answers a call, use the OPL command OFF.
Because the Comms Link software is stored on ROM and because of power-conserving features of the Organiser, the operation of the RS232 port is more complex than for other computers.
In this section, the RS232 lines are described from the Organiser point of view and you should read the left hand column of figure 3 when converting the pin names into pin numbers.
The RS232 port can be in one of three states:
In the OFF state, no voltage is applied to any of the pins of the Comms Link connector and the signals seen by the connected device will depend upon the hardware design of that device.
The RS232 port is OFF when no power is supplied to the top port. Actually, the Organiser architecture is such that power is either supplied to all three ports or to none of them.
Normally, in the interests of power conservation, the Organiser switches off the ports whenever the software is waiting for a key press. In Comms Link terminal emulation, however, this effect is disabled.
When the Organiser is switched off, the ports are also off. The Organiser is switched off when the top-level menu OFF command is used, when the Organiser has automatically switched itself off after being left for five minutes without a key press (except in terminal emulation), or when the OPL command OFF is used.
The RS232 port is in the POWERED state when power is supplied to the ports and the RS232 hardware is not selected.
In the powered state, the Organiser is unable to send or receive data, to set the state of RTS, or to read CTS or DTR. However, the hardware drives TD and RTS to the MARK state such that the communicating device will see no data and, provided that it is using RTS/CTS handshaking, it will not send any data to the Organiser. If XON/XOFF handshaking is enabled, the Comms Link software sends an XOFF followed by a delay (to give the communicating device a chance to respond to the XOFF) before entering into the POWERED state from the SELECTED state.
The RS232 port is in the POWERED state when a Datapak is being accessed or when the Comms Link ROM is being accessed. For example, a procedure call to any of the extensions to OPL supplied by the Comms Link will put the RS232 port into a POWERED state.
The RS232 port is in the SELECTED state when power is supplied to the ports and the RS232 hardware is selected.
In the SELECTED state, the Organiser is able to send and receive data, drive RTS, and read CTS and DTR. Received data is stored in a receive buffer by an interrupt routine.
When the RS232 port is in the SELECTED state, RTS is output in the SPACE state and is only temporarily output in the MARK state when RTS/CTS handshaking is enabled and the receive buffer is nearly full. Also, when RTS/CTS handshaking is enabled, transmission is paused when CTS is in the MARK state (otherwise CTS is ignored). When CTS is not connected on the Organiser, it floats to the MARK state and RTS/CTS handshaking should not be enabled when CTS is not connected.
The RS232 port is in the SELECTED state during terminal emulation and when data is input or output to the RS232 port. It normally remains in the SELECTED state until something happens to move it to the POWERED state (e.g. a Datapak access) or to the OFF state (e.g. waiting for a key press).
As with the Baud parameter, Parity, Bits and Stop must match the corresponding settings on the communicating device. If they don't, then the communicating device will almost certainly incorrectly receive data sent to it, and the Organiser will incorrectly interpret its received data.
These parameters determine how each character to be transmitted over Comms Link is converted into bits. The Organiser transmits and receives data in groups ('frames') of 10 or 11 bits. One character, or 'byte', of data is included in each frame, together with other information. The character itself is given by the 7 or 8 'data bits':
<Start bit><Data bits><Parity bit><Stop bits>
The start and stop bits are used to define the beginning and end of a frame:
The start bit of a frame is always present and cannot be altered.
The value of the Stop bits cannot be altered, but you can choose whether to have 1 or 2 of them. Usually 1 stop bit is sufficient, but with slow baud rates (300 or lower) or when communicating with some mechanical devices you may need to have 2 bits. Having 2 stop bits rather than 1 will never cause an error - it will just Slow down the byte transfer rate. Putting 1 when you should have 2, however, will cause an error.
The number of stop bits is also used to make up the length of the frame to either 10 or 11 bits, which are the only lengths of frames which the Organiser can transfer, when the other bits don't add up to one of these totals. The software overrides the Stop parameter value under the following circumstances:
The number of data bits is specified by the Bits parameter. When there are only 7 data bits in the frame, the missing 8th bit (the most significant bit) is set to zero.
If the Parity parameter is set to NONE, there is no parity bit. Otherwise the parity bit is present and its value (0 or 1) is determined by the Parity parameter setting. To find out the correct setting, consult the documentation of the machine you are attaching to or use trial and error. MARK and SPACE parity are rarely used.
One way of telling that your Parity, Bits and/or Stop settings are incorrect is to see whether in terminal emulation characters are being displayed as a solid block. These are characters which are received with an error and are set to ASCII 255 - a solid block. (This may also indicate that your Baud setting is wrong.) In other cases, e.g. during file transfer or a call via Comms Link from an OPL procedure, a DEVICE READ ERROR is reported. If the parameter values do not match those of the correspondents but are not too dissimilar, you may receive some characters (sometimes as much as half the characters) without error.
Some manufacturers include the parity bit in their definition of data bits. This means that 7 data bits and a parity bit would be called 8 data bits. Check the definition of data bits used by your target device in its documentation.
The setting of Parity, Bits and Stop are ignored in communications involving the PSION protocol. PSION uses 8 data bits, no parity and 1 stop bit. Other than this case, the Parity, Bits and Stop parameters are used by all aspects of the Comms Link software.
A Abandon (Setup list) Adaptors IBM AT Macintosh modems non-standard computers Organiser pin connections printers when needed, (2) amode% parameter (XFOPEN:) Any computer see 'Other computers' Appending Apple Macintosh see 'Macintosh' ASCII characters control character set in Setup list in terminal emulation Auto with printer with other computers Auto-answer modem adaptor with Macintosh with PC B BAD PARAMETER error Baud for printer for PC via modems for Macintosh via modems in terminal emulation Binary files file transfer opening/reading example program Bits for printer Boot C Capture buffer clearing (2) editing (2) saving (2) transmitting (2) printing contents Capture menu model LZ models XP, CM Carrier detect Clear (capture buffer) (2) Comms Link fitting/removing cable installing on Macintosh installing on PC interface running program see 'PCs' and 'Macintosh' Communications parameters changing settings changing with LSET: for host dial-up service for Macintosh for other computers for PC for printer table Communications procedures LINPUT$: LSET: TRIG$: XFCLOSE: XFEOF: XFGET$: XFOPEN: XFPOS: XFPUT: XTRECV. XTSEND: D Data files appending format sending/receiving see 'File transfer' DCD (carrier detect) DCE/DTE interface Dial string for Macintosh for PC Dial-up services See 'Hosts' Diary files format (model LZ) sending/receiving See file transfer Dir (directory of Setup lists) DIRW$ function DISK FULL error DSR/DTR pins E Echo Editing capture buffer (2) Electronic mail See 'Hosts' Setup files Error messages during XMODEM file transfer from comm. procedures trapping with TRAP/ONERR Example programs connecting to modem diary backup opening/reading binary file printing MAIN sending all files Existing file names Exit (Setup list) F FILE ALREADY EXISTS error File extensions added by Transmit added by XTSEND: for DIRW$ FILE NOT FOUND error File transfer from OPL to/from capture buffer (2) with host with Macintosh with other computers with PC File types ftype% (XFOPEN:) see 'Data files', 'Diary files', 'Notepad files', 'Procedure files' type% (XTSEND:) Folders (Macintosh) ftype% parameter (XFOPEN:) G Gender changers (2) H Hand(shaking) for host for Macintosh via modems for PC via modems for printer XON/XOFF, DSR/DTR HOST echo Hosts capture buffer model LZ model XP, CM file transfer fitting Comms Link cable setting parameters terminal emulation K Keyboard in terminal emulation L len% parameter (XFGET$:) LINPUT$: LOAD, Setup files LOCAL Echo LPRINT in OPL printer example LSET: M Macintosh adaptors connecting via modems dial string file transfer fitting Comms Link cable folders and file names handshaking for modems installing Comms Link setting parameters Setup on Macintosh on Organiser viewing Organiser files Male/female connectors (2) mode% parameter (XFPOS:) Modems adaptors null RS232 standard with Macintosh with PC with other computers N NONE Protocol Notepad files password protection sending/receiving see 'File transfer' Null modems O OFF state OPL errors example procedures (2) file transfer printing from remote file access see also 'Comm. procedures' Other computers file transfer fitting Comms Link cable Protocol NONE XMODEM requirements setting parameters testing the link Auto handshaking Term using modems P Pager setup files, transfer Parameters comm. parameters see 'Communications parameters' or parameter name in comm. procedures amode% (XFOPEN:) len% (XFGET$:) type% (XFOPEN:) mode% (XFPOS:) pos (XFOPEN:) type% (XTSEND:, XTRECV:) Parity Pathnames (2) PCs connecting via modems file transfer fitting Comms Link cable installing Comms Link files pathnames setting up on Organiser on PC single disk drives PORT for Macintosh via modems for PC via modems pos parameter (XFPOS:) POWERED state Printer adaptors Baud, Parity, Bits, Stop fitting Comms Link cable optional features testing the connection Auto handshaking Term Printing from model LZ from models XP, CM data files diary files notes from capture buffer procedures from OPL Procedure files names sending/receiving see 'File transfer' Protocol for Macintosh for other computers for PC NONE XMODEM PSION protocol (2) R Receive see 'File transfer' RECORD TOO LONG error Reof for host for other computers Reol for host for other computers Reset RS232 port states OFF POWERED SELECTED Rtrn S Save capture buffer (2) Setup files Scrolling in terminal emulation SELECTED state SERVER ERROR error Setup files file transfer saving/loading etc. Setup list when reinitialised Setup menu Split speed host Spreadsheet files transfer Stop T TABs Teof for host for other computers for printer Teol for host for other computers for printer Term with host with other computers with printer Timeout for printer Transmit see 'File transfer' Trapping errors TRIG$: Ttrn type% (XTSEND:, XTRECV:) W Width for host for printer X XFCLOSE: XFEOF: XFGET$: XFOPEN: XFPOS: XFPUT: XMODEM protocol XTRECV: XTSEND: