This Psion LZ/LZ64 Programming manual is also available in French and Italian.
1 Introduction to OPL The Prog menu Creating, saving and running a procedure Edit. Print, Dir. Copy, Delete 2 Procedures and variables 3 Loops and branches 4 Operators 5 Handling data files 6 Handling any type of file 7 Error handling Common errors Run-time errors Error trapping 8 Example programs 9 OPL commands and functions Summary Command syntax Function syntax List of commands and functions
Appendices A Organiser character set Printing non-keyboard characters Codes for special keys Control characters User-defined characters B Technical Data C Technical programming Memory addresses D Error messages
OPL is the Organiser Programming Language. It has a set of commands and functions suitable for all kinds of applications - including the manipulation of records in data files.
To enter OPL:
From the Prog menu you can start new programs or continue with old ones.
Once you have written programs in OPL, you can run them from within Prog or directly from the main menu, or even whilst you are working on the calculator or the Pocket Spreadsheet.
An OPL program consists of one or more procedures each of which is typed in separately. A simple program may consist of just one and a more complex program of a main procedure which calls others.
The most efficient way to use OPL is to write short procedures which can be tested individually. Each one should ideally perform just one specific task. That way, programs which have similar requirements can share one common procedure to do the same job.
This chapter shows you how to write, save and run a simple procedure and covers all the options on the Prog menu.
The Prog menu looks like this:
11:32a Edit New Run Print Dir Copy Delete
The options on the Prog menu are:
| Edit | Lets you alter an existing procedure. |
| New | Lets you type in and save a new procedure. |
| Run | Executes an existing procedure. |
| Prints out a procedure on an attached printer or computer. | |
| Dir | Provides a directory list of your procedures. |
| Copy | Copies procedures to another device. |
| Delete | Deletes procedures. |
The simple procedure below just clears the screen and displays the date until you press a key. The procedure's name is DATE:
DATE: CLS PRINT "TODAY IS",DAY;"/";MONTH GET
The current device is shown after the word New; in this case it is A: (the internal memory). If you want to work on a pack, press MODE to change device.
The first thing to type is the procedure name, this can be up to 8 characters long and must start with a letter.
The procedure name is shown with a colon at the end. The
cursor is flashing at the end of it.
DATE:_
If you are not used to the keys look at the Keyboard section in Chapter 2 of the operating manual.
Note: in OPL you can use either upper case or lower case letters in any combination.
Check that the line appear on screen exactly as it does here as even the spaces are important. Here is an analysis of the line:
The GET function, waits for a keypress before running the rest of the program. So when you run DATE:, the date will remain on the screen until you press a key.
You can correct what you've typed at any time:
You can also press MODE and use four of the options on the editor menu to help you:
| Find | Takes you to a search-clue you specify (you have to press ON/CLEAR to remove the find prompt). |
| Home | Takes you to the top of the procedure file. |
| End | Takes you to the bottom of the procedure file. |
| Zap | Clears all the lines deleting the whole procedure text so that you can start again. |
When you have finished typing the procedure, you can:
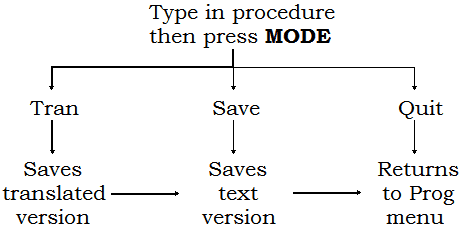
This diagram illustrates the differences between them. The bold path shows the normal process of translating a new procedure:
You would normally select Tran, so that you can run the procedure, but to see what the other two do:
The procedure is translated into a form that OPL can run. When the procedure has been translated, the screen displays this prompt: Save A:DATE
You can now save the translated procedure.
You return to the Prog menu. When you save the translated version, the original text version is saved with it. So you can run it and re-edit it later.
Syntax errors
If you make a typing error, OPL spots it during translation. For example, if you typed PRONT instead of PRINT or omitted one of the pair of quotation round a string, this message is displayed:
ERROR SYNTAX ERR .................... press SPACE key
When you just save a procedure rather than translating it, no error checking is done. The text is simply saved exactly as you typed it.
If you type in part of a procedure and intend to return to it later to complete it you can select Save instead of Tran so as not to waste memory by producing an unnecessary translated version.
Where you should save programs
The best place to save programs is on A: or a Rampak. Then, if a procedure takes a couple of versions before it runs properly, each version will not use up space:
When a final version of a procedure has been produced on device A: it is a good idea to copy it to a Datapak.
When you've successfully translated the procedure, you can run it.
When DATE: is run, the screen will first clear and then show something
like this, depending on the date:
TODAY IS 19/8
The last line of the procedure was GET. This instruction simply waits until you press a key before continuing. So, when you press a key, the procedure finishes and you return to the Prog menu.
Like Run, the remaining Prog options all require you to specify an existing procedure file.
If you haven't left Prog, the name of the procedure you worked on last is supplied for Edit and Print. You can press EXE to accept it, or DOWN to get a list of procedures to select from. For detail on selecting from file lists, see Chapter 12 in the operating manual.
The Edit option from the Prog menu allows you to return to an old procedure to change it or add to it.
When you've finished editing the procedure, you can either:
The Print option is used to print out a listing of a procedure on a printer or personal computer.
If no printer or computer is connected to the Organiser, this
error message is displayed:
DEVICE MISSING
For more details on printing, see Chapter 17 in the operating manual.
The Dir option on the Prog menu shows you the directory of procedures stored on the various devices.
If necessary, change device with MODE, then list the procedures with DOWN in the same way as you do in Dir in Utils. See Chapter 15 of the Operating Manual.
The Copy option in the Prog menu is used to make copies of procedures from one device to another.
Opl Copies both the text and translated object code of the procedure.
Oplobj Copies only the translated object code part.
Opltxt Copies only the editable text part.
Copy in Prog works just like Copy in Utils.
Warning: If you copy a procedure, and one with the same name already exists on the destination device, the existing one is deleted - even if the existing one is text only and the one you are copying is object only.
The Delete option allows you to delete procedures from any of the devices.
If necessary change device with MODE. Select a file or files to be deleted in the same way as you do in the Utils Delete option.
To insert the name of a procedure in the main menu:
When you select the name, the procedure is run.
For example, you could type in, translate and save a procedure like the one below, then enter its name, ID, in the main menu. When the item Id is selected, your Organiser will be identified.
ID: CLS PRINT "IF FOUND PLEASE RING" PRINT "PAUL SMITH EXT. 998" GET
Sometimes you may want to stop a procedure when it's running. To halt the execution of a procedure:
This will pause it indefinitely. (Unless the procedure was waiting for a key, with a function such as GET.)
If the procedure was run from the main menu, the screen shows:
ERROR ESCAPE IN A:procname .................... press SPACE key
If the procedure was run from the Prog menu, the screen shows:
ERROR ESCAPE .................... Edit A:procname Y/N
Press Y if you want to enter the procedure text to edit it, or press N to return to the Prog menu.
You can't use Copy to rename a procedure you have to re-save it under a different name. For example, to rename A:DATE to A:TODAY.
If you are creating a procedure to be run on a two-line Organiser model CM or XP:
When you run a procedure created on an XP or translated with Xtran, anything printed on the screen has a border like this round it:
XXXXXXXXXXXXXXXXXXXX XX 2-LINE PROC XX XX XX XXXXXXXXXXXXXXXXXXXX
When you select the name, the procedure is run.
The previous chapter dealt with the mechanics of using the Prog menu. The next five chapters cover the basic concepts of OPL programming. If you are familiar with programming languages just skim through these chapters, or refer instead to the reference sections which follow.
Procedures generally consist of the four steps shown in this simplified example:
| 1 Name | SINE50: |
| 2 Declaration of variables | LOCAL x |
| 3 Operations upon variables | x=SIN(50) |
| 4 Communication of variables | PRINT x |
This chapter deals with these four steps.
e.g. print:, shares89:, TAXCALC:
If you were adding together two numbers, in algebra you would
write 'x+y=z'.
In OPL you would write z=x+y but first you would have to declare x,y
and z as variables in order to reserve memory space for them. You would
do this:
1 Declare the variables in order to reserve 3 spaces in memory, called x, y
and z.
LOCAL x,y,z
2 Assign values to x and y.
x=5
y=2
3 Add x and y together and assign the result to z:
z=x+y
A variable is therefore a named region of memory which at the very beginning of your procedure you declare. This means that you tell the Organiser you are going to use the variable so that it will have space to store the number or text you later assign to it. So in the SINE50 example, the line 'LOCAL x' reserves a memory space named x in which the value given to x in the next line can be stored.
There are three kinds of variables identified when you declare them by the format of the variable name. The three kinds are:
Floating point variables e.g. x
Integer variables e.g. x%
String variables e.g. x$
All variables may be up to 8 characters long. The first character must be a letter. The other characters may be letters or numbers but not symbols - except for the identifiers % and $ at the end.
A floating point number is one which has a decimal point and then any number of digits after that point, e.g. 13.567 or 8. or 0.05319 or 6.0
You should declare a floating point variable when you know that the sort of value you are likely assign to it will be a floating point number.
A floating point variable name does not have any special symbol at the end.
e.g. a, AGE, PROFIT89.
Floating point variables are stored to an accuracy of 12 digits and must be in the range ±9.99999999999E99 to ±1E-99 and 0.
An integer is a whole number, e.g. 6 or 13 or -3 or 11058
You should use integer variables wherever floating point numbers are not necessary and speed or space are important. Integer arithmetic is faster than floating point and it occupies two bytes of memory instead of eight.
An integer variable name ends with a % sign. (The % sign is included in the 8 characters length.)
e.g. a%, AGE%, PROFI89%.
Integer variables must be in the range -32768 to +32767.
A string is a sequence of characters, alphabetic, numeric or symbolic, which is treated literally rather than being evaluated. Examples of strings are: "x + y =" and "01-345-2908" and "profit".
A string variable name ends with a $ sign. (The sign is included in the 8 characters length.)
e.g. a$, NAME$, MAN6$.
When declaring a string variable, you must state the maximum length of the string you expect to assign to it. So if you want to enter names up to 15 characters long as the value of NAME$, you have to declare NAME$(15). The number goes in brackets.
The maximum length of a string is 255 characters.
You must declare your variables immediately after the procedure name. You may list together all 3 types, in any order; they must be separated by commas like this:
LOCAL x,y,a%,NAME$(15),YEAR3%
To declare variables you use either the LOCAL or the GLOBAL
command like this:
LOCAL x,a%,list$(8)
or
GLOBAL x,a%,list$(8)
LOCAL and GLOBAL define the range the variables are to be active in. The basic difference is that:
An OPL program can be made up of more than one procedure. However, you have to type, translate and save each procedure separately.
In the example below, the fourth line of proca: calls another procedure, procb:. To do this, you just type the procedure name (with the colon).
proca: GLOBAL a% a%=2 procb: PRINT a% | procb: a%=a%+4 |
You declare a% as a global variable so that it can be used in the second procedure. In this example the value printed out when proca: is run is 6.
The only danger with global variables is that you may get mistakes occurring if you accidentally use the same variable name twice. So, you should use the LOCAL command unless the GLOBAL one is required.
If OPL comes across a variable which isn't declared in that procedure, it assumes it has been declared in a previous procedure. OPL will then report a MISSING EXTERNAL error if it can't find the global variable in a calling procedure.
Calculator memories
There are ten floating point variables which are always available. These are the calculator memories m0 to m9. You do not declare these as variables, as they are always in existence.
Values may be assigned to these at any time in any procedure. You can then access them in the calculator.
Array variables
You may want to declare a large number of similar variables at the beginning of a program. For this reason. OPL has array variables.
The idea is simply that, instead of having to declare variables a, b, c, d and e, you can declare variables a1 to a5 in one go like this:
| LOCAL a%(5) | (integer variable array) |
| LOCAL a(5) | (floating point variable array) |
| LOCAL a$(5,8) | (string variable array) |
Numeric array variables may be thought of as a list of numbers, each with the same name, but with an index number to differentiate them.
When the array is declared, the number in brackets is the number of elements in it. Here is a simple example assigning values to the elements of in integer array:
procname: GLOBAL num%(4) num%(1)=1 num%(2)=3 num%(3)=5 num%(4)=7 PRINT num%(1)+num%(2)+num%(3)+num%(4)
This example just prints the sum of the four elements of the array num%.
With strings, you must declare the number of elements in the array and the maximum length of the strings.
For example GLOBAL ARRAY$(5,10) allocates memory space for five strings, each up to ten characters in length, under the names ARRAY$(1) to ARRAY$(5). As yet, each of the variables is empty (is a null string), but enough memory still has to be set aside to contain all of the five strings when full.
Once you have declared your variables you can perform any number of operations on them. This might be a combination of arithmetic operations, or you might pass the variables to other procedures for them to operate upon them, or use one of the OPL functions. Whatever you do, however, you need to understand how your variables will react according to what type they are and how you combine them.
For example, you cannot divide a string variable by an integer variable. And if you mix integers and floating point variables in the same sum one may convert the other into its own type of variable. The following sections give details of what problems may arise and how to avoid them.
In the procedure below there is a potential mistake in the third line after the name, where the integer variable y% is assigned a floating point value:
procname: GLOBAL x%,y% x%=7 y%=3.7+x% PRINT y% GET
OPL deals with this in the following way: instead of reporting an error, OPL carries out an automatic type conversion internally on the value assigned to the mismatched variable.
The right hand side of y%=3.7+x% is evaluated to 10.7. However, the fractional part of the number is dropped before the result is assigned to the left hand side, y%. So, the PRINT statement will display the value 10.
Since OPL does not report this as an error, the onus is on you to ensure that it does not happen - unless you want it to! You must always take care when mixing variable types that the answer produced is the one which you expect.
In the procedure below where only floating point variables are used, you can see that another type conversion is made, but does not cause the value to change:
procname: GLOBAL a,b,c a=1.2 b=2.7 c=3 PRINT a+b+c
In this procedure, the floating point variable c is given the integer value 3. An automatic type conversion is carried out in such cases. Here the result is converted to 3.0, so the real value of the variable remains the same.
If you assign a floating point number to an integer variable, then the automatic type conversion will generate an integer rounded down. So if you say a%=2.3 then the value of a% will be 2; but a%=2.9 would also give a% the value 2. And if you assign a negative floating point number to an integer variable, then the number is still rounded down - rather than toward zero. So if you say a%=-2.3 then a% will take the value -3. This may not be desirable..
If you expect an expression to return a floating point number, you must ensure that the correct types of number are used within that expression.
It is possible to control how floating point numbers are rounded when
converted. For example, if you wanted to round floating point numbers to
the nearest half (so 2.4 would round to 2.5 and 2.2 to 2) then you might
try the following statement:
r=INT(2*n+0.5)/2
where n is the number to be rounded.
This would produce the wrong result, though. To see why substitute a trial
value, say 3.4, instead of n:
INT(2*3.4+0.5) i.e. INT(7.3)
returns the integer 7. But 7/2, when rounded down gives the integer 3,
not 3.5.
To obtain 3.5 you must force the division to give a floating point result.
In this case the simplest way to do this is to divide by the floating point
value of 2.0, instead of the integer 2. So the expression:
r=INT(2*n+0.5)/2.0
will give the required result.
There is more about integers and floating point variables in the chapter on Operators.
If you try to allocate a number to a string variable, an error will be reported. There is no automatic type conversion between string and numeric variables. However, OPL does have facilities for forcing conversion of numbers to strings and vice versa. These are the SCI$, FIX$, GEN$, NUM$ and VAL functions.
Adding strings together is as easy as adding numeric variables:
Alternatively, you could give c$ the same value with the statement c$="DOWN"+"WIND".
When concatenating strings, the result cannot be longer than the maximum length you declared.
You can also split strings up. This process is known as string slicing.
There are three functions which allow you to do this. They are LEFT$, RIGHT$ and MID$. These allow you to access the left, right or middle portions of a string respectively. For example:
String slicing operations leave the original string unchanged - i.e. a$ would still have the value 01-234-5782 after b$ had gained the value 01. The exception would be when the left hand side of the expression is the same string as appears in the right hand side, e.g. a$=LEFT$(a$,4) would return a string containing the leftmost four characters of a$ and assign it to a$, thus overwriting the original value.
Note: If you need to define a string which includes the quotation mark character (ASCII character 34) then this character must be included twice in the string. So, if you say a$="x""y""z", then the resulting value of a$ will be x"y"z.
In the first example procedure at the beginning of this chapter, the statement PRINT x simply takes the value found in the memory space of variable x and prints it on the screen.
Values can also be passed between procedures. In the example on page 2-5 [See Calling procedures], the procedure proca: called another procedure, procb: which returned the adjusted value of a% back to proca:. The variable a% was declared global to allow this.
The rest of this chapter deals with two other ways of communicating values: entering values from the keyboard using the INPUT command, and passing values between procedures using parameters.
Values can be entered from the keyboard using the INPUT command, as in the example below.
This simple procedure just asks you to enter a number. The number you enter is assigned to the variable x and is then printed out to the screen with a message:
INPUT: LOCAL x CLS PRINT "ENTER NUMBER" INPUT x CLS PRINT "YOU ENTERED",x GET
For full details of the INPUT command, see Chapter 9.
Values can be passed between procedures using parameters. In the VAT example below, the second procedure VAT1: is followed by a parameter name (p).
The last line of the first procedure PROC1: calls VAT1 with the value of x. The value of x is copied to the parameter p. VAT1: then prints out this value plus VAT at 15%.
PROC1: LOCAL x CLS PRINT "ENTER PRICE" INPUT x VAT1:(x)
VAT1:(p) CLS PRINT "PRICE INCLUDING VAT = ",p*1.15 GET
In this similar VAT example the second procedure VAT2: has two parameters.
The value of the price variable, x, is passed to the parameter p1 and the rate of VAT is also a variable, r, which is passed to the parameter p2. VAT2 then prints out the price plus VAT at the rate specified.
PROC2: LOCAL x, r CLS PRINT "ENTER PRICE" INPUT x CLS PRINT "ENTER VAT RATE" INPUT r VAT2:(x,r)
VAT2: (p1,p2) CLS PRINT p1+p2/100*p1 GET
This VAT example differs from the previous two in that control does not end with the second procedure but returns instead to the first.
The RETURN command is used to return the value of X plus VAT at r percent - to be printed out in PROC3:. VAT3: is now just doing the calculation and not printing. This means it can be called by other procedures which need this calculation but do not necessarily need to print it.
PROC3: LOCAL x,r CLS PRINT "ENTER PRICE" INPUT x CLS PRINT "ENTER VAT RATE" INPUT r CLS PRINT "PRICE INCLUDING VAT =",VAT3:(x,r) GET
VAT3:(p1,p2) RETURN p1+p2/100*p1
So far we have only considered programs which run in a straight line from start to finish. They consist of a number of instructions which are executed in the order they appear in the program; if you want to carry out an instruction more than once you must repeat it.
That is clearly very inefficient. A far more efficient method is for the program to be able to loop around a particular part as many times as you require, or until a certain condition is met.
There are a number of ways of doing this in OPL.
The first two are the DO/UNTIL and the WHILE/ENDWH loops. These are known as structures. They operate in a similar way to each other, with one difference.
You can have up to eight loops nested within each other.
Here is an example of a DO/UNTIL loop:
a%=10 DO PRINT "A=";a% a%=a%-1 UNTIL a%=0
First 10 is assigned to a%. The loop starts on the next line, with the instruction DO. This says to OPL:
"Execute all the following instructions until an UNTIL is reached. If the condition following UNTIL is not met, repeat the same set of instructions until it is."
The next line displays "A=", followed by the value of a%. The first time through the loop, this is 10.
Next, the value of a% has 1 subtracted from it so that a% is 9. Now comes UNTIL, followed by a condition. The condition is that a% is equal to zero. It isn't yet, so the program returns to DO and the loop is repeated. Now a% decrements to 8, and again the condition fails. This process continues until a% does equal zero.
When a% equals zero the loop finishes and the program continues with the instructions after UNTIL.
The WHILE/ENDWH loop is similar, except that the test condition is at the beginning. For example:
a=4.1 b=2.7 WHILE a>b PRINT "a is greater than b" b=b+1.04 ENDWH
BREAK can be used in conjunction with an IF statement, see below, to break out of a DO or WHILE loop. It jumps to the instruction after the end of the loop.
Another command which can direct the program out of a straight sequence is GOTO. This jumps to a label.
In this example, when the program reaches the GOTO, it jumps to the line beginning with the label exit::.
GOTO exit:: PRINT "MISS THIS LINE" PRINT "AND THIS ONE" exit::
Labels end in a double colon.
The label must be in the same procedure as the GOTO, and the jump is not conditional, it always happens.
GOTO is a way of branching, but it is a fairly crude tool and can make procedures difficult to read.
Better is the IF/ELSEIF/ELSE/ENDIF structure. This structure is used to perform one or more instructions IF a condition is met. If the condition is not met, you can use an ELSEIF instruction, to test for another condition. You can have any number of ELSEIF instructions within an IF/ENDIF structure.
After all likely things are catered for by the ELSEIF instructions, other possibilities can be catered for by an ELSE statement, followed at the end by the ENDIF statement. Here is an example:
whatkey: LOCAL g% g%=GET PRINT "THAT KEY IS" IF g%>64 AND g%<91 PRINT "UPPER CASE" ELSEIF g%>96 AND g%<123 PRINT "lower case" ELSE PRINT "NOT A LETTER." ENDIF GET
This just waits for a key to be pressed, and then prints that it is either a lower or upper case letter. (If you don't realise the significance of the numbers 64 and 91, see Appendix A.) If it is not a letter at all, then that is printed, as allowed for by the ELSE statement.
ELSEIF and ELSE statements are optional, but for every IF there must be a corresponding ENDIF.
ESCAPE OFF, GET, KEY and INPUT must be used with caution in loops for the following reasons:
To halt the execution of a procedure, you normally press ON/CLEAR then Q:
Arithmetic operators
| + | add |
| - | subtract |
| * | multiply |
| / | divide |
| ** | raise to a power |
| - | unary minus (make negative) |
| % | percent |
Comparison operators
| > | greater than |
| >= | greater than or equal to |
| < | less than |
| <= | less than or equal to |
| = | equal to |
| <> | not equal to |
Logical operators
AND OR NOT
| Highest: | ** |
| - (Unary minus) NOT | |
| * / | |
| + - | |
| = > < <> >= <= | |
| Lowest: | AND OR |
The percent operator % is rather different as its effect depends on the operator it is combined with. The way % works is described in the calculator chapter of the operating manual.
An expression such as a+b+c presents no problems, as the result is the same whichever addition is done first. However, you may want to enforce precedence with brackets. For example:
a+b*c/d
is evaluated in the order: b multiplied by c, then divided by d, then added to a. To perform the addition and the division before the multiplication, use brackets:
(a+b)*(c/d)
a%**b%**c%
b% will first be raised to the power of c% and the resulting value will be used as the power of a%.
When in doubt, simply use brackets.
You are free to mix floating point and integer values, in expressions, but be aware how OPL handles the mix:
but then
For example, your procedure might include the expression:
a%=b%+c
This is handled like this: b% is converted to floating point and added to c. The resulting floating point value is then automatically converted to an integer in order to be assigned to the integer variable a%.
These conversions may produce odd results, so be careful. For example, a%=3.0*(7/2) assigns 9 to a%, but a%=(3.0*7)/2 assigns 10 to a%.
The comparison operators and logical operators are based on the idea that a certain situation can be evaluated as either true or false. For example, if a%=6 and b%=8, a%>b% would be false. They are useful for setting up alternative paths in your procedures. For example you could say:
IF salary<expenses PRINT "bad" ELSEIF salary>expenses PRINT "good" ENDIF
You can also make use of the fact that the result of these logical expressions is represented by an integer:
These integers can be returned to a variable or printed out to the screen to tell you whether a particular condition is true or false, or used in an IF statement.
For example, in a procedure you might arrive at two sub-totals, a and b. You want to find out which is the greater. So include the statement, PRINT a>b. If zero is displayed, a and b are equal or b is the larger number but if - 1 is displayed, 'a>b' is true - a is the larger.
| Example | Result | Integer Returned | |
| < | a<b | True if a less than b | -1 |
| False if a greater than or equal to b | 0 | ||
| > | a>b | True if a greater than b | -1 |
| False if a less than or equal to b | 0 | ||
| <= | a<=b | True if a less than or equal b | -1 |
| False if a greater than b | 0 | ||
| >= | a>=b | True if a greater than or equal to b | -1 |
| False if a less than b | 0 | ||
| <> | a<>b | True if a not equal to b | -1 |
| False if a equal to b | 0 | ||
| = | a=b | True if a equal to b | -1 |
| False if a not equal to b | 0 | ||
You can use these-operators with a mixture of floating point or integer values. However, if one side of the comparison is floating point, and the other is an integer, the integer is converted to a floating point. So if a%=1 and b=1.2, b>a% is true. You can't use a mix of string and numeric values, so a$<b is invalid.
Few programmers need the following information, so skip the rest of the chapter if it seems daunting.
The logical operators AND, OR and NOT have different effects depending on whether they are used with floating point numbers or integers:
1 When used with floating point numbers only, the logical operators have the following effects:
| Example | Result | Integer Returned |
| a AND b | True if both a and b are non-zero | -1 |
| False if either a or b are zero | 0 | |
| a OR b | True if either a or b are non-zero | -1 |
| False if both a and b are zero | 0 | |
| NOT a | True if a is zero | -1 |
| False if a is non-zero | 0 |
2 When used with integer values only, AND, OR and NOT are bitwise logical operators.
The way the Organiser holds integer numbers internally is as a 16-bit binary code. So, 7 looks like this: 0000000000000111 The Organiser's numerical range is +32767 to -32768. 32767 is the largest number that can be represented with 15 binary bits. The 16th bit is used for the + or -.
As the operators are bitwise they perform the operation on first the 1st bit, then the 2nd, up to the 16th bit.
AND The statement PRINT 12 AND 10 prints 8. To understand this, write 12
and 10 in binary:
12 0 0 0 0 0 0 0 0 0 0 0 0 1 1 0 0
10 0 0 0 0 0 0 0 0 0 0 0 0 1 0 1 0
AND acts on each pair of bits. Thus, working from left to right -
discounting the first 12 bits:
1 AND 1 → 1
1 AND 0 → 0
0 AND 1 → 0
0 AND 0 → 0
The result is therefore the binary number 1000, or 8.
OR What result would the statement PRINT 12 OR 10 give? Again, write
down the numbers in binary and apply the operator to each pair of digits:
1 OR 1 → 1
1 OR 0 → 1
0 OR 1 → 1
0 OR 0 → 0
The result is the binary number 1110, or 14 in decimal.
NOT NOT works on only one number. It returns the one's complement, i.e. it replaces 0s with 1s and 1s with 0s.
So if 7 looks like this: 0000000000000111
NOT 7 will look like this: 1111111111111000
This is the binary representation of -8.
Hint. A quick way of calculating NOT for integers is to add 1 to the original number and reverse its sign. Thus, NOT 23 is -24, NOT 0 is -1 and NOT -1 is 0. The last two results are the same for floating points.
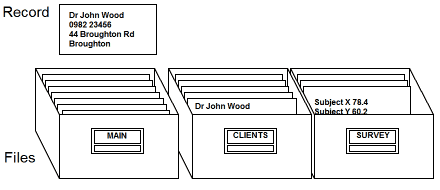
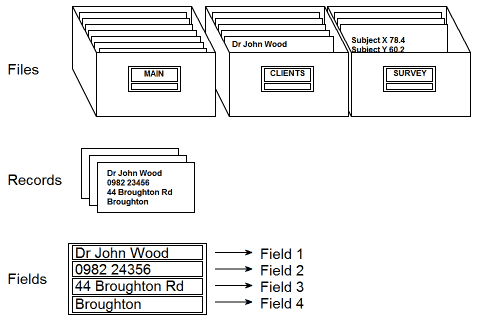
When you use the SAVE option from the main menu your records are saved in a file called MAIN. You can also create extra data files in the Xfiles option. You can access these files and the records in them from OPL. You can also create new files and then manipulate them. This chapter explains how to do this.
There are also three examples of data file handling programs at the end of the example procedures chapter. It may be a good idea to refer to those programs while you read this chapter.
The data file MAIN and any extra ones you create contain records which are divided into fields. When you save a record from the main menu with the SAVE option, you start a new field every time you start a new line by pressing DOWN.
In a name and address file, in each record, there might be a name field, a telephone number field, and separate fields for each line of the address.
Before you can start to enter data into a new data file, you must create the file on one of the devices using New in Xfiles or the CREATE command in OPL.
With CREATE in OPL you have more control, as you specify how many fields
there can be in each record, and what type of data can go in each field.
The CREATE command has this syntax:
CREATE "<dev>fname",logname,fldnm1,fldnm2
"<dev>fname", is the device (A:, B: or C:) which the file is to be on, and then the file name. This all goes in quotes as a string, e.g. "a:clients". You can also assign this device and file name string to a string variable (e.g. cl$="a:clients") and then use the variable name (cl$) as the parameter. The file name may be up to 8 characters long.
logname is the logical file name. This may be A, B, C or D. You use this logical file name to refer to the file from within the program.
fldnm1, fldnm2 are the field names. There may be up to 16 fields in any record, and these may be given a qualifier, either % or $, to signify integer data or string data respectively. Fields containing floating point data need no qualifier. Field names may be up to 8 characters long including any qualifier used.
An example of a CREATE command might be:
CREATE "a:clients",B,nm$,tel$,ad1$,ad2$,ad3$
When a file has been created, it is automatically open. This means records can be saved to it immediately. It also becomes the current file which means that when you use one of the commands for manipulating records, they operate on this file.
You add records to a data file field by field. First you assign some values to the current field names, then you use the APPEND command to add them to the file.
The field names act in a similar way to variables, and can be assigned values
and used in INPUT statements. The field name must be used with the logical
file name like this:
INPUT B.name$
or this
B.name$="MR Bruno"
where B is the logical file name and name$ is the name of the field. These are separated by a full stop.
When you have assigned values to the fields, you add them to the open file with the APPEND command. They are always added as the last record in the data file. If the file is a new one, this will be the first record.
The APPEND command has no parameters - the field values are automatically added to the file in the correct order and format.
If you try to assign a text string to a numeric field name, an error will be reported.
See the second procedure (insert:) in program no. 6 of Chapter 8 for an example of adding records to a data file.
At any time while a data file is open, the field names currently in use can be used like any other variable - for example, in a PRINT statement, or a string or numeric expression. However, in order to operate on a particular field, you must make the record containing it the current one.
Before you can erase a record or operate on the fields in it you must make it current. You can change the current record by using any of the six commands and functions below.
FIRST moves to the first record in a file.
NEXT moves to the following record in a file. If the end of the file is passed, NEXT does not report an error. The current record will then be null. This condition can be tested for with the EOF function.
BACK moves to the previous record in the file. If the current record is the first record in the file then the current record does not change.
LAST moves to the last record in the file.
POSITION moves to a particular record. For example, the instruction POSITION 3 makes record 3 (the first record is record 1) the current record. You can find the current record number by using the POS function which returns the number of the current record.
FIND moves to the record which contains a search string you specify.
The FIND function acts like the main menu Find, but without wild cards. The difference is that whereas the main menu Find prints the record on the screen, this function makes it the current record so that you can operate on it: editing it, erasing it, or just displaying it.
For example, the line
r%=FIND("HOLMES")
would make the first record containing the string "HOLMES" the current
record and return the number of that record to the variable r%. If the
number returned is zero, the string was not found.
There is another function, FINDW, which is the same as FIND but does allow wild cards. So, to find the first record containing ORDER and 89 use this instruction:
r%=FINDW("*ORDER*89*")
+ Matches any character.
* Matches any group of characters.
The procedure called search: in program no. 6 in Chapter 8 is an example of how to find and edit records.
To erase a record, make that record current by use of one of the commands FIRST, NEXT, BACK, LAST, POSITION or FIND and then use the ERASE command. This removes the current record from the file and renumbers the ones that follow.
The final procedure (erase:) in program no. 6 in Chapter 8 is an example of how to find and erase records.
When you first CREATE a data file it is automatically open but it closes again when the program ends. To open the file again in another program, you use the OPEN command.
The syntax of the OPEN command is the same as for the CREATE command. You
must use the same device and file name as when you first created it, but
when opening it in a different program, you can give it a different logical
file name and give the fields different names. For example, a file which was
created in one program with the command:
CREATE "c:address",D,name$,num$,add$,add2$
can be opened in another program by the command:
OPEN "c:address",A,a$,b$,c$,d$
Up to four files may be open at any one time, and these may be spread over any of the three devices. Each must be referred to in the program by a different logical name. So, if you have 4 files open, one is A one is B one is C and the other is D.
If you are going to edit or erase records in the file, you need to include
all the fields you are going to operate on in the OPEN command. However, if
you are just going to search for strings and display records, you only need
to include the first field in the OPEN command, like this:
OPEN "c:address",A,a$
When a file is created or opened, that file is then automatically the
current file and all access is to that file until you say you want to USE a
different one. The USE command makes a file current. You refer to the
file by its logical file name. For example:
USE B
In this example the file with the logical file name B (as specified in the OPEN or CREATE command which opened it) becomes the current file. All access is now to this file until you change the current file with another USE command or OPEN or CREATE another file. If you attempt to use a file which has not previously been opened, an error is reported.
Data files close automatically when programs end. However, when you have finished accessing a particular file, you can close it with the CLOSE command which closes the current file.
You might want to close a file if you already have 4 files open in a program, and you want to open another, or if you want to delete the file. There is a command DELETE for deleting data files, but the file to be deleted must be closed first.
See the beginning of Chapter 9 for a summary of all the data file handling commands and functions. Then look up each one for more detail.
Look at programs 6, 7 and 8 in Chapter 8 for examples of data file handling programs.
Most of the file handling commands and functions are only for data files.
However there are three, COPYW, DELETEW and DIRW$, which operate on any type of file. You indicate the type of file with these extensions:
| Data file and diary file (ODB stands for Organiser Data Base.) | .ODB |
| OPL procedure | .OPL |
| Notepad file | .NTS |
| Comms Link setup file | .COM |
| Spreadsheet file | .PLN |
| Pager setup file | .PAG |
| Diary file from XP or CM | .DIA |
There are also two extra extensions for COPYW only. Use these to copy only one part of an OPL procedure.
| OPL procedure (text only) | .OPT |
| OPL procedure (object only) | .OPO |
You can also use wild cards with COPYW, DELETEW and DIRW$. The wild cards are the normal ones: + is any character, * is any group of characters.
COPYW "A:*88.OPL","B:"
Copies all the OPL procedures whose names end in 88 from A: to B:
DELETEW "C:*.NTS"
Deletes an the notepad files on C:
DIRW$ ("A: R*")
Returns the name of the first file of any type on A: which starts with
the letter R.
Diary files are saved as data files. Each entry is a record with this two field format:
1989042712000100 JAMES BIRTHDAY
in this example, the first field carries this information:
| 1989 | The year |
| 04 | The month |
| 27 | The date |
| 1200 | The start time |
| 01 | The duration - one 15 minute interval |
| 00 | The alarm pre-warning time. In this case there is no alarm so it's zero. |
You can open a saved diary file in Xfiles, and then find and update records in it. For example, you could find all your annual entries such as birthdays and change 1989 to 1990. If you then restored the diary and merged it with the current one you wouldn't need to put in all the birthday entries again at the end of the year. However, be careful to use the right format, or you won't be able to restore the diary.
You could also do this in OPL using the data file handling and string handling commands. There is a program in Chapter 8 which does this.
This chapter covers commonly made errors, then error trapping. There is a list of the OPL error messages in Appendix D.
All programming languages are very particular about the way commands and functions are used, especially in the way program statements are laid out.
Below are a number of errors which are easy to make in OPL. The incorrect statements are in bold and the correct versions are on the right.
Punctuation errors
Omitting the colon between statements on a multi-statement line:
| Incorrect | Correct |
| a$="text" PRINT a$ | a$="text" :PRINT a$ |
Omitting the colon after a called procedure name:
| Incorrect | Correct |
| proc1: GLOBAL a,b,c . . proc2 |
proc1: GLOBAL a,b,c . . proc2: |
Omitting one or more of the colons after a label:
| Incorrect | Correct |
| proc1: GOTO below: . . below:: |
proc1: GOTO below:: . . below:: |
Omitting the space before the colon between statements on a multi-statement line:
| Incorrect | Correct |
| proc1: a$=b$:PRINT a$ |
proc1: a$=b$: PRINT a$ |
Parameter errors
Passing a floating point value to a procedure which requires an integer - here the procedure proc2:(x%).
| Incorrect | Correct |
| 2*6+proc2:(PI) | 2*6+proc2:(INT(PI)) |
This may also happen when a procedure is called from the calculator. The calculator converts all numbers to floating point, so:
| Incorrect | Correct |
| Calc:proc2:(3) | Calc:proc2:(INT(3)) |
Passing an integer to a procedure which requires a floating point value - here the procedure proc3:(x)
| Incorrect | Correct |
| proc1: . . proc3:(2/3) |
proc1: . . proc3:(2.0/3) |
Passing the wrong number of parameters to a procedure - here, the procedure proc4:(x,y)
| Incorrect | Correct |
| proc1: . . proc4:(3.7) |
proc1: . . proc4:(3.7,2.5) |
Integer size error
OPL only allows numbers between minus 32768 and plus 32767 to be assigned to integer variables, so any expression which exceeds these limits will cause an error:
| Incorrect | Correct |
| proc1: LOCAL a% a%=100*2468 |
proc1: LOCAL a a=100.0*2468 |
Structure errors
The structures allowed within OPL are DO/UNTIL, WHILE/ENDWH and IF/ELSEIF/ELSE/ENDIF. These may all be nested within one another to up to eight structures deep. Attempting to nest to a greater depth than this will cause an error. Mixing up the three structures e.g. by matching up DO with WHILE, will also cause an error:
| Incorrect | Correct |
| proc1: . DO . WHILE a<2 |
proc1: . DO . UNTIL a>=2 |
If an error occurs when you run a program, the program stops and an error message is displayed.
If you are running the procedure from the main menu, just press SPACE to return to the menu.
However if you are running it from the Prog menu, you get a chance
to edit it. Here a call has been made to a procedure called subproc:
which does not exist:
MISSING PROC
SUBPROC
....................
Edit A:MAINPROC Y/N
Press Y if you want to edit the procedure. If the source code is available, you are returned to the OPL editor to correct the offending line. Press N or ON/CLEAR if you don't want to edit it.
When you have done this, press MODE to get the editor menu, and either translate, save or quit the procedure. If you quit, the edits you have made this session are abandoned.
In the case of the run time errors described above, the program stops to display the error message. There are ways of avoiding this by trapping errors and dealing with them yourself within the program - but they put you in full control and must be used carefully. The tools used to control errors are ONERR, TRAP, ERR, ERR$ and RAISE:
ONERR, is used to redirect program control to a label if an error occurs. This is useful if you want to provide your own error handling routine, such as printing out a message for an error you anticipate. ONERR is followed by the label name which ends in two colons. The label itself can be either in the same procedure or in a procedure before it in the same program.
In the example below, LPRINT is being used to print to an attached printer. Normally, when no printer is connected, the message DEVICE MISSING is displayed. Here a more precise message, CONNECT PRINTER, is supplied by the programmer:
ONERR noprint:: LPRINT "Dear Sir" RETURN noprint:: ONERR OFF :IF ERR=194 :RAISE ERR :ENDIF PRINT "CONNECT PRINTER" GET
The first line causes a jump to the label noprint:: if an error occurs. If no printer is connected, the LPRINT command causes such a jump and the message "CONNECT PRINTER" is displayed. If there is one connected, "Dear Sir" is printed and the lines after the label are never run, because of the RETURN before it.
Notice that the first instruction after the label noprint:: is ONERR OFF. This is very important because if you don't do this after the ONERR label:: command is used, all subsequent program errors - even in other procedures called - result in the program being directed to the same label. This diagram illustrates how two completely different errors cause a jump to the same label, and cause the same explanatory message to be printed out:
proc1: onerr label:: .... a=log(- 1) .... label:: PRINT "Explanation of log error" .... proc2: .... proc3: PRINT 2/0
As all errors go back to the same label unless you switch ONERR OFF, it is very easy to create an endless loop by mistake. If this happens, you cannot press ON/CLEAR and Q to break out, as this just makes control go to the label as any other error would - so, you have to take the battery out of the Organiser, and lose everything in the internal memory. To avoid this:
TRAP traps errors on a specified command only, so it doesn't need to be cancelled like ONERR does. It can be used with any of the commands listed below:
APPEND BACK CLOSE COPY COPYW CREATE DELETE DELETEW ERASE EDIT FIRST INPUT LAST NEXT OPEN POSITION RENAME UPDATE USE
The trap command immediately precedes any of these commands, separated from
it by a space - e.g.:
TRAP INPUT a%
When INPUT is used without TRAP and a text string is entered when a number is required, the display just scrolls up and a question mark is shown, prompting for another - valid - entry. When you put TRAP in front of INPUT, the command is executed in the usual way, but if an error occurs the next line of the program is executed as if there had been no error. The next line in the example below is a helpful message.
proc: LOCAL a% start:: PRINT "ENTER AGE", TRAP INPUT a% IF ERR=252 PRINT "NUMBER NOT WORD" GOTO start:: ENDIF
The example above also uses the ERR function.
When errors occur in a program, the number of the error is accessible by using the ERR function. This means that you can be absolutely sure which error you are dealing with.
The anticipated error in the lines below is 246 (NO PACK). If 246 occurs when trying to open the MAIN file on pack B: a helpful error message is printed out. However, just in case a different error occurs, the next lines make sure that the standard error message for that error is printed.
TRAP OPEN "B:MAIN",A,a$ IF ERR=246 PRINT "NO PACK IN B:" ELSEIF ERR PRINT ERR$(ERR) ENDIF
The OPL error messages are listed in Appendix D.
If you are using commands to trap errors and handle them yourself, then at some during the development stage of your program you need to test your error handling routines. An easy way to do this is with the RAISE command. You can generate an error that you think might occur when the program is in use, and see if the error handling routine takes care of it in the way you anticipate. For example, this statement causes the NO PACK error to be generated:
RAISE 246
This chapter contains example programs written in OPL. The programs are not intended to demonstrate all the features of OPL, but they should give you a few hints. To find out more about a particular command or function, refer to Chapter 9. Each of the procedures must be entered separately, you can't enter two procedures in one block. Chapter 1 explains how to type in, translate, save and run a procedure.
Uppercase, lowercase
In the listings here, variables are shown in lowercase and commands and functions in uppercase. However, it doesn't matter which you use when you enter procedures into the Organiser:
Spaces
Be careful to type in the necessary spaces:
Remarks
Lines beginning with the command REM are remarks; they are there to explain things. They do not affect the way a procedure runs and you don't have to type them in if you don't want to.
This procedure works out the number of days you've been alive. Substitute your own date of birth for the one supplied here.
days1: LOCAL birth%,now%,answer% birth%=DAYS(14,6,1957) now%=DAYS(DAY,MONTH,YEAR) answer%=now%-birth% PRINT answer% :GET
Variables
birth% is your date of birth.
now% is the current date.
answer% is the current date minus your date of birth.
Date functions
All the OPL date functions return values accessed from the Organiser
clock and calendar. The function DAYS returns the number of days
since the beginning of the calendar on a particular date.
This procedure is a more flexible one which works out the number of days between boy two dates that you input. When you run the procedure you are prompted to enter the day, month and year of the first date then the second date.
days2: LOCAL d1%,m1%,y1%,d2%,m2%,y2% PRINT "ENTER FIRST DAY" INPUT d1% PRINT "ENTER FIRST MONTH" INPUT m1% PRINT "ENTER FIRST YEAR" INPUT y1% PRINT "ENTER SECOND DAY" INPUT d2% PRINT "ENTER SECOND MONTH" INPUT m2% PRINT "ENTER SECOND YEAR" INPUT y2% PRINT DAYS(d2%,m2%,y2%)-DAYS(d1%,m1%,y1%) GET
Variables
d1%, m1% and y1% are the day month and year of the first date.
d2%, m2% and y2% are the day month and year of the second date.
This procedure turns the Organiser into a dice. When the program is run, a message is displayed saying that the dice is rolling. You then press S to stop it. A random number from one to six is displayed and you choose whether to roll again or not.
dice: LOCAL dice%,key% KSTAT 1 top:: CLS :PRINT "****DICE ROLLING****" PRINT "PRESS S TO STOP" DO dice%=(RND*6+1) UNTIL KEY$="S" CLS PRINT "********* ";dice%;" ********" BEEP 50,100 AT 1,4 :PRINT "ROLL AGAIN Y/N" label:: key%=GET IF key%=%Y GOTO top:: ELSEIF key%=%N RETURN ELSE GOTO label:: ENDIF
Variables
dice% is a random number from 1 to 6.
key% is the ASCII value of the keypress read by the GET function.
Random numbers
This is how dice: displays 1, 2, 3, 4, 5 or 6 randomly. The RND
function returns a random floating point number, between 0 and 1
(not including 1). It is then multiplied by 6 and 1 is added (so that
you get numbers from 1 to 6 instead of from 0 to 5). It is rounded
down to a whole number by assigning to the integer dice%.
Identifying keypresses of Y and N
The ASCII value of the character on the key you press is returned by
the GET function and assigned to key%. In OPL you get the ASCII
value of any character by putting % in front of it, so %Y is the ASCII
value of Y and %N is the ASCII value of N. In case you had the
keyboard set to lowercase, KSTAT 1 is used at the start of the
procedure to set it to uppercase, so that you are not pressing y and n.
This program calculates monthly mortgage payments. When you run it, you have to enter the amount of the loan, the interest rate and the term in years. Then you specify the source of the loan by selecting from a menu. The program does not allow for tax relief.
The program is made up to two procedures - mortgage: and q: - a general input routine. You must type each one in separately. The input routine could be called by any procedure which needs to prompt the user to enter a floating point number.
mortgage: LOCAL num%,loan,x,term,rate,pay,ques$(2) CLS PRINT "EVALUATE MONTHLY" PRINT "MORTGAGE PAYMENT" PAUSE 30 ques$=CHR$(63)+" " REM CHR$(63) is a "?" - See Appendix A loan=q:("ENTER LOAN"+ques$) DO rate=q:("INTEREST RATE % "+ques$) UNTIL rate>0 AND rate<99 DO term=q:("ENTER TERM (YRS)"+ques$) UNTIL term>.5 AND term<100 num%=MENU("BUILDING-SOCIETY,BANK,OTHER") IF num%=0 :RETURN :ENDIF rate=rate/100 :x=1+11*(num%/2) pay=loan*rate/12/(1-((1+rate/x)**(-x*term))) CLS :PRINT "MONTHLY PAYMENT" PRINT FIX$(pay, 2, -8) GET RETURN q:(a$) LOCAL z CLS :PRINT a$,CHR$(16); INPUT z CLS RETURN(z)
Variables
loan, term, rate and pay are the amounts of
the loan, the term in years, the interest rate and the monthly payments.
ques$ is "? ".
num% is the number of the menu item you choose.
x is a variable used in the calculation at the end.
z is the variable used for the values you input when q: is running.
Calling q:
The main procedure mortgage: calls q: three times, passing it a string to
be printed out as a prompt. The text string is passed to q: as a parameter.
The values returned are assigned to the variables loan, rate, and term.
How "?" is printed
The CHR$ function converts the ASCII value 63 to the question mark character.
How the input routine beeps
The CHR$ function converts the value 16 to the beep control character. This
is then "printed" out.
The next two procedures make up a game which demonstrates the use of user defined graphics (UDG's). Each procedure must be typed in separately.
The object of the game is to avoid being caught by the pursuers. Your movable man can jump up and down: press the X key to jump down and the S key to jump up. At the end of the game your score will be displayed on the screen.
To pause the game, press ON/CLEAR and to restart press it again. To quit out of the game press ON/CLEAR then Q.
game: LOCAL e$(2) LOCAL a%,b%,b1%,c%,c1%,x%,y%,i%,sc% graphic: :CURSOR OFF e$=CHR$(4)+CHR$(6) b%=20 :c%=12 :x%=3 :y%=1 DO CLS :PRINT REPT$(CHR$(158),80) AT x%,y% :PRINT CHR$(7) a%=1 :c%=1+RND*4 DO :c1%=1+RND*4 :UNTIL c%<>c1% DO AT a%,c% :PRINT CHR$(0) AT a%,c1% :PRINT CHR$(0) :BEEP b%,10*b% AT a%,c% :PRINT CHR$(1) AT a%,c1% :PRINT CHR$(1) :BEEP b%,10*b% AT a%,c% :PRINT CHR$(2) AT a%,c1% :PRINT CHR$(2) :BEEP b%,10*b% AT a%,c% :PRINT CHR$(3) AT a%,c1% :PRINT CHR$(3) :BEEP b%,10*b% AT a%,c% :PRINT e$ AT a%,c1% :PRINT e$ :BEEP b%,10*b% AT a%,c% :PRINT CHR$(5) AT a%,c1% :PRINT CHR$(5) :BEEP b%,10*b% AT a%,c% :PRINT " " :AT a%,c1% :PRINT " " i%=KEY IF i% IF i%=%S AND y%>1 AT x%,y% :PRINT CHR$(158) y%=y%-1 :AT x%,y% :PRINT CHR$(7) ENDIF IF i%=%X AND y%<4 AT x%,y% :PRINT CHR$(158) y%=y%+1 :AT x%,y% :PRINT CHR$(7) ENDIF ENDIF a%=a%+1 IF a%=x% AND (c%=y% OR c1%=y%) :REM Hit i%=0 DO AT x%,y% :PRINT CHR$(170+i%) BEEP 10,100+i% i%=i%+1 BEEP 10,100-i% UNTIL i%=30 b%=b%+5 :a%=20 :x%=x%+2 IF x%>20 CLS :PRINT "GAME OVER" PRINT "SCORE:",sc% :PAUSE 40 WHILE KEY :ENDWH :REM Drain buffer GET :RETURN ENDIF ENDIF UNTIL a%=20 sc%=sc%+1 IF b%>12 b%=b%-2 ELSEIF b%<6 IF b1% b%=b%-1 :b1%=0 ELSE b1%=1 ENDIF ELSE b%=b%-1 ENDIF UNTIL 0 graphic: UDG 0,0,0,28,30,30,30,28,0 UDG 1,0,0,14,31,30,31,14,0 UDG 2,0,0,7,14,12,14,7,0 UDG 3,0,0,3,7,6,7,3,0 UDG 4,0,0,1,3,3,1,0,0 UDG 5,0,0,0,1,1,1,0,0 UDG 6,0,0,24,16,4,16,24,0 UDG 7,30,14,4,14,30,14,11,25
User defined graphics
The main procedure, game:, calls graphic: which then uses the UDG
command 8 times to set up the graphics characters used in the game.
The last UDG command is the one which sets up the little man. User
defined characters are explained in Appendix A.
The main procedure below creates a data file called addr on device A, to contain names, addresses, post codes and telephone numbers. It is followed by 4 other procedures which allow you to insert, search for, alter and erase records in the file. When you run files:, a menu giving you a choice of these options is displayed.
Each of these 5 procedures must be typed in separately.
files: LOCAL m% IF NOT EXIST("A:addr") CREATE "A:ADDR",A,n$,ad1$,ad2$,ad3$,pc$,tel$ ELSE OPEN " A:ADDR",A,n$,ad1$,ad2$,ad3$,pc$,tel$ ENDIF DO m%=MENU("INSERT,SEARCH,ALTER,ERASE,QUIT") IF m%=0 or m%=5 :STOP ELSEIF m%=1 :insert: ELSEIF m%=2 :search: ELSEIF m%=3 :alter: ELSEIF m%=4 :erase: ENDIF UNTIL 0 :REM do loop forever insert: PRINT "ENTER NAME" :INPUT A.n$ CLS :PRINT "ENTER STREET" :INPUT A.ad1$ CLS :PRINT "ENTER TOWN" :INPUT A.ad2$ CLS :PRINT "ENTER COUNTY" :INPUT A.ad3$ CLS :PRINT "ENTER PCODE" :INPUT A.pc$ CLS :PRINT "ENTER TELNUM" :INPUT A.tel$ APPEND search: LOCAL recnum%,search$(30) top:: FIRST :CLS :PRINT "FIND:"; TRAP INPUT search$ IF ERR=206 RETURN ENDIF recnum%=FIND(search$) IF recnum%=0 CLS :PRINT "NOT FOUND" :PAUSE 20 GOTO top:: ENDIF DO DISP(-1,"") :NEXT :recnum%=FIND(search$) IF recnum%=0 :CLS PRINT " NO MORE ENTRIES" PAUSE 20 :RETURN ENDIF UNTIL 0 alter: LOCAL recnum%,search$(30),k% DO FIRST :CLS PRINT "ALTER:"; :TRAP INPUT search$ IF ERR=206 :RETURN :ENDIF recnum%=FIND(search$) IF recnum%=0 CLS :PRINT "NOT FOUND" PAUSE 20 :CONTINUE ENDIF DO KSTAT 1 :CLS :AT 1,2 :PRINT "EDIT Y/N" k%=VIEW(1,A.n$) IF k%=%Y :CLS EDIT A.n$ :EDIT A.ad1$ EDIT A.ad2$ :EDIT A.ad3$ EDIT A.pc$ :EDIT A.tel$ :UPDATE :RETURN ELSEIF k%=%N :NEXT :recnum%=FIND(search$) IF recnum%=0 CLS :PRINT "NOT FOUND" :PAUSE 20 :BREAK ENDIF ENDIF UNTIL 0 UNTIL 0 erase: LOCAL recnum%,search$(30),k% FIRST :CLS :PRINT "ERASE:"; TRAP INPUT search$ IF ERR=206 :RETURN :ENDIF recnum%=FIND(search$) DO IF recnum%=0 CLS :PRINT "NOT FOUND" :PAUSE 20 :RETURN ENDIF ask:: KSTAT 1 :AT 1,2 :PRINT "ERASE Y/N" k%=VIEW(1,A.n$) IF k%<>%Y AND k%<>%N GOTO ask:: ELSEIF k%=%Y ERASE ELSEIF k%=%N NEXT :recnum%=FIND(search$) ENDIF UNTIL EOF
Variables
m% is the number of the menu item you select
recnum% is the record number returned by FIND.
search$ is the search clue you enter.
k% is the ASCII value of the key you press whilst the found record is
displayed. (%Y is the ASCII value of Y, %N is the ASCII value of N.)
Creating the data file
The first procedure, files:, creates or opens a file called addr on device
A: with 6 fields for each record. The six field names are n$ for the
name, ad1$, ad2$, and ad$3 for each line of the address, pc$ for the
post code and tel$ for the phone number. The file is given the logical
name A.
Inserting records
Notice how in insert: the 6 fields of the record are input one by one.
The field names are used like variables and preceded by the logical file
name (A) and a full stop. Then the APPEND command is used; this
is necessary to actually add the record to the end of the file.
Displaying the current record
When a record containing a particular string has been found by
FIND it becomes the current record. DISP with -1 as the first
parameter, displays it.
In the procedure alter:, VIEW is used to display just the first field of the record, while you decide whether to edit it. If you choose to, each field is then displayed by the EDIT function, which allows you to alter what is on the screen.
These 3 procedures make up a program which allows you to log telephone calls. It stores their duration with your comments in a data file. It could easily be adapted to record the duration of any other activity.
The first procedure displays a menu like this with a phone UDG and the clock. Because the clock uses UDGs 3, 4, 5, 6, 7 and 1, UDGs 0 and 2 been used for the phone and the underline:
X 11:19a Logcall Viewcalls
logger: LOCAL m% UDG 0,31,21,14,10,31,31,0,31 UDG 2,0,0,0,0,0,0,0,31 PRINT CHR$(0);REPT$(CHR$(2),14) CLOCK(1) m%=MENUN(2,"Logcall,Viewcalls") IF m%=0 RETURN ELSEIF m%=1 logcall: ELSE m%=2 viewcall: ENDIF
logcall: LOCAL k%,h%,m%,s%,sec%,start$(8),swof% ESCAPE OFF IF NOT EXIST("A:LOG") CREATE "A:LOG",B,date$,t$,comment$ ELSE OPEN "A:LOG",B,date$,t$,comment$ ENDIF swof%=PEEKB($7C) POKEB $007C,0 :REM no auto turn off B.t$="00:00:00" B.date$=DATIM$ start$=RIGHT$(DATIM$,8) h%=0 :m%=0 :s%=0 :sec%=SECOND DO IF sec%<>SECOND BEEP 1,100 sec%=SECOND :s%=s%+1 IF s%=60 :s%=0 :m%=m%+1 IF m%=60 :m%=0 :h%=h%+1 ENDIF ENDIF B.t$=REPT$("0",-(h%<10))+NUM$(h%,2)+":" B.t$=B.t$+REPT$("0",-(M%<10))+NUM$(m%,2)+ B.t$=B.t$+REPT$("0",-(s%<10))+NUM$(s%,2) ENDIF AT 1,1 :PRINT "Started:";start$ PRINT "Time:";B.t$ PAUSE -1 :REM save battery k%=KEY IF k%=1 GOTO exit:: ENDIF UNTIL k%=13 PRINT "Comments "+CHR$(63) TRAP INPUT B.comment$ IF ERR=206 GOTO exit:: ENDIF CLS :PRINT "Saving" :APPEND exit:: CLOSE POKEB $007C,swof% :REM restore auto turn off ESCAPE ON viewcall: LOCAL k% TRAP OPEN "A:LOG",B,date$,t$,comment$ IF ERR :RETURN :ENDIF DO k%=DISP (-1,"") NEXT IF k%=1 RETURN ENDIF UNTIL EOF AT 1,4 :PRINT " NO MORE ENTRIES" PAUSE 25 RETURN
Variables
k% is used for the keypresses read by KEY.
sec% is the actual number of seconds past the minute at the start of
the procedure.
s% is the seconds shown counting up.
m% is the minutes shown counting up.
h% is the minutes shown counting up.
start$ is the time the call started.
swof$ is the initial setting of auto-switch off.
The data file
A data file called LOG is created on device A: with three fields in each
record: one for the date, one for the time which the call took, and one for
your comments. When you run the program and log a call the date, time and
comment are appended to the data file as a record. Select Viewcalls to look
through all the appended records.
You could also open the file A LOG in Xfiles, and search for the records
using Find.
How the stopwatch counts up the elapsed time
The actual number of seconds past the minute is read from the system clock
by the SECOND function and assigned to sec% at the start. Then the SECOND
function is used again, and if it is no longer equal to sec% - i.e. when a
second has elapsed - 1 is added to s% and sec% is assigned the actual number
of seconds again. Whenever s% is 60, it is reset to 0 and 1 is added to m%
and so on.
ESCAPE OFF
Normally ON/CLEAR pauses the execution of a procedure so that Q can be
pressed to quit. At the start of this procedure ESCAPE OFF is used. This
means that ON/CLEAR does not pause the program, and can thus be read by
the KEY and DISP functions and cause a RETURN to the PROG menu instead of
an ESCAPE error.
Displaying the records
When A:LOG is opened in viewcall, the first record is made current then
displayed by DISP with - 1 as the first parameter. Then NEXT is used to
make each record current in turn.
If you save your diary to a file, you can use this program to copy all the birthdays from one year to the next year. It could easily be adapted to deal with other annual entries too.
A saved diary file called "olddia" is opened. All the records containing 1989 and birthday have the 1989 changed to 1990 and are put into a file called "newdia". You can then restore "newdia" into your current diary and merge the two.
Remember to substitute the name of your saved diary for "olddia" when you type the procedure in.
birthday: CREATE "a:newdia",B,date$,text$ OPEN "a:olddia",A,date$,text$ WHILE FINDW("1989*birthday") PRINT a.text$ b.date$="1990"+mid$(a.date$,5,255) b.text$=a.text$ USE B :APPEND USE A :NEXT ENDWH GET
Diary files
A saved diary file is just like any other data file. However, for
more information about the format of records in diary files, see
Chapter 6.
Here is a summary of the OPL commands and functions to give you an idea of what is available. This is followed by an alphabetic list which deals with each command and function in detail.
A * indicates that the instruction can only be used on a model LZ or LZ64 and not on an XP or CM.
Structures
DO/UNTIL Loops until a condition is met
GOTO label:: Branches to a label
IF/ELSEIF/ELSE/ENDIF Acts conditionally
WHILE/ENDWH Loops while a condition is met
BREAK Exits from a loop
CONTINUE Goes to the test condition of a loop
General commands
LOCATE Positions the cursor
BEEP Sounds the buzzer
CLS Clears the display
CURSOR ON/OFF Sets the cursor
EDIT Allows a string to be edited on the screen
ESCAPE ON/OFF Allows user to break out of program
GLOBAL Declares variables for all procedures called
INPUT Allows data to be input
KSTAT Sets the keyboard status
LOCAL Declares variables for current procedure only
OFF Turns the Organiser off
OFF x% Turns the Organiser off for a limited time only*
PAUSE Pauses the program
PRINT Prints to the screen
PRINT Prints to an attached printer or computer,
RANDOMIZE Sets a new sequence of random numbers
REM Precedes a programmer's remark
RETURN Returns to the calling procedure
STOP Exits from OPL
UDG Defines a display character (user-defined graphic)*
Error handling commands
ONERR label:: Goes to label on error
ONERR OFF Cancels ONERR label::
RAISE Generates an error
TRAP Traps errors on a specified command
File handling commands
APPEND Adds current field values to current data file
CLOSE Closes a data file
COPY Copies a data file
COPYW Copies any type of file*
CREATE Creates a data file
DELETE Deletes a data file
DELETEW Deletes any type of file*
ERASE Erases a record
FIRST/LAST/NEXT/BACK Select first/last/next/previous record
OPEN Opens a data file
POSITION Selects a record by number
RENAME Renames a data file
UPDATE Updates a record
USE Changes current data file
Memory address commands
POKEB Writes a byte to an address
POKEW Writes an integer to two successive addresses
General functions
CHR$ Returns a character with a specified. ASCII code
CLOCK Displays the clock.*
FIX$ Returns a number as a fixed point decimal
FREE Returns the amount of free internal memory
GEN$ Returns a number as a string
GET Waits for a keypress. Returns ASCII value of key
GET$ Waits for a keypress. Returns the key as a string
KEY Returns the ASCII value of the key pressed
KEY$ Returns the key pressed as a string
NUM$ Returns a number as an integer
MENU Displays a menu
MENUN Displays a multi-line menu*
SPACE Returns free memory space on a device
VIEW Displays a scrolling string on the screen
Error handling functions
ERR Returns error number
ERR$ Returns error message
File handling functions
COUNT Returns the number of records in a data file
DIR$ Returns name of data file
DIRW$ Returns name of any type of file*
DISP Displays a record
EOF Tests for end of data file
EXIST Checks to see if a data file name exists
FIND Finds a record containing a string
FINDW Like FIND but allows the use of wild cards*
POS Returns the current record number
RECSIZE Returns bytes occupied by the current record
Numeric functions
ABS Returns the absolute (unsigned) value of a floating point number
ACOS Returns the arc cosine of a number*
ASIN Returns the arc sine of a number*
ATAN Returns the arc tangent of a number
COS Returns the cosine of a number
DEG Converts from radians to degrees
EXP Returns e raised to the power you specify
FLT Converts an integer into a floating point number
IABS Returns the absolute (unsigned) value of an integer
INT Returns a rounded down integer number
INTF As above, but returns a floating point number
LN Returns the natural log of a number
LOG Returns the base 10 log of a number
PI Returns pi (3.1415926535 ... )
RAD Converts from degrees to radians
RND Returns a random floating point number
SIN Returns the sine of a number.
SQR Returns the square root of a number
TAN Returns the tangent of a number
HEX$ Converts an integer into a hexadecimal string
Numeric list functions*
MAX Returns the greatest item
MIN Returns the smallest item
MEAN Returns the mean
STD Returns the standard variation
SUM Returns the sum
VAR Returns the variance
Date functions
DAYS Returns the number of days since 0 1/ 0 1 1900 - used to fInd out
the number of days between two dates*
DATIM$ Returns the date and time as a string
DAYNAME$ Converts 1-7 to the day of the week*
DOW Returns the day a date falls on as a number 1-7*
MONTH$ Converts 1- 12 to the month*
SECOND/MINUTE/HOUR/DAY/MONTH/YEAR Return Information
about the current time and date.
WEEK Returns the week number a date falls in*
String handling functions
ASC Returns the ASCII value of the first character of a string
LEFT$/MID$/RIGHT$ Select characters from strings according to their
position
LEN Returns the length of a string
LOC Returns the location of a string within a string
LOWER$/UPPER$ Convert a string to lower/upper case
REPT$ Returns repetitions of a specified string
VAL Converts a numeric string to a floating point value
Memory address functions
ADDR Returns the address of a variable
PEEKB Returns the value stored at an address
PEEKW Returns the value store at two consecutive addresses
Microprocessor functions
USR Passes values to the microprocessor and returns an integer
USR$ Passes values to the microprocessor and returns a string
Most OPL commands require one or more arguments after them. The arguments may be either literal values or variables.
The following method of specifying the syntax of a command is used:
| x | Numeric expression, variable or literal. E.g. price or 49.99 |
| x% | Integer expression in the range -32768 to +32767, variable or literal. E.g. price% or 50 |
| a$ | String expression, variable or literal. E.g. price$ or "49.99" |
| dev: | Device (A:, B: or C:) |
| log | Logical file name (A, B, C or D). |
Functions are used to produce values which can then be assigned to a variable or combined with commands such as PRINT. For example:
The instruction y%=YEAR assigns the integer value 1990 (or whatever the current year is) to the variable y%
The instruction PRINT YEAR displays the number 1990 on the screen
The method of specifying the syntax is the same as for commands.
You can tell what the return type of the function is by the type of the receiving variable shown in the syntax:
Numeric functions which return a floating point value look like this: f=FUNCTION.
Numeric functions which return an Integer look like this: f%=FUNCTION.
String functions look like this: f$=FUNCTION$.
ABS
Syntax: a=ABS(x)
Returns the absolute value, i.e. without any sign, of a floating point
number. E.g. ABS(-10) is 10.
See also IABS.
ACOS
Syntax: a=ACOS(x)
Returns the arc cosine of the expression inside the brackets.
ADDR
Syntax: a%=ADDR(var)
Returns the address at which the variable inside the brackets is stored
in memory. You can use an array as the variable, e.g.
A%=ADDR(ARRAY()), but
you can't specify individual elements of an array.
APPEND
Syntax: APPEND
Appends the current field values to the end of the current file as a
new record.
See also UPDATE.
ASC
Syntax: a%=ASC(a$)
Returns the ASCII value of the first character of a string expression.
E.g. A%=ASC("hello") returns 104.
See Appendix A for the ASCII codes.
If you just need the ASCII code for one particular character you can use
the % sign. For example, A%=%G returns the ASCII
code for the letter G to the variable A%.
See also CHR$.
ASIN
Syntax: a=ASIN(x)
Returns the arc sine of the expression inside the brackets.
AT
Syntax: AT x%,y%
Positions the cursor at the screen position you specify. x% is the number
of characters across the screen in the range 1 to 20, and y% (1, 2, 3 or 4)
indicates the top, second, third or bottom line.
ATAN
Syntax: a=ATAN(x)
Returns the arc tangent of the expression inside the brackets.
BACK
Syntax: BACK
Makes the previous record in the current data file the current record. If
the current record is the first record in the file then the current record
does not change.
BEEP
Syntax: BEEP x%,y%
Sounds the internal buzzer of the Organiser. The sound duration is k%
milliseconds. The frequency of the sound is determined by the equation
Frequency = 921600/(78+2*y%)Hz.
Alternatively, the control character 16 can be used in conjunction with the PRINT command and the CHR$ function to sound the buzzer, i.e.: PRINT CHR$(16)
BREAK
Syntax: BREAK
Allows program control to break out of a DO/UNTIL or a WHILE/ENDWH loop,
and
to continue the execution of the program at the instruction following the
terminator of the loop (UNTIL or ENDWH).
CHR$
Syntax: a$=CHR$(x%)
Returns the ASCII character with the value of the expression inside the
brackets. You can use it to print characters unavailable from the keyboard -
for example, the instruction PRINT CHR$(63) prints
the question mark character. See Appendix A for more information.
CLOCK
Syntax: c%=CLOCK(x%)
This function displays the continuously updating clock in the top
right-hand corner of the screen. x% can be 0 or 1:
| 0 | Clock not displayed or if CLOCK(1) has been used already, not updated. |
| 1 | Clock displayed. |
Returns the previous status of the clock (0 or 1).
CLOSE
Syntax: CLOSE
Closes the current file.
See also OPEN, CREATE, DELETE, USE.
CLS
Syntax: CLS
Clears the screen, and returns the cursor to the first character space on
the top line.
CONTINUE
Syntax: CONTINUE
Returns program control to the test expression of either a DO/UNTIL or
a WHILE/ENDWH loop. E.g.:
DO <statement list> IF x=y CONTINUE ENDIF <statement list> UNTIL a=b
In the example, the CONTINUE command will be executed if the expression following the IF statement is true. If this happens, program control will then be transferred to the UNTIL test.
COPY
| Syntax: | COPY "dev1:fname1","dev2:fname2" COPY "dev1:fname1","dev2:" COPY "dev1:","dev2:" |
1 In the first example, a data file on one device is copied to a file on
another device with a different filename. An example might be:
COPY "A:CLIENTS","B:CLIENT88"
If there is already a file on the destination device with the name fname2,
then the records in the file being copied over are appended to it. Otherwise
a new file is created with that name and the records written to it.
2 In the second example, the file name on the destination device is taken to be the same as that on the source device.
3 In the third example, all files on the source device are copied onto the destination device, and are given the same names on the destination device as they had on the source device.
COPYW
| Syntax: | COPYW "dev1:fname1.ext","dev2:fname2" COPYW "dev1:fname1.ext","dev2:" COPYW "dev1:*.*","dev2:" |
COS
Syntax: c=COS(x)
Returns the cosine of the expression inside the brackets. The expression
represents an angle expressed in radians.
COUNT
Syntax: c%=COUNT
Returns the number of records in the current file.
See also POS, POSITION.
CREATE
Syntax: CREATE "dev:fname",log,fld1,fld2
Creates a data file on device dev:, with the name fname, the logical file
name log, and up to 16 fields as specified by fld1, fld2 etc. The logical
file name (A, B, C or D) is used to refer to this file within the program.
Each new file is automatically OPEN, and up to four may be open at once.
An example of the command might be:
CREATE "A: CLIENTS", B, NAME$, PHONE$, ADDRESS$
In this example a data file is created on device A: with the name clients
and the logical name B. Each record In this data file can have up to three
fields.
See also OPEN, CLOSE, DELETE, USE.
CURSOR ON/OFF
Syntax: CURSOR ON or CURSOR OFF
Switches the cursor on or off. The default is CURSOR OFF.
DATIM$
Syntax: d$=DATIM$
Returns the current date and time fro m the system clock in string
format; e.g.: "MON 16 OCT 1989 16:25:30"
See also SECOND, MINUTE, HOUR, DAY, MONTH, YEAR.
DAY
Syntax: d%=DAY
Returns the current day of the month, 1 to 31).
See also SECOND, MINUTE, HOUR, MONTH, YEAR, DATIM$.
DAYNAME$
Syntax: d$=DAYNAME$(X%)
Converts x%, a number from 1 to 7, to the day of the week.
E.g.: d$=DAYNAME$(1) returns Mon.
See also DOW.
DAYS
Syntax: d%=DAYS(day%,month%,year%)
Returns the number of days since 01/01/1900. You can use this to find out the
number of days between two dates by subtracting one result from another. E.g.:
x%=DAYS(1,1,1989) y%=DAYS(DAY,MONTH,YEAR) z%=y%-x%
DEG
Syntax: d=DEG(x)
Converts from radians to degrees. Returns the value of the expression in the
brackets, an angle measured in radians, as a number of degrees.
See also RAD.
DELETE
Syntax: DELETE "dev:fname"
Deletes a data file with the name fname from device dev:. For example,
DELETE "B:CLIENTS". The file must be
closed before this command is given.
See also CREATE, OPEN, CLOSE, USE.
DELETEW
Syntax: DELETEW "dev:fname.ext"
Deletes any type of file with the name fname from device dev:. The syntax
is the same as for DELETE except that you must use a file extension to
indicate the type of file. You can also use wild cards. E.g. to delete all
the notepad files on C:
DELETEW "C:*.NTS"
For details of the file extensions, see Chapter 6.
Because DELETEW is such a powerful command, all files should be closed when it is used. If they are not, the command will close them automatically.
DIR$
| Syntax: | d$=DIR$("dev") d$=DIR$("") |
1 DIR$(dev:) returns the name of the first data file on the device specified. The device name (A, B or C) must be in quotation marks and brackets. E.g.: D$=DIR$ ("A")
2 Subsequent uses of this function with a null string in the brackets return the names of the following files on the device. When there are no more, a null string is returned.
DIRW$
| Syntax: | d$=DIRW$("dev:fname.ext"') d$=DIRW$("") |
DISP
Syntax: d%=DISP(x%,a$)
Displays a string or a record according to the value of x%. The value of x%
may be - 1, 0 or 1:
-1 a$ is ignored and the current record is displayed with one field on each line of the display. The cursor keys may be used to scroll around the record.
1 a$ is displayed as above. If a$ contains tab characters (ASCII character 9), these divide the string into different fields so the string is displayed on different lines.
0 a$ is ignored and the last displayed string or record is continued. If any key other than the arrow keys is pressed, the number of that key is returned.
No other commands or functions should be used between using DISP with x% equal to 1 or -1 and DISP with x% equal to 0. For example:
A%=DISP(1,A$) WHILE A%<>13 A%=DISP(0,"") ENDWH
This displays A$ until EXE is pressed. Clearly there can be no reason to use
any other command or function which accesses the screen in between the two
uses of DISP. Doing so may have unpredictable results. (13 is the code for
the EXE key. See Appendix A for more details.)
See also VIEW and EDIT.
DO/UNTIL
| Syntax: | DO <statement list> UNTIL x=y |
DOW
Syntax: d%=DOW(day%,month%,year%)
Returns the day of the week of the date you specify as a number from 1
to 7. (Monday is 1.) E.g. D%=DOW(25,12,1990)
returns 2, Tuesday.
EDIT
Syntax: EDIT var$
Displays a string which you can edit on the screen using the cursor keys
and DEL. var$ can be a string variable name or a field name. When you have
finished editing, press EXE to return the edited string. If you press
EXE
before you have made any changes, then the same string will be returned as
was included inside the brackets. If you press ON/CLEAR during editing, the
string will be cleared and new text may be typed. However, if the TRAP
command is used with this command and ON/CLEAR is pressed twice, the string
will be cleared and then control will pass on to the next line of the
procedure with the ESCAPE error condition being set.
See also DISP and VIEW.
ELSE See IF.
ENDIF See IF.
ENDWH See WHILE.
EOF
Syntax: e%=EOF
Tests for the End Of File. Any program instruction which
tries to read past the last record in a data file will result in
the end of file (EOF) being reached. This can be tested for like this:
DO <statement list> UNTIL EOF
The EOF function returns -1 (True) if the end of file condition has been reached, or 0 (False).
ERASE
Syntax: ERASE
Erases the current record in the current file. Following this command,
the current record will be the record after the one just deleted. If the
erased record was the last record in a file, then following this
command, the current record will be null and EOF will return true.
ERR
Syntax: e%=ERR
Returns the number of the last error which occurred. Appendix D has a list of
all the error messages in numeric order. The number returned will be in the
range 0 to 255. If 0 is returned, there is no error.
See also ERR$, RAISE, ONERR.
ERR$
Syntax: e$=ERR$(x%)
Returns an error message as a string. x% can either be a number - e.g.
E$=ERR$(240), to return the message for error
number 240, or ERR - i.e. PRINT ERR$(ERR), to print
the message for the last error which occurred. If the number is outside the
range 192 to 255, "UNKNOWN ERR" is returned.
Appendix D is a list of error messages.
See also ERR, ONERR, RAISE.
ESCAPE OFF/ESCAPE ON
Syntax: ESCAPE OFF or ESCAPE ON
Disables and enables the ON/CLEAR key. You can normally press
ON/CLEAR to pause a running program, and then Q to quit.
ESCAPE
OFF cancels the use of the ON/CLEAR key to pause. ESCAPE ON lets the
ON/CLEAR key pause the program again. This is the normal state.
Warning: If your program enters a loop which has no logical exit, and ESCAPE OFF has been used, you won't be able to quit the program unless you remove the battery from the Organiser. All data in the RAM of the machine will then be lost.
EXIST
Syntax: c%=EXIST("dev:fname")
Tests for the existence of a data file called fname on device dev:. Returns
logical true if the file exists and logical false otherwise - so EXIST can
be used on an IF statement, for example:
IF EXIST ("a:clients") <statement list> ENDIF
See also DIR$.
EXP
Syntax: e=EXP(x)
Returns the value of the arithmetic constant e (2.71828... raised to
the power of x.
FIND
Syntax: f%=FIND(a$)
Searches the current data file for the string Inside the brackets. If found,
it returns the record number where the string occurs, and makes the record
the current record. If the string is not found, zero is returned.
See also NEXT.
FINDW
Syntax: f%=FINDW(a$)
Searches the current data file for the string inside the brackets in the
same way as FIND. The difference is that you can include wild cards in the
string expression. For example, to find a record containing both "Dr" and
either "BROWN" or "BRAUN", the instruction is:
F%=FINDW("*DR*BR++N")
FIRST
Syntax: FIRST
Makes the first record in a data file the current record.
See also ERASE, NEXT, POSITION, LAST, BACK, POS.
FIX$
Syntax: f$=FIX$(x,y%,z%)
Returns a string representation of x, with y% decimal places in a field
which is z% characters wide. If z% Is negative then the string is right
justified. So:
FIX$(123456.127,2,9) ="123456.13"
FIX$(1,2,-5) =" 1.00"
If the number will not fit in the field width specified then the returned
string will contain asterisks.
See also GEN$, NUM$, SCI$.
FLT
Syntax: f=FLT(x%)
Converts the integer expression inside the brackets into a floating point
number.
FREE
Syntax: f%=FREE
Returns the number of free bytes in the work area.
See also SPACE.
GEN$
Syntax: g$=gen$(x,y%)
Returns a string representation of x in a field of width y% characters.
GEN$ tries to represent the number as integer, decimal or scientific,
in that order. If the value of y% is negative then the result will be right
justified. If the number will not fit in the field width specified then the
returned string will contain asterisks.
See also FIX$, NUM$, SCI$.
GET
Syntax: g%=GET
Waits for a key to be pressed and returns the ASCII value or special code
for that key. For example, if the A key is pressed in lower case mode, the
integer returned is 97. If the EXE key is pressed, the integer returned
is 13. See Appendix A for tables of ASCII values and special key codes.
See also GET$, KEY, KEY$, PAUSE.
GET$
Syntax: g$=GET$
Waits for a key to be pressed and returns that key as a string. For example,
if the A key is pressed in lower case mode, the string returned is "a".
See also GET, KEY, KEY$.
GLOBAL
Syntax: GLOBAL var1,var2%,var3$(length),var4(n)
Used to declare variables which will be available in the current procedure
and any procedures below it in the program.
Variable names not ending with a special sign are floating point variables; those ending with a percent sign (%) are integers; those ending with a dollar sign ($) are string variables. String variable names must be followed by the maximum length of the string in brackets.
The last variable in the example above is a floating point array. The number following it in brackets is the number of elements in the array. Array variables may be of any of the three types.
Variable names may be up to 8 alphanumeric characters long, the first of
which must be a letter. This length includes the % or $. More than one
GLOBAL or LOCAL statement may be used but they must be the first lines in
the procedure. See the chapter on variables for more information.
See also LOCAL.
GOTO
Syntax: GOTO label::
Sends program control to the line containing the label name label:: The
label must be in the current procedure, and must end with a double colon.
Labels may be up to 8 characters long excluding the colons.
HEX$
Syntax: h$=HEX$(x%)
Returns the hexadecimal (base 16) version of the integer expression inside
the brackets. For example: HEX$(255) will return
"FF".
(Hex numbers may be entered by preceding them by a $. So PRINT $FF gives 255.)
HOUR
Syntax: h%=HOUR
Returns the number of the current hour from the system clock (0 to 23).
See also SECOND, MINUTE, DAY, MONTH, YEAR, DATIM$.
IABS
Syntax: i%=IABS(x%)
Returns the absolute value, i.e. without any sign, of an integer.
E.g. IABS(-10) is 10.
See also ABS.
IF/ELSEIF/ELSE/ENDIF
| Syntax: | IF x=y <statement list> ELSEIF x=z <statement list> ELSE <statement list> ENDIF |
The ELSEIF statement is optional, but if it is included, and the following expression returns logical true - while none of the previous ones have, then the next list of statements are executed. There may be more than one ELSEIF, each with its own list of statements.
The ELSE statement is optional. If none of the preceding expressions have returned logical true, then the list of statements after the ELSE statement and before the ENDIF statement are executed.
INPUT
| Syntax: | INPUT var% INPUT var INPUT var$ INPUT log.field |
Allows data to be input from the keyboard during program execution. There are four variations.
The variable supplied must have been declared previously with a GLOBAL or LOCAL command, or be a field variable of the current file. If inputting to a string variable, you cannot exceed its maximum length.
If inappropriate input is entered, e.g. a string when the variable specified was an integer, a "?" is displayed and you can try again. However, if the TRAP command is used with INPUT, control passes on to the next line of the procedure with the ESCAPE error condition (no. 206) being set.
INT
Syntax: i%=INT(x)
Returns the integer (i.e. the whole number part) of x. Negative numbers are
rounded down, so INT(-5.3) returns -6. Used when the returned value will be
within the Organiser's integer range.
See also INTF.
INTF
Syntax: i=INTF(x)
Used in the same way as the INT function, but the value returned is a
floating point number. You may need this when an integer calculation may
exceed the Organiser's integer range, for example:
PRINT INTF(320000/3)*100
KEY
Syntax: k%=KEY
Returns the ASCII value of any key pressed. If no key has been pressed, zero
is returned. This command doesn't wait for a key to be pressed.
See also PAUSE, GET, GET$, KEY$.
KEY$
Syntax: k$=KEY$
Returns a string containing the key pressed. If no key has been pressed, a
null string is returned. KEY$ does not wait for a key to be pressed.
See also KEY, GET, GET$.
KSTAT
Syntax: KSTAT x%
Sets the state of the keyboard to SHIFT mode. CAPS mode etc. x% is a number
from 1 to 4:
1 Alphabetic - upper case
2 Alphabetic - lower case
3 Numeric - upper case
4 Numeric - lower case
LAST
Syntax: LAST
Makes the last record in a data file the current record.
See also ERASE, FIRST, NEXT, POSITION, BACK, POS.
LEFT$
Syntax: b$=LEFT$(a$,x%)
Returns the leftmost x% characters from the string specified by a$.
See also RIGHT$, MID$, LEN, LOC.
LEN
Syntax: a%=LEN(a$)
Returns the length of the string expression a$.
LN
Syntax: a=LN(x)
Returns the natural (base e) logarithm of the expression inside the brackets.
See also LOG.
LOC
Syntax: a%=LOC(a$,b$)
Returns the position in a$ where b$ occurs. E.g.
LOC("Standing","AND") would
return the value 3 because the substring "AND" starts at the third
character of the main string. If b$ does not occur in a$, zero is returned.
See also LEFT$, RIGHT$, MID$, LEN.
LOCAL
Syntax: LOCAL var1%,var2,var3$(length),var4(n)
Used to declare variables which will only be available in the current
procedure. Other procedures may use the same variable names for other uses.
See GLOBAL for more details on declaring variables.
LOG
Syntax: a=LOG(x)
Returns the base 10 logarithm of the expression inside the brackets.
See also LN.
LOWER$
Syntax: b$=LOWER$(a$)
Converts any upper case characters in the string expression inside the
brackets to lower case and returns the completely lower case string.
See also UPPER$.
LPRINT
Syntax: LPRINT x,y%;a$
Prints out to a printer. If there is no printer attached, a DEVICE MISSING
error is reported. If the Psion Printer II is attached and you get this
message, try pressing ON/CLEAR on the main menu to load the printer
software.
If items to be printed are separated by commas, there is a space between
them when printed. If they are separated by semi-colons, there are no
spaces.
A final semi-colon makes the next items printed with an LPRINT command
start immediately after these. A final comma has the same effect but inserts
a space. Otherwise the next line is used. For example, the instruction:
LPRINT "The year is", YEAR
prints
The year is 1989
The PRINT command operates like LPRINT, but displays on the screen rather than listing to a printer.
MAX
| Syntax: | m=MAX(Item1,item2,item3)
m=MAX(array(),n) |
Returns the greatest of the items in the list. The list can either be a list of items separated by commas, or the elements of a floating point array. For more details of the format of list functions, see MEAN.
MEAN
| Syntax: | m=MEAN(item1,item2,item3)
m=MEAN(array(),n) |
1 The items in the list can be any mixture of real values and integer and
floating point variables. E.g.:
m=MEAN(12,x,y%,3.6)
2 When operating on an array, the two arguments in brackets are the array name, and the number of array elements you wish to operate on. E.g.: to return the mean of the first 3 elements of an array called arr, m=MEAN(arr(),3) In the example below, 12.5 would be displayed:
LOCAL a(3) a(1)=10 a(2)=15 a(3)=20 PRINT MEAN(a(),2)
MENU
Syntax: m%=MENU(menuitem1,menuitem2...)
Displays a menu of items and allows a selection to be made from the menu in
the usual way. Returns the number of the item selected (1 to ... ). If
ON/CLEAR is pressed, 0 is returned.
The menu items are displayed starting on the top line of the screen.
MENUN
Syntax: m%=MENUN(n%,menuitem1,menuitem2...)
Displays a menu of items in the same way as MENU. However, the items are
displayed differently according to the value of n%:
n%=0 Exactly the same as MENU
n%=1 Displays a one-line menu
n%=2 Displays a multi-line menu starting on the line with the current cursor
position. Any text already display on the line above the cursor remains on
the screen.
MID$
Syntax: m$=MID$(a$,x%,y%)
Returns a string comprising y% characters of a$, starting at the character
at position x%.
See also LEFT$, RIGHT$, LEN, LOC.
MIN
| Syntax: | m=MIN(item1,item2,item3)
m=MIN(array(),n) |
MINUTE
Syntax: m%=MINUTE
Returns the current minute number from the system clock (0 to 59).
See also SECOND, HOUR, DAY, MONTH, YEAR, DATIM$.
MONTH
Syntax: m%=MONTH
Returns the current month from the system clock (1 to 12).
See also SECOND, MINUTE, HOUR, DAY, YEAR, DATIM$.
MONTH$
Syntax: m$=MONTH$(x%)
Converts x% a number from 1 to 12 to the month.
E.g.: M$=MONTH$(1) returns Jan.
NEXT
Syntax: NEXT
Makes the next record the current record in the current file. If use of NEXT
is continued beyond the end of a file, no error is reported but the current
record is a null and the EOF function returns true.
See also FIRST, LAST, BACK, POSITION, POS.
NUM$
Syntax: n$=NUM$(x,y%)
Returns a string representation of the floating point number x as an
integer in a field y% characters wide. If y% is negative then the string is
right justified. If the number will not fit in the field width specified
then the returned string will contain asterisks.
See also FIX$, GEN$, SCI$.
OFF
Syntax: OFF or OFF x%
Switches off the Organiser. If the ON/CLEAR key is pressed, program
execution will start again at the program line following the OFF command.
x% is a number from 1 to 1800. If you include this number the machine
switches off for that number of seconds only.
OPEN
Syntax: OPEN "dev:fname",log,fld1,fld2
Opens an existing data file on device dev:, with the logical file name log,
with the field names as specified by fld1, fld2 etc. That file may then be
referred to within the program by the logical file name (A, B, C or D). Up
to 4 files can be open at once. For more details see the section on opening
a file in the data file handling chapter.
See also CREATE, CLOSE, DELETE, USE.
ONERR
Syntax: ONERR label:: and ONERR OFF
If an error occurs during program execution, the ONERR label:: instruction
transfers program control to the line containing the label.
ONERR OFF cancels the ONERR label:: statement, so that any errors occurring below the ONERR OFF statement are no longer referred to the label:: It is advisable to put the command ONERR OFF immediately after the label and to test for LOW BATTERY explicitly.
PAUSE
Syntax: PAUSE x%
Pauses the program according to the value of x%:
| 0 | Waits for a key to be pressed. |
| <0 | Pauses for x% (made positive) twentieths of a second or until a key is pressed. |
| >0 | Pauses for x% twentieths of a second. |
So PAUSE 100 would cause the program to pause for five seconds. In the first two cases, the key pressed is stored in a buffer and it is wise to remove it with the KEY function:
<statement list> PAUSE 0 KEY <statement list>
The keypress stored in the buffer from the PAUSE 0 command is taken as the input for KEY.PEEKB
Syntax: P%=PEEKB(x%)
Returns the value (0 to 255) stored at the address specified by the
expression inside the brackets.
PEEKW
Syntax: p%=PEEKW(x%)
Returns the value of the two byte integer stored at addresses x% and x%+1.
PI
Syntax: p=PI
Returns the value of Pi (3.14...).
POKEB
Syntax: POKEB x%,y%
Writes the number y% which must be in the range 0 to 255, into the memory
address x%, which must be an integer. Addresses above 32767 are addressed by
negative values or hexadecimal numbers. E.g. $FFFF=-1, which corresponds to
address 65535.
Warning: Casual use of this command can result in the loss of an data in
the Organiser.
POKEW
Syntax: POKEW x%,y%
Writes the integer y% into two successive memory addresses, starting with
the address x%, with the most significant byte in the lower address.
Warning: Casual use of this command can result In the loss of an data in
the Organiser.
POS
Syntax: p%=POS
Returns the number of the current record in the current data file.
POSITION
Syntax: POSITION x%
Makes record number x% the current record in the current data file. If x% is
greater than the number of records in the file then the EOF function will
return true.
See also FIRST, NEXT, LAST, BACK, POS.
PRINT
Syntax: PRINT x,y%;a$
Prints numbers or text to the screen.
If items to be printed are separated by commas, there is a space between
them when displayed. If they are separated by semi-colons, there are no
spaces.
A final semi-colon makes the next items displayed with a PRINT command start
immediately after these. A final comma has the same effect but inserts a
space. Otherwise the next line is used. For example, the instruction:
PRINT "The year is", YEAR
displays
The year is 1989
The LPRINT command operates in the same way as the PRINT command except that it prints on a printer.
RAD
Syntax: n=RAD(x)
Converts x from degrees to radians.
See also DEG.
RAISE
Syntax: RAISE x%
Artificially generates an error, even though no such error has occurred.
If no ONERR statement has been issued previously then the appropriate
message for that error number Is displayed. The range of possible internal
errors to use as x% is 192 to 255. Refer to the chapter on error handling
for more explanation. A full list of error messages is in Appendix D.
See also ONERR, ERR, ERR$.
RANDOMIZE
Syntax: RANDOMIZE x
Gives a new seed value to the random number generator, so that a new
sequence of random numbers will be initiated. So use RANDOMIZE if you wish
to use the same sequence of random numbers more than once.
See also RND.
RECSIZE
Syntax: r%=RECSIZE
Returns the number of bytes occupied by the current record. No record may
contain more than 254 characters, so this function may be used to check that
a record may have data added to It without overstepping this limit.
REM
Syntax: REM text
The REM statement precedes a remark you include to explain how a program
works. The Organiser ignores all text after the REM statement up to the end
of that line.
RENAME
Syntax: RENAME "dev:fname1","fname2"
Renames a file on device dev: called fname1 as the file fname2. E.g.:
RENAME "B:ADDR", "OLDADDR"
REPT$
Syntax: r$=REPT$(a$,x%)
Returns a string comprising x% repetitions of a$.
See also LEFT$, RIGHT$, MID$, UPPER$, LOWER$, LEN, LOC.
RETURN
Syntax: RETURN or RETURN x
Used on its own, the RETURN command terminates the execution of a procedure
and returns control to the point where that procedure was called. Use of
this command at the end of a procedure is optional.
The RETURN command may also be used to pass a value back to the level from which the procedure was called. The value must be supplied after the RETURN command thus: RETURN X% or RETURN X or RETURN A$
A procedure may only return one type of value as indicated by the identifier which is the last character of the procedure name. So proc$: can only return a string.
RIGHT$
Syntax: r$=RIGHT$(a$,x%)
Returns the rightmost x% characters of a$.
See also LEFT$, MID$, REPT$, LEN, LOC.
RND
Syntax: r=RND
Returns a random floating point number in the range 0 (inclusive) to 1
(exclusive).
See also RANDOMIZE.
SCI$
Syntax: s$=SCI$(x,y%,z%)
Returns a string representation of x In scientific format, to y% decimal
places in a field of width of z% characters. For example:
SCI$ (123456, 2, 8) = "1.23E+05"
SCI$(1,2,8) = "1.00E+00"
SCI$(123456789,2,-9) = "1.23E+08"
If the number does not fit in the field width specified then the returned
string contains asterisks.
See also FIX$, GEN$, NUM$.
SECOND
Syntax: SECOND
Returns the current number of seconds from the system clock (0 to 59).
See also MINUTE, HOUR, DAY, MONTH, YEAR.
SIN
Syntax: s=SIN(x).
Returns the sine of the expression inside the brackets. The expression
represents an angle expressed in radians.
SPACE
Syntax: s=SPACE
Returns the number of free bytes on the current device. There must be a file
open on the device first.
See also FREE.
SQR
Syntax: s=SQR(x)
Returns the square root of the expression inside the brackets.
STD
| Syntax: | s=STD(item1,item2,item3)
s=STD(array(),n) |
STOP
Syntax: STOP
Halts execution of the language and returns the Organiser to the point where
that program was started, e.g. the main menu or the calculator.
SUM
| Syntax: | s=SUM(item1,item2,item3)
s=SUM(array(),n) |
TAN
Syntax: t=TAN(x)
Returns the tangent of the expression inside the brackets. The expression
represents an angle expressed in radians.
TRAP
Syntax: TRAP command
TRAP may precede any of these commands:
APPEND/BACK/CLOSE/COPY/COPYW/CREATE/DELETE/DELETEW/ERASE/EDlT/FIRST/INPUT/LAST/NEXT/OPEN/POSITION/RENAME/UPDATE/USE
For example, TRAP FIRST. Any error resulting
from the execution of the command will be trapped - the next program line
will be executed regardless of whether the error would normally have caused
an error message to be displayed.
UDG
Syntax: UDG x%,a%,b%,c%,d%,e%,f%,g%,h%
Defines a display character. x% is the number of the character (0-7) and the
integers a% to h% define each line of the character. For example, the
instruction:
UDG 7,0,0,0,0,0,0,0,31
Defines UDG 7 as an underline character.
See Appendix A for a full explanation of this command.
UNTIL See DO.
UPDATE
Syntax: UPDATE
The current record in the current file is deleted and the current field
values are appended as a new record at the end of the file.
See also APPEND.
UPPER$
Syntax: u$=UPPER$(a$)
Converts any lower case characters in the string expression inside the
brackets to upper case. Returns the completely upper case string.
See also LOWER$.
USE
Syntax: USE log
Selects for use the data file with the logical file name log (A, B, C or D),
which must previously have been opened with OPEN or CREATE command.
See also OPEN, CLOSE, CREATE, DELETE.
USR
Syntax: u%=USR(x%,y%)
The value of y% is passed to the D register and the value of x% is passed to
the PC register of the HD6303X microprocessor. The microprocessor then
executes the machine language program starting at the address x%. At the end
of the routine, the value in the X register is passed back to the language as
an integer.
Warning: Casual use of this function can result in the loss of all data in
the Organiser.
See also USR$, ADDR.
USR$
Syntax: u$=USR$(x%,y%)
The value of y% is passed to the D register and the value of x% is passed
to the PC register of the HD6303X microprocessor. The microprocessor then
executes the machine language program starting at the address x%. At the end
of the routine, the value in the X register must point to a length-byte
preceded string. This string is then returned.
Warning: Casual use of this function can result in the loss of all data
in the Organiser.
See also USR, ADDR.
VAL
Syntax: v=VAL(a$)
Returns a floating point number which is the value of the string expression
inside the brackets. E.g. VAL ("470.0")
would return the value 470.0. The string cannot contain any non-numeric
characters. ScientifIc notation is allowed, so
VAL("1.3E10") would return the value 1.3E10.
VAR
| Syntax: | v=VAR(item1,item2,item3)
v=VAR(array(),n) |
VIEW
Syntax: v%=VIEW(x%,a$)
Displays a$ on line number x% (1, 2, 3 or 4) on the screen. a$ can be a string, a string variable, or a field name.
If the text is longer than 20 characters, the display auto-scrolls to the
left, and pressing the left or right cursor keys allows you to change the
direction of the scroll. Pressing any other key halts the scrolling of the
text and returns the ASCII value of the key pressed. If VIEW is used again
with a$ being a null string then viewing is continued at the point it was
interrupted by a key press.
See also DISP.
WEEK
Syntax: w%=WEEK(day%,month%,year%)
Returns the week number of the date you specify. The weeks begin on Mondays,
so the 1st Monday in January is the beginning of week 1.
WHILE/ENDWH
| Syntax: | WHILE x<>y <statement list> ENDWH |
This structure is started by the WHILE command which precedes a numeric expression.
The subsequent list of statements, which must end with the ENDWH
statement, is executed while the expression returns logical true (non-zero).
See also DO/UNTIL.
YEAR
Syntax: y%=YEAR
Returns the current year from the system date (1900 to 2155).
See also SECOND, MINUTE, HOUR, DAY, MONTH.
The full character set of the Organiser is shown in the table overleaf. The more common characters can obviously just be typed from the keyboard. However, there are others which do not appear on the keys. These are accessed via the OPL CHR$ function.
By supplying the CHR$ function with the appropriate number from
the table overleaf, you can print out to the screen or the printer, or
assign to string variables, any of the characters shown. For example,
to display a question mark the instruction is:
PRINT CHR$(63)
To display a pound sign the instruction is:
PRINT CHR$(156)
You can find out the ASCII value of any of the characters on the keyboard at any time without looking at the table. You do this by typing the % sign followed by the character in the calculator. For example if you type %P in the calculator, the number 80 is returned.
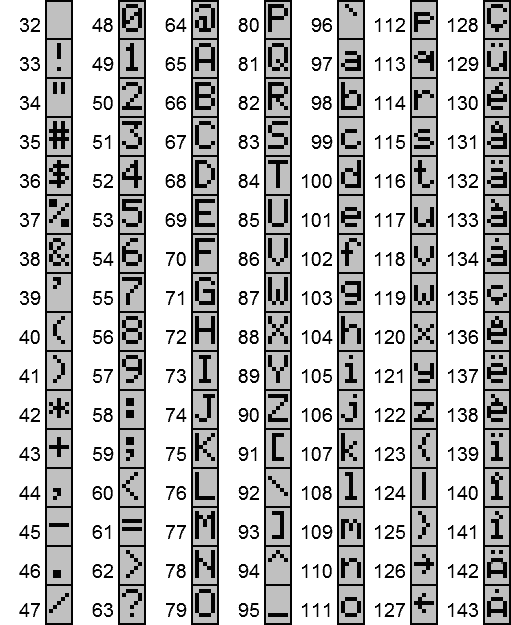
The table on these two pages shows the characters which have the ASCII codes 32 to 255. 32 is the space character.
The codes 0 to 7 are for user-defined characters. (page A-6)
The codes 8 to 31 are for control characters. (page A-5)
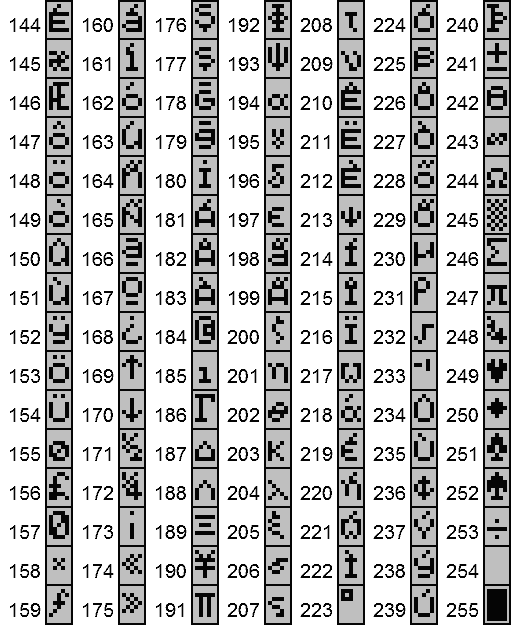
It is often useful to access the ASCII value of a character in a procedure - for example if you want to know whether a user has typed in Y or N.
To do this you can use the % sign and the character, e.g. %Y. The example below is part of a procedure in which you are asked whether or not you want to erase something. If you type N the program stops. If you type Y another procedure called erase: is called. If you type a key other than Y or N the procedure goes to a label in order to give you another chance.
PRINT "ERASE Y/N" label:: g%=GET IF g%=%N OR g%=%n :STOP ELSEIF g%=%Y OR g%=%y :erase: ELSE GOTO label:: ENDIF
When functions such as the GET and KEY functions are used, the ASCII code for the character on the key is normally returned. The keys not in the ASCII set return these numbers:
| ON/CLEAR | 1 |
| MODE | 2 |
| UP | 3 |
| DOWN | 4 |
| LEFT | 5 |
| RIGHT | 6 |
| SHIFT and DEL | 7 |
| DEL | 8 |
| EXE | 13 |
For the screen, the numbers 8 to 26 have special uses. They do not produce a visible character, but may be used in conjunction with the PRINT command produce the effects listed below. For example, the instruction PRINT CHR$(22) clears the 3rd line of the screen.
CHR$(8) Moves the cursor 1 character to the left.
CHR$(9) Moves the cursor to the next tab position. (Position 0 and 10 on the
screen.)
CHR$(10) Moves the cursor to the next line.
CHR$(11) Moves the cursor to the top left "home" position of the
display.
CHR$(12) Clears the display (equivalent to CLS).
CHR$(13) Moves the cursor to the left of the current line.
CHR$(14) Clears the top line of the display, and moves cursor to start of line.
CHR$(15) Clears the second line of the display, and moves cursor to start of line.
CHR$(16) Sounds the Organiser's buzzer.
CHR$(17) Refreshes the 1st and 2nd line.
CHR$(18) Refreshes the 1st line.
CHR$(19) Refreshes the 2nd line.
CHR$(20) Refreshes the 3rd line.
CHR$(21) Refreshes the 4th line.
CHR$(22) Clears the 3rd line of the display, and moves cursor to start of line.
CHR$(23) Clears the 4th line of the display, and moves cursor to start of line.
CHR$(24) Prints dashes, like the ones above a multi-line menu, on the 2nd line.
(uses UDG 2.)
CHR$(25) Prints dots, like the ones above a one-line menu, on the 3rd line. (uses
UDG 2.)
CHR$(26) Clears to the end of line.
CHR$(27) to CHR$(31) are reserved.
For the screen, the numbers 0 to 7 are reserved for user-defined characters. You use the UDG command to define the pattern of dots which appears when you print one of these characters with the CHR$ function.
You define each character line-by-line by a series of eight bytes, starting with the top line of the character. (From each of the eight bytes which make up the characters, only the last five bits 16 to 1 are used because the characters are only five dots across.)
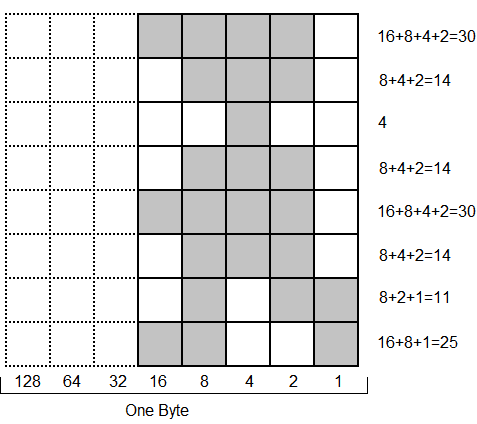
To define the running man as character number 1, you would use the instruction below. The first number is the character number and the 8 numbers after represent each line of the character.
UDG 1,30,14,4,14,30,14,11,25
Then you can use this instruction to display the man:
The screen clock, the symbols in the top left-hand corner, and the dotted lines under and over menus, all use UDGs. So, each time they are displayed, they overwrite any UDGs you have defined. You therefore have to redefine your UDGs each time you wish to display them.
This shows the UDG numbers taken up by the clock, the symbol and the underline graphics.
02 345671
X 12:45a
Edit New Run
Print Dir Copy
Delete
If you wish to display an underlined menu with a symbol and the clock, you have to use UDGs 0 and 2 for your symbol and the underline. The telephone logging program in Chapter 8 is an example of how to do this.
Dimensions (with protective case closed)
| Length | 142.0 mm |
| Width | 78.0 mm |
| Depth | 29.3 mm |
| Weight | 250 grams. |
Display
Four line by twenty character alphanumeric dot-matrix liquid crystal display.
Keyboard
A total of thirty six keys including editing, cursor, alphabetic, numeric,
MODE and ON/CLEAR.
Microprocessor
HD6303X Crystal frequency 3.6864 Mhz.
Memory
ROM: 64K
RAM: 32K LZ, 64K LZ64
Extra EPROM 8/16/32/64/128K - from Datapaks.
Extra RAM 32K - from Rampak.
Clock
Real time clock with 32768 Hz crystal frequency source.
Storage medium
EPROM (Erasable, Programmable. Read Only Memory)
Data retention
'Mean time to failure' 50 years at temperatures up to 100'C
Formatting
30 minutes in Psion Formatter clears Datapak. Can be re-formatted up
to 100 times
Memory capacity
| 8K Datapak | 8192 bytes |
| 16K Datapak | 16384 bytes |
| 32K Datapak | 32768 bytes |
| 64K Datapak | 65536 bytes |
| 128K Datapak | 131072 bytes |
Storage medium
Battery backed-up RAM.
Formatting
Format option in Utils clears Rampak.
Memory capacity
32768 bytes.
Standard alkaline 9 volt long-life battery. Mains adaptor available.
Psion has a policy of continuous product development Small modifications arising from this are not necessarily reflected in this manual.
These addresses are used for certain system variables. You access them with PEEKB, PEEKW, POKEB and POKEW. You should only use these commands if you know what you are doing.
| Address | Default | Use |
| $0069,$006A | ($04) | Horizontal scroll delay counter |
| $006B,$006C | ($0A) | Vertical scroll delay counter |
| $0077 | ($0E) | Delay before keyboard auto-repeat |
| $0078 | ($00) | Keyboard auto-repeat counter |
| $007C | non-zero | Auto-switch off flag, 0 disables |
| $20CB,$20CC | Frame counter, increments every 50ms | |
| $20CD,$20CE | ($012C) | Default number of seconds to auto-switch off |
| $00A4 | ($00) | Buzzer mute. Non-zero mutes |
| $2099 | ($F5) | Border character round 2-line mode procedure. |
| $20C0 | ($01) | Length of key click. 0 is silent |
| $20A7 | ($1F) | Sets bits for workday alarms.
The default is $1F - Monday to Friday:
MSB LSB 1 | F 0 0 0 1 | 1 1 1 1 Sun Sat Fri Thu Wed Tue Mon |
The Organiser Model LZ has 64K of ROM and 32K of RAM in the following arrangement. Model LZ64 has two extra 16K RAM banks as indicated.
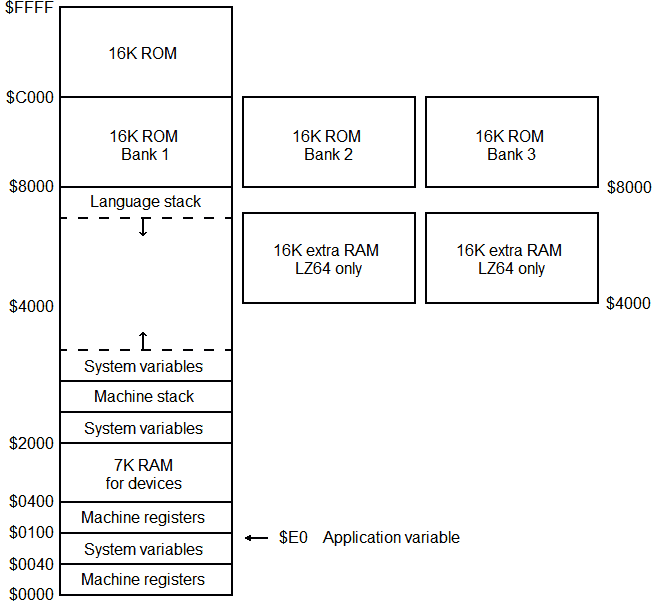
To get a hexadecimal number in OPL, prefix it with a $ identifier - for example $FF is 255.
The Organiser's CPU (Central Processor Unit) is the HD6303X microprocessor. This advanced processor can be programmed directly, in its own language called machine language or machine code.
Machine language programs run far faster than OPL programs and take up less memory, but they are much more difficult to write and debug. Also, a simple mistake in a machine language program can easily wipe out all of the information stored in the internal memory of the Organiser, as these programs take over full control of the chip at the heart of the machine.
To avoid this, it is wise to save all important data to a pack before testing machine language programs, so that all will not be lost if the machine loses all its data, or 'crashes'.
The error messages are listed in numeric order. If you find it difficult to locate a message because you do not know the number, find what page it's on by looking it up in the index. Error trapping is covered in Chapter 7.
192 DEVICE WRITE FAIL
Usually occurs when a pack is faulty or when an attempt is made to write to
a write-protected program pack. Also occurs when an attempt is made to format
a Datapak rather than a Rampak in the Utils Format option or when Comms Link
fails.
193 DEVICE READ FAIL
Usually occurs when a pack is faulty or when trying to copy from a
copy-protected pack or when Comms Link fails.
194 BATTERY TOO LOW
The battery is low. Switch off and see Chapter 1 of the operating manual on
how to change the battery.
195 INTEGER OVERFLOW
The range of numbers allowed for integer variables (-32768 to +32767) has
been exceeded.
196 FILE NOT OPEN
An attempt has been made to write to or read from a file which is not open.
197 BAD PROC NAME
Occurs when an invalid procedure name is given. For instance, in New in Prog
or inserted in the main menu.
198 RECORD TOO BIG
No record may exceed a total of 254 characters.
199 FILE IN USE
An attempt has been made to open a file which is already open, or to delete
a file which is open.
200 READ PACK ERROR
The data in a Datapak cannot be read and the pack needs re-formatting.
201 FIELD MISMATCH
Occurs when a field variable used does not match any of those in the current
file.
202 MENU TOO BIG
The string supplied to the MENU function is too large and must be shortened.
203 MISSING PROC
A procedure has been called which does not exist on any device.
204 MISSING EXTERNAL
A variable has been encountered which has not been declared in a calling
procedure as a global variable and has not been declared in the current
procedure as a local or global variable.
205 ARG COUNT ERR
An incorrect number of arguments has been supplied to a procedure.
206 ESCAPE
The ON/CLEAR key followed by Q has been pressed during program execution,
halting that program.
207 BAD FIELD LIST
Any file must contain at least one and not more than sixteen fields. Occurs
when an attempt is made to exceed these limits.
208 BAD ASSIGNMENT
An attempt has been made to assign a value to the wrong type of variable -
for example by the statement a$=4.3
209 BAD LOGICAL NAME
An illegal logical name has been used: i.e., not A B, C or D.
210 MISSING COMMA
A comma has been omitted from a list of items which should be delimited
by commas throughout.
211 MISSING LABEL
An attempt been made to GOTO a label which does not exist in the current
procedure.
212 TOO COMPLEX
Structures within a procedure have been nested too deeply. The limit is 8.
213 STRUCTURE ERR
An IF/ENDIF. WHILE/ENDWH or DO/UNTIL structure has been incorrectly
nested.
214 DUPLICATE NAME
The file, procedure or variable name given is already in existence on the
current device.
215 BAD ARRAY SIZE
An array has been declared with an illegal number of elements,
e.g. GLOBAL name$(0,15)
216 BAD DECLARATION
A variable has been declared incorrectly - e.g. GLOBAL name$(300) - where the
length of the string exceeds the maximum allowed.
217 NO PROC NAME
An externally created program file has been introduced which does not have a
valid procedure name as its first line.
218 BAD NUMBER
A number which cannot be evaluated properly has been used. E.g. 2.3.4
219 BAD CHARACTER
A non-valid character such as ? or @ has been included in a calculation
string or an expression.
220 STRING TOO LONG
A string has been produced which exceeds the space allocated with the GLOBAL
or LOCAL commands. E.g.:
LOCAL a$(10) A$="123456789ABCDEF"
221 MISMATCHED "
Occurs when quotation marks are not paired up correctly.
222 BAD IDENTIFIER
An incorrectly formed variable name has been used, e.g. name$$.
223 NAME TOO LONG
The specified file, procedure or variable name exceeds the maximum number
of characters allowed: eight characters including the $ or % qualifier.
224 TYPE MISMATCH
A value has been assigned to variable of the wrong type, e.g. a$=12 or
a="text", or a procedure parameter has been given a value of the wrong
type.
225 SUBSCRIPT ERR
An out of range subscript has been specified for an array variable e.g. a(0)
or a(10) when the array a() has been declared as having 9 elements.
226 BAD FN ARGS
An illegal number or type of arguments has been supplied to a function,
e.g. LOG(-1).
227 MISMATCHED ()'s
Brackets have not been paired up correctly.
228 SYNTAX ERR
A syntax error has been detected during the translation of a procedure.
229 DEVICE LOAD ERR
A program or peripheral pack has been removed during its
verification by the Organiser or the pack has become corrupted.
230 DEVICE MISSING
An attempt has been made to access a device which is not present, e.g. a
printer. When no printer is connected, the LPRINT command will produce this
error.
231 BAD DEVICE CALL
Occurs if an illegal operation is requested of a device.
232 PAK NOT COPYABLE
An attempt has been made to copy a pack which is copy-protected.
233 DIRECTORY FULL
Only 110 data files are allowed on each device. An attempt has been made to
create a file which exceeds this limit.
234 FILE NOT FOUND
An attempt has been made to access a file which does not exist on the
specified device.
235 FILE EXISTS
An attempt has been made to create a file or procedure under a name which
already exists on that device.
236 BAD FILE NAME
A file name has been specified which does not conform to the rules. (Max 8
characters, alphanumeric starting with a letter.)
237 BAD RECORD TYPE
Occurs only when running machine language programs.
238 END OF FILE
Occurs when an attempt is made to read past the end of a data file.
239 PACK FULL
An attempt has been made to write to a full Datapak.
240 UNKNOWN PACK
A pack not supported by the Organiser II has been fitted to one of the
devices.
241 PACK NOT BLANK
Datapak needs formatting as data remnants are still present.
242 PACK CHANGED
Occurs when calling operating system machine language routines or when a
pack is changed in the middle of a COPY.
243 BAD DEVICE NAME
A device name other than A, B or C has been used.
244 READ ONLY PACK
An attempt has been made to write to a program pack. These may be read from,
but not written to.
245 WRITE PACK ERR
The Organiser cannot write data to one of the Datapaks. Try re-fitting it.
246 NO PACK
There is no Datapak fitted to the device named in an instruction such as
CREATE, OPEN etc. or a pack has been removed during pack access.
247 FN ARGUMENT ERR
The wrong type of argument has been passed to a function or a user's
procedure.
248 STACK UNDERFLOW
Will only occur when users machine language program destroys the Organiser's
stack.
250 NUM TO STR ERR
Only occurs when calling operating system machine language routines.
251 DIVIDE BY ZERO
An attempt has been made to divide by zero.
252 STR TO NUM ERR
A non-numeric string has been passed to the VAL function.
253 EXPONENT RANGE
A number has exceeded the exponent limit of + or -99.
254 OUT OF MEMORY
Either the internal memory of the machine is fully occupied by programs,
diary entries and data files, or the current program has used up all
available memory.
255 NO ALLOC CELLS
Seen only when running machine language routines which access internal
buffer space.
$ sign
for hexadecimal numbers
for string variables
on procedure name
% sign
for integer variables
on procedure name
used to access ASCII values
? character
displaying
æ sign
displaying
A
aborting running procedures
ABS function
syntax and summary
ACOS function
syntax and summary
ADDR function
syntax and summary
addresses in memory
AND, logical operator
explained
APPEND command
explained
syntax and summary
ARG COUNT ERR
arithmetic operators
array variables
example integer array
ASC function
syntax and summary
ASCII codes
accessing with %
ASCII values, accessing
ASIN function
syntax and summary
AT command
syntax and summary
ATAN function
syntax and summary
B
BACK command
explained
syntax and summary
BAD ARRAY SIZE error
BAD ASSIGNMENT error
BAD CHARACTER error
BAD DECLARATION error
BAD DEVICE CALL error
BAD DEVICE NAME error
BAD FIELD LIST error
BAD FILE NAME error
BAD FN ARGS error
BAD IDENTIFIER error
BAD LOGICAL NAME error
BAD NUMBER error
BAD PROC NAME error
BAD RECORD TYPE error
BATTERY TOO LOW error
BEEP command
syntax and summary
branches
BREAK command
explained
syntax and summary
C
calculator memories
as OPL variables
characters
accessing ASCII code
control
printing non-key ones
user defined
user-defined, example
CHR$ function
explained
syntax and summary
Clock
technical details
UDGs used by
CLOCK command
example of
syntax and summary
CLOSE command
explained
Syntax and summary
CLS command
explained
syntax and summary
CM
translating procedures for
COM, file extension
commas, in OPL syntax
concatenating strings
CONTINUE command
syntax and summary
control characters
Copy
Prog menu option
COPY command
syntax and summary
copying
procedures
COPYW command
file extensions for
syntax and summary
COS function
syntax and summary
COUNT function
syntax and summary
CREATE command
explained
syntax and summary
D
data files
changing current in OPL
closing in OPL
creating in OPL
example program for handling
handling in OPL
opening in OPL
Datapaks
technical details
DATIM$ function
syntax summary
DAY function
explained
syntax and summary
DAYNAME$ function
syntax and summary
DAYS function
syntax and summary
declaring variables
explained
LOCAL and GLOBAL
DEG function
syntax and summary
Delete
Prog menu
DELETE command
syntax and summary
DELETEW command
file extensions for
syntax and summary
DEVICE LOAD ERR
DEVICE MISSING error
DEVICE READ FAIL error
DEVICE WRITE FAIL error
DIA, file extension
diary files
example program for handling
format of records in
dimensions of Organiser
Dir
Prog menu option
DIR$ function
syntax and summary
directory
of procedures
DIRECTORY FULL error
DIRW$
file extensions for
DIRW$ function
syntax and summary
DISP function
syntax and summary
display
technical details
DIVIDE BY ZERO error
DO/UNTIL command
syntax and summary
DO/UNTIL commands
explained
syntax and summary
DOW function
syntax and summary
DUPLICATE NAME error
E
Edit
Prog menu option
EDIT command
syntax and summary
editing
procedures
ELSE statement
syntax and summary
End
OPL editor menu option
END OF FILE error
EOF function
syntax and summary
ERASE command
explained
syntax and summary
erasing
procedures
ERR function
explained
syntax and summary
ERR$ function
syntax and summary
error messages
errors
common OPL errors
generating for debugging
messages
run-time
ESCAPE error
ESCAPE ON/OFF command
risks of
syntax and summary
escaping from procedures
escaping from procedures
EXIST function
syntax and summary
EXP function
syntax and summary
EXPONENT RANGE error
F
FIELD MISMATCH error
fields
field names
field qualifiers
handling in OPL
input to
FILE EXISTS error
file extensions
FILE IN USE error
FILE NOT FOUND error
FILE NOT OPEN error
files, any type
handling in OPL
Find
OPL editor menu option
FIND function
explained
syntax and summary
FINDW function
example of
syntax and summary
FIRST command
explained
syntax and summary
FIX$ functions
syntax and summary
floating point variables
explained
precedence in OPL
range
rounded down
type conversion
FLT function
syntax and summary
FN ARGUMENT ERR
FREE function
syntax and summary
G
GEN$ function
syntax and summary
GET function
accessing ASCII codes
explained
numbers returned by
syntax and summary
GET$ function
syntax and summary
GLOBAL command
syntax and summary
GOTO command
explained
syntax and summary
HEX$ function
syntax and summary
hexadecimal numbers
Home
OPL editor menu option
HOUR function
syntax and summary
I
IABS function
syntax and summary
IF/ELSEIF/ELSE/ENDIF command
explained
syntax and summary
INPUT command
explained
in example input routine
syntax and summary
INT function
syntax and summary
INTEGER OVERFLOW error
integer variables
explained
range
type conversion
INTF function
syntax and summary
K
KEY function
numbers returned by
syntax and summary
KEY$ function
syntax and summary
KSTAT command
syntax and summary
L
labels
with ONERR command
labels with GOTO command
LAST command
explained
LEFT$ function
explained
syntax and summary
LEN function
syntax and summary
LN function
syntax and summary
LOC function
syntax and summary
LOCAL command
explained
syntax and summary
LOG function
syntax and summary
logical expressions in OPL
logical file names
logical operators
with floating point values
with integer values
loops
breaking out of
endless, how to avoid
maximum nested
LOWER$ function
syntax and summary
LPRINT command
syntax and summary
M
machine language
main menu
running procedures from
MAX function
syntax and summary
MEAN function
syntax and summary
memories, calculator
as OPL variables
memory maps
MENU TOO BIG error
messages, error
microprocessor, technical details
MID$ function
explained
syntax and summary
MIN function
syntax and summary
MINUTE function
syntax and summary
MISMATCHED " error
MISMATCHED ()'s
MISSING COMMA error
MISSING EXTERNAL error
MISSING LABEL error
MISSING PROC error
MONTH function
syntax and summary
MONTH$ function
syntax and summary
N
NAME TOO LONG error
names
of procedures
of variables
New option
NEXT command
explained
syntax and summary
NO ALLOC CELLS error
NO PACK error
NO PROC NAME error
NOT, logical operator
explained
NTS, file extension
NUM TO STR ERR
NUM$ function
O
ODB, file extension
OFF command
syntax and summary
ONERR command
explained
syntax and summary
OPEN command
explained
syntax and summary
operators
available in OPL
precedence in OPL
OPL, file extension
OPO, file extension
OPT, file extension
OR, logical operator
explained
OUT OF MEMORY error
P
PACK CHANGED error
PACK FULL error
PACK NOT BLANK error
PAG, file extensions
PAK NOT COPYABLE error
parameters
explained
multiple
returning
PAUSE command
syntax and summary
PEEKB function
syntax and summary
PEEKW function
tax and summary
PI function
syntax and summary
PLN, file extension
POKEB command
syntax and summary
POKEW command
syntax and summary
POS function
syntax and summary
explained
POSITION command
explained
syntax and summary
pound sign
displaying
PRINT command
explained
syntax and summary
Printing procedures
procedure names
length and format
procedures,
copying
creating
editing new
editing old
erasing
escaping from
escaping from
examples
Introduction to
listing/printing
names
names format
quitting out of
quitting out of
renaming
running from main menu
saving
translating
translating for XP/CM
Prog menu
summary of
program labels
programs
See procedures
programs, examples
Q
question mark
displaying
Quit, Prog option
quitting running procedures
quitting running procedures
quotation marks in strings
R
RAD function
syntax and summary
RAISE command
explained
syntax and summary
RANDOMIZE command
syntax and summary
READ ONLY PACK error
READ PACK ERROR
RECORD TOO BIG error
records
adding to file in OPL
changing current in OPL
erasing in OPL
finding in OPL
RECSIZE function
syntax and summary
REM command
syntax and summary
RENAME command
syntax and summary
renaming procedures
REPT$ function
syntax and summary
RETURN command
syntax and summary
RETURN command (OPL)
explained
RIGHT$ function
explained
syntax and summary
RND function
syntax and summary
Run
Prog menu option
running procedures
S
Save
Prog menu
saving
procedures
SCI$ function
syntax and summary
SECOND function
syntax and summary
semi-colons, in OPL syntax
SIN function
syntax and summary
Slicing strings
SPACE function
syntax and summary
SQR function
syntax and summary
STACK OVERFLOW error
STACK UNDERFLOW error
STD function
syntax and summary
STOP command
syntax and summary
STR TO NUM error
STRING TOO LONG error
string variables
explained
strings
concatenating
explained
maximum length
quotation marks in
slicing
STRUCTURE ERR
SUBSCRIPT error
SUM function
syntax and summary
SYNTAX ERR
system variables
operations upon
T
TAN function
syntax and summary
TOO COMPLEX error
Tran, Prog option
translating procedures
TRAP command
explained
syntax and summary
trapping errors in OPL
type conversion, automatic
type conversion, string/numeric
TYPE MISMATCH error
U
UDG command
explained
syntax and summary
UDGs
example program using
example program using
explained
UNKNOWN PACK error
UNTIL command
syntax and summary
UPDATE command
syntax and summary
UPPER$ function
syntax and summary
USE command
explained
syntax and summary
user defined characters
explained
user defined graphics
example program using
USR function
syntax and summary
USR$ function
syntax and summary
V
VAL function
syntax and summary
VAR function
syntax and summary
variables
array
explained
floating point
GLOBAL v LOCAL
int./floating pt. conversion
integer
names
operations upon
string
VIEW function
syntax and summary
W
WEEK function
syntax and summary
weight of Organiser
WHILE/ENDWH command
explained
syntax and summary
WRITE PACK ERR
X
XP
translating procedures for
Xtran
OPL editor option
Y
YEAR function
syntax and summary
Z
Zap
OPL editor menu option