NRG Surveys
User's Guide for the Psion Organiser
Welcome to NRG. This booklet describes the facilities available on the Psion and explains how to use them. (For material relevant to NRG software for MS-DOS or Windows, please consult the relevant user's guides or system tutorial.
If you have any difficulties or suggestions, please contact NRG on +44 (0) 1248 681240 (voice) or +44 (0) 1248 680914 (fax).
NRG Surveys, Castle View, Station Road,
Llanfairfechan, Gwynedd, LL33 0AN
Contents
How to Read this Manual Setting Up The System Where to Put the Packs Sexagesimal Entry Control Stations Setting Out Setting Out by Coordinates Setting Up Design Strings Creating Strings on the Psion Typical Summary Setting Out from Design Strings Key Presses Display Modes Set Out Main Menu Reference Obs Menu Reference Setting Out to Design Strings and Checking Work Profiles Batter Rails Piles/Random Coordinates Tunnels Circular Tunnel Shape Custom Tunnel Shape Entering Shapes Trackwork Data Logging Changing Measurement Mode Sectioning Offsetting Surveying 1 Face 2 Face Traversing Traverse Menu Data Transfer to the PC Psion Troubleshooting Communications Appendix Saving System Configuration Printer Settings Setting Up Instruments to Transmit Sokkisha or Pentax Instruments Setting Out Profiles Displaying Information With Custom Programs Index
How to Read this Manual
Much of this manual contains instructions in parallel with indications of Psion screen output. Through the manual, anything output by the Psion is represented in a sans serif or monospaced typeface.
Psion menu optionS are indicated in the main text by [brackets]. Note that for clarity we have sometimes ignored the Psion's habit of displaying everything in capitals - [SectF] is clearer for Section Forward than [SECTF].
Setting Up The System
Where to Put the Packs
Coordinate and station files are stored on B:. In order to allow frequent updating a RAMpack is recommended for use in B:. Should no pack be present, device A: (Psion internal memory) will be used.
String data is stored on pack B: or C: and the program pack may be used in either slot.
Sexagesimal Entry
Note that 123° 45' 56" is represented and should be entered as 123.4556.
Control Stations
Prior to taking the Psion into the field enter the control stations into its control file as follows.
Select [Sta] from menu2 by using the cursor keys.
| Press EXE | Control Station |
| Select [Add]. | Add Edit Del Read Print Quit |
| Confirm [Add]. | Add Menu |
| Enter the station name;
its easting; its northing; and its altitude. |
Stn East North Alt |
| Select [Add] again to add new points or [Menu] to return to the station editor menu. | Add Menu |
Setting Out
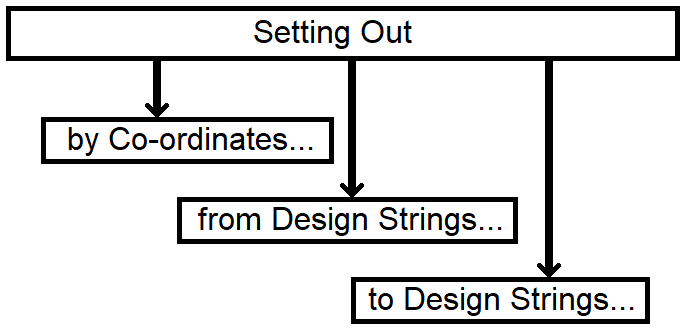
Setting Out by Coordinates
Store coordinates you are likely to need using [Fman] (file management).
| Options | PRC RPC File OccLast LOg Compar Mode | |
| PRC | Polar to rectangular coordinates | |
| RPC | Rectangular to polar coordinates | |
| File | Select coordinate file for setting out and logging to | |
| Occlast | Occupy last observed point | |
| Log | Log observed points as coordinates to coordinate file. | |
| Compare | Compare observation point, if servo instrument is used it will turn instrument to desired direction. | |
| Mode | Change setting out modes. | |
| To set out, select RPC. | PRC RPC File
OccLast LOg Compar Mode |
Setting Up Design Strings
The design strings used by the Psion are three dimensional lines defined by their position and direction
Attached to these strings are roadworks widths, crossfalls and verge details.
These strings may be downloaded from the PC.
Creating Strings on the Psion
The strings are created on pack B:, the RAMpack, and when complete may be copied across to C:. A copy utility is provided for this in [Fman] which copies all files with similar first character.
Note: this is only necessary if you wish to use the additional space on the program pack for permanently storing string information.
The horizontal and vertical alignments may be typed in directly from MOSS, BIPS or similar summary. The crossfalls and widths are usually shown on the drawings.
Typical Summary
| Horizontal Alignment Data | String Ref: M001 | Operator:Ivan | Date:05SEP1991 |
| Elt. No. | Chainage Start | Chainage of Origin | Eastings of Origin | Northings of Origin | Bearing of Origin | Radius | R*L |
| 1 | 1504.958 | 1504.958 | 14545.042 | 3342.795 | 097,56,51 | 0.000 | 0.000 |
| 2 | 2948.316 | 2948.316 | 15974.531 | 3143.227 | 097,56,51 | 999999.99 | 71620.320 |
| 3 | 3018.531 | 3018.531 | 16403.958 | 3132.722 | 099,55,10 | 1020.000 | 0.000 |
| 4 | 3338.004 | 3408.220 | 16406.289 | 2995.470 | 119,50,14 | 1020.000 | 71619.810 |
| 5 | 3478.135 | 3478.435 | 16467.590 | 2961.238 | 117,51,56 | -1020.000 | 0.000 |
| 6 | 3940.571 | 3940.571 | 16910.406 | 2843.530 | 091,54,23 | -1020.000 | 0.000 |
| Vertical Alignment Data | String Ref: M001 | Operator:Ivan | Date:05SEP1991 |
| Elt.No. | Chainage Start | Level | Radius |
| 1 | 1504.958 | 108.177 | 13755.200 |
| 2 | 1742.248 | 112.239 | -11261.261 |
| 3 | 2399.073 | 109.993 | 16940.252 |
| 4 | 3179.947 | 102.546 | -30030.030 |
| 5 | 3821.149 | 104.364 | 45045.045 |
| 6 | 4341.241 | 103.288 | 0.000 |
| Crossfall Data | String Ref: M001 | Operator:Ivan | Date:05SEP1991 |
| Elt. No. | Chainage Start | Crossfall % left/ Alternate File | Crossfall % Right/ Alternate File | Type of Crossfall |
| 1 | 1904.958 | -2.500% | -2.500% | *REGULAR* |
| 2 | 2948.315 | -2.500% | -2.500% | *SUPERELEVATED* |
| 3 | 3018.531 | 3.500% | -3.500% | *REGULAR* |
| 4 | 3338.004 | 3.500% | -3.500% | *SUPERELEVATED* |
| 5 | 3478.435 | -3.500% | 3.500% | *REGULAR* |
| 6 | 3940.000 | -3.500% | 3.500% | *REGULAR* |
| Width Data | String Ref: M001 | Operator:Ivan | Date:05SEP1991 |
| Elt. No. | Chainage Start | SOL to 1st Left Edge | SOL to 2nd Left Edge | SOL to 1st Right Edge | SOL to 2nd Right Edge |
| 1 | 1504.958 | -1.250 | -10.550 | 1.250 | 10.550 |
| 2 | 3940.000 | -1.250 | -10.550 | 1.250 | 10.550 |
Please note the following:
Radius on transition is the smallest radius the spiral achieves.
For roads that "loop" it is convenient to split the strings so that no point may be relative to the same string twice.
Create Vertical Strings
| Select [Vert]. | Horiz Vert Xfl Width List Dir |
| Select:
[Create] to create a new file; [Edit] to edit an existing file; [Add] to add to an existing file. | Create Edit Add |
| To create a new file: | |
| Enter the string reference. | Filename: |
| Enter the element number. | Element No.: |
| The consecutive number will be displayed at the bottom right of the screen. | 1 |
| Enter data. | Chain Start: Level Start: Radius Start: |
| Enter 0 to end data entry. | Element No.:0 |
| Enter end of string data. | Chain End: etc. |
| Select [Save] to save data. | Add Edit Save |
Create Crossfall Strings
| Select [Xfl]. | Horiz Vert Xfl Width List Dir |
| Select:
[Create] to create a new file; [Edit] to edit an existing file; [Add] to add to an existing file. | Create Edit Add Save |
| Enter string reference. | Filename: |
| Enter element number. | Element No.: |
| The consecutive number will be displayed at the bottom right of the screen. | 1 |
| Enter data. Crossfall left % Crossfall right % | Chain Start: Crossfall L: Crossfall R: |
| If crossfall is unknown, enter 100 then enter alternate file or reference, e.g. slip road, retaining wall, etc. | Crossfall L: 100 Alternate: |
| Select [Regular] or [Superelevated] element. | Regular Superelevated |
| Enter 0 to end data. | Element No.: 0 |
| Enter end of string data. | Chain End: etc. |
| Select [Save] to save data. | Add Edit [Save] |
Create Width Strings
| Select [Width]. | Horiz Vert Xfl Width List Dir |
| Create Edit | |
| Enter the string reference. | Filename: |
| Select [Dual] or [Single] lane carriage-way. | Dual Single |
| Enter element number. | Element No.: |
| The consecutive number will be displayed in the bottom right of the screen. | 1 |
| Enter data. | Chain Stan: SOL to 1st LE: SOL to 2nd LE: |
| Enter second edge only if dual lane. | SOL to 1st RE: SOL to 2nd RE: |
| Enter 0 to end data entry. | Element No.: 0 Chain End: etc. |
| Select [Save] to save data. | Add Edit Save |
Setting Out from Design Strings
| Select [SetOut] from the main menu. Press EXE. | Fman SetOut Com Obs Mis Sur Sta |
| The Setting Out menu is displayed. | SetOut Nsta Ntgt NRef Log String Interval Mode OBS |
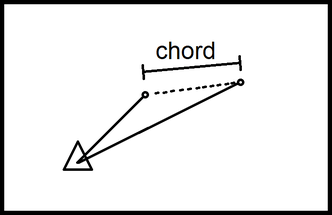
| To specify what information you want the Psion to display, select [Mode]. | WCB HCR RECT MEAS FRL TUNNEL BATTER TRACK CHORD Custom |
| To calculate setting out information for a point, select [SetOut]. | SetOut Nsta Ntgt NRef Log String Interval Mode OBS |
| You are prompted for the chainage and offset. | CH: O/S: |
| When you have entered the chainage and offset, the setting out information is displayed. | (Answer, such as...) HCR: HD: |
| You can then enter a new point by pressing EXE. | |
| Use ON/CLEAR to return to the menu. |
To display different information, change the display mode using the [Mode] menu command. When you're actually looking at a point, you can use the MODE key as a shortcut for this.
Key Presses
| ↑ | Step back | MODE | Change display mode* |
| ON/CLEAR | Quit | EXE | Continue |
| → | Increment number by interval* | ||
| ← | Decrement number by interval* | * if valid | |
Display Modes


Set Out Main Menu Reference
| SetOut | Input chainage and offset to display answers (according to selected mode) |
| Nsta | Go to new occupied station |
| Ntgt | Change to new target height |
| NRef | New reference object (sets the horizontal reading to the RO, and checks height and distance readings are correct). |
| Lng | Survey point and record as coordinate in current coord file. |
| String | Enter new string name for use in calculations |
| Interval | Scroll interval for chainages (scroll using ← and → ) |
| Mode | Change display mode |
| OBS | Coordinate setting out and survey programs (see below) |
Obs Menu Reference
| PRC | Polar to rectangular coordinates |
| RPC | Rectangular to polar coordinates (see Mode) |
| FILE | Change current coordinate filename |
| OccLast | Uses the last point surveyed as the new occupied station |
| Log | Survey point and log as a coordinate into current coordinate file. The system continues logging until ON/CLEAR is pressed to return to menu. |
| Mode | Alter display mode. |
Setting Out to Design Strings and Checking Work
This technique relates surveyed data to design, eliminating the setting out process.

Profiles
Note
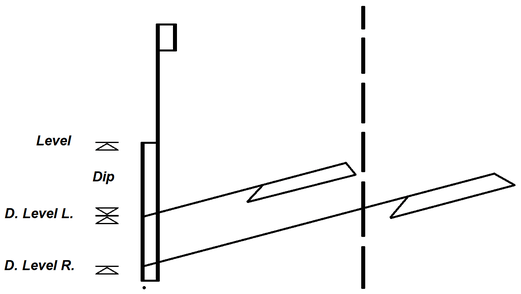
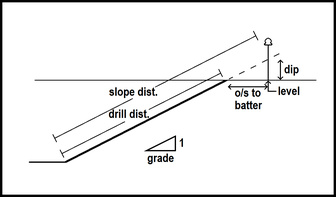
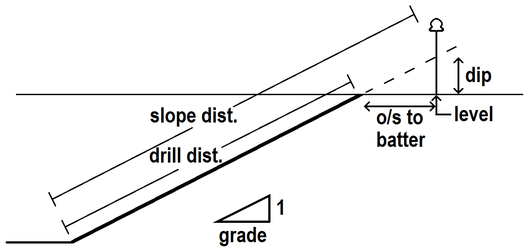
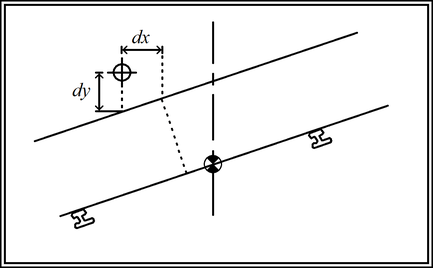
Batter Rails
| Batter rails may be calculated from:
[Obs] observations; [Co-ords] known co-ordinates; [Offsets] known chainage and offsets; [Auto] using Obs file collected from survey module. | Batters Profiles Tunnel Co-ords |
| Obs Co-ords Offsets Auto File | |
| The answers from Auto may be used at any time using [File].
Chainage and offset are calculated as with profiles. | |
| If no verge file is present: | No Verge File |
| Enter verge Width. | Verge Width: |
| Enter difference in level of the back of the verge to the channel (see diagram). | Diff BOV - Channel |
Piles/Random Coordinates
| Vector comparisons against an existing file of coordinates. | Fman Pro Obs Com Mis Typ Sur Sta |
| Select [Coords]. | Batter Profiles Tunnel Coords |
| Enter the filename containing the design coordinates (entered through Fman or from PC). | Coord file: |
| Select [Y]es or [N]o to printed output. | Hardcopy Y/N: |
| Enter the name of an observation file already created using [Survey]. | Obs file B:? Busy... |
| The computer will then reduce the observations to coordinates and using the label attached to the observed point will display (or print) the differences to the relevant point. | Diff E: Diff N: |
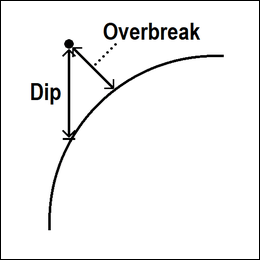
Tunnels
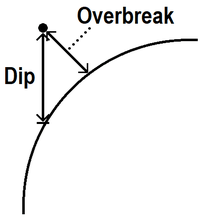
Overbreak/underbreak is calculated in relation to a design string and shape. The shape may be circular or custom.
Circular Tunnel Shape
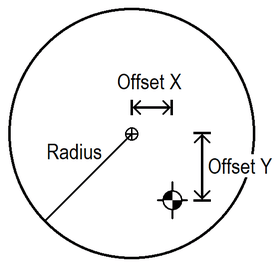 where the relation to the string and radius are input. | Batters Profiles Tunnel Coords |
| Circular Custom | |
| String: Radius: Ctr Offset X: Ctr Offset Y: |
Custom Tunnel Shape
 | ||
| where the design shape is entered as a string. | Circular [Custom] | |
| String: | alignment string | String: |
| Shape: | shape string | Shape: |
| Select output to printer. | Hardcopy Y/N: |
| Select output to screen. | Screen Y/N: |
| If the approximate chainage is known this will speed calculations considerably, so enter Y. Note that the search begins from the value entered, so err on the low side. | Is approximate chainage known Y/N: |
| The tunnel may be calculated by:
[Obs] field observations; [Co-ords] known co-ordinates; [Offsets] known chainage and offsets; [Auto] using an obs file collected from the survey module | Obs Coords Offsets Auto |
| Enter the approximate chainage if selected. | Approx CH? Thinking... |
| The easting and northing of the point entered are displayed. | E: N: |
| The computed chainage and offset are displayed. | CH: O/S: |
| The level of the point and the computed overbreak are displayed. Note: negative overbreak means underbreak. | Level: Overbreak: |
| For circular tunnels a dip is also reported. | Dip: |
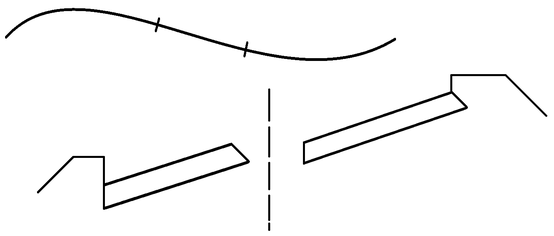
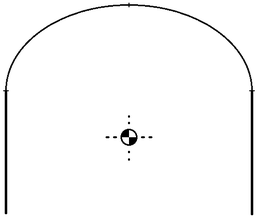
Entering Shapes
Shapes may be entered:
- through the NRG for Windows Shape Editor, or
- using the Create menu on the Psion. In this case shapes are entered as
horizontal alignments, where the easting and northing values are replaced
by offsets to the string. For example, the shape sketched below would be
represented by a string with the following first element:

ELEMENT 1
Chain Start: 0
Chain Origin: 0
Easting Origin: -5.000
Northing Origin: -4.000
Bearing: 0
Radius: 0
NOTE: Concave shapes are not permitted.
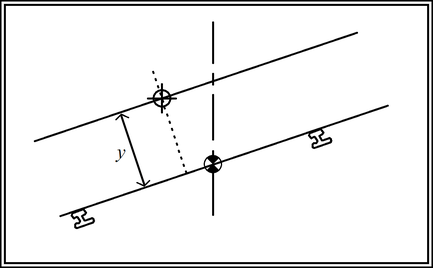
Trackwork
Data Logging
Important: ensure instrument and Psion are switched OFF.
Connect Psion to instrument via Comms Link.
Set up instrument to communicate to serial port. (See appendix for instrument settings.)
Options
| ↑ | increase point number in 100s |
| ↓ | decrease point number in 100s |
| → | increase point number in 1s |
| ← | decrease point number in 1s |
| EXE | accept feature code displayed and point number, and execute measurement to this point |
| ON/CLEAR | return to survey menu |
| MODE | go to sectioning menu |
| Any other key | will be taken as the start of a new point label or feature code. Enter point label and press EXE. |
Changing Measurement Mode
Sectioning
| To aid the stringing of line types a section function is provided allowing up to 50 points on a section to be defined. |
To record the features displayed above, the following procedure may be adopted.
Press MODE at point 1 to enter the section menu.
Offsetting
| To use the offset facility select [Offset]. | Cont NSta Ntgt Offset |
| Observe to the reflector and measure. | Label? |
| Select either distance or angular offset. | Distance Offset Angle Offset |
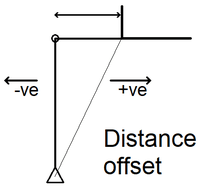
| Observe to the reflector then enter offset distance. |
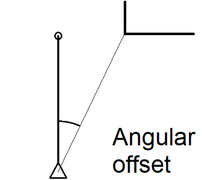
| Observe to the reflector then observe again to the object. |
Surveying
| In addition to the facilities provided in data logging, Obs may also be used for on-site reduction of observations. | Fman Pro Obs ComMis Typ Sur Sta |
| Enter station details (FREE, FREE3 and NEAR are accepted). | Occ Sta: E = N = Alt = |
| Select 1 or 2 Face Obs. | 1 Face 2 Face |
1 Face
| Enter observations to reference object. | Tgt Ht.: HCR to R.O.: VCR to R.O.: SI. D. to R.O.: |
| Errors are reported. | Ht. Err.: D. Err.: |
| At the Obs menu, select [Obs]. | Obs NSta NTgt |
| Enter observations to point. | Label: HCR: VCR: SI. Dist.: |
| Co-ordinates are displayed. | E= N= Ht= |
2 Face
Traversing
A traverse program is provided allowing entry and reduction of traverse observations.
| Press EXE. | |
| Select instrument. | AGA400 WILDT1 WILDT2 WILDT3 |
| Enter filename to take traverse. | Filename: |
| If the file already exists, select [NewName] to enter a new name, [Delete] to delete the existing file, or [Append] to add to the existing traverse. | NewName Delete Append |
| Upon starting a new traverse, enter the opening reference object. The co-ordinates will be taken from the station file and displayed for editing. | Back Stn: Back E: Back N: Back Alt: Back Tgt: |
| Enter occupied station name and details. Instrument heights and target heights need only be selected if station levels are required. | Occ Stn: Occ E: Occ N: Occ Ch: |
| Enter the forward target height if known. Otherwise enter 0 and the instrument height will be used when this is entered for the forward station. | Frwd Stn: Frwd Target or 0: |
| Target heights are closely monitored with instrument heights, and the program will query if changes appear to have been made. |
Traverse Menu
| Options: | Traverse NSta Print Edit Close Serve System Quit |
| Traverse: Take observations from current occupied station.
Nsta: Change occupied station. Print: Print all raw observations taken so far. Edit: n/a Close: close traverse and apply adjustments as required. | |
| Save: save observations taken so far. It is important to do this regularly.
System: set up printers, instrument, etc. Quit: exit traverse program. | WARNING! If the battery goes whilst saving, the data may be lost! Ensure good batteries are used. Use RAMpacks wherever possible (they take less power). Save regularly to a backup file. |
Data Transfer to the PC
Psion Troubleshooting

|
CommunicationsErrors reported on the Psion are:
|
Appendix
Saving System Configuration
Connect Comms Link.
With the packs inserted into the Psion, press ON/CLEAR and the NRG main menu will be displayed.
No special setting up needs to be done, since the appropriate questions will be asked when they are needed.
If you wish to dedicate the Psion to your peripherals then select [System] from the main menu.
| Select your printer. | DM580 P80 |
| Enter the route to get to the data. (See Transferring Data; usually c:/nrg/[jobname].) | Data on PC stored where? |
| Select your instrument. | AG/X400 WILDT1 WILDT2 WILDT3 |
| Enter the distance and height errors you will accept on checking the instrument setup. | Max. Distance Error: Max. Height Error: |
| Select angular measurement mode. | Degrees Grads |
This data will be stored on the Psion itself and will need to be re-entered whenever you change your batteries. Alternatively you can copy A:SYSDAT to C: using the Psion copy function, but this may only be changed around ten times due to the available space on the datapack.
Printer Settings
| Baud | Parity | Bits | Stop Bits | Handshake | Width | |
| DM50 | 1200 | even | 8 | 1 | RTS+DTR | 132 |
| P80 | 4800 | none | 8 | 2 | RTS+DTR | 80 |
| PC | 9600 | even | 8 | 1 | XON | 80 |
| Psion | not applicable | |||||
Setting Up Instruments to Transmit
NRG supports a wide range of measuring instruments, and we are always prepared to add more. You can input data from non-Psion data loggers using the "Import to NRG" command on the Data Conversion Menu (q.v.). However, you must first set up your instrument to send its output through the serial port. Instructions on how to do this for the instruments supported are included in the Help material on the Psion Data Menu and are reproduced here for reference.
You need to perform the following operations, which can be done by making the exact keystrokes listed.
Note for all Wild instruments
Before sending data to the Psion it is necessary to send a 'standard data block'. To ensure that this block is sent, make the following keystrokes on the instrument.
SET REC ±99 RUN REC SET REC 99 RUN REC
Wild T1000 Old
| Turn ? to off | [SET SET SET REC] |
Wild T1000 New
| data output | [SET 5 7 5 RUN ALL] |
| or emulate T2000 and select T2 on Psion |
[SET 5 7 4 RUN TEST] |
Wild TC1000
Select TC1 New on Psion.
| Set up TC1000 if necessary: | Screen Display | |
| SET MODE 7 5 RUN ALL RUN | COM | |
| SET MODE 7 6 RUN ALL RUN | GRE | |
| SET MODE 7 0 RUN REP RUN | 9600 | |
| SET MODE 7 1 RUN DATA RUN | EVEN | |
| SET MODE 7 3 RUN TEST RUN | CR | |
(The MODE key is the one labelled 5 on the panel. If the screen display is not correct, then use the REP key to cycle between options.)
Wild T1600/TC1600
| SET MODE 7 0 RUN 6 RUN | 9600 |
| SET MODE 7 1 RUN 2 RUN | EVEN |
| SET MODE 7 3 RUN 1 RUN | CR LF |
| SET MODE 7 5 RUN 0 RUN | DATA |
| SET MODE 7 6 RUN 0 RUN | GRE |
The TC 1600 uses CR instead of CR+LF and uses COM instead of DATA. You can select these by pressing REP to cycle between options.
Wild T2000/TC2000/T2000S
| SET MODE 79 RUN 0 RUN | |
| SET MODE 75 RUN 0 RUN | GRE off |
| SET MODE 70 RUN 4 RUN | 2400 baud |
| SET MODE 71 RUN 2 RUN | even parity |
| SET MODE 73 RUN 1 RUN | CR LF |
(Note: the TC2000 uses CR instead of CR+LF. Use the REP key to cycle between options.)
Geotronics instruments
| Set Communications | [ MNU | 4 {Data Comm} |
| 1 {Select Device} | ||
| 2 {Serial} | ||
| Yes {Serial On} | ||
| Set Parameters to | COM=1.8.0.9600 | |
| Enter table number | 0 | |
| Reg. Key? | No | |
| Slave? | Yes ] | |
Topcon GTS3B
| Switch the instrument off. | |
| Switch on with [R/L] held down. | 0 SET displayed |
| Move telescope as normal. | FAC.. is displayed then disappears |
| 00 is displayed | |
| Press [ | 10.?? |
| Press [VH] twice. | 12.?? |
| Press [R/L] to change 6th character to 1. | 12.??.?1 |
| Press [REP] to change 5th character to 0. | 12.??.01 |
| Press [0 SET]. | 12.01 |
| Press [VH]. | 13 is displayed. |
| Press [VH]. | 14 is displayed. |
| Press [0 SET]. | 14 SET is displayed. |
| Switch off. |
Sokkisha or Pentax instruments
These instruments will set themselves up automatically when switched on.
If the instrument that you want is not listed. Contact NRG at the number given on the cover page, and we will try to develop a convertor for it.
Setting Out Profiles
| Select [Pro]files from menu2. Press EXE. | Fman SetOut Com Mis Typ Sur Sta Pro |
| Profiles | |
| Select points to be offset from the design line (SOL);
or edge of carriageway as defined by width strings; or back of verge as defined by verge defaults. | SOL Edge |
| Select by pressing Y or N the information required. | Levels: Co-ordinates: Polars: |
| The Psion displays tangential bearing, widths, crossfalls and grade level. | T.Brg., W, G, L: |
| Choose whether to output to the printer. | Hardcopy: |
| Choose whether to output to the screen. | Screen: |
| Enter string reference name. | File: |
| If offsets and interval are constant then start and end chainage may be entered. | Offsets constant? Y/N |
| Otherwise enter each chainage in turn. | Chainage: Offset L: Offset R: |
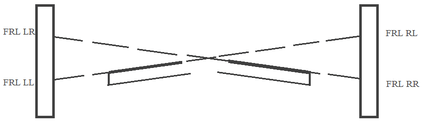
| After a short pause, levels will be displayed if selected. Otherwise the next chainage will be requested. | CH: L: R: FRL LL: FRL LR: FRL RR: FRL RL: Xfall L: Xfall R: |
| pleted and co-ordinates will be displayed if requested. | Chainage: 0 |
| The co-ordinates are now stored and may be accessed for setting out. If polars are selected then setting out may begin. | |
| Enter the name of the occupied station. FREE, FREE3 and NEAR are again all valid. | Occ Sta: |
| Select:
[Ref] to obtain reference bearings; [NSta] to change station; [Polar] to display bearings and distances. | Ref Polar NSta NTgt PRC Quit |
| Chainage and offset will be displayed first. | CH: L: R: |
| Press EXE to continue or S to calculate slope distance. | Brg L: Dist L: |
| Press EXE to continue or S to calculate slope distance. | Brg R: Dist R: |
| ← to scroll back through chainages → to scroll forward through chainages ON/CLEAR to skip to menu EXE to display next chainage | Press ← → or EXE |
Displaying Information With Custom Programs
If you know how to program the Psion using OPL, you can call custom programs from the Setting Out menu. You access custom programs by selecting the Custom display mode option (see Setting Out from Design Strings).
To do this, you need to write a program called CUSTOM. (If you want a selection of functions, just have CUSTOM display its own submenu.) CUSTOM knows the chainage and offset entered, but is responsible for collecting any additional data required and for all its own output. Refer to the Psion Organiser manual for information about programming in OPL.
Your custom procedure can see a number of variables provided by NRG. These are global variables; be sure that you know what you are doing if you modify them.
The following NRG global variables are available to custom programs:
Index
Symbols 1 face (2) 2 face (2) A angular measurement angular offset approximate chainage auto (2) B back of verge batter rails (2) branch C checking work close traverse co-ordinates (2) coaxial instrument Comms Link (2) (3) (4) communications troubleshooting compare trackwork control stations coordinate files crossfall (2) (3) regular superelevated custom program calling cut D data logging data transfer datapack design batter design strings (2) creating setting out to dip (2) directory distance errors (2) (3) distance offset download (2) dump E example F feature code (2) file management (2) fill Fman. See file management forward station (2) (3) free station (2) (3) (4) free3 (2) G grade (2) gradient H height errors (2) (3) horizontal alignments horizontal index errors I index changed? index errors instrument (2) coaxial instrument instruments setting up L label (2) (3) (4) last station (2) list log M main menu manual observations entry measurement (2) measurement mode menu2 (2) (3) (4) misclosure N near station (2) (3) (4) O observations Obs menu occupied station (2) (3) offset angular distance offsetting orientation overbreak P peripherals piles point number (2) PRC. See observations print printer (2) (3) (4) printer settings profiles (2) R radius RAMpack (2) random coordinates receive reduction (2) reference object (2) resection RL value RPC (2) S serial port setting out (2) Set Out menu setting out by coordinates setting out from design strings (2) setting out to design strings setting up instruments sexagesimal entry shapes custom tunnel entering slope distance (2) (3) station (2) (3) (4) control station file (2) station files string data strings creating strings survey surveying system configuration T tangential bearing target height (2) (3) (4) (5) total station trackwork (2) transition transmit traversing troubleshooting tunnel (2) typical summary U underbreak V verge verge details vertical alignments (2) vertical index errors W width (2) (3)