NUMBASE DISCLAIMER
IMPORTANT - PLEASE READ BEFORE
OPENING THIS PACKAGE
This document is an agreement between yourself and Eidersoft Software Limited. By opening this package, and thus breaking the seal, you are agreeing to become bound by the conditions of this Limited Warranty.
If you do not agree with these conditions, DO NOT OPEN THE PACKAGE. Instead, return the entire package promptly to the address at the bottom of this page for a full refund. Please note that if the package has been opened or tampered with in any way, a full refund may be refused. Your statutory rights are not affected.
WARRANTY AND DISCLAIMER
The media onto which the software has been copied is guaranteed against faults tor a period of 12 months only. Further, Eidersoft Software Limited does not warrant, guarantee or make any representations regarding the use, or results of use, of the software or written materials in terms of correctness, accuracy, reliability, correctness or otherwise. The entire risk as to the results and performance of using this software is assumed by you. If the media or written materials are defective in any way, you and not Eidersoft Software Limited or its dealers, distributors, agents or employees, assume the entire cost of returning the package for all necessary servicing, repair and correction.
Eidersoft will not in any event be liable for any loss, including consequential loss, caused by any error, defect or failure of the program, or howsoever otherwise arising, including but not limited to loss of use, loss of stored data, loss of profit or loss of contracts.
Due to the complex nature of the statistics section, we recommend that it only be used by people who have an understanding of statistics and statistical calculations.
Eidersoft does not guarantee to give any support regarding the software and its use.
* EIDERSOFT SOFTWARE LTD *
* UNIT 4 STANNETS - LAINDON NORTH TRADE CENTRE *
* BASILDON - ESSEX - SS15 6DJ *
EIDERSOFT NUMBASE
REGISTRATION/GUARANTEE
DOCUMENT
We  regret that we cannot give any guarantee for our software
unless this form is completed  and  returned  to  us  at  the
address below.


NAME      ___________________________________________________

ADDRESS   ___________________________________________________

          ___________________________________________________

          ___________________________________________________

POSTCODE  ______________________   TEL NO.  _________________

DATE OF PURCHASE  ______/______/___________

DEALER NAME       _________________________

Which Organiser items do you already own?  __________________

_____________________________________________________________


Please  indicate any new software applications you would like
for the Psion Organiser.

_____________________________________________________________

_____________________________________________________________

_____________________________________________________________
THANK YOU
Eidersoft Software Ltd, Unit 4 Stannets
Laindon North Trade Centre
Basildon, Essex. SS15 6DJ
14/10/1987
1.1 Introduction 1.2 Getting Started 1.3 Formats 1.3.1 Demonstration Formats 1.3.2 Setting Up a New Format 1.3.3 Format Input Limits 1.3.4 Ending Format Setup 1.4 Directories 1.5 Date and Time Stamping 1.6 Interchanging Formats 1.7 Format Design 1.8 Default Filenames 1.9 Where to Store Files 2.1 Main Menu 2.2 Input 2.3 Search 2.4 Display 2.5 Files 2.5.1 Copy 2.5.2 Delete 2.5.3 Export 2.5.4 Dir (Directories) 2.5.5 Rename 2.5.6 Space 2.5.7 Returning to Main Menu 2.6 Stats (statistics) 2.6.1 Interactive Analysis 2.6.1.1 Mean + S.D 2.6.1.1.1 Selection of Records 2.6.1.1.2 Selection by Column 2.6.1.1.3 Analysis by Field or Column 2.6.1.1.4 Output or Menu + S.D 2.6.1.2 Frequency Distribution 2.6.1.2.2 Frequency Distribution Output 2.6.1.2.2.1 Output to Screen 2.6.1.2.2.2 Output to Printer 2.6.1.2.2.3 Output to Easel 2.6.1.2.2.4 Output to Abacus 2.6.1.3 Linear Regression 2.6.1.4 T-Tests 2.6.1.5 Chi-Squared Test 2.6.2 Tasks 2.6.3 Display 2.6.4 Functions 2.7 Print 2.7.1 Printing Data 2.7.2 Printing Format 2.8 Off 2.9 Mode 2.10 Quit 2.11 Format 2.11.1 Adding Fields to Format File 2.11.2 Deleting Fields from Format File 2.12 Bleep 3.1 RS232 Link 3.2 Error Messages and Problems 3.2.1 OUT OF MEMORY 3.2.2 STR TO NUM Error 3.2.3 Non-Numeric Val in Record 56 3.2.4 Selection Left No Records! 3.2.5 RS232 Link Not Setup 3.2.6 Other Messages Chapter 2 - Communications And File Transfers
NUMBASE STATSPACK is a general purpose DATA-CAPTURE and STATISTICAL database program written in OPL, the programming language on the PSION ORGANISER. It has been written for people with an understanding of the Psion Organiser II and statistics. IT HAS NOT BERN DESIGNED TO BE AN INTRODUCTION TO OR A TEACHING AID FOR STATISTICS.
The ORGANISER II is a very powerful computer that offers real portability and excellent data security. Unlike disk-driven portable computers, the ORGANISER II is not sensitive to dust, magnetic fields or extremes of temperatures and has no moving parts. Nor does it need an external power supply and has a remarkably low battery consumption. The ORGANISER is an EPROM-writer which means that it stores its data on removal micro-chips called EPROMS. The acronym EPROM stands for Erasable Programmable Read-Only Memory. Data stored on an EPROM is almost indestructible and can be retained indefinitely without a power supply. This means that the PSION ORGANISER II and NUMBASE are ideal for collecting data anywhere from the Sahara to the Antarctic!
With the help of NUMBASE you can collect vast amounts of information and analyse the data yourself using NUMBASE's own statistical routines.
You can set up a database with up to 254 separate "Fields" or questions of your own choice, and you can have up to a total of 254 characters or letters per record. This gives plenty of scope to collect information such as the results from social or epidemiological surveys, scientific experiments, exam results, questionnaires or anything else you night have in mind. The only limit to the number of records you can have are the size of your Datapaks. For example, with 128K datapaks you can have 1200 records which each contain 100 pieces of information! Even on 32K datapaks you can have more than 1500 records that contain 20 pieces of information.
NUMBASE can calculate means, standard deviations, standard errors, confidence limits, Skewness, frequency distributions, linear regression, Student's T-tests and the chi-squared test. You can select records for the analysis by any field or columns, any number of times so you have full control of the of your analysis. For example, you could select all females aged 12 years in social class 3 who answered "Yes" to question 4!
NUMBASE has some of the most commonly used statistical functions built in. NUMBASE offers the Normal Distribution, the Inverse Normal, T-Distribution and Inverse T, and Chi-squared Distribution und Inverse Chi. One of the most powerful features of this program is that you can "batch" process your analysis.
This means that you can set up a list of statistical tests you want the computer to carry out and then go away and leave the machine to do all the work. It can print out the results, if you have a printer or it can even send the output directly into your own word-processor.
The PSION ORGANISER II is a surprisingly fast computer. Programs written in OPL on the ORGANISER II are equivalent or faster than Microsoft BASIC running on an IBM-AT. This speed is enhanced because data-access from EPROMS is as fast as RAM. Most other computers are slowed down by relatively slow disk-drives.
There are no other computers that compare in terms of size, portability, and speed. The combination of such fast processing speed and batch processing overnight, means that NUMBASE and the ORGANISER II can analyse sets of data, that five years ago, would have only been considered feasible on a large mainframe computer.
Another useful feature of this program is that you can "export" your graphs directly into PSION's graphic program EASEL, for instant graphic displays or you can send them into PSION's spreadsheet program ABACUS for further analysis.
The PSION ORGANISER II is ideal for collecting vast quantities of information and then transferring it to a larger computer for analysis. NUMBASE allows you to transfer your information to other computers in a compatible format. If you are running ARCHIVE on a Sinclair QL or with PSION's XCHANGE on an IBM-compatible PC, NUMBASE will write out your information so that you can "import" directly. It will also write out the data for other program such as dBASE II, dBASE III and Framework, Survey Plus, or in a general purpose form that almost any other computer can use.
The program has been designed mainly for numeric information. If you want to use the PSION ORGANISER II to collect textual data with variable field lengths, such as names and addresses, you can do this with EIDERSOFT's TEXTBASE program.
Before you use NUMBASE, it is highly recommended that you read Section 1 of your ORGANISER II operating manual. This will give you a general feel for the machine and will greatly assist you when you come to use NUMBASE.
This NUMBASE user's manual explains how to use the program to enter data and carry out statistical analyses, but it assumes that you have a basic understanding of statistics. If this is not the case, there are many suitable textbooks available for the user who is interested in statistics and would like to know more.
Plug in the datapak containing the program NUMBASE into slot B: (top slot). You can call the program from the main menu just as you would call the diary or the calculator. When in the main menu, position the cursor where you want the new option NUMBASE to go and press the MODE key. Then type in "NUMBASE" and press EXE. NUMBASE will now appear on your main menu, and will work just like all the other options.
Alternatively, choose the proc option from the main menu by pressing the "P" key. You will now be in the PROG menu. Choose RUN option by pressing the "R" key. Type in NUMBASE, and press the MODE key until the datapak B:, is shown, then press EXE key. Normally, you would store your data on a datapak in slot C:.
As a general rule, use firm but quick key presses, as prolonged key presses can he interpreted as pressing the key twice.
Once you have started the program, you will he greeted by the title.
*****Numbase**** **by EIDERSOFT**
The program will wait for you to read the information and then continue after you have pressed any key (except ON/CLEAR which has a special effect - see below). Whenever information is presented the computer waits, and it will only continue if you press a key.
The first question the computer asks is for the format filename. A format is a set of fields, questions, or variable names that you want the computer to ask you when you are entering in information. So that you don't have to keep re-entering in all the fieldnames every time you use the program, these sets of fieldnames are stored in a format file.
Another way to think about format files is to consider a rectangular block of data with each record (data relating to one subject) in rows and the fields in columns. See diagram below which shows how the data is arranged in the computer.
                      COLUMNS ------>
                              SOC
          CODE   |SEX|  AGE  |CLA|    HEIGHT       |   WEIGHT
       1 | 2 | 3 | 4 | 5 | 6 | 7 | 8 | 9 | 10 | 11 |12 | ...254
Record---+---+---+---+---+---+---+---+---+----+----+---+
  1  | 0 | 0 | 1 | 1 | 1 | 2 | 3 | 1 | . | 3  | 4  | 0 |
  2  | 0 | 1 | 7 | 0 | 1 | 2 | 5 | 1 | . | 5  | 6  | 0 |
  3  | 0 | 2 | 0 | 1 | 1 | 2 | 4 | 1 | . | 2  | 4  | 0 |
From this you can see that the fieldnames CODE uses columns 1-3, SEX uses column 4 and so on.
when you design a format file it is you who decides how the columns should be allocated and to which fieldnames. The format file stores all this information about the fieldnames, field-types, field lengths. This information defines the structure of your database.
Two demonstration format files have been created and stored with the program on your NUMBASE program pack. The first is a simple 7 field format for collecting information about children's weight and height and is called B:FSURVEY. A second more complex Format File has also been constructed and this is called B:FWHO. This format has been designed for collecting Oral Health Survey data for the World Health Organisation. It allows the ORGANISER II to be used by dental epidemiologists to enter data directly rather than collect it paper forms such as the one in Appendix 4. The format structure is shown in Appendix 3.
NOTE: When using these format files, no NOT forget to change the DATAFILE pack to A: or C:. You cannot open a datafile on pack B: as it is "Read Only".
If this is the first time that you have used the program, or you want to create a new format, you must enter a new FORMAT filename. The screen will display;
Format Filename A:F
You will note that pack A: in shown and the letter "F". It is recommended, but not essential, that you use the letter "F" at the beginning of format filenames.
Do not use non-numeric or non-alphabetic characters such as spaces or "/" or dots. Filenames have a maximum of eight characters.
Examples of valid filenames would be:
A:FSURVEY1 for surveys
B:FS1 " "
C:FEXP1 for experiment
These filenames would be invalid:
A:FSURV.1 A:FSURV 1 A:FEXP/1 A:FEXP,2
You can use datapaks to store your data. To do this change the pack (A: or C: - Not B: because the program should be in that slot) by pressing the MODE key, either before, or at any tine while entering the filename.
Lets suppose that you want to do a study to examine a group of children to see if there was a relationship between weight, height and social class. In our example, call the FORMAT filename A:FSURVEY, by typing in "SURVEY" and pressing the EXE key. The computer will detect that it is a new filename and asks you whether or not you want to "Make a new format" and you can reply by press "Y" or EXE key. The fieldnames you would need would be something like this;
CODE code number
SEX 0 for female, 1 for male
AGE in years
SOC CLASS categories 1-5
HEIGHT in metres
WEIGHT in Kilograms
After confirming that you want to make a new format file the computer asks for the first field.
1st Field: :
Type in "CODE" and press EXE key.
The computer will ask if it is text or numeric information.
Field-type:- Numeric Text
You can reply by selecting "N" for numbers, or "T" for letters, i.e. someone's name. Choose by moving the cursor with the arrow keys on to the appropriate choice and pressing EXE. or by pressing "N" or "T". Note that when you later come to entering data, the keyboard mode (text or numbers) will automatically change according to how you have designed your format. However, the shift and "cap" keys still work, so it is possible to enter letters by pressing the shirt key and "cap", and shift and "num".
With NUMBASE you can only analysis numerically coded date so it is best to avoid letter codes if you want to analyse the data with NUMBASE's statistical routines. However, if you plan to analyse the data on another computer you can use any codes.
The computer now displays
CODE:(N) No. Columns:
The "(N)" just tells you that it is Numeric. The computer is asking you how many columns you want to reserve for this field. so you must now tell it how many digits you will need for the information in "CODE". This will, of course depend on how large the code numbers are. For a small study with less than a thousand, three columns would be adequate.
The screen now displays:
Set Input Limits OK (Y/N)?
This is asking you if you want to restrict the values that can be entered into this field. The main purpose of this is to pick-up accidental errors when the data is entered. For example, the fieldname SEX can only have two possibilities, male and female. You could use the codes 0 and 1 for the two sexes, and could set the upper and lower input limits so that the computer rejects any other values. Similarly, SOC CLASS would probably have 1 to 5 as the only valid entries, so you could set the limits accordingly. If you do set Input Limits, later, when you enter a value outside your limits, for example, 9, the computer will beeps and displays:
Out of Range! 1 - 5
which informs you of the numbers that you have set as valid.
For the fieldname, CODE, it is unlikely that you will want to set any limit, so you can press "N" key to reject the option.
(Note: the computer itself dictates that there are certain limits to the values it can excepted but these limits are very unlikely to be exceeded as they are plus or minus 10 to the power 99!!)
The computer now asks you to confirm that you have set up field 1 correctly and displays the information;
CODE:(N) Col 1-3 OK (Y/N)?
The "N" in brackets denotes "Numeric" and that columns 1 to 3 have been assigned to CODE. Press "Y" or EXE if it is correct, else press "N" and you will have an opportunity to re-enter it.
It will now go on to the "2nd Field". Type in "SEX" and so on. You will note that column 4 is assigned to SEX. You will need only 2 columns for AGE if you are only going to record only years, otherwise you will need 4 columns for numbers such as "13.7" because the decimal place occupies one column. Columns 5-6 will be assigned to AGE, if you choose 2 digits. The fields HEIGHT and WEIGHT will also require 4 and 5 columns respectively, if want 2 decimal places. i.e. 2.15 and 40.35.
When you get to "SOC CLASS" there is a slight problem if you plan to export the file to PSION's Archive program running on another computer as this other program will not accept a space between "SOC" and "CLASS". If this is the case it would be best to omit the space. otherwise it does not matter and you can type in "SOC CLASS".
When you are up to field 7, but have no more fields to enter, press EXE instead of entering another fieldname. This will tell the computer that you have finished your list of fields. The screen will display;
End Setup? OK (Y/N)?
If you have made a mistake and want to delete the last field, you can answer "N" to this question. The computer will then ask you;
Alter Format:- Add Delete
Press "A" if you want to add more fields and press "D" to delete the last field. If you choose to delete the screen will display;
Delete Last Entry (No. 6)? OK (Y/N)?
If you do, it will delete this last field and ask you if you want to Delete Again. This is referring to the next last field, and you can delete this too if you desire. You can delete all the fields if you really want to! After deleting fields, press "N" to the above question and you will be given the earlier question;
Alter Format:- Add Delete
Choose "A" this time and then you can then re-enter the fields as before.
This method of altering formats is used in the Format option which is available from the main menu (Section 2.11) To finish either press ON/CLEAR or press EXE to the Field? question as above. After confirming that you have finished, the screen should look like this:
Set-up Complete No.Fields=6, 17 Chars Per Record
You have now successfully entered in you first format file and can press any key (except ON/CLEAR) to continue on to the main part of the program.
If you want to calculate how many records you can fit on to a datapak you must add two bytes to the record length, in this case, 17, to make 19 bytes per record (two bytes are used by the computer). Then divide the pack size, 16384 bytes for a 16k pack, by 19 which is 862 records.
The screen will now display;
Data Filename C:DSURVEY
Note that the filename "C:DSURVEY" has been suggested. You can either accept it or change it with the DEL key. Note that it starts with a "D" to tell you that it is a Data file. The datapak has also changed from "A:" to "C:". This is suggesting that datafiles should be stored on a datapak in slot "C:". (See Section 1.9 - Where to Store Files).
You will now be in the main menu. It is recommended that you record on paper your fieldnames and the columns that have been assigned to them as this will be very helpful later when you want to analyse the data. Alternatively, if you have a printer and RS232 Link, you can print out a table containing this information using the "Print" option from the main menu.
If you have already entered several formats but cannot remember the filenames press SHIFT AND "N" to get "$". The "$" symbol is used as there is no key for "?". The Directory will he displayed after you select the appropriate datapak with the MODE key and press EXE. Press space or EXE keys to see the next file in the directory. Pressing the ON/CLEAR key will return you to the "Format Filename" question.
If you desire, the current date and time each record was entered in to the computer can be automatically inputted into a field. To store the date in the form "11 OCT 1986" call one of your fieldnames "DATESTAMP" with column width 11, and to store the current time in the form, "12:13:58", call one of your fields "TIMESTAMP" with column width 8. If you only want the day in the month, call a fieldname "DAYSTAMP" with column width 2. For the month only, call a fieldname "MONTHSTAMP" with column width 2, and for only the year, call a fieldname "YEARSTAMP" with column width 2. Only the year "86" will be entered, rather than "1986".
The best way to understand this is to try it out. Use one of the above fieldnames in a format file end then use the Input option from the main menu. When your reach the "Stamped" field, the appropriate information will automatically appear in the place where you would normally have to type it in. You just have to press EXE to continue to the next field.
It is possible to open any datafile with any format file and vice-versa, but only if they have exactly the same number of characters per record.
The design of a format file is closely related to the design of the study. It therefore requires a great deal of careful thought. Most people will have to redesign their formats many times before they are happy with it (6 or 7 times is not unusual).
Each time you make a new format file you have to leave NUMBASE and start again with a different format filename and re-enter all the fieldnames etc. It is possible to make small changes to your format file; you can delete the last field or last fields and can then add more fields to the end (see section 2.11). Inserting new fields or changing fields in the middle of format files that you have already created is, unfortunately, not possible.
One apparently minor change such as the inclusion of one extra field will cause major problems because all the columns and column-widths, associated with later fields, will be out of place. The program therefore requires you to either start afresh, or delete all the fields from the last field backwards until you reach the error, and then re-entering the fields following on from there: For example, if you had a format with 20 fields and you wanted to have a new field between field number 14 and 15, you would have to delete the fields 20,19,18,17,16, and 15. You could then enter the new field and re-enter the later fields. This saves you having to start from the beginning again (see Section 2.11).
It is strongly recommended that you plan out your format on paper and give it full consideration before entering it into the computer.
To avoid becoming too frustrated during this process, you should remember two things. Firstly, designing a paper data collection form also requires a great deal of thought and paper forms are not that easy to change after they have been printed or typed out and duplicated. Secondly, many researchers do not have to face up to answering detailed questions about how their data is going to be stored, or about how it is going to be analysed. Here is a quote from a recent Cambridge university Computer centre Newsletter:
'There is a tendency for research students to spend two or more years collecting large amounts of data before considering the problems of analysing that data and without seeking statistical or computing advice. In a disturbing number of cases, it has proved that the proposed analysis has had to be severely restricted, or even abandoned.'
It certainly is worth taking this advice in the design stage or your study. One point is worth noting: NUMBASE forces you to consider these questions in detail and hopefully will avoid some of the pitfalls. Remember. most of these difficulties are related to STUDY DESIGN and not to computing!!
Some Hints:
1) Design the format on paper first. 2) Use the Print/Format option (section 2.7) to check that your format is correct. 3) For most purposes you will require one fieldname for each piece of data. However, it is possible to enter more than one piece of data per field. There are several examples of this in the example format file B:FWHO. Eight pieces of information are entered into one field "1:ST87654321" with a column width of 8.
If you try inputting data using B:FWHO you will see that the cursor always starts on the 2nd row and the 5th column
1:ST87654321 _
When the cursor is under the appropriate number, the correct piece of data can be entered. If you use this you must be sure that every space is filled with data, else the computer will fill any empty spaces in front with zeros. Another example of this could be for a questionnaire when you night want to fit the first nine questions in to one screen. You could use the following fieldname,
QU: 123456789 _
with a column width of 9.
One small problem with this is that when you come to analyse question 5, there is no fieldname called "Question 5". You must therefore, analyse by "Column" and enter the correct column number. You should be able to work this out by examining your format.
For speed and convenience, default format, data and selection filenames will be used if you do not enter your own filename. If you want to use the default filename leave the "A:F", "C:D"."A:S", "A:FD", or "A:T" and press EXE. You can alter the datapak by pressing the MODE key. If you confuse data files and format files, unpredictable problems will arise. It is best to begin format files with the letter "F", data files with the letter "D" and selection files with the letter "S" and so on.
The program will use the following default names for each file:
| File type | Default filename |
|---|---|
| Format | FNBMAIN |
| Data | DNBMAIN |
| Freq distrib. | FDNBMAIN |
| Tasks | TNBMAIN |
| Selection | SNBMAIN |
(Note: "NB"="NUMBASE")
The first time you use the any of the default filenames, you will go through the usual set-up procedures, as when you use your own filenames, but this is only necessary once. If you later decide to change the default file, you must first delete the these "data" files. You cannot delete them if you actually using then because the files will still be open. If this is the case, you will have to quit NUMBASE and delete them by opening other files temporarily and use NUMBASE's Files option to delete them. After deleting them, you can start NUMBASE again, choosing the default filenames and set them up as new.
To get the best out of this program format files work fastest on pack A:. For security, a copy can be permanently stored on a datapack.
Small data files can be stored on pack A: but generally it is best to store data on datapaks. This is because all ORGANISER OPL programs work by transferring their constituent procedures into pack A:, before running them. If large data files are already there you will get an OUT OF MEMORY error message (See section 3.2) and the program will terminate. If this happens you must make more room on pack A: by deleting or transferring files elsewhere.
Storing data on datapaks is far more secure than storing it in RAM or pack A:. The two main reasons for this are, 1) changing the battery could result in you losing all your data, (the new battery could be a dud!!), and 2) although it is unusual, it is not inconceivable that the ORGANISER II could "crash" and stop working!! The only way of fixing this is to remove the battery, losing all data on pack A:.
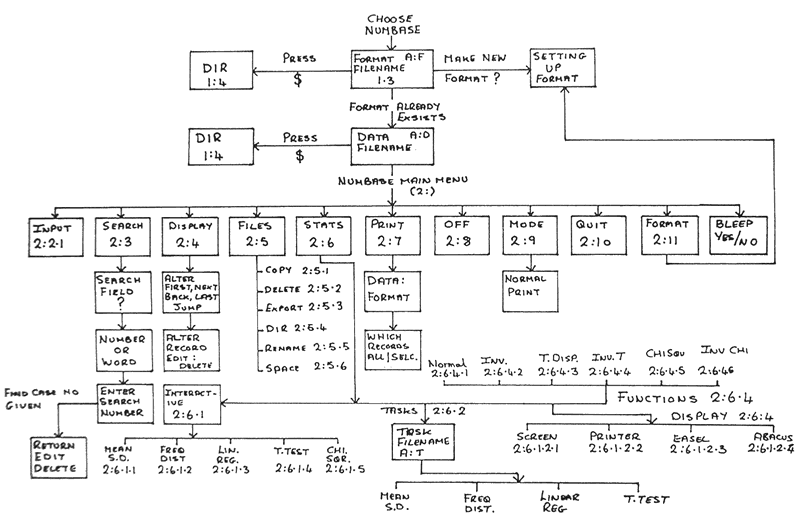
This menu works just like all the other menus on the ORGANISER II. You can move around the menu with the arrow keys. If you move down you will see the full menu which has five lines:
Input Search Display Files Stats Print Off Mode Quit Format Sleep
The ON/CLEAR key is important. Where ever you are in the program, pressing ON/CLEAR will allow you to "escape" back to the main menu. If you want to stop the computer in the middle of doing something like printing, pressing ON/CLEAR will cause it to pause, and then if you hit any key but "Q" it will continue. Pressing "Q" after ON/CLEAR will abort the process.
When you use any parts or NUMBASE that either use a printer or communicate with other computers, you must first setup the RS232 Link. This requires you to leave NUMBASE. See section 3.1 and the RS232 Link manual for full details.
If you press "I" or EXE when the cursor is on "Input" you can start entering in your information. You will see that the computer in asking your first field "CODE?". Type in "1" and press EXE. The computer now asks the second field "SEX?" and you can go through entering in the information. Pressing EXE key only will enter a "0" value in numeric fields and go on to the next field. This is a fast way to go through empty fields.
If you press the ON/CLEAR button before typing anything in the screen will display;
Jump to Field:
This allows you to jump to another field to change it. Type in "HE" for HEIGHT and the computer will ask if it has the correct field:
HEIGHT OK (Y/N)?
Press EXE or "Y" and it will allow you to change or edit the title you entered before. You will notice a "0" will be added in front of the number you entered if you did not use all 4 columns on Input. This is normal and it is only padding out empty columns.
It will then carry on through the list of fields as before but will display the information that you have already typed in. Press EXE to continue past each field until you are where you want to be. If you press the ON/CLEAR key after you have typed in some text, the line will be cleared. Press ON/CLEAR again and you will go to the "Jump to" option. If you press ON/CLEAR again, or only once when on the first field, the computer will go back to the main menu.
After answering all the 9 fields, the computer will ask if everything is correct? If the answer is no, type "N" and the computer will display;
Edit Field:
Type just the first part of the field you want to change. such as "SE" for SEX, and you can then edit that field. After doing this, it will again ask "All correct?" If you press EXE or "Y" the computer will add the new or altered data to the file.
The screen will display;
Saving.....
to show you that it is saving it. Up until this point, any entries you had made were only temporary but when the "Saving..." appears and the computer bleeps, you know that the information has been saved to the datafile. If you do not like the bleep, it can he turned off (Section 2.12).
The ORGANISER II makes a strange crackling noise when it is writing to a datapak and there always is a pause. Do not start pressing keys because the keyboard remembers all your key presses even though the computer is busy doing something else. As soon so it stops doing what is was doing it starts carrying out all your key presses in the exact order that you pressed them!!! This may not be what you intended!!
After the pause and bleep, you will return to the first field to enter in the next record. If you have finished entering records and want to return to the main menu you must press ON/CLEAR (keep pressing it until the main menu appears).
The next option from the main menu is "Search". This searches from the first record to the last and tries to find the record you want. It then lets you either return to the main menu, edit or delete the record.
After choosing this option, the display looks like this;
Search Field? :
Now enter the field that you want to enter the search number or word.
Search For:- Number Word
Press "N" or "W" depending on whether you want to find a particular number or word and after choosing you can enter the search number or word.
The record containing your Search number or word will scroll across the top line. The record number will be displayed in brackets before the record. You will be asked whether this is the correct one, and if it is not, the search will continue until it reaches the "End of Pack".
After finding the record, a three-item menu will be displayed;
Return Edit Delete
The "Return" option takes you back to the main menu. The "Edit" option is very similar to the Input option and works in exactly the same way. The only difference is that the field values already present in the record will be displayed.
Very Important: After editing a record it will change its position in the file to become the last record. This has nothing to do with NUMBASE but is just a characteristic of the ORGANISER II and EPROM storage.
The "Delete" option allows you to delete the current record but it asks you if you are sure! Once deleted, a record cannot be retrieved again.
The display option looks like this;
E/F/N/B/L/J 12
The first record will scroll on the bottom line. Scrolling can he speeded up, stopped or reversed by pressing the left or right arrows. The number in the brackets that appears before the record is the record number and denotes the order in which the records were entered. Editing or altering a record causes it to become the last record in the file.
The abbreviations in Display are as follows;
| E | Edit | Record |
| F | First | " |
| N | Next | " |
| B | Back | " |
| L | Last | " |
| J | Jump | " |
| Del Key | Delete | " |
Those commands will be executed immediately except Jump.
Edit - lets you edit the current record and is similar to Input, but the field values are displayed and can be changed with the Shift/Del or Del key.
First - takes you to the first record, and Last to the last record.
Next - moves on one record and Back moves back one record.
Jump - asks for the record number you want to jump to.
Del key - lets you delete the current record after asking you to confirm.
The number at the end of the top line tells you how many records you have. To return in the main menu, press the ON/CLEAR key.
To get to the Files option, press "F" twice or move with the arrows. The Files option has its own sub-menu.
Copy Delete Export Dir Rename Space
Copy works in a very similar manner as the copy in the ORGANISER's main menu (Read manual). Entering in "$" will give you the Directory. It only will transfer data files (this includes Format, Selection, Task, and Frequency Distribution files which are data files) and not programs or procedures.
Please note that if you are copying to a pack that already contains a file with the same name, then the computer will display;
File Exists:- Delete Append
If you want to delete the file on the destination device press EXE or "D". If you want the source file to be added onto the bottom of the destination file choose "A" for "Append" and records will be added to the bottom of that file. (If you unintentionally copy and "Append" a format file to a pack that already has a file with the same filename, you will get some curious results. The Input option will go through the field names of both format files!).
If you want to copy all files from one pack to another, you must use the COPY command in the main ORGANISER menu.
WARNING: Copying datafiles into pack A: may cause NUMBASE to run out of memory due to the datafiles occupying too much space. When this happens you cannot run NUMBASE to delete these datafiles. A small procedure named "DELETE" is provided for deleting datafiles if this happens. You must RUN the procedure from the Main ORGANISER II menu (See 3.2.1).
This allows you to delete a Data, Format or Label file. Entering in "$" will give you the Directory.
(The RS232 Link needs to be setup for this option - see Section 3.1).
This allows you to transfer your data to other computers. It will transfer data from the current data file.
The screen displays a three-item menu when you choose this option;
Archive dBASE-II Survey+ Other
You are being asked whether you want to export the data to PSION's ARCHIVE, dBASE-II, Survey+ or Other formats. If you press "A". the file will be transferred in an ARCHIVE compatible format which can be "imported" directly.
If you press "D" for dBASE-II or dBASE-III, the file will be written in a dBASE compatible form. Once the file has been transferred to the receiving computer, you must use dBASE "APPEND FROM" command with the "DELIMITED" clause and the external file that is created from the ORGANISER data should have a file extension ".TXT".
Pressing "S" for "Survey+", will make the ORGANISER write the datafile in a Survey+ compatible form, which can be read into Survey+ with the "Read Sequential Link" command. If you press "O" the data will be sent with one space separating each field and a Carriage Return as a record separator.
Finally, you will be asked if the terminal is ready. If the receiving computer is set-up to receive, press "Y" or EXE. Further details on file transfers are give in Chapter 2.
This option will show you a directory of data files on any pack. Use the MODE key to change datapaks.
Rename allows you to rename a data file. First enter the filename and datapak using the MODE and press EXE. Then enter the new filename.
This allows you to see how much room is left on each datapak. When this command is used on B: or C: a small file called "LOOKUP" will be deposited on the datapak. This file is necessary as OPL cannot examine a datapak without a file being present. The file uses a small amount of space (11 bytes). You can delete this file if you wish but another one will replace it the next time you use the Space command, and a further 11 bytes will be used. (Memory is not used up like this on pack A:).
This is achieved by pressing the ON/CLEAR key.
The statistical analysis that are available in this program are means and standard deviations, standard errors, confidence limits, frequency distributions, linear regression and T-tests. The data can be analysed interactively; that is, the user tells the computer want to do and waits tor the answer and then gives it another instruction, and so on. "Batch processing" is also available on this program. This means setting up many different tasks at the beginning and then letting the machine do all the work, over night if necessary, and printing out the results to a printer. Alternatively the results could be sent to a another computer such as a Sinclair QL and "imported" directly into the word-processor.
After choosing the Stats command the screen displays a four-item menu;
Interact Tasks Display Functns
The first two options have just been explained above. The "Display" option allows the user to display frequency distributions that have been stored in files from previous analyses and is covered in more detail in the section on Frequency Distributions. The "Functns" or Functions option gives you access to the statistical tables.
To demonstrate how this statistical program works it is suggested that you enter in about 30 records of imaginary children aged 12 and 13, with from social class 1 to 5, and with heights from 1.20 metres to 1.80 metres and weights between 35Kg and 60Kg. This will also give you some practice in entering data and will give you a feel for the program.
After selecting this option the screen will display;
Mean+SD FreqDist LinearReg T-Test Chi-Sqrd
If you decide you want means, standard deviations, confidence limits and Skewness (3rd moment), you should select this option. You will first be asked;
Which Records: All Selected
If you want the analysis to be carried out an all the records in the file, just EXE key for "All". This will then skip the selection process outlined in section 2.6.1.1.1. If you want to "Select Records" press "S" or move the cursor to "Selected" and then press EXE.
In our example, we might want select all the girls aged 12 years in social class 3 and then obtain the mean and SD of their heights and weights. Assuming that you have entered in some data you can try this out. To do this we need to tell the computer how we want to select these records. To save having to go through all these selections every time we can store this information in a "selection File". Next the screen will display;
Selection File name A:S
If you want to use the default filename just press EXE else type in the filename and press EXE. If you choose a filename that already exists the screen will display;
File Exists:- Use-again Delete
If you choose to use it again the selection set-up procedures will be shipped and the computer will use the specified selection file for the analysis. Choosing to "Delete" deletes the old selection file and lets you set-up a new selection file using the same filename.
So, assuming it is a new selection filename the screen will look like this:
1st Selection:- Field Columns
This is asking you how you want to select on the first selection. Do you want to select by a particular field or by a particular column. If you choose "Field" the screen will display:
Field name :
and you can enter the first field name "SEX". After confirm that the computer has found the correct field the display will look like this
Lower Limit :
and you can enter 0 for girls and press EXE. Both lower and upper limits are inclusive of themselves. The screen will now display:
Upper Limit :
Press 0 and EXE again to select only girls. After confirming that all this is correct you will be ask if you want to select again. In our example we do, so press "Y" or EXE.
The screen will now display
2nd Selection:- Field Columns
This is the same as before. We can now go through and choose the 2nd selection;
Select by : Field
Field name : SOC CLASS
Lower Limit : 3
Upper Limit : 3
and then make the 3rd selection by;
Select by : Field
Field name : AGE
Lower Limit : 12
Upper Limit : 12.9
Note that the upper limit is 12.9 and not 13 because only 12 year-old subjects are required in this select. Having the upper limit of 13 would included thirteen your-olds too.
This time when the computer asks you if you want to select again press "N" for no. There is no limit on the number of times you select records (apart from running out of memory if you are storing the selection file on pack A:). Be careful that you do not select out all the records!
If you want to select by a particular column select "Column" and you will simply be asked for the first column and the number of columns, which is the column width.
The screen will now display;
Analysis on:- Field Columns
This similar to the "Selection by" question except it is asking you which fields or columns you want to analyse. In our example we wanted to analyse WEIGHT so you must choose "Field" and then enter the field name "WEI" for WEIGHT If you are interested in analysing the contents of columns 4 and 5 you should press "c" for "Columns" and then you will be asked which column and then for the column width.
You are finally asked if you want the results to go to the Screen or Printer. To use the printer you must first setup the RS232 link (see Section 3.1). Select the appropriate choice.
The screen will now display;
Calculating.. No. 4
and the number will change as it does the calculations. If you choose the screen the display will show the results, otherwise they will be printed out.
For the screen results, press EXE to see more results until the first line of results are shown again. The results will continue to rotate until you press ON/CLEAR. This will return you to the Stats menu. To analyse the HEIGHT of these girls aged 12 years in Social class 3, you must follow the same path;
1) Choose -Interactive
2) Which records -Selected
3) Selection file
name A:S -as before
The computer will tell you that this selection file exists and ask you if you want to use it again. You can respond by pressing EXE. (You don't have to do this and can delete this file. However, for this example do not do this.)
You will now be asked whether you want to analyse by field or column and you choose Field and enter in the field name HEIGHT. The computer will ask where the results should go (Screen or Printer) and it then will do the calculations and display the results.
If you want to display the results on the screen, you will be able to View two lines at a time. Press any key to see the next set of results. The results will be displayed on five sets of screens after which the first set will be displayed again and will continue to rotate until you press the ON/CLEAR key which will return you to the Stats menu.
The results will look like this;
| Mean=1.9452 N=146 | Total number | |
| Sum=284.000 SD=.2676 | Total sum of values Standard Deviation | |
| Sum Sq=1.13E+03 Std Err=0.1877 | Sum squared (x10^3) Standard Error | |
| 95% Con. limits 1.635 - 2.256 | Confidence limits | |
| Skewness=1.33 |
The Frequency distribution program in NUMBASE works only on integers, (later versions of NUMBASE (2.0 and above) will allow this). After choosing this option you are asked whether you want to select the records. The selection procedures that follow are identical to those in Mean+SD option (see 2.6.1.1.1).
Again as in the Mean+SD option, you are asked which field or column you want analysing and you can answer in a similar way. In our example, a frequency distribution of social class and age could be useful. After choosing the analysis field or column, the screen will display;
Freq Filename A:FD
All frequency distributions can be stored in files for later use. If you particularly want to keep a frequency distribution, for say, later exporting to EASEL graphics package, add a few letters or numbers to the file name so that you can identify it later on.
If you don't want to keep it is easiest to use the default filename. After choosing your frequency distribution filename the computer will start do the calculations and will bleep when it has finished.
The screen will display the frequency distribution output option menu;
Screen Printer Easel Abacus
If you choose this option the results will display on the screen as follows;
No. 0 Freq= 0 00.00%
The first number is the value of which there are none, because we did not have a social class score of 0. The percentage 00.00% in the second line tells you the proportion of the total that this represents.
Now press EXE and the screen will now display the frequency of the score 1.
No 1 Freq= 6 13.51%
and you can go through the frequency distribution by pressing EXE until you reach the end, when you will return to the output menu. Here, you can example to frequency distribution again or try some of the other options.
(The RS232 Link needs to be setup for this option - see section 3.1).
If you have a printer choosing this option will allow you to print out a bar chart of the frequency distribution. It looks like this;
******** Frequency Distribution ********

Analysis on column 6
Total No.=31

0    0 (0.00%)
  ____
1|____|   2  (6.45%)
  ________
2|________|   4 (12.90%)
  __________
3|__________|   5 (16.13%)
  ____________________________________
4|____________________________________|   18 (55.65%)
  ____
5|____|   2  (6.45%)
Note: If your printer does not produce bar graphs that look like this, it may he that the underlining character, "_", is not the ASCII character 95 that this program uses. You may be able to correct this by changing the communication SETUP settings in the COMMS RS232 option in the main ORGANISER II menu. Translate (TTRN) from "95" to the ASCII code for underlining on your printer.
(The RS232 Link needs to be setup for this option - see Section 3.1).
To send the frequency distribution to the graphics package EASEL, choose the "Easel" option and send the file direct into EASEL running on a QL or via XTALK communications package running on an IBM-PC. If you are using a QL, select the Files command, then Import and type in "_SER2HZ" and press ENTER. The bottom line will display "Importing..".
Now answer the next question on the ORGANISER II;
Enter Graph Label:
This is will be the name of the graph that will appear in "Current Graph" on the EASEL. screen. Then answer "Y" or EXE to the "Terminal Ready" question and the your graph should appear on the QL screen. Note: this will only work if you have already set up the communication protocols correctly. (see chapter 2.)
Sending your graph to an IBM-PC is the same as above except the data must be stored in an intermediary file (use the file extension ".exp").
(The RS232 link needs to be setup for this option - see Section 3.1).
This essentially the same as for EASEL except in ABACUS, you choose the Files command, then Import and then you must decide to import "by rows or columns". You can try both but "by columns" appears to work better. It really depends on how you want your spreadsheet to look.
Linear regression is a common statistical method to investigate if two variables are correlated. The two variables are plotted against each other, on the X and Y axis of a graph, and the best fitting line through them is found by calculation.
This option works in a very similar manner to the previous two options, except that you are asked for TWO fields or columns to analyse (1st and 2nd). These are the two that will be compared. You can still select the records as before but it is not possible to do linear regression with different selections because there must be the same number of observations both sets of data.
when the results are sent to the screen the display will look like this;
Reg Coef=0.345 Y=1.2521*X+0.567
The first line gives the regression coefficient and the second line gives the equation of the best straight line through the observations. The equation is in the form Y=MX+C, where M is the gradient and C is a constant.
T-tests are another common statistical method of testing to see if two variables are significantly different. It used for normally distributed parametric data and can be used with reasonable small numbers, greater than 4 and below 120 in each sample).
The procedure for using this option is almost identical to the Linear regression option except than the two fields or columns for analysis can come from different selections. If you wanted, you could compare the HEIGHT in girls and boys by having different selections by the same field for analysis, namely, HEIGHT.
After setting up the T-test, the computer will run through the calculations TWICE and the "Calculating.." message will go round TWICE. The results can be displayed on the screen or on a printer. If you choose the screen the display will look like this:
t-value: 4.865 DF = 78
If you press EXE the next part of the results will be displayed;
5% Signif. Level t>3.23
press EXE again to see;
1% Signif. Level t>4.56
Press EXE again and the top line will be displayed. The value that t must be greater than for the different between the two samples to his statistically significant has been calculated using the t-distribution with the stated degrees of freedom. If you choose the printer option all the above will be printed out.
The option allows you to carry out the Chi-squared contingency table test. It calculates the expected values, the component parts of the Chi-squared values, the total Chi-squared, the degrees of freedom and the Chi-squared distribution function for the appropriate degrees of freedom at the 5 and 1% level.
The program allows you to have up to a 5x5 table first asks you for the number of columns, then the number of rows. You then must enter in the observed values into the correct row and column positions. For example, you may have a set of data of individuals continuing in a clinical trial, that look this;
| Group | ||
| A | B | |
| No. Withdrawing | 167 | 120 |
| No. Continuing | 450 | 654 |
This would require 2 columns and 2 rows.
The number in Row 1, Col 1 is 167
The number in Row 1, Col 2 is 120
The number in Row 2, Col 1 is 450
The number in Row 2, Col 2 is 654
After entering your data, the program asks if you want the results to go to the screen or the printer. If you choose the screen, the display will show "calculating.." and then the expected values for each cell of the table will be displayed. Press any key to see the next cell.
The component parts of the chi-squared value will be displayed in the same order as the cells of the table and then the chi-squared total and the degrees of freedom will be displayed. The 5% and 1% critical values of statistical significance are also shown. If you press any key the results will all he displayed again. To return to the statistics menu you must press ON/CLEAR key.
If you choose the "Print" option the results will be printed out in a tabular form. (The RS232 link needs to be setup for this option - see section 3.1).
This is one of the most powerful and useful options because you can set up the computer to do an almost unlimited number or "Tasks" or jobs and process them as a batch, one after another, without you having to be there. All the statistical tests in the Interactive option are available from Tasks except Chi-squared which is interactive only. (The RS232 Link needs to be setup for this option - see Section 3.1). After choosing this option the screen will display;
Task Filename A:T
The computer suggests the default filename and you can use it or change it to your own, but it is best to retain the first letter "T".
The screen will then display;
Set-up 1st Task? OK (Y/N)?
Press "Y" or EXE and then you go through defining the first teak in exactly the same way as in the interactive mode. When you have defined the task, you must confirm that it is "All Correct" and then the screen will display;
Set-up 2nd Task? OK (Y/N)?
If you answer "Y" or EXE you can then set up the next task, and then the next, and so on. When you have finished your list of tasks, answer "N" to the Set-up next Task question and the computer will ask you if the printer if ready.
Assuming that you have an RS232 link and a printer connected, and have loaded the RS232 software (by press ON/CLEAR twice from the main ORGANISER menu) the computer will now start processing your tasks and will set all the results to the printer. You can now go away and do something else more enjoyable!!!
It is also possible to send the results directly in another computer. If you are running Quill on a QL, use the Files command and choose Import from "_SER2HZ". Make sure the communications are set up as in chapter 2. You can also send the results to an IBM-PC via a communication package such as XTALK.
If the Task Filename you choose already exists you are offered the option of Deleting it or using it again Deleting is self-explanatory. If you want to use it again you will be offered the chance to add more Tasks. If you accept, you can add more tasks, otherwise the computer will ask you if the printer is ready, and then begin processing your tasks.
The Stats option "Display" allows you to jump into the frequency distribution display output menu (2.6.1.2.2). This is only applicable if you have already used the "Freq Dist" statistics option to calculate the frequency distribution of a set of data. First you must enter the frequency distribution filename that you want to display. If the chosen filename does not exist, you will return to the Stats menu.
With NUMBASE you do not need any statistical tables because the appropriate mathematical functions have been built into the program. After choosing this option the screen will display a six-item menu;
Normal Inv-norm T-distr Inv-T Chi-Sqr Inv-Chi
If you select "Normal" (normal distribution function), or "T-distr" or "Chi-sqr" (Chi-squared function) you will be asked to enter the function value (chi,z,t), for example 1.96 for the normal distribution function. If you have chosen the "T-distr" or the "Chi-Sqr" option you will then be asked for the "Degs of Freedom". The computer will then calculate the probability and give the result as a proportion of 1.
Probability= 0.9752
If you select any of the inverse functions you must first enter the "Confidence(0-1)?" which in the desired level of statistical significance. For example, for the Inv-normal distribution, the 5% significance level requires you to enter 0.975. The answer is calculated and displayed;
Value(Chi,z,t)= 1.96044827374
If you select "Inv-T" or "Inv-Chi" you will also be asked for the degrees of freedom.
(The RS232 Link needs to be setup for this option - see Section 3.1).
If you choose this option the screen will display;
Print Out:- Data Format
Press "D" to print data records. You will then be asked if you want to print out all or selected records
Which Records:- All Selected
If you choose all records will be printed out and the filename and current date will be printed first. If you choose "Selected", then you will he asked for the;
Selection File A:S
This is exactly the same as Section 2.6.1.1.1. After creating your selection file and selected the records you want, the program will only print out those records. When it prints out each field will be separated by a space and a carriage return will occur when the printer carriage reaches the 80th column.
Press "F" if you wont to Print out, the file structure or the format file.
The format file option will print out like this;
*********** Numbase Format ***********

Format for file : A:FSURVEY
6 Nov 1986 12:00:00

Variable        Columns      Fieldtype    Limits
------------------------------------------------
CODE              1-3          N            -
SEX               4            N           1-2
AGE               5-6          N            -
SOC CLASS         7            N           1-5
HEIGHT            5-11         N            -
WRIGHT            12-16        N            -
The fieldtype "N" stands for numeric and "T" for text.
This option switches the liquid crystal display off to conserve the battery. When you next press ON/CLEAR, you will still be in NUMBASE.
The Mode option allows the current record to be printed out to a printer after each record has been entered using the Input command. When you choose this option the screen displays:
Input Mode:- Normal Print
If you press "P" the records (only after inputting) will be sent to the printer (The RS232 Link needs to be setup for this option - see Section 3.1). but if you press "N" they will not be. The default Mode in Normal.
This option from the main menu terminates your session in NUMBASE.
The Format option allows you to add more fields to the end of your format file. It also lets you delete fields from the end of the format file. This gives you the possibility to change your format The reasons why it is not possible to insert new fields into the middle of your format have already been explained in Section 1.7. You can, however, delete backwards from the last field until you reach the error and re-enter all the fields following on from there.
(It may he helpful to know that a format file is really a normal "data" file and each record stores all the information concerning each field; such as the fieldname, the field length, the field type and so on.)
After choosing this option the screen displays;
Alter Format:- Add Delete
If you have chosen this option by mistake, press ON/CLEAR to return to the main menu.
If you want to add more fields to your format press "A" or EXE. You will now be in exactly the same procedure as section 1.3 and can add more fields. To finish, either press ON/CLEAR or EXE when asked for the next field. You will be asked:
End Setup? OK (Y/N)?
If you wish to delete fields from the end of the format file press "D" or move the cursor to "Delete" and then press EXE. You will then be asked;
Delete Last Entry (No. 28) OK (Y/N)?
After answering appropriately the computer will either delete the field or return to the first question above (section 2.11).
If you delete the field you will be offered to
Delete Again (no. 27) OK (Y/N)?
and so on until you have deleted the correct number of fields. You can then answer "N" to this question and you will be offered the choice in section 2.11 to exit from the Format option or Add more fields.
This option lets you turn off the bleep at the end of the input option. The screen displays;
Bleep Sound:- Yes No
Choose No if you do not want the bleep to sound. The default is yes for on.
If you want to use the RS232 Link to connect the ORGANISER II to a printer or another computer you must first setup the RS232 link. This CANNOT be done from within NUMBASE so you must first quit the program. Plug in the RS232 Link and press ON/CLEAR twice to load the RS232 software (see RS232 manual). A new option, COMMS will appear on the main ORGANISER menu near the bottom, between RESET and OFF. You must choose this COMMS or communications option and go into setup. Most printers use BAUD 9600, 8 DATA bits, 1 STOP bit and RTS/CTS. However, you should refer to your printer manual to check this. If you cannot get your printer to work properly you should contact your computer dealer.
Please note that the RS232 Link only needs to be setup once and it will work until you unplug it. To remove the COMMS option, press ON/CLEAR twice after removing it. (The RS232 software occupies some of your RAM, which can be reclaimed by removing the COMMS option).
Most aspects of communication with other computers is dealt with in CHAPTER 2.
On occasions NUMBASE will display error messages.
If this occurs you have insufficient room left on pack A: for NUMBASE to work in. Pressing any key will exit from NUMBASE. You must make more room in pack A: by transferring files you need to other datapaks or by deleting datafiles (this includes format, selection files etc. which are technically datafiles). You may be able to run NUMBASE and use the Files option to carry out these tasks. However, if the memory shortage is really bad, you will not be able to run NUMBASE to get to the Files option which has Delete in it! If this happens there is a OPL procedure called "DELETE" on your program pack. To use it return to the main ORGANISER menu, and press MODE key and insert a new item, "DELETE". Then call this, and the screen will display
Delete Datafile A:
This is the same procedure that NUMBASE uses and it works in exactly the same manner and has "$" directory.
This method just gives you a short cut to get out of trouble if NUMBASE can't run because of lack of memory.
This can occur if you have used the wrong format filename that is incompatible with the datafile. Printout your Format and Data to Check that they correct.
If this error occurs you must check that there are no non-numeric entries (anything that is not a number - this could be a "." if the column you choose was only one column wide). You can use the Display option from the main menu to Jump to Record 4, for example and then Edit it.
If this happens you have done something like selected by SEX with lower and upper limits outside the normal range. For example, if boys were 1 and girls were 0, you may have selected by codes 2 to 2. This can also happen with multiple selections if you are not careful. It Just means there were no records that had your criteria for selection.
This occurs when you try to print out something and the RS232 link is absent or the software has not been loaded. If this happens when the RS232 link is connected it is most likely that you forgot to load the software by pressing ON/CLEAR twice before starting NUMBASE. See Section 3.1 or the RS232 manual.
If any other messages occur, check in the main ORGANISER manual under Chapter 27. The number following the Error Message is the error number. If this does not help, please contact EIDERSOFT.
1.0 INTRODUCTION 1.1 Setting Up 1.2 Connecting Up 1.2.1 To QL 1.2.2 To IBM-PC 2.0 From ORGANISER II to QL 2.1 directly to ARCHIVE 2.2 to non-ARCHIVE formats 3.0 From ORGANISER II to IBM-PC 3.1 for XCHANGE TO IBM-PC 3.2 for non-ARCHIVE formats 4.0 From QL to ORGANISER II 4.1 ARCHIVE files 4.2 non-ARCHIVE files 5.0 From IBM-PC to ORGANISER II 5.1 ARCHIVE files 5.2 non-ARCHIVE files
This chapter tells you how to set-up your ORGANISER II to communicate with other computers, particularly with Sinclair QL's and IBM-PC's. You can transfer data files and programs to and from the ORGANISER II, and you can use program compatible formats so that the data files can be used immediately on other systems.
You will need to SETUP your ORGANISER II in the following way to communicate with a Sinclair QL. Connect your RS232 link and go into the COMMS option and choose SETUP. Use these settings:
Set-up the ORGANISER II using the following settings:
BAUD 9600 PARITY NONE BITS 3 STOP 2 HAND RTS/CTS ECHO HOST WIDTH NONE (Change to 40 if using 40 column printer) REOL <CR> REOF <SUB> RTRN NONE TEOL <CR><LF> (Change to "13" if printing gaps between lines) TEOF <SUB> TTRN NONE
when communicating with an IEM-PC running communication software such as XTALK, use the same settings.
To connect a Sinclair QL and an ORGANISER II, plug together the RS232 link and a modified QL serial cable. Plug the Telecomm connector into the serial 2 port on the QL. A modified QL ORGANISER II lead can he obtained from EIDERSOFT.
To modify a standard QL serial lead to work with an ORGANISER you will need a soldering iron or a friendly electrical engineer. The wires from the QL telecomm-type connector should be soldered to the 25-pin D-socket in the following way;
| QL Pin | Colour | D-socket Pin |
|---|---|---|
| 1 | Black | 7 |
| 2 | White | 2 |
| 3 | Green | 3 |
| 4 | Blue | 4 |
| 5 | Red | 5 |
| 6 | Orange | 20 |
Connect the RS232 link directly into the serial port on the IBM-PC.
Set-up ORGANISER II Go into the NUMBASE and open the file that you want to send. Choose the Files option and then choose the Export option. You will then be asked which file type you want; ARCHIVE or the Other. Pressing "A" will send the file in an ARCHIVE compatible format, and pressing "O" will send the file with spaces between the fields and with a carriage return at the and of each line.
Lastly, you will be asked if the terminal is ready. If the receiving computer is ready press "Y" or EXE.
Set-Up QL
Load ARCHIVE. Type on the command line
import "_ser2hz" [Enter]
then add as "filename" [Enter]
The disks or microdrives will start whirring and you can tell the ORGANISER II to send the file. After a pause, the ORGANISER II will display the record number that it is exporting, and will bleep when its finished.
You may now DISPLAY your file on the QL. Print count() to check that you have all your records and then close the file.
Set-up the ORGANISER II You can send the file from NUMBASE as above but choosing "O" for other or you can use the RS232 COMMS option.
Using the COMMS option.
The ORGANISER II data file uses TAB (ASCII 9) as a field separator. You can translate this TAB in to a space, a comma, or any other character using the TTRN in the SET-UP option of COMMS. To convert a TAB to a space, move the arrow to TTRN and press MODE, then "9,32" and EXE. Keep all the other settings the same as above, and TRANSMIT the file.
Set-Up QL
Load and run the SUPERBASIC program listed in appendix 1. Type in the filename and press "R" to receive. Then TRANSMIT the file from the ORGANISER II.
If you want to use the ORGANISER II file in ARCHIVE, use NUMBASE to Export the file, as in section 1 and capture the file with XTALK. You can then IMPORT the file into ARCHIVE. It is best to use the file extension ".exp".
If you want to use the ORGANISER II file in non-ARCHIVE formats, export from NUMBASE, as above, but choose the appropriate file-types. Then capture the file with XTALK as above.
Set-Up ORGANISER II
This option will only work if you have the Archive field lengths of each field the same for each record. This is because NUMBASE uses fixed length fields while Archive uses variable field lengths. It is unlikely that your Archive file is like this so you will have to write an Archive procedure to make each the respective field lengths the same for each record. You can use Appendix 2 as a basis for your procedure.
Go into the COMMS option, and choose RECEIVE and select FILE. Type in the filename and press EXE. The display will show;
busy....
Ensure that the BAUD rate on the QL is still on the default of 9600. It should be unless you have changed. Load ARCHIVE and then type;
run "export"
to run your modified "export" program.
This ARCHIVE program first asks you for the data filename that you want to transfer. It this sends the file to serial port 2. The ORGANISER II will bleep when the file has been transferred and you can then use the file from a NUMBASE.
You can use the SUPERBASIC program in Appendix 1 to send any file to the ORGANISER II.
Use XTALK or a similar package to send any file and RECEIVE it with the RS232 link option.
If you want to send an ARCHIVE file from XCHANGE ARCHIVE run a program similar to than in Appendix 2, but you should use spoolon "filename$" export instead of spoolon "_ser2hz" export. Then send the file with XTALK and RECEIVE it as in part 4.1.
You can now save the file on the QL and edit if you wish.
QL SUPERBASIC program for file transfers. Von may have to change lines 100, 120 and 125 to "mdvl_".
10 BAUD 9600 15 CLS 16 PRINT"RS-232 communication Program running" 18 INPUT"Enter filename :",f$ 20 INPUT"(T)ransmit or (R)eceive? ";a$ 100 IF a$="t" OR a$="T":COPY_N "f1p1_"&f$ TO ser2hz 110 END IF 120 IF a$="r" OR a$="R":COPY ser2hz TO "f1p1_"&f$ 125 COPY "f1p1_"&f$ TO scr_ 130 END IF 140 GO TO 10
Program for transferring ARCHIVE files into an ORGANISER II. This program is only meant to give you an idea of how this can be achieved. The program needs to be tailor made for each ARCHIVE file to get the correct field widths for the fixed field lengths in the NUMBASE file.
proc start input "Enter the data file name : ":file$ rem input "Enter the export file name: ";expfile$ print "Print to (S)creen or (P)ort (ser2) ?" let x$=lower(getkey()) look files print "Now exporting" if x$="s": spoolon screen else : if x$="p" spoolon "_ser2hz" export else : stop : endif endif all string lprint b$ endall lprint chr(26); close spooloff endproc
proc string let b$="" let a$=str(code,2,0) zero:4 let b$=b$+a$ let b$=b$+str(sex,2,0)+"12" let a$=str(decay,2.0) zero;2 let b$=b$+a$ let a$=str(fl,2,0) zero;2 let b$=b$+a$ let a$=str(f2,2,0) zero;2 let b$=b$+a$ let a$=str(f3,2,0) let b$=b$+a$ let a$=str(f4,2,0) zero:2 let b$=b$+a$+str(f5,2,0)+str(f6,2,0)+str(f7,2,0) endproc
proc zero;x while len(a$)<x let a$="0"+a$ endwhile endproc
Format for the example format file B:FWHO. This is a format for the World Health Organisation Oral Health survey form (see Appendix 1).
Variable        Columns    Fieldtype    Limits
-------------------------------------------------------
LEAVE BLANK       1-4          N          -
YEAR              5-6          N        86-87
ID NUMBER         7-10         N          -
ORIGIN/DUPL       11           N          -
EXAMINER          12           N          -
AGE               13-14        N          -
SEX               15           N         1-2
ETHNIC            16           N          -
OCCUPATION        17           N          -
GEOG LOCATION     18-19        N          -
LOCATION TYPE     20           N         1-3
OTHER 1           21           N          -
OTHER 2           22           N          -
OTHER 3           23           N          -
MALOCCLUSION      24           N         0-2
CPITN 17/16       25           N         0-5
CPITN 11          26           N         0-5
CPITN 26/27       27           N         0-5
CPITN 36/37       28           N         0-5
CPITN 31          29           N         0-5
CPITN 47/46       30           N         0-5
1:ST87654321      31-38        N          -
2:ST12345678      39-46        N          -
1:TR87654321      47-54        N          -
2:TR12345678      55-62        N          -
3:ST87654321      71-78        N          -
4:ST12345678      63-70        N          -
3:TR87654321      79-86        N          -
4:TR12345678      87-94        N          -
FLUOROSIS         95           N         0-5
Assessment Form
  ======================================================================

  Leave Blank     Year     Month Day           I.D. No.  O/D       Exam
  ___________     _____     _______            _______    __       ____
 |__|__|__|__|   |__|__|   |_|_|_|_|          |_|_|_|_|  |__|     |____|
 1           4   5         6                  7       10    11         12

  ======================================================================

  General Information    Name______________________

  Age in Years   _____     Geographic    _____
                |__|__|    Location     |__|__|
               13     14               18     19

  Sex (m=1, f=2)    __     Location Type:                Other Data:
                   |__|    1=Urban                                 ____
                      15   2=Periurban                   ________ |____|
  Ethnic Group      __     3=Rural                                 ____21
                   |__|                                  ________ |____|
                      16                                           ____22
  Occupation        __                                   ________ |____|
                   |__|                                                23
                      17
  ======================================================================

  Malocclusion             Periodontal Status

  0=none        __       25________27  0=Healthy    3=Pocket 4.5mm
  1=slight     |__|       |__|__|__|   1=Bleeding   4=Pocket 6mm +
  2=moderate      24      |__|__|__|   2=Calculus   X=Excluded Sextant
   or severe             28   29   30

  ======================================================================

  Fluorosis               0=Normal
                          1=Questionable
             __           2=Very Mild
            |__|          3=Mild
           31             4=Moderate
                          5=Severe

  ======================================================================