Below is the version of the Psion Printer II manual used until 1988. See also:
Psion Printer II Manual (1989+)
Notes on the Psion Printer II
Repairing the Psion Printer II
© Copyright Psion PLC 1988
All rights reserved. This manual and the programs referred to herein are copyrighted works of Psion PLC, London, England. Reproduction in whole or in part including utilisation in machines capable of reproduction or retrieval, without the express permission of Psion PLC, is prohibited. Reverse engineering is also prohibited.
The information in this document is subject to change without notice.
1. INTRODUCTION 1.1 About the Psion Printer II 1.2 About this Manual 2. OPERATION 2.1 Connecting the Printer 2.2 Powering the Printer 2.3 The Printer Software 2.4 Keyboard Control 2.5 Listing Programs and Data Files 2.6 Changing the Paper Roll 3. PRINTING FROM OPL 3.1 Printing Text 3.2 Control Codes 3.3 Example: Listing MAIN 3.4 Printing to Comms Link 3.5 Bit image Graphics 3.6 OPL Errors 3.7 Common Problems Appendices A. Character Set B. Specifications
The Psion Printer II connects with your Organiser II to provide a portable system for producing printed output wherever you need it. The printer is ideal for producing hard copy from any Organiser application, whether a purchased product (such as the Pocket Spreadsheet) or your own program written in OPL, the Organiser Programming Language.
The printer can he set to print 20, 40, 60 or 80 characters per line. You can underline characters, make them double height, and also use dot-by-dot graphics printing.
You can power the printer either from a rechargeable battery or via a mains power adaptor. The printer comes complete with both, together with a roll of thermal paper.
Additional rolls of paper are available from Psion. If you wish to obtain paper from another supplier, the correct paper is specified in Appendix B. Note that using the wrong paper can dramatically reduce the life of the print head.
The printer can be used with all versions of the Organiser II. The software which is built in to the printer uses about 2.5K of the Organiser's memory, which reduces the amount of memory available for other applications. This is more significant on the 8K Organiser II model CM than on higher memory models.
Chapter 2 explains how to prepare your printer for use, and some basic printing procedures. You should read this first.
Chapter 3 describes how to print text and graphics from programs written in OPL. It includes an example OPL program which you may wish to adapt for your own use. To understand this chapter, you should be familiar with such basic ideas as data files, records, devices, text strings and ASCII values. If you have any doubts about these, consult your Organiser II Operating Manual for further information.
The Organiser II is connected to the Psion Printer II by Inserting the Organiser (with its sliding case removed) into the purpose-built cavity within the printer. The cavity contains a male connector which mates with the top port connector on the Organiser.
To connect the Organiser to the printer:
Although it connects with the top port on your Organiser, the Psion Printer II contains its own top port (positioned, in fact, on the left side of the printer) into which you can still plug other devices, such as a Comms Link lead.
The printer comes supplied with a 9 Volt mains adaptor and a built-in 7.2 Volt Nickel-Cadmium rechargeable battery. The mains adaptor lead plugs directly into the socket on the left hand side of the printer and will recharge a flat battery in 12 to 14 hours. A fully charged battery will print continuously for about 1 hour.
You can continue to use the Organiser or disconnect it white the mains adaptor is recharging the battery. Note that, if your battery has totally discharged, you should wait at least one minute after plugging in the mains adaptor before printing anything.
While the mains adaptor is connected it also powers the organiser. If are not using the printer's mains adaptor, the Organiser can draw power from the printer's battery if its own battery becomes low on power. The printer, however, will never take power from the Organiser's battery.
The printer's mains adaptor can be used as an alternative to the Organiser Mains Adaptor to power an Organiser II which is not connected to the printer. A mains adaptor interface is included with the Psion Printer II which plugs in to the top port of the Organiser and provides a socket for the mains adaptor lead.
You cannot use an Organiser II Mains Adaptor to power the printer, because of the printer's greater power consumption.
The printer is automatically turned on and off by the Organiser, and so does not have an ON/OFF switch.
The Psion Printer II contains software which must be loaded into the Organiser before you can print. To do this, connect the Organiser to the printer, go to the main menu on the Organiser, and press ON/CLEAR.
The printer software takes up about 2.5K of Organiser internal memory. If there is not enough space, an "OUT OF MEMORY" message will be displayed. You will then need to free some more memory by deleting some programs, diary entries, data files or records from device A: before trying to load the printer software again.
Once the software is loaded, you can:
See the relevant operating manual for a description of how to print from other products. Printing from OPL is described in the next chapter.
When you have finished using the printer, disconnect it, return to the main menu and press ON/CLEAR again. The printer software will be removed and the memory will be freed.
You can print blank lines (to advance the paper), print the current Organiser screen, and stop the printer, all directly from the keyboard.
To print three blank lines, hold down the SHIFT key and press SPACE. The printer positions to the left hand margin and moves down by three lines. This is useful as a quick way of separating different printouts.
To print the Organiser screen, hold down the SHIFT key and press the <- key. The printer moves down a line and to the left margin, then prints the Organiser screen (2 lines of 16 characters).
If you are viewing a record under the HND option on the main menu, this keypress will in fact print the entire record being displayed, not just the 2 fields which the screen can show.
If you press ON/CLEAR while the printer is printing, it immediately stops printing. This can leave the print head in any position. To return to the left margin, hold down the SHIFT key and press SPACE.
To print out an OPL procedure, go to the PROC menu and select the LIST option. Enter the procedure name - pressing MODE, if necessary, to select the device. Press EXE and the procedure will be listed to the printer.
To print data files you will need to write a small OPL program to print the file record by record. An example program to do this appears in the next chapter.
You can also use the OPL editor as a text editor if you want to type notes and print them, using the LIST option, as if they were an OPL procedure. Go to the PROG menu and select the NEW option. Enter a name for the text and press EXE. Start the text with a few blank lines, to separate it from the program's name on the final printout. When you have entered the text press MODE, select SAVE (not TRAN!) and press EXE. This will save the text and return you to the program menu. You can now select LIST from this menu to print the text.
To fit a new paper roll:
The OPL command to send a text string to the printer is LPRINT. LPRINT has the same syntax as the PRINT command and operates in the same way except that LPRINT writes to the printer rather than to the display. The syntax of both PRINT and LPRINT are described in the Organiser II Operating Manual
By default, LPRINT adds a carriage return (ASCII 13) at the end of the string - moving the print position to the start of the next line. If you want to leave the print position at the end of the string, so that the next string will print immediately to its right, add a semi-colon at the end of the LPRINT command, as follows:
LPRINT "HELLO WORLD";
If you want the next string printed one space to its right, add a comma instead of a semi-colon.
You can make several strings appear on the same line like this, but note that the text is not printed until a carriage return is received by the printer. The text is also printed if the text exceeds the current line length or if a form feed (ASCII 12) is sent to the printer.
Note that if you end an LPRINT with a semi-colon or a comma, and you then use an OPL command or function which uses the keyboard (such as INPUT, GET or a PAUSE of 0 or below), the unprinted line of text wilt be lost. This is because the printer is switched off whenever the Organiser is waiting for a key press. If you do have to access the keyboard in an OPL program which uses the printer, build up complete lines of text in the program, and LPRINT them without using a semi-colon.
You can in fact use the above feature to help conserve power when running your printer from the battery. If an LPRINT command which does cause a carriage return is followed by i gap when nothing is printed, follow the LPRINT with a harmless keyboard command such as KEY. This may cause a slight pause in your OPL program while the printer finishes printing the text from the LPRINT, but the printer will then turn off and use no power until the next printer command occurs.
If the printer reaches the end of a line without having received a carriage return, it will print the line of text, then position to the start of the next line. If this does happen and the printer then immediately receives a carriage return, it will be ignored, to prevent unwanted blank lines appearing on your printout. So, for example, an LPRINT of a 40 character string in 40 column mode will always position to the next line, whether or not the string was followed by a semi-colon.
It is a good idea to use a single LPRINT command at the start of your OPL programs, to ensure that the printer positions itself back to the left hand margin.
Control codes do not represent characters but are used to position the printer head and to change the typeface.
To send a control code to the printer, use the CHR$ function in an LPRINT command. For example:
LPRINT CHR$(23);
sends control code 23 to the printer (which sets the printer to 60 characters per line). The trailing semi-colon stops LPRINT from sending an unwanted carriage return.
The controls supported by the Psion Printer II are:
This section describes an OPL program to print out the contents of the "MAIN" data file on drive A:, the internal memory of the Organiser. Since this is commonly used to hold names and addresses, the program prints a title saying "this is my address book", with the word "my" printed in 20 column mode. The first field of each record, usually a person's name, is underlined, to stand out on the printout. The text is printed in 60 column mode.
If you want to enter the program, select PROG from the main menu on your Organiser to give you the program menu. Then select NEW, and type a name for the program (e.g. APRINT), followed by EXE. You will then be in the program editor, with the program name shown on the top line. Press EXE again to start a new line, and then type in the program. Note that lines which begin with a "rem" statement are merely comments on what the program does, and you do not have to type them in.
When you have finished entering the program, press MODE and select TRAN to translate the program If any errors are found, you are given the chance to re-edit the program, with the cursor appearing on the line containing the error. Otherwise, you will be prompted to SAVE the program, so press EXE to do this and you will be returned to the program menu. If you now press R to select the RUN option, you should see your program name suggested as the one to run, so just press EXE to run it.
Remember that you must be connected to your printer, and you must previously have pressed ON/CLEAR when at the Organiser's main menu to load the printer's software into the Organiser.
rem ** program to print "a:main" rem ** alter the program if you want to rem rem "errs" is the error handler ONERR ERRS:: rem ensure we are at the left margin LPRINT rem set underline and 40 cols:start title LPRINT CHR$(21)+CHR$(15)+"THIS IS "; rem print "my" in 20 cols LPRINT CHR$(14)+"MY"; rem 40 cols:end the title. stop underline LPRINT CHR$(15)+" ADDRESS BOOK"+CHR$(24) rem set 60 cols:print a blank line LPRINT CHR$(23) rem open my address book OPEN "A:MAIN",A,F1$,F2$,F3$,F4$,F5$,F6$ WHILE NOT EOF rem 1st field underlined: note comma LPRINT CHR$(21)+A.F1$+CHR$(24), rem print other fields LPRINT A.F2$, A.F3$, A.F4$, A.F5$, A.F6$ NEXT ENDWH rem close the file:turn the printer off CLOSE :KEY :STOP rem any errors are handled here ERRS:: IF ERR<185 AND ERR>181 CLS :PRINT CHR$(16)+"PRINTER "; IF ERR=184 :PRINT "BATT LOW" ELSEIF ERR=183 :PRINT "TIMEOUT" rem the lprint goes to left margin ELSE PRINT "ESCAPE" :LPRINT ENDIF :GET ELSE ONERR OFF :RAISE ERR :ENDIF
If Comms Link is connected to the printer (via the "top port" on the left side of the printer), the LPRINT command will, by default, send data to the printer rather than via the Comms Link lead. The printer software includes an OPL command "XPRINT%" to switch LPRINT between the printer and Comms Link. Use:
XPRINT%:(0)
to direct LPRINTs to Comms Link, and:
XPRINT%:(1)
to make LPRINT revert back to the printer.
XPRINT% returns 0 if LPRINT had previously been going to Comms Link, and 1 if it had previously gone to the printer This returned value may be used to restore the initial XPRINT% state by using it as the parameter to a second call to XPRINT%.
You can print bit-image graphics on your Psion Printer II by using the GPRINT command.
GPRINT positions to the left margin before printing, and to the left margin of the next line afterwards.
You cannot mix text and graphics on the same line of printout - GPRINT discards any unprinted characters.
If you are running your printer on battery power, you may wish to know that graphics printing uses more power than text printing. Printing graphics is also slower than printing text - the maximum time to print a line of graphics is 3 seconds.
If you are running your printer from the battery, and you have periods between GPRINTs when nothing is printed, you can conserve power by following each GPRINT with a harmless keyboard command such as KEY. This may cause a slight pause in your OPL program while the printer finishes printing the data from the GPRINT, but the printer will then turn off and use no power until the next printer command occurs.
GPRINT must be called with 2 parameters. The first parameter is the number of bytes of data to print, and should be an integer between 1 and 256 inclusive The second parameter is the memory address of the data to print.
Each byte of data defines one vertical line of eight dots (there are 256 such lines to the full print width). To work Out the byte to give a particular dot pattern, think of each dot as having a "value". From the bottom of the line upwards, the "values" of the dots are 1,2,4,8 16, 32,64 and 128. To work out the value of the byte, add the values of the dots you want to set. So if you wanted just the top two dots of the eight to be drawn, the byte of data should have the value 64+l28=192.
For example, the following OPL program prints a solid horizontal line, 2 dots thick and 256 dots wide.
LOCAL I%, DATA%(128) I%=1 WHILE I%<=256 POKEB (ADDR(DATA%())+I%),24 I%=I%+1 ENDWH GPRINT:(256,ADDR(DATA%()))
The program uses an array of integers, declared as DATA%(128), to reserve 256 bytes of memory (an integer takes 2 bytes of memory). The WHILE loop gives each byte in the array the value 24 (16+8 - the middle two dots in the vertical line). The ADDR function is used to get the address of the beginning of the array for POKE B and for the second parameter in GPRINT.
If your OPL program contains GPRINT or XPRINT% references and it gives a "MISSING PROC" error when run, it is possible that you have not loaded the printer's software into the Organiser's memory. This situation causes a "DEVICE MISSING" error if you use the LPRINT command. Just return to the main menu and press ON/CLEAR to load the printer software.
As well as the standard errors: listed in your Organiser II manual (such as "DEVICE MISSING"), the Psion Printer II can return three other error numbers to OPL, as follows:
Unless you use the OPL command ONERR and write some OPL to deal with these particular errors, they will cause "*** ERROR ***" to be displayed, and the program will stop.
UNWANTED BLANK LINES - every LPRINT, even when sending a control code (e.g. to set underline) causes the printer to go to the next line unless you put a semi-colon (or comma) after the text to print.
STRING NOT PRINTED - if you end LPRINT commands with a semi-colon, the text will not be printed until you use another LPRINT without a semi-colon (or until your text is too long to fit on one line). If you use a keyboard command such as GET, KEY or INPUT, any such text not yet printed will be lost.
KEYBOARD TEMPORARILY LOCKED - if you press a key while the printer is still printing, the Organiser has to wait until the printer has finished printing before it can accept the keypress. The longest time that this can take is 3 seconds, when printing graphics (or if the printer has a problem such as the paper being jammed).
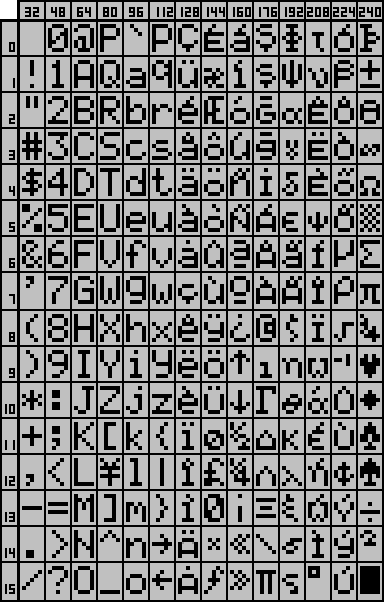
The Psion Printer II character set is based on a 7 by 5 array of dots as shown in the table overleaf. To get the character code, multiply the column number by 16 and add the row number. For example, character 'X' has code 5*16+8=88. (The image below has different numbers in the columns to the picture in the manual. Simply add the two numbers without multiplying by 16. -Jaap)
Characters with descenders below the line, such as 'p', 'g' and 'y', are moved down by 2 dots when printed.
The full character set conforms to the Psion Organiser II multi-national character set Characters with codes exceeding 127 may not agree with those on a particular model of the Organiser, but all of the commonly used characters (those with ASCII values between 32 and 127) are the same as those on any Organiser II.
If your text includes user defined characters (those with ASCII values from 0 to 7), they will appear the same as on the Organiser screen when printed except that the bottom row of the eight will always be blank. For more information on user defined characters, see your Organiser II Operating Manual.
Print Method: Thermal 5 x 9 dot matrix
Print Mechanism: Epson 1221
Print Speed: 0.8 lines/second
Paper Roll: Thermal (Jujo TF50 KS-C), 30-112mm width
Print Width: 100mm
Column Capacity: 20, 40, 60 or 80 columns
Character Size (40 column): 1.7mm x 2.4mm
Character Size (80 column): 0.85mm x 2.4mm
Line Spacing: 4.2mm ± 10% (12 dot feed)
Printer Input Voltage: 9 to 11.5V DC
Power Supply Voltage: 10.5V DC 600 mA
Head Voltage: 4.3 to 5.4V DC
Motor Voltage: 4.6 to 5.6V DC
Battery Duration: 1 hour continuous printing from full recharge
Ambient Temperature: 0°C to 40°C
Head Reliability: MCBF 300,000 lines
Mechanism Reliability: MCBF 500,000 lines
Size: 253 x 153 x 76mm
Note: The design and specification of the Psion Printer II may change without notice.
Replacement Nickel-Cadmium batteries are available from Psion.