PLUG
The Psion Link-Up Pack 2 is part of a sophisticated pocket computer system. It has been designed for ease of use but, in order to ensure that you make the most of its capabilities, we suggest that you read this booklet in conjunction with your basic Organiser handbook.
To avoid any possible damage your Organiser or communication, data and Program Packs, they should not be exposed to extremes of temperature or humidity. Do not subject them to hard knocks or excessive force, nor immerse them in liquids or use volatile fluids when cleaning the case.
© PSION PROCESSORS LTD 1985
DESIGN REGISTRATION APPLICATIONS
NOS. 1019736 AND 1019737
PATENT APPLICATION NO. 8412628
1. INTRODUCTION 2. INSTALLING THE SOFTWARE Loading from the Link-Up Software pack 3. THE "SETUP" COMMAND Setting Baud rate, parity, handshaking, etc. 4. TERMINAL MODE 5. EXAMPLES 6. TECHNICAL DATA 7. PSION AFTER SALES SUPPORT APPENDIX A The Link-Up Cable
With the Link-Up Software Pack 2 you can use your Organiser
The Link-Up Software Pack 2 contains programs which enable your Organiser to communicate with a range of RS232 and RS423 compatible equipment. Once these programs have been loaded the software pack does not have to be in the Organiser for data communication to take place.
To use Link-Up, you need to purchase two packs from the Psion range of communication products. You need:
You may also need a Link-Up Adaptor between the Link-Up Cable and you particular equipment.
The Psion Link-Up Cable has been designed to fit into the "solid state drives" of the Organiser. The Link-Up Cable looks like a datapak attached to a multi- coloured ribbon cable, ending in a special 25-pin socket. As you would expect, it is used to connect the Organiser to other equipment which will be referred to as the "target". This cable must be plugged into the Organiser whenever data transfer takes place.
If the pin layout used by your target machine is not the same as the pin layout on the Link-Up Cable you will need an adaptor. The pin layout of the Psion Link-Up Cable is described in detail in Appendix A.
The Link-Up Cable will connect directly with the serial interface of an IBM PC. If you want to communicate with equipment which does not use exactly the same pin layout as the IBM PC serial interface. you will need an adaptor. A selection of adaptors is available, either from your Psion Organiser dealer, or direct from Psion Limited.
If the adaptor you need is not available, either you or your dealer may be able to make one, Before attempting to make your own please consult Appendix A.
Software Pack 1 is designed to allow your Organiser to send and receive either single lines of information or whole files. If your only need is to transfer files between your Organiser and a printer or a microcomputer, Link-Up Software Pack 1 should fulfill all your requirements.
Software Pack 2 is designed to be used with the Organiser as a terminal to a larger computer system. It also enables you to store full 8-bit data in a datapak. Amongst other benefits, this allows you to send and receive both UPPER and lower case letters and an extended range of characters (for example, the £ and # signs).
You may wish to use Link-Up to communicate with a mainframe computer, a minicomputer, a microcomputer or a printer. For simplicity the machine you wish to communicate with will be called the target.
Before communication can take place:
After these operations have been performed, you are ready to send and receive data. Chapter Four shows you how to use the Organiser in TERMINAL mode.
Chapter Five is devoted to a set of examples, showing all these stages in detail.
When you first use Link-Up, it can take some time to match the communication needs of your target machine to those of the Organiser. The Link-Up software is designed to let you store the settings you need so that they can be automatically loaded the next time you want communication to take place.
With the Organiser switched off, fit your Link-Up Software Pack into either of the solid state drives in the back of your Organiser. You should not have any other program pack (such as the Finance pack) in your Organiser at the same time.
Switch on the Organiser. You can test to see that the software has been loaded by pressing the MODE/HOME key repeatedly. The commands available should be:
ENTER
OFF
SETUP
RESET
Every time you turn on the Organiser with a Link-Up Software pack in place these commands will be available. Note that the CALC option is not available when using Link-Up.
SETUP and RESET can only be executed when a Link-Up Software pack is in place. SETUP is described in detail in the next chapter.
Once the SETUP command has been used, turning the Organiser off does not delete the communications software. The Organiser can be turned off and the Software pack removed without affecting the communications software.
RESET clears the communications software from the organiser and returns it to its normal state. Select RESET, press EXECUTE, and the normal Organiser functions, including CALC, will return.
Removing the battery or using any other specialist program pack (such as the Psion Finance pack) also clears the communication software. You should press the ON/CLEAR key several times and wait a couple of minutes before reconnecting the battery after removing it.
When the communications software has been cleared, you must reload it before any further communications can be undertaken.
Imagine you are tuning in your radio. The station you want is transmitting at a certain frequency in a certain waveband. In order to hear it you must do two things. You must find out what the transmitted frequency is, then you must tune your radio to that frequency. Similarly, before communication can take place between the Organiser and a target device you must find out various things about the way in which the two machines can transfer data, then use the SETUP command to tell the Organiser what they are.
Setting up communication between the Organiser and a target machine is more complicated than tuning in a radio receiver. There are several settings to make, rather than just one.
Both the Organiser and the target machine must be set to transfer information at the same speed (or Baud rate). Because information can be sent both ways between Organiser and target, you must also set the controls which determine when data will be transmitted (known as handshaking). Also, since different machines transmit data in different ways you must set the pattern of bits sent in each group of information. Because you usually are in control of both ends of the communication, you must set all these things on both the Organiser and the target machine.
Collectively, the settings which must be agreed between the Organiser and the target machine are called transmission parameters. You must first discover or set these transmission parameters on the target machine, then use the SETUP command to tell the Organiser what they are. A brief description of each of these parameters is given later in this Chapter, but it is not necessary to understand what each one does in order to use Link-Up. It is important, however to make sure that the settings are the same on both machines. You may have to run communications software on the target machine, but this will depend on its nature.
If, for example, you intend to use the Organiser as a terminal to a mainframe or minicomputer, or log into an electronic mail or billboard system, it will already be set up for communications. You will not have to run a setup program on the target. All you have to do is discover what transmission parameters the system uses.
If your target is another computer, you will need to run some sort of communications program on it to set these parameters. On printers, these parameters are often set on banks of switches. Chapter Five includes examples of the whole procedure.
Once the parameters you need have been set on the Organiser they can be saved on the Software pack so that they are loaded automatically the next time the communications software is loaded.
To get into SETUP press the MODE/HOME key until SETUP appears in the display, then press the EXECUTE key. The Organiser searches the Software pack for the last set of parameters saved. It loads them into its memory, and displays the first of these - TBAUD - on its screen.
Within SETUP the FIND and SAVE keys take on their alternative meanings, becoming ↓ and ↑ respectively, as indicated by the blue arrows below the keys. Use these keys to move up and down through the list of parameters and their current values. Figure 3.1 lists the parameters you can set in this way, and the values you can choose from in each case.
The parameters are, effectively, arranged in a loop. For instance, you can move from TBAUD to CTRL either by pressing ↑ twice or by pressing ↓ eleven times. The values of most of the parameters are set by a multiple choice system, where you use the << and >> keys to move left and right through a row of options for that parameter until the one you want is displayed. The value is now fixed until you alter it again. For example. to change the handshaking from RTS/CTS to XON/XOFF, press the ↓ key until HAND:RTS/CTS appears on the screen. Then press the >> key until the display shows HAND:XON/XOFF. Note that you could also get from RTS/CTS to XON/XOFF by pressing << twice.
You can set the parameters in any order you choose. When you wish to accept the setup as it stands move to the EXIT command and press EXECUTE. Until you do that, there is no limit to the number of times you may alter the value of each parameter. When you execute EXIT the parameter values set become effective and remain so for all ensuing communications, until you replace the setup with another, or clear the communications software.
| PARAMETER | INDICATOR | OPTIONS |
| BAUD RATE | BAUD: | 150 300 600 1200 2400 4800 9600 |
| PARITY | PAR: | ODD EVEN MARK SPACE NONE |
| NO. OF DATA BITS | BITS: | 7 8 |
| NO. OF STOP BITS | STOP: | 1 2 |
| HANDSHAKING | HAND: | RTS/CTS XON/XOFF NONE |
| END OF LINE | EOL | } Up to 3 characters. See Text for details. |
| END OF FILE | EOF: | |
| EXTRA TRANSLATION | ||
| ORGANISER VERSION | TRANA: | } 1 character. See Text for details. |
| TARGET VERSION | TRANB: | |
| EXIT | EXIT: | NO SAVE SAVE |
Transmission Parameters
FIGURE 3.1
The Baud rate measures the speed at which lines of data are transferred. It is sometimes called bits per second by other communications packages.
The TBAUD rate is the speed at which the Organiser transmits data to the target. The RBAUD rate is the speed at which the Organiser receives data.
It is not always best just to use the highest Baud rate available. If the Baud rate is high, the probability of transmission errors increases. If some of your characters are not being transferred correctly, try lowering the Baud rate on both Organiser and target.
Many printers print at a much slower speed than the maximum Baud rate available with Link-Up. If you are using Link-Up to connect to a printer, increasing the Baud rate will probably not have any effect on the speed at which printing takes place.
The Organiser can transmit data in groups (known as frames) of ten or eleven bits. One character of data is included in each frame.
The first bit of each group is the start bit. The next seven or eight bits contain the actual data. Then there may be a bit known as the parity bit. Lastly, there will be one or two step bits. The PARITY, BITS and STOP commands allow you to specify the data frame you need.
Figure 3.2 shows all the possible ways of combining start, data, parity and stop bits in a frame of ten or eleven bits. Simple addition will reveal that two combinations are not allowed. Seven data, no parity and one stop bit is an illegal combination. It would leave only nine bits in the data frame. Similarly eight data bits, two stop bits and a parity bit is an illegal combination, because it would lead to a data frame of twelve bits. Link-Up will not allow either of these combinations to be set.
| START BIT |
7 DATA BITS |
PARITY BIT |
1 STOP BIT |
|
| Total 10 |
||||
| START BIT |
7 DATA BITS |
PARITY BIT |
2 STOP BITS |
|
| Total 11 |
||||
| START BIT |
7 DATA BITS |
2 STOP BITS |
||
| Total 10 |
||||
| START BIT |
8 DATA BITS |
PARITY BIT |
1 STOP BIT |
|
| Total 11 |
||||
| START BIT |
8 DATA BITS |
2 STOP BITS |
||
| Total 11 |
||||
| START BIT |
8 DATA BITS |
1 STOP BIT |
||
| Total 10 |
||||
Legal Data Frames Figure 3.2
A parity bit is a bit added to the data frame by the transmitting device. It helps the receiving device check whether the data has arrived correctly. There are several different types of parity checking in use. The four most commonly used types, all recognised and accepted by Link-Up are shown in figure 3.1.
If your target device uses parity checking, make sure that your Organiser SETUP uses the same type of parity checking as the target device. Select the appropriate type using >> and <<.
If your target does not allow parity checking, select parity NONE on your SETUP. If you do not use parity checking, the parity bit is not included in the data frame, allowing you to include one more data or stop bit.
This command allows you to set the number of data bits, in each frame. As stated above, the length of each frame may be ten or eleven bits. Of these only seven or eight contain the information you want to transfer. The others are the start bit, stop bit(s) and the optional parity bit. With the >> and << keys you may set the number of data bits to be seven or eight.
Some manufacturers include the parity bit in their definition of the data bits. This means that they would call seven data bits and a parity bit eight data bits. Check the definition of data bits used by your target device in its documentation.
Seven bits of data (not including the parity bit) is the most common number of bits used in data communication. Some systems are set up to expect eight bits per character, and to allow communication with such devices the Link-Up Software Pack 2 will accept, transmit and save data frames with eight data bits.
Stop bits mark the end of the data frame. Some systems use one stop bit, others require two. Link-Up allows you to choose either option using the >> and << keys. Remember, however, that the total number of bits in a frame must be ten or eleven. The six combinations of bits which satisfy all the conditions are shown in figure 3.2
Data can only be transmitted when one device is ready to transmit and the other is ready to receive. Handshaking is a technique which ensures that this happens. It is another safety check on data transfer. Three handshaking options are offered by the Link- Up pack. They are RTS/CTS, XON/XOFF or NONE. RTS/CTS is sometimes referred to as hardware handshaking, and XON/XOFF is sometimes called software handshaking.
If you are using the Organiser as a terminal to a mainframe or with a modem to a remote system, you will probably be using XON/XOFF handshaking.
If you are using Link-Up with a printer, or with certain types of microcomputer you may wish to use RTS/CTS handshaking. In this case, you must make sure that the hardware handshaking lines on the Link-Up Cable and adaptor you are using are correctly wired.
There is another form of hardware handshaking called DSR/DTR Appendix A describes how Link- Up's RTS/CTS handshaking can be used to communicate with a DSR/DTR system.
If your target does not support any of the types of handshaking mentioned, you will have to choose NONE.
On most computers, a line ends when you press the return key. On some systems, pressing the return key generates a carriage return character and a line feed character. On other systems however, the return key will only send a carriage return character.
On the Organiser, a line ends when you press the EXECUTE key. By using the >> and << keys when EXE is displayed on the screen, you can chose whether this will generate carriage return and line feed characters, or just carriage return. Carriage return is shown on the screen as CR, and line feed is shown as LF.
In the ASCII character set used by the Organiser, carriage return is 13 (decimal) and line feed 10.
In general, if you are using the Organiser as a terminal to a larger system you will only need carriage return to end a line. If you are using the Organiser to transfer tiles to another micro, or to send data to a printer, you will probably need carriage return and line feed.
This feature is useful when you are sending data from a datapak to a printer or for display on another computer screen.
Records on the Organiser can be up to 200 characters long. Few printers or computer screens can display lines this long. This feature allows you to set the display width (or line length) to 40, 64, 80 or 132 characters
Suppose, for example, you are printing the contents of a datapak and you set the width to 80 characters. If the datapak contains a record which is over 80 characters long, the Organiser will tell the printer to start a new line with the 81st character and, if applicable, the 161st character.
Alternatively you can make sure that nothing is displayed on the target screen, by setting width to OFF.
One of the most common difficulties users find is in displaying and printing the British pound sign. Every time you want a pound sign to appear, a hash is shown, and on the rare occasions you want a hash, the pound will pop up.
This is because most computer systems use the same ASCII code (35 decimal) to represent both. When the Link-Up sends a £ to another computer, it sends ASCII 35.
The HASH feature of SETUP allows you to choose how ASCII 35 will be interpreted by the Organiser. Suppose HASH is set to £. Then if the Organiser receives ASCII 35, it will assume that it is supposed to be a pound sign.
Internally, the Organiser uses ASCII 15 (or 0F in hexadecimal) to represent the pound sign. If it receives a pound sign, it converts it to ASCII 15 for internal use. The ASCII character set used by the Organiser is described in the chapter 6.
If you are using the Organiser as a terminal to a larger system you will probably want to set ECHO to HOST. When you press a key on the keyboard, the Organiser will not immediately display a character. The character will be sent to the main system, and then the system will echo the same character back. This is the way most large computer systems work. If you ever find that the Organiser is displaying double characters, it will be because you have forgotten to set the echo to HOST.
If you are using the Organiser for a local operation, such as sending data to a printer or to a microcomputer, set ECHO to LOCAL. The Organiser will then display characters typed in at the keyboard immediately.
When the Organiser receives data from another computer, it can store this data on a datapak. It can save the data either in 6-bit (packed) format or 8-bit (unpacked) format.
When you are not using Link-Up, data stored with the SAVE key is packed so that only six bits are used to store every character. This packed storage allows the Organiser to save up to eleven thousand characters on an 8K datapak, and 22,000 characters on a 16K datapak. Programs written in the Organiser programming language POPL (as used by the Psion Finance pack, Science pack and Maths pack) are saved using 8-bit storage.
In 6 bit (packed) format, only characters with ASCII values between 32 and 95 (decimal) can be saved. Lower case letters cannot be stored. If you try to save a record which includes lower case letters, they will be converted to upper case letters before saving.
If you save in 8-bit format, you Will be able to save all normal characters. However you will not be able to find data stored in 8-bit format unless you use the Link-Up Software Pack 2.
When the Organiser is in terminal mode, the MODE key becomes a CTRL key. By using this key, you can generate all the characters on a normal typewriter keyboard. For example, pressing MODE then zero (0 is shifted U) generates the exclamation mark.
In SETUP the CTRL option does not set any of the transmission parameters. It serves to remind you of the control sequences used to generate characters which are available but not shown on the keyboard.
The final item to be displayed as you move down the list of parameters is EXIT. You can select either of its two options, SAVE and NO SAVE. with the >> and << keys.
If you are likely to use the settings frequently, use the >> or << key to select the SAVE option before pressing EXECUTE. Once the settings have been saved they will appear as the default when the communications software is next loaded.
If you have not changed the settings of any parameter, or it the setup you have created will only be used once, the NO SAVE option and press EXECUTE.
In either case the parameter settings you have selected will be retained in the memory of the Organiser. The retained settings can be changed at any time or entirely deleted by executing the RESET command. The settings are not affected by turning off the Organiser, removing the Link-Up Software Pack 1 or fitting a datapak. If you do not use the RESET command the settings will only be deleted when you fit another program pack or disconnect the battery.
When you have used SETUP, you can turn the Organiser off and remove the Link-Up Software Pack. You will not need it again, unless you wish to change the transmission parameters. The communications software remains loaded until you use the RESET command or use another program pack, such as the Psion Finance pack.
Turning off the Organiser allows you to fit the Link-Up Cable, needed to make physical connection with the target. When you have slotted the Link-Up Cable into the back of the Organiser and fitted it and, if necessary, the appropriate adaptor to the serial communications socket of your target, you are ready to enter terminal mode.
If you turn your Organiser on with the Link-Up Cable in place, the Organiser will give you three options when you press the MODE key. They are:
ENTER:
OFF: and
TERM:
If you do not have the Link-Up Cable in place, only ENTER and OFF will be offered as options.
If you select TERM (by pressing EXECUTE when TERM is displayed on the screen) you will enter Terminal mode. Your Organiser is now a handheld terminal, waiting to send or receive data from its target. If ECHO is set to LOCAL characters entered from the keyboard will immediately be shown on the screen. If ECHO is set to HOST, characters will only be shown on the screen when the host machine accepts and echoes them.
MODE and SPACE are used to leave terminal mode.
When you are in terminal mode, many of the keys on the Organiser keyboard have special uses.
The ON/CLEAR key returns the cursor to the left of the Organiser screen.
The MODE key is now used as a CTRL key. Pressing MODE then another key will send the CTRL definition of that key. For example, pressing MODE then M will send a carriage return.
There is a standard control definition for each letter of the alphabet. In addition, the control key and the yellow and blue characters on the keyboard are used to generate characters which do not appear on the Organiser CTRL (MODE) then 5, for instance. gives [. Figure 4.1 lists the control characters you can use.
The SHIFT key will, as usual, change between letters and numbers. The cursor will be an underline when letters are available or flashing when numbers are available. All the yellow and blue characters may be used with the Link-Up Software Pack 2.
Letters typed in on the Organiser may appear in Upper or lower case. The CTRL key and the arrow keys change between upper and lower case letters. CTRL (MODE) then << changes to lower case. Any
| CTRL 0: | ! | CTRL 8: | } |
| CTRL 1: | $ | CTRL 9: | ; |
| CTRL 2: | ^ | CTRL /: | ' |
| CTRL 3: | & | CTRL *: | | |
| CTRL 4: | - | CTRL -: | \ |
| CTRL 5: | [ | CTRL +: | ? |
| CTRL 6: | { | CTRL =: | @ |
| CTRL 7: | ] |
Figure 4.1 CTRL sequences
letters entered from the keyboard will appear in lower case. (Data from the target machine will appear in upper and lower case, depending on the way it is received). Conversely, CTRL then >> changes to upper case.
It you are using XON/XOFF handshaking, the >> key is also used to toggle scrolling.
To leave terminal mode press CTRL then SPACE.
When you are in terminal mode the SAVE and FIND keys are used to receive and send files.
FIND is used to send the contents of a datapak to the target. If you have a datapak in your Organiser, press ON/CLEAR then FIND, and all the records on the datapak will be sent to the target. If you type in a string, then press FIND. all the records containing that string will be sent to the target.
SAVE is used to receive a file sent by the target and save it on a datapak. Suppose you are using the Organiser as a terminal to another computer. Most operating systems have a command which displays the contents of a file on the screen. If you have a datapak in your Organiser, type in the command to display a file, then press SAVE instead of EXECUTE. The file will then be saved, line by line, on the datapak. When the file has been saved on the datapak, press ON/CLEAR to terminate the data.
Characters received by the Organiser will only be displayed on the screen after a carriage return has arrived. They are saved record by record, not character by character Remember that there is a maximum of 200 characters per record.
If you are using the Organiser to transfer files with another micro, press SAVE, then use the appropriate command to send a file from the other computer.
Remember that it you have selected 6-bit packed storage, only a limited character set will be used to save the file. Lower case letters will be converted to upper case. If you have selected 8-bit storage, the full ASCII character set may be saved to the datapak, but records stored in this way cannot be accessed from the normal Organiser operating system.
This chapter consists of examples which show how to connect the Organiser to various target devices.
Telecom Gold is an electronic mailbox system, operated by British Telecom. Subscribers may log on to the system through the telephone system, and send or read messages.
To access Telecom Gold, you need a modem, a telephone and an account with Telecom Gold. If you do not have an account with Telecom Gold, you can still get as far as receiving the Telecom Gold welcome message.
First SETUP the transmission parameters. Telecom Gold can be accessed at 300 Baud for both transmit and receive, so TBAUD and RBAUD must be set to 300. Other parameters must be set as follows:
PAR - EVEN BITS - 7 STOP - 1 HAND - XON/XOFF EXE - CR HASH - £ ECHO - HOST
Make sure that the Link-Up Cable you have is correctly wired to communicate with your modem. In order to connect to most modems, you will need an RS232 cable which terminates with a DTE connector. The standard Link-Up Cable is wired with a DCE connector. Appendix A describes how to determine whether your equipment needs a DTE or DCE connector. A 25 pin D type connector to make this conversion is available through your Organiser dealer or direct from Psion Limited.
Replace Link-Up Software Pack 2 in your Organiser with the Link-Up Cable and connect the Organiser and modem. Put the Organiser into terminal mode.
Dial the telephone number for Telecom Gold. In London the number is 01 583 3000. There are also telephone numbers throughout the British Isles which can be used to connect to the Telecom Gold system. When your call is connected, you should hear a whistling tone. When you hear this tone, connect the telephone to the modem. You should see the welcome message appearing on the screen of the Organiser. If you have access to the system, you can then log in, as normal.
On most microcomputers you will need to run some sort of program which performs a similar function to the SETUP command. It will set the parameters such as Baud rate, parity checking etc. This may be a commercially marketed communications package or a program you have written yourself. Alternatively the commands to set the transmission parameters can often be accessed from the operating system, and can be executed one by one.
Much of the following description of communication with the Apricot, also applies for communication with Victor/Sirius computers
The centre port of the ACT Apricot is an RS232 interface. A Link-Up Adaptor to connect the Link-Up Cable to this port is available from your Organiser dealer or direct from Psion Limited.
The ACT Apricot is provided with a standard communications package - "ASYNC". Run ASYNC to set the software parameters on the Apricot. Use the SETUP command to set the software parameters on the Organiser.
To use Link-Up with the Apricot, you must choose the user specified terminal option of ASYNC's main menu. You can then set the Baud rate, the parity convention, the number of data and stop bits and whether you want XON/XOFF handshaking. Note that if you want XON/XOFF handshaking on the Apricot. you must set the receive and send parameters separately. On the Link-Up software pack, handshaking for both sending and receiving is set with one command. XON/XOFF is the only form of handshaking possible with ASYNC.
Set both the Link-Up pack and ASYNC to local echo. Make sure that EXECUTE is defined as carriage return and line feed on the Link-Up pack.
Start terminal operation by selecting the relevant option of ASYNC. Enter terminal mode on the Organiser, and everything you type on the Organiser will appear on the screen of both the Apricot and the Organiser.
If you have a datapak in your Organiser, you will be able to send and receive individual or groups of records. In order to send files from the Apricot, set the Organiser to receive (by pressing SAVE) then select the send option from the microscreen menu. When the file has been received, press the ON/CLEAR key on the Organiser.
Link-Up always uses serial data transmission. Some dot-matrix printers only have parallel ports as standard. In contrast, daisywheel printers almost always use serial transmission. On most printers. transmission parameters are set by DIP switches. which are small switches commonly found under the front cover of the printer.
Hardware Interface An adaptor is needed to connect the Link-Up Cable to the Epson FX 80 serial interface. This may be available from your computer dealer or ordered direct from Psion Limited. It is also possible to wire an adaptor yourself. The Epson only needs three connections to be made. These are:
| Link-Up | Epson |
| 3 | 3 |
| 4 | 11 |
| 7 | 7 |
The transmission parameters of the Epson are set by dip switches on the serial interface card. As the meanings and settings of these switches may vary between different versions of the serial interface card, you must consult the manual to your interface. It should be possible to set the switches to match the following SETUP:
TBAUD 2400 RBAUD 2400 PARITY NONE BITS 8 STOP 1 HAND RTS/CTS EXE CRLF
The screen size should be set to the width of your printer paper. If you want the data printed to be displayed on the screen of the Organiser, you should set ECHO to LOCAL. The HASH and PACK options do not affect printing. When this SETUP has been created you can send the contents of a datapak to the printer using FIND.
The characters displayed by the Organiser correspond to Hitachi standard HD44780A00. Remember that, when the data IS saved in the packed (6-bit) format, only characters 20 (hex) to 5F (hex) inclusive can be saved on the datapak.
Characters with an ASCII value of over 127 cannot be generated from the Organiser keyboard. However if BITS is set to 8, and PACK is set to 8-bit, the Organiser can receive, save and then transmit 8 bit data.
A carriage return cannot be saved on the datapak as part of a normal record.
Internally, the Organiser uses ASCII 0F (hex) to represent the pound sign. As described in chapter 3, the Organiser transmits and receives the pound sign as ASCII 23 (hex).
| ORGANISER CHARACTER SET | |||||||||||||||||||||||||||||||||||||||||||||||||||||||||||||||||||||||||||||||||||||||||||||||||||||||||||||||||||||||||||||||||||||||||||||||||||||||||||||||||||||||||||||||||||||||||||||||||||||||||||
|
| ||||||||||||||||||||||||||||||||||||||||||||||||||||||||||||||||||||||||||||||||||||||||||||||||||||||||||||||||||||||||||||||||||||||||||||||||||||||||||||||||||||||||||||||||||||||||||||||||||||||||||
The character set - Figure 6.1
Link-Up recognises XON/XOFF and RTS/CTS handshaking.
XON/XOFF handshaking - after Link-Up has transmitted an XOFF character there will be a short interval before the target machine receives this character and stops transmitting data. Up to eight characters can be received in the Organiser overflow buffer during this time. Any further characters will be lost.
Link-Up sends an additional XOFF for every character received.
DSR/DTR handshaking is similar to RTS/CTS handshaking. if you wish to communicate with a device which uses DSR/DTR handshaking, set the Link-Up pack to RTS/CTS handshaking, then communicate through an adaptor which connects the RTS and CTS lines from the Organiser to the DSR and DTR lines of the target. Your Organiser dealer may be able to supply you with a suitable adaptor. Alternatively you can order one direct from Psion Limited.
When the Organiser is in use with the Link-Up system power consumption is high. If you have only the Link- Up Cable in place, 54 milliamps of current are used. If you have a datapak and the Link-Up Cable in place 78 milliamps are used.
When you save data to a datapak, the Organiser uses additional power. Average battery life when the Organiser is used with the Link-Up system is approximately 10 hours.
The RS232 standard specifies that voltages between -3V and -25V are to be used to represent logic 1, and voltages between +3V and +25V are to be used for logic 0.
Link-Up uses voltages of -5V and +5V for transmitting 1 and 0 respectively. It can receive signals from the whole RS232 voltage range.
As with all computing equipment, there may well come a time when you find that you are stuck and feel that you can go no further. This section is designed to help you solve some of the more common problems users have experienced with the Link-Up packs.
You cannot see how to connect the Organiser to your target.
To use the Link-Up Software Packs you need the Psion Link-Up Cable, which is sold separately. It is an RS232 cable which slots in to either of the positions normally used by datapaks or program packs.
You can not see how to join the Link-Up Cable to your target.
You cannot get the word "SETUP" to appear on the screen.
You can only get to the SETUP command when the Organiser has been powered up with a Link-Up Software pack in place. Try turning the Organiser off. inserting the your Link-Up Software pack, then turning it on again.
You cannot get into terminal mode.
You can only get into terminal mode after SETUP has been used, and when the Link-Up Cable is in place. If only ENTER: and OFF: appear on the screen of the Organiser, then the Link-Up Cable is not in place. Turn the Organiser off, insert the Link-Up Cable and turn on again. If CALC is also available, this means you still have to use the SETUP command. Turn off the Organiser, insert your Link-Up Software Pack and go through the actions described in chapter three.
Nothing happens when you go into terminal mode
Press the EXECUTE key a few times. If nothing happens, check the wiring used between the Organiser and target. Check whether your target RS232 port is wired as DTE or DCE. If you are using hardware handshaking (RTS/CTS or DSR/DTR) check the wiring on the connector between the Link-Up Cable and your target.
Characters you type in on the Organiser appear twice on the screen
This usually means that the ECHO option has been set to LOCAL, when it should be set to HOST. If the ECHO is set to HOST when it should be set to LOCAL nothing at all will appear on the screen of the Organiser when keys are pressed.
You cannot leave terminal mode
Press MODE, take your finger off it, then press SPACE.
If all else fails, remove the battery, wait a couple of minutes, press the ON/CLEAR key once or twice, then reconnect the battery.
Many purchasers will want to use Link-Up with target devices which have not been covered. If you want to communicate with a machine which we have not described, and after reading its documentation you still cannot discover the correct hardware and software connections you have two options. Firstly you can go back to the dealer who sold you the machine and ask him how to set up your target. If you still cannot solve the problem, Psion Support helps users of Psion products with any problems they may have. The address is:
Psion Support,
Psion House.
Harcourt Street.
London W1H 1DT
tel 01 723 0553
Your Psion Organiser Link-Up Software Pack 2 carries a one year warranty against mechanical or electrical failure other than in the case of misuse or damage arising from negligence. There are no user- serviceable parts within the Link-Up Software Pack 2, and any attempt to dismantle or repair your Software Pack other than by an Appointed Psion Service Agent will invalidate this warranty.
Should you experience any problems consult your Organiser manuals with particular reference to the troubleshooting sections. If you find no solution to your problem, send your Link-Up Software Pack in suitably protective packaging to:
Service Department
Psion Limited,
Psion House,
Harcourt Street,
London W1H 1DT
We can accept no responsibility for goods damaged in transit to us. This warranty does not affect your statutory rights.
The hardware interface needed for Organiser communications is sold separately from the Link-Up Software packs. The hardware, the Psion Link-Up Cable can be fitted to either solid state drive of your Organiser. The socket at the other end of the Link-Up Cable is designed to connect to equipment using the RS232C and RS423 communications standards. This appendix shows you how to make sure that the wiring of your target device is compatible with the Link-Up Cable.
Part of the fascination of the microcomputer industry is that it was started and has been fuelled mainly by the invention and industry of talented individuals. The disadvantage of this is that talented individuals can rarely agree on a standard. So it is with the RS232 interface. There are differences even between connectors which are described as standard. This appendix describes the wiring of the connector supplied with the Link-Up Cable, using as little jargon as possible. Read through this appendix carefully and compare the wiring of the Link-Up Cable with that of your target device.
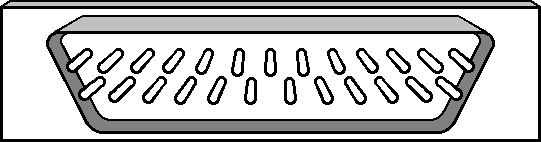
The Link-Up Cable is terminated with a 25 way D type socket (It has been wired so that it will connect directly into an IBM PC.) The socket has receptacle contacts and must be connected to a plug, with pin contacts. Figure 1 illustrates both connectors.
Plug and Socket - Figure 1
The wiring of the Link-Up Cable socket is shown in figures 2 and 3. Figure 2 us a table, showing the functions and positions of the socket contacts. Figure 3 is a diagram of the socket, with each contact labelled. The wiring pattern of the socket is known as its pinout.
| PIN | NAME | FUNCTION | SIGNAL DIRECTION | COLOUR | |
| 2 | TxD | - | TRANSMITTED DATA | INPUT TO ORGANISER | BLUE |
| 3 | RxD | - | RECEIVED DATA | OUTPUT TO TARGET | RED |
| 4 | RTS | - | READY TO SEND | INPUT TO ORGANISER | GREEN |
| 5 | CTS | - | CLEAR TO SEND | OUTPUT TO TARGET | BROWN |
| 6 | DSR | DATA SET READY | - | ||
| 20 | DTR | DATA TERMINAL READY | - | ||
| 7 | GND | - | SIGNAL GROUND | YELLOW |
Link-Up Cable pinout - Figure 2
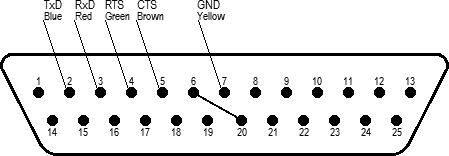
Link-Up Pack pinout diagram - Figure 3
To connect up the Organiser to the target equipment you must check that the pinout of the target RS232 connector matches that of the Link-Up Cable socket pinout. If the wiring is compatible then there is no problem - connect the Link-Up Cable directly to your target. If the wiring is different or the target connector does not fit the Link-Up Cable connector, you will either have to buy or wire an adaptor or interconnection cable to go between the Link-Up socket and your equipment. Your dealer may be able to supply a suitable adaptor. Alternatively a range of adaptors are available direct from Psion Limited.
Although there are 25 contacts on the D type socket, only five are needed for data communication. Two are used for data, two for control signals and one is signal ground.
Data travels from the target to the Organiser on the TxD line, and from the Organiser to the target on the RxD line.
The direction in which your target expects data to travel depends upon whether it is wired as Data Communication Equipment (DCE) or Data Terminal Equipment. A signal which is output for a DCE will be input for a DTE. The difference between DCE and DTE is explained later.
TxD is for serial data transmitted to the Organiser from the target. RxD is data received from the Organiser. These will normally be used, though for some printers, RXD only need be connected.
The signals on these lines control when data is sent on the TxD and RxD lines. This control is known as handshaking, and is described in chapters 3 and 6. Link-Up only uses them if the RTS/CTS protocol is selected.
The signal from the Organiser to the target is on the CTS (clear to send) line of the Link-Up Cable. The signal from the target to the Organiser is on the RTS (ready to send) line of the Link-Up Cable.
If your target is wired as Data Terminal Equipment the connections run as you might expect. CTS on the Link-Up Cable socket is connected to CTS on the target connector, and similarly for RTS. If, however, your target is wired as Data Communication Equipment, CTS of the Link-Up Cable must be connected to the RTS pin of the target, and vice versa.
These signals are not used by the Organiser, but the relevant pins are connected together on the Link-Up socket, so that equipment which requires a data set ready signal will get one whenever it generates a data terminal ready signal.
The Link-Up Cable is wired as Data Communications Equipment. This means that the RXD and CTS connectors are output for the Organiser. The convention is designed so that DCE connectors join directly to DTE connectors. If your target is wired as Data Terminal Equipment, RxD and CTS will be inputs for your target. If your target is wired as Data Communication Equipment, the RXD and CTS of the Organiser must be connected to the TxD and RTS of the target. The diagrams below show the direction of data flow and the connections to be made between the Organiser and DTE or DCE ports.
In general, if you are communicating with a micro or a printer, the connector on the RS232 cable from the Organiser should be wired as DCE. If you are using the Organiser as a terminal to a mainframe or remote system, the RS232 cable from the Organiser should terminate in a DTE connector.
| CONNECTING THE ORGANISER TO A DTE | ||||||
| ORGANISER (DCE) |
TARGET DTE |
|||||
| 2 | ← | TxD | - | TRANSMITTED DATA | ← | 2 |
| 3 | → | RxD | - | RECEIVED DATA | → | 3 |
| 4 | ← | RTS | - | READY TO SEND | ← | 4 |
| 5 | → | CTS | - | CLEAR TO SEND | → | 5 |
| 6 | DSR | - | DATA SET READY | → | 6 | |
| 20 | DTR | - | DATA TERMINAL READY | ← | 20 | |
| 7 | - | SIGNAL GROUND | - | 7 | ||
| CONNECTING THE ORGANISER TO A DCE | ||||||
| ORGANISER (DCE) |
TARGET DCE |
|||||
| 2 | ← | TxD | TxD | → | 2 | |
| 3 | → | RxD | RxD | ← | 3 | |
| 4 | ← | RTS | RTS | → | 4 | |
| 5 | → | CTS | CTS | ← | 5 | |
| 6 | DSR | DSR | ← | 6 | ||
| 20 | DTR | DTR | → | 20 | ||
| 7 | ------------- | 7 | ||||
DTE and DCE - Figure 4
MADE IN U.K.