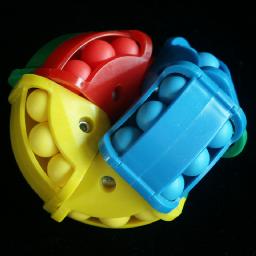
Astrolabacus
This ingenious puzzle consists of a loop of six
segments. Each segment has two coloured tunnels containing three coloured balls. Some tunnels
connect up to form a loop containing 18 balls. The balls in this loop can be shifted around. The
segments are connected to each other with a hinge so that the shape of the puzzle can be changed,
and by doing so the loop can be formed using the other tunnels of the segments. The aim is to put
each coloured ball in the tunnel of the same colour.
This is a fascinating puzzle, and very confusing. The puzzle feels strangely organic when you
change its shape, and it takes a long time to get used to where the loop forms from the tunnels.
Astrolabacus was invented and designed by John D. Harris (Möbius Phobias).
It was patented on 8 July 1997, US 5,645,278. By the way, the inventor is not the
same John Harris who invented the Rolling Cubes Puzzle.
If your browser supports JavaScript, then you can play the Astrolabacus by clicking
the link below:
The number of positions:
The puzzle is symmetrical, and remains so even when it changes its shape (180 degree rotational
symmetry around a central axis). The balls therefore occur in pairs which remain opposite each
other. There are four colours (red, blue, green, yellow), and the tunnels are coloured in such a
way that every pair occurs exactly once.
There are 18 pairs coloured balls which can be permuted in 18! ways. The balls of a pair can also
be swapped, so there are (at most) 18!·218 ways to arrange them all. There
are however indistinguishable ball pairs - there are 6 pairs of colours, all occurring three times.
This gives a total of 18!·218/3!6 = 35,972,733,468,672,000.
Terminology:
I will use the same terminology as on the Astrolabacus homepage:
Segment: One of the six hinged parts of the puzzle.
Tunnel: Half of a segment, containing 3 balls.
Action loop: The loop of 6 tunnels, containing 18 balls that can be shifted.
GREEN-Yellow ball: The green ball in a green-yellow opposing pair of balls. Similarly for other colours of course.
GREEN-Yellow tunnel: The green tunnel in a green-yellow pair of tunnels.
Green-Yellow position: The shape where the green-yellow pair of tunnels is
brought together in the middle of the puzzle.
Clockwise shift of the action loop: Hold the puzzle so that the action loop is fully
visible, and push its balls in a clockwise direction.
Solution:
Phase 1: Solve the Green-Yellow tunnel.
- Do whatever moves you need to make sure that there is no Green-Yellow (or Yellow-Green)
pair of balls in the Green-Yellow tunnels (This is not strictly necessary but it makes the
description easier).
- If, in the Green-Yellow position, you can find a Green-Yellow pair in the action loop then
continue with step e.
- If there is a Green-Yellow pair in the Red-Yellow tunnel then, in the Red-Blue position
shift the loop so that the ball pair lies in the Blue-Yellow tunnel, and continue with step
e.
- There must be a Green-Yellow pair in the Red-Blue tunnel. In the Red-Yellow position
shift the loop so that the ball pair lies in the Blue-Yellow tunnel, and continue with the next
step.
- In the Green-Yellow position there must now be a GREEN-Yellow ball in the action loop.
Shift the loop so that it lies in the RED-Green tunnel, just adjacent to the BLUE-Yellow
tunnel.
- In the Blue-Green position, shift the loop anti-clockwise one step, so that the GREEN-Yellow
ball enters the GREEN-yellow tunnel.
- Repeat steps b-g twice more, so that all GREEN-Yellow balls lie in the GREEN-Yellow tunnel.
Phase 2: Solve the Red-Yellow tunnel.
- Do whatever moves you need to make sure that there is no Red-Yellow (or Yellow-Red)
pair of balls in the Red-Yellow tunnels, but do not disturb the already solved Green-Yellow
tunnel.
- If, in the Red-Yellow position, you can find a Red-Yellow pair in the action loop then
continue with step d.
- There must be a Red-Yellow pair in the Blue-Green tunnel. In the Green-Yellow position
shift the loop so that the ball pair is no longer in the Blue-Green tunnel, and continue with the
next step.
- In the Red-Yellow position there must now be a RED-Yellow ball in the action loop.
Shift the loop so that it lies in the BLUE-Yellow tunnel, just adjacent to the RED-Green
tunnel.
- In the Blue-Red position, shift the loop anti-clockwise one step, so that the RED-Yellow
ball enters the RED-yellow tunnel.
- Repeat steps b-f twice more, so that all RED-Yellow balls lie in the RED-Yellow tunnel.
Phase 3: Solve the RED-Green pieces.
The RED-Green balls will first be placed together inside the RED-Blue tunnel, and only then
put correctly into the RED-Green tunnel.
- Do whatever moves you need to make sure that there is no Red-Green (or Green-Red)
pair of balls in the Red-Blue tunnels, but do not disturb the already solved Green-Yellow
and Red-Yellow tunnels.
- In the Green-Yellow position there must be a RED-Green ball in the action loop.
Shift the loop so that it lies in the RED-Green tunnel, just adjacent to the GREEN-Blue
tunnel.
- In the Red-Yellow position, shift the loop anti-clockwise one step, so that the RED-Green
ball enters the RED-Blue tunnel.
- Repeat steps b-c twice more, so that all RED-Green balls lie in the RED-Blue tunnel.
- In the Red-Yellow position, shift the loop clockwise three steps, so that the three RED-Green
balls enter the RED-Green tunnel.
Phase 4: Solve the Blue tunnels.
In this phase we will put all the blue balls in the blue tunnels. The blue balls
will not necessarily be in their correct blue tunnels, so their opposite balls will
probably still be mixed.
- Examine the BLUE-green tunnel, in particular the ball
adjacent to the GREEN-red tunnel. This end of the BLUE-green tunnel will be the
focus of this phase - any non-blue balls are brought to that spot, and then
changed to blue.
- If there is a non-blue ball at the end of the BLUE-green
tunnel, then change it to blue as follows:
1. In the Red-Yellow position, shift the loop anti-clockwise three steps.
2. In the Green-Yellow position, shift the loop anti-clockwise one step.
3. In the Red-Yellow position, shift the loop clockwise three steps.
- Repeat step a until the ball at the end of the BLUE-green
tunnel is blue.
- If there are still non-blue balls in the BLUE-green or
BLUE-red tunnels then:
1. In the Red-Yellow position, shift the loop clockwise one step.
2. In the Green-Yellow position, shift the loop clockwise one step.
3. Repeat steps 1-2 until there is a non-blue ball at the end of the BLUE-green tunnel.
Go to step b to fix that ball.
- If there are still non-blue balls in the BLUE-yellow tunnel then:
1. In the Red-Yellow position, shift the loop clockwise three steps.
2. In the Green-Yellow position, shift the loop clockwise three steps.
Go to step a to fix the remaining balls.
Phase 5: Solve the YELLOW-blue tunnel.
In the last two phases we will solve the YELLOW-blue, RED-blue, and GREEN-blue
tunnels. Note that all the opposite balls are blue, so we need only concentrate
on one the non-blue side.
- In the Red-Yellow position, shift the loop clockwise two steps.
- Examine the ball at the end of the YELLOW-blue tunnel adjacent to the RED-blue tunnel.
If this ball is not yellow, then:
1. In the Red-Yellow position, shift the loop clockwise one step.
2. In the Green-Yellow position, shift the loop clockwise one step.
Repeat this as often as necessary to make the ball in that position yellow.
- In the Red-Yellow position, shift the loop anti-clockwise one step.
- Do exactly the same as step b, so that there are now two yellow balls in the YELLOW-blue tunnel.
- In the Red-Yellow position, shift the loop anti-clockwise one step.
- Again do exactly the same as step b, so that there are now three yellow balls in the YELLOW-blue tunnel, in other words the tunnel is solved.
Phase 6: Solve the RED-blue and GREEN-blue tunnels.
- Examine the ball in the RED-blue tunnel adjacent to the
YELLOW-blue tunnel, and also the ball in the GREEN-blue tunnel adjacent to the
YELLOW-blue tunnel. If one or both those balls are wrong, then
1. In the Red-Yellow position, shift the loop clockwise one step.
2. In the Green-Yellow position, shift the loop clockwise one step.
3. In the Red-Yellow position, shift the loop clockwise one step.
4. In the Green-Yellow position, shift the loop anti-clockwise one step.
5. In the Red-Yellow position, shift the loop anti-clockwise one step.
6. In the Green-Yellow position, shift the loop anti-clockwise one step.
7. In the Red-Yellow position, shift the loop anti-clockwise one step.
8. In the Green-Yellow position, shift the loop clockwise one step.
9. In the Red-Yellow position, shift the loop clockwise one step.
10. In the Green-Yellow position, shift the loop clockwise one step.
Repeat this until both positions adjacent to the YELLOW-blue tunnel are correctly filled.
- Examine the middle ball in the RED-blue tunnel.
If that ball is not red, then
1. In the Red-Yellow position, shift the loop clockwise two steps.
2. In the Green-Yellow position, shift the loop anti-clockwise one step.
3. In the Red-Yellow position, shift the loop anti-clockwise two steps.
4. In the Green-Yellow position, shift the loop clockwise one step.
If necessary, repeat this until the middle ball in the RED-blue tunnel is red.
- If some of the three remaining balls are not yet solved, then
1. In the Green-Yellow position, shift the loop anti-clockwise two steps.
2. In the Red-Yellow position, shift the loop clockwise one step.
3. In the Green-Yellow position, shift the loop clockwise two steps.
4. In the Red-Yellow position, shift the loop anti-clockwise one step.
If necessary, repeat this until the puzzle is solved.


