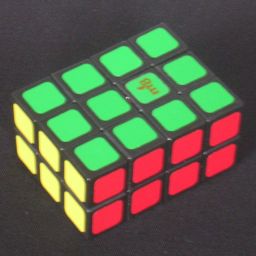
This puzzle is like a 2×3×4 Rubik's cube. Any layer can be turned, but since they are
all rectangular, only half turns will keep the puzzle in a cuboid shape.
The puzzle can change shape by using quarter turns of the 2×4 sides. If you do this, then
the puzzle acts like a 2×2×3 cuboid. The parts from the two outer 2×3 layers
cannot be separated from its adjacent part until the shape has been changed so as to form a complete
outer layer, and even then it will depend on the arrangement of the internal pieces whether the
outer layer can move or not.
There are two versions of the puzzle. One version has two types of internal moving parts (bandaged
and unbandaged), and if they are not in the correct arrangement, one or both the outer layers are
blocked from moving even if the puzzle is in the correct shape. It should be noted that if you only
ever use half turns to mix the puzzle, then this situation never arises. The other version only has
internal moving parts that are identical, and so cannot be in an incorrect arrangement. In this
version the outer layers will always be able to move when the whole puzzle is in the correct shape.
The number of positions:
First let's assume no shape-changing takes place.
Every movable piece can be moved to only four locations using half turns. There are 24
movable pieces, which therefore split into 6 orbits of four pieces each. This gives a maximum
of 4!6 possible positions, but this maximum is not reached because:
- The orbit of face centres has two pairs of indistinguishable pieces (2!2)
- In the pair of corner orbits the permutation of one orbit determines the relative locations of the pieces in the other orbit. (3!)
- In the pair of wing edge orbits the permutation of one orbit determines the relative locations of the pieces in the other orbit. (3!)
- The orientation of the puzzle as a whole does not matter (4)
The second (and the third) condition essentially means that the location of five of the pieces in the two orbits
determines the locations of the other three. This gives a total of 4!6 / (2!2·3!2·4) =
331,776 positions.
If we do allow the shape to be changed, then there are many more positions. The puzzle then consists
of a 2×2×3 core, onto which the pieces of the outer layers are attached. The core puzzle
stays the same shape, it is just the outer layer pieces that define the changing shape.
First consider just the 2×2×3 core of the puzzle. This cuboid has 8 corners, and 4 edges,
and the edges can be flipped. This gives at most 8!·4!·24 positions,
but this maximum is not reached because:
- The edges all have the same orientation (23)
- The edges come in two pairs of indistinguishable pieces (2!2)
- The orientation of the puzzle as a whole does not matter (8)
The outer layer extensions consist of two sets of 4 corner pieces, and a set of 4 edges. There only
remains a parity constraint on the corners, So there are 4!3/2 possible permutations of these
outer pieces without affecting the core cuboid.
Putting it all together, the total number of positions is
8!·4!·24·4!3 / ( 23·2!2·8·2 )
= 418,037,760.
If you are using the variant with two different kinds of internal pieces, then the state of
those pieces should be taken into account as well. Of the 8 internal edge pieces, two are essentially
fixed to the internal core. The other 6 comprise 3 bandaged and 3 unbandaged edges. These can be
permuted in 6! / 3!2 = 20 ways. Therefore this version has 20 times as many states,
namely 20·418,037,760 = 8,360,755,200.
Notation:
Hold the puzzle with a 2×4 face on top. Assuming the puzzle is in a cuboid shape, hold a 3×4
face at the front, leaving the left and right faces as 2×3. If it is not in cuboid shape, then simply
look only at the middle layer, and hold it horizontal with its long side facing you. Keep in mind that you
have a vertical core 2×2×3, and that all the pieces that stick out will eventually form extra layers
on the left and right sides.
Clockwise quarter turns of the top or bottom layer will be denoted by U and D respectively, half turns by U2 and
D2, and finally counter-clockwise turns by U' and D'. For the side faces the letters F, B, L, and R represent half
turns of the front, back, left and right face respectively, the latter two only having any meaning if the puzzle is
in cuboid shape. Similarly, lower case letters l and r represent half turns of the vertical inner layers adjacent to
the L and R face layers. I will use lL and rR to mean a half turn of the left or right half of the puzzle, regardless
of whether it is in cuboid shape or not. Lastly, M2 denotes a half turn of the middle layer (like doing U2 D2 and then turning the puzzle around).
Solution:
Phase 1: Put the puzzle into cuboid shape.
This phase is obviously not necessary if you have not used quarter turns when scrambling the puzzle.
- If three or more of the U layer corners stick out to the front or back, then do U.
- If three or more of the D layer corners stick out to the front or back, then do D.
- If you still have four U/D layer corners sticking out to the front or back, then use half turns
to bring at least three of them to U layer, and then do U.
- If you still have two U/D layer corners sticking out to the front or back, then use half turns
to bring them both to U layer. Turn the U layer so that so that you have two corners sticking out
to the front only. Finally, do rR U' B U B U to fix the corners.
Phase 2: Find out which edge connects to the internal mechanism.
This phase is not necessary if you have not used quarter turns when scrambling the puzzle. If it has changed shape
during scrambling, then you should probably do this step even if your puzzle does not have internal bandaged pieces.
- Peek between the two front centre pieces to see the screw in the mechanisms core.
- Do rR, and see of the screw stays in place with the left half of the puzzle, or moves along with the right half.
If it moves, then turn the puzzle around so that the left and right halves have swapped. The connected edge must
now lie in the left half.
- 3. Do D2.
- 4. Do rR, and see of the screw stays in place, or moved. If it moves, then do U2.
The connected edge must now lie in the left half of the top layer. It will in fact be the back-left
edge of the top layer. You should now be able to do any combination of F, D2, and rR moves without the
screw moving.
Phase 3: Solve the internal bandaged pieces.
This phase is obviously not necessary if you have not used quarter turns when scrambling the puzzle,
nor if your puzzle does not have internal bandaged pieces.
- Hold the puzzle so that the connected edge lies at the back left of the top layer, as described in the previous phase.
- See if the L and R faces move freely. If so, then skip to the next phase.
- If the L face moves freely (and the R face does not) then do D2.
- If the L face still moves freely (and the R face does not) then do rR D2.
- The L face now cannot move, so has a bandaged internal edge at the bottom. Do D2 rR to being it to the top right,
then do the move sequence D F rR F D' to insert it into the bottom front, and finally do F to bring it to the top front.
- See if the L and R faces move freely. If so, then skip to the next phase.
- If the L face moves freely (and the R face does not) then do D2.
- If the L face still moves freely (and the R face does not) then do rR D2.
- The L face now cannot move, so has a bandaged internal edge at the bottom. Do D2 rR to being it to the top right,
then do the move sequence D F rR F D' to insert it into the bottom front, and finally do D2 to bring it to the bottom rear.
- See if the L and R faces move freely. If so, then skip to the next phase.
- If the L face moves freely (and the R face does not) then do D2 rR D2.
- If the L face still moves freely (and the R face does not) then do rR D2 rR D2.
- The L face now cannot move, so has a bandaged internal edge at the bottom. Do D2 rR D2 to being it to the top right without
disturbing the previously solved bandaged pieces, then do the move sequence D F rR F D' to insert it into the bottom front.
Phase 4: Solve the corners
- Consider the back left edge of the top layer (the connected edge) to be solved. This edge determines the colours of the corners.
- Using half turns only, and without disturbing the top back left edge, solve the back left corner, so that it matches that edge.
- Using half turns only and without disturbing the first corner and edge (i.e. using only F, R, D2), solve the front left corner of the top layer.
- Using half turns only and without disturbing the first two corners (i.e. using only R, D2), solve the back right corner of the top layer.
- If the front right corner of the top layer is not solved (which can only happen if the puzzle was scrambled with quarter turns) then
1. Find the fourth corner, the one that belongs at the front right of the top layer.
2. Bring that corner to the front left of the bottom layer, if necessary, by doing a D2 move.
3. Do F rR D' rR U F U2 rR D rR U to insert the corner into the top face.
- If the side colours of the bottom four corners do not match each other, do rR U2 F U rR F U2 F U F U2 rR U.
- If necessary, do D2 to make the sides of the top layer corners match the bottom layer corners.
Phase 5: Solve the top and bottom edges.
- Find the edge that belongs at the front left of the top layer (at UFl). Depending on where it is, do one of the following to solve it:
UFl, front-left of top layer: do nothing.
UBr, back-right of top layer: F r F
DFr, front-right of bottom layer: r F r F
DBl, back-left of bottom layer: D2 r D2 F r F
- Find the edge that belongs at the back right of the top layer (at UBr). Depending on where it is, do one of the following to solve it:
UBr, back-right of top layer: do nothing.
DFr, front-right of bottom layer: r
DBl, back-left of bottom layer: D2 r D2
- If the front-right edge of the bottom layer (DFr) is incorrect, then it need to be swapped with the back-left one (DBl).
Do r D2 r D2 r.
- If the remaining three edges are incorrect, which can only happen if the puzzle was scrambled with quarter turns,
then do the following steps:
1. Find the edge that belongs at the front-right of the top layer (UFr). It will lie at DFl or DBr.
2. If it lies at DBr, do D2 to bring it to DFl.
3. Do r.
4. Do the sequence rR U2 F U rR F U2 F U F U2 rR U, which is the same as used in step f of phase 4.
5. Repeat steps 3 and 4 once more.
6. If necessary do D2 to align the layers.
Phase 6: Solve the edges of the middle layer.
- Find the edge that belongs at the back left of the middle layer (at BL). Depending on where it is, do one of the following to solve it:
BL, back-left of middle layer: do nothing.
FR, front-right of middle layer: M2.
FL, front-left of middle layer: F M2 F.
BR, back-right of middle layer: L M2 L.
- Find the edge that belongs at the front left of the middle layer (at FL). Depending on where it is, do one of the following to solve it:
FL, front-left of middle layer: do nothing.
FR, front-right of middle layer: D2 F D2 F D2 F.
BR, back-right of middle layer: R D2 F D2 F D2 F R.
- If the remaining two edges need to be swapped, then do rR D2 rR D2 rR D2.
Phase 7: Solve the front and back face centres.
- If both middle centres of the front face (i.e. uF and dF) are not the correct colour, do r M2 r M2 to fix them.
- Hold the puzzle such that the centre at the back left is correct.
- If the right centre of the front face is not correct, do F U2 r u2 F U2 r U2.
- If the left centre of the front face is not correct, do U2 r u2 F U2 r U2 F.


