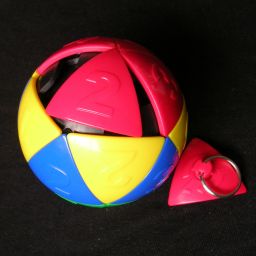
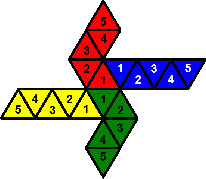
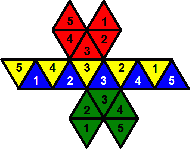
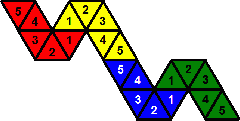
Rubik's Delta Ball, also marketed as Rubik's Brain Racker, is a spherical sliding piece
puzzle. It is a ball with 20 curved triangular pieces like an icosahedron. The piece
with key-chain attachment can be removed, leaving a space. Any one of the three pieces
adjacent to the space can slide into it. When that is done the piece has to rotate by
60 degrees, and this twist can be done in either direction. The pieces come in 4 colours
(yellow, red, blue, green) with five pieces each which are numbered 1 to 5. The removable
piece is red, number 1. There are several goal patterns suggested on the packaging.
The Impossiball can be used in the same way as this puzzle by
removing a piece. On the impossiball you can turn a cap of 5 pieces, but that kind of
movement is not possible on the Delta Ball.
Some of the suggested goal patterns are:
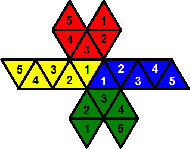
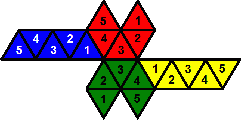
- Make three pentagons (each one colour, optionally with the numbers in order), arranged around the red 1 piece.

- Make two non-adjacent pentagons (each one colour, optionally numbers in order), and two strips (also each one colour, optionally numbers in order).

- Make two adjacent pentagons, and two strips.

- Make two strips and two 'question mark' shapes.

- Make two non-adjacent pentagons, and one strip between them of alternating colours like shark's teeth.

- Make four 'question mark' shapes.

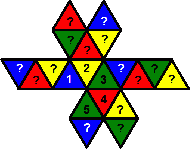
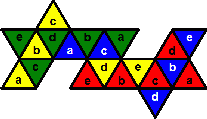
- Make a mosaic pattern where no two adjacent tiles have the same colour, optionally also placing the numbers
such that every pentagon contains all five numbers. The numbers are not all shown in the picture below,
because that is a large part of the challenge.

The number of positions:
There are 19 distinct pieces, with 3 orientations, and a space. This gives
a total of 20!·319 positions. All these positions are possible,
but since positions that differ only by a rotation of the whole puzzle are not
considered distinct, we have to divide by the 60 orientations that the puzzle
can have. This leaves 20!·319/60 = 19!·318
= 47,127,804,284,843,793,358,848,000 positions.
Solution:
Whenever you slide a piece into its correct location, it is easy to make sure its
orientation is correct. You can for example slide it back and forth, always twisting
it clockwise, until it is in the correct orientation. If you want to twist any piece
on the puzzle, just slide some pieces until the space is next to the piece you want
to twist, twist it, and put back the pieces you moved. This means that the orientations
are never a problem.
Notation:
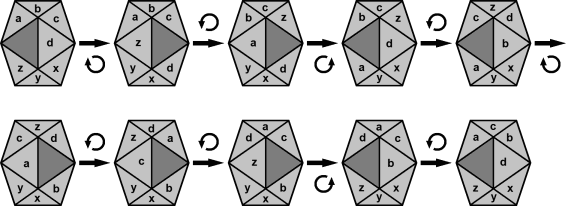
Hold the puzzle with the space towards you, where the corners of that triangular space
pointing up, down-left, and down-right. There are four pieces that meet with the space at
the up corner. By sliding those pieces to the left one by one, until the space is back at
the front (5 moves), the four pieces are cycled clockwise. This will be denoted by U. Doing
the inverse, sliding them around in an anti-clockwise direction is denoted U'.
The same can be said for the four pieces that meet at the down-right corner. Shifting
them around clockwise until the space is back at the front will be denoted R, and doing this
anti-clockwise will be denoted by R'.
Similarly the four pieces that meet at the down-left corner can be shifted around
clockwise, denoted by L, or anti-clockwise, denoted by L'.
Phase 1: Solve five pieces about one vertex.
- Imagine the goal pattern, and from it choose a cap of five pieces that you
want to solve first. The removable piece should not be one of those five pieces.
- Solve four of the five pieces of this cap. This is easy as long as you do them
in order, so simply start with any one of the five pieces. Put the correct
piece next to it, then the correct piece next to that, and so on until you
have four pieces that are correct. Remember to orient each one as you place it.
- To insert the fifth piece you will have to temporarily disturb something.
Use the following steps:
- Make sure the fifth piece is not adjacent to the fourth piece, and that
the space is where the fifth piece belongs.
- Slide the fourth piece into the spot where the fifth piece belongs. The
place vacated by the fourth piece is then filled up by some other piece,
not the fifth one because of the previous step.
- Bring the fifth piece to the spot adjacent to where the fourth piece is now, and
also bring the space to the spot where the fourth piece belongs.
- Slide the fourth and fifth pieces into position, also orienting them correctly.
Phase 2: Solve all but the pieces about one vertex.
- Imagine the goal pattern, and from it choose a cap of five pieces that includes
the removable piece (or space). This is the part of the ball that you will
solve last, in the next phase.
- Choose a cap that is already partially solved, but that does not overlap with
the cap you have chosen to exclude in step a. Give preference to caps that
have fewer unsolved pieces.
- Solve the cap chosen in step b, using the techniques from phase 1. Note that none
of the previously solved pieces will ever be moved, except for the single piece
specified in step 1c2 that is restored in step 1c4.
- Repeat steps b-c until all but the last cap is solved.
Phase 3: Solve the last cap.
- You can slide the pieces around the unsolved cap. Note that this
does not change their order. Imagine what order they would have to be in
for you to be able to put them all in their correct place.
- The move sequence below swaps two adjacent pieces. It is always possible
to put the four remaining pieces in their correct cyclical order by using at
most two such swaps. Decide which two adjacent pieces you would like to swap
to get closer to the correct order.
- To swap two adjacent pieces in the unsolved cap, follow these steps:
- Slide the pieces of the unsolved cap so that the two adjacent pieces you
want to swap are not next to the space, i.e. the space is on the side of the
cap opposite to the two pieces to be swapped.
- Hold the puzzle so that the unsolved cap is at the top, with the space at
the front left. The move sequence described below take place within the top
cap and the front cap, which are the two caps that share the space and the
piece to its right.
- Let U denote shifting the pieces in the top cap in a clockwise direction
until the space is back where it started, and U' the same but in the opposite
direction. Similarly, let F and F' be the same for the pieces of the front cap.
To swap the pieces, do the move sequence: F U' F' U' F U' U' F' U'

The Mosaic patterns
The 7th suggested goal pattern is to place the colours such that no two adjacent pieces
have the same colour, and the numbers such that every cap of 5 pieces contains all the numbers
1 to 5. This is rather difficult.

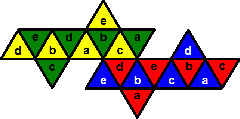
There is really only one way to place the numbers, shown here. It is of course possible to use
the mirror image of this pattern, or to exchange all the ones and all the twos, or any other
permutation of the numbers. The centres of the four pieces with the same number form a tetrahedron,
so this number pattern is essentially the Compound
of five tetrahedra.
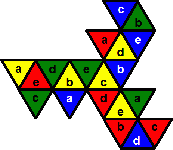
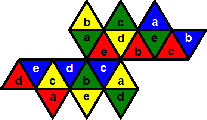
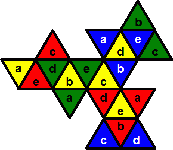
Given this number arrangement, there turn out to be only 5 ways to arrange all the
colours so that each colour uses all five numbers and no adjacent pieces have the same
colour. These are shown below. I have used a-e to represent the numbers 1-5 in any order.
The most symmetrical pattern is the first one.
a.

b.

c.

d.

e.
