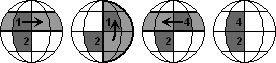
Masterball
This nice puzzle is consists of a ball which is sliced up like an orange
into 8 segments, and the whole is also divided horizontally into 4 layers
(two polar caps and two middle bands). In other words, it is like a globe
with 8 lines of longitude and 3 lines of latitude.
There are two types of move: A half turn of half the ball along any of the
lines of longitude, called a slice move, or a 1/8 turn of one of the 4 layers.
On the standard puzzle, the Rainbow Master (sometimes known as the 'geomaster'),
each of the 8 segments has a different colour. Other designs have pictures on
them. The Rainbow version is easier than a picture version because the pieces
occur in identical pairs in opposite layers.
The Masterball was invented by Geza Gyovai and patented on 15 August 1989, US 4,856,786.
A different version is the Logi-Vip ball, made by Arxon. It has a much simpler mechanism
since it is made of two hemispheres and therefore only allows one type of slice move. To do
the other slice moves, you have to turn all four layers to bring the seam to the right place.
Because each piece is different, it is similar in difficulty to picture masterballs. When
solved, the four pieces of a segment have the same colour but in different shades ranging
from a light colour at one pole to a darker shade at the other pole.
The Logi Vip ball was invented by
Hubert Petutschnig and patented on 11 June 1981, WO 81/01638.
If your browser supports JavaScript, then you can play the rainbow Masterball by clicking
the link below:
The number of positions:
There are 16 polar pieces and 16 middle pieces, giving a maximum of 16!2
positions. All of these positions are attainable. This gives
16!2 = 437,763,136,697,395,052,544,000,000 or 4.4·1026 positions.
There are 16 possible orientations of the puzzle as a whole, so the actual number is
16!2/16 = 27,360,196,043,587,190,784,000,000 or 2.7·1025.
On the Rainbow Master the pieces come in identical pairs, so then the number
of positions becomes 16!2/216 = 6,679,735,362,203,904,000,000 or
6.6·1021 positions. Dividing this by 16 to account for the puzzle
orientation gives the approximate number of positions 4.1·1020.
There are two move sequences that we will use repeatedly throughout the
solutions. Hold the puzzle with one seam directly in front, facing you.
- The first sequence is used to pair up pieces in the middle bands, or in the
polar caps. Suppose in some layer there are two pieces directly opposite each other,
and that they actually belong in the same segment in the solved puzzle.
Then do the following:
1. Hold the puzzle with one of the pieces just to the left of the front seam (on the Logi-vip sphere you of course have to turn the layer to achieve this).
2. Move the layer to the right, so the two pieces cross the front or back seams.
2. Twist the right hand side of the ball.
3. Move the layer to the left.
This leaves the two pieces in the same segment without separating other
such pairs.
- The second sequence swaps a pair of pieces in one segment with a pair in
another segment. It is mainly used to line up the pieces in the polar caps with those of the
middle layers. The pairs that are swapped also turn over, so it can also be used for orienting them.
To swap one pair of middle band pieces in one segment with those of the opposite segment, do the following:
1. Hold the puzzle with one pair of pieces in the segment just to the left of the front seam (on the Logi-vip sphere you of course have to turn the layers to achieve this).
2. Move the top band to the right.
3. Twist the right hand side of the ball.
4. Move the top band back to the left.
5. Move the bottom band to the right.
6. Twist the right hand side of the ball.
7. Move the bottom band back to the left.
This sequence can of course also be used on the caps instead of the middle bands.

Solution for Rainbow Master:
Phase 1: Pair up the pieces in the middle bands.
- Find any two pieces in the middle bands that have the same colour.
- Use any slice moves you need to places them in opposite segments.
- If they are now in the same band, then do sequence a to pair them up.
If they do not lie in the same band, then try to find another pair of
pieces to pair up.
- If you have done steps a-c as often as possible but cannot pair up all
the middle band pieces, then use some slice moves to place an unmatched
pair in the front segment, and a matched pair at the back segment, and
do sequence b. You will now find that the unmatched pair can be solved
using steps a-c above.
Phase 2: Pair up the pieces in the polar caps.
This is essentially the same as phase 1, except that you of course turn the caps
instead of the bands when doing the move sequences.
Phase 3: Align the pairs in the middle bands and the caps to build segments.
- Find any pair of middle band pieces and pair of cap pieces that belong
together in one segment.
- Use any slice moves to put them in opposite segments.
- Now do sequence b to put them all in a finished segment.
- Repeat steps a-c above to solve all the segments.
Phase 4: Put the segments in order.
 Note that this
phase is similar to solving the Saturn Puzzle,
and that the simpler but longer solution shown there can be used as well.
Note that this
phase is similar to solving the Saturn Puzzle,
and that the simpler but longer solution shown there can be used as well.
In this final phase, only slice moves are needed. To describe the move sequences
we need a notation for the moves, and for the different positions of the segments.
Number the segment positions 1 to 8, where the front is position 1, the segment
to its right position 2, and so on.
Name the possible slice moves A to D. A is the slice that turns over pieces
1 to 4, B is the slice move that turns over 2 to 5, and so on.
- The segment at position 8 is assumed to be correct. The other segments
will be placed correctly alongside it, from segment 1 to segment 7.
- Find the segment that belongs in position 1 and note its position. Do
the appropriate sequence below:
2: ABA
3: BA
4: A
5: CA
6: DCA
7: DA
- Find the segment that belongs in position 2 and note its position. Do
the appropriate sequence below:
3: BCB
4: CB
5: B
6: DB
7: DCB
- Find the segment that belongs in position 3 and note its position. Do
the appropriate sequence below:
4: CDC
5: DC
6: C
7: DCDC
- Find the segments that belongs in positions 4 and 5 and note their
positions. Do the appropriate sequence below:
4,5: -
4,6: CBCBDCDB
4,7: BDCDBCBC
5,4: BCDBDCB
5,6: BABACBCA
5,7: BCDCDCBC
6,4: ACBCABAB
6,5: BCBCBDBC
6,7: BCBDBCBD
7,4: CBCDCDCB
7,5: CBDBCBCB
7,6: D
- To swap the segments at 6 and 7 then do ABCDCDCA and turn over the ball.
A nice pattern for the Rainbow Master:
From the solved state, rotate the bottom layers of the ball by 180 degrees,
and perform ADCDCBC.
Solution 1 for any Masterball:
I used to solve the general Masterball by an extension of the Rainbow solution.
This is rather complicated. I have a much easier solution now, but for completeness
only, my original solution is provided here. I much recommend using the
easier solution method further down this page.
Phase 1: Pair up the pieces in the middle bands.
This is the same as phase 1 of the Rainbow solution.
Phase 2: Orient middle band pairs.
- Put the middle band pairs in the correct order (ignoring orientation),
by using the same methods as in the final phase of the Rainbow solution.
- Count how many of the middle band pairs are upside down.
- If this is an odd number then move one of the middle bands once in any
direction and go back to phase 1 to pair them up properly. The next time you
return here there will be an even number of reversed pairs. Note that your
puzzle may have a pair that looks identical whichever way up it is. If so,
consider it to be in such a orientation that there are an even number of
pairs upside down, so that you don't have to go back to phase 1.
- If an even number of pairs are upside down, then remember which pairs
of pieces they are. Use any slice moves to place one such pair in the front
segment and one such pair at the back, and do sequence b. Repeat this for all
the pairs that were upside down before. If you were to place the segments
in the right order again, they would now automatically end up in the
right orientation. This is not necessary right now, but it may be a good idea
to do this anyway to check if the orientations are correct.
Phase 3: Pair up the pieces in the polar caps.
This is identical to phase 2. of the Rainbow solution.
Phase 4: Align the pairs in the middle bands and the caps to build segments.
- Find any pair of middle band pieces and pair of cap pieces that belong
together in one segment.
- Use any slice moves to put them in opposite segments.
- Assuming the orientation of both pairs of pieces matter, check whether the
polar cap pieces are upside down relative to the middle band pieces on the
other side. If not, go back to step a to try another set of pieces. If no set
of pieces can be placed in the correct orientation, then ignore the orientation
for now as we can fix it later.
- Now do sequence b ON THE POLAR CAPS to put them all in a finished segment. The
reason you must use b on the caps and not on the bands is that the middle band
pair was already correctly oriented in phase 2.
- Repeat the above to solve all the segments apart from the orientation
of a few of the cap pairs.
- Count how many segments have the cap pieces upside down. If there is
an odd number of such segments then rotate one of the polar caps once in any
direction and go back to phase 3 again. The next time you reach this point,
there will automatically be an even number of reversed cap pairs. Note that if
your puzzle has a segment where the caps are indistinguishable, then
you can assume its orientation is such that an even number of segments
are wrong.
- To reverse the caps of any two segments, then you can use sequence b
four times to solve them. If A and B are the two incorrect segments, and
C is any other, then use sequence b to swap the caps of A and B, B and C,
C and A, and finally C and B. Repeat this until all the segments are
correct. As this is a rather tedious procedure, it is best to try to place
as many of the cap pairs correctly straightaway in step c.
Phase 5: Put the segments in order.
This is the same as phase 4 of the Rainbow solution.
Solution 2 for any Masterball:
Phase 1: Put pieces in their correct layers.
- Find any piece in the top hemisphere (cap or band) that is not in the correct layer.
- Hold that piece at the front, just to the left of the seam. (On the Logi-Vip sphere, you probably have to turn the layer to get it there.)
- Find a piece in the opposite layer that does not belong there.
- Turn that opposite layer until the wrong piece lies at the front, just to the right of the seam.
- Do this sequence:
1. Twist the right hand side of the ball.
2. Shift the layer containing the two pieces to the right, so both pieces cross the seam.
3. Twist the right hand side of the ball again.
- Repeat a-e until all the pieces are in the correct layer.
Phase 2: Solve two opposite layers.
- Find in any layer two adjacent pieces that you want to swap.
- Hold those pieces at the front, one on each side of the seam. (On the Logi-Vip sphere, you probably have to turn the layer to get them there.)
- Find any two adjacent pieces in the opposite layer that you also want to swap.
- Rotate that layer to bring them to the front, too.
 Do the following sequence:
1. Twist the right hand side of the ball.
2. Shift the top layer to the right.
3. Twist the right hand side of the ball.
4. Shift the top layer to the left.
5. Shift the bottom layer to the right.
6. Twist the right hand side of the ball.
7. Shift the bottom layer to the left.
8. Twist the right hand side of the ball.- Continue using steps a-e to do swaps in both layers until one of the layers is solved.
- Find any adjacent pair in the remaining layer that must be swapped.
- Turn the layer to bring it to the front.
- Do the sequence of step e. This temporarily disturbs two pieces in the solved layer.
- Repeat steps g-i for another pair, and this will also restore the temporarily swapped pieces.
- Continue repeating g-i until either both layers are solved, or until one of the layers apparently needs a single swap.
- If one layer apparently needs single swap, it really means that nearly all of them are in the wrong place. Simply pick one of the two 'swapped' pieces, and consider that one to be correct. Then use steps g-j to place the other 7 pieces correct relative to the chosen piece. This will involve moving the other 'swapped' piece all the way around the layer until it ends on the other side of the solved 'swapped' piece.
Phase 3: Solve other two layers.
This is the same as phase 2, except as applied to the remaining two layers. Finally,
turn all the layers so that they match up.
Improvements
It is of course possible to do phase 1 on all four layers at the same time.
In the top two layers put an incorrect piece to the left of the seam, in the bottom
layers to the right. Then apply a twist, turn the top two layers to the right, and another
twist.
Similarly is is also possible to do phase 2 and 3 at the same time, making swaps in
all four layers simultaneously, again by simply by sliding two layers in the move sequence
of step 2e. It can get a little tricky to remember exactly what is going on in each layer.


