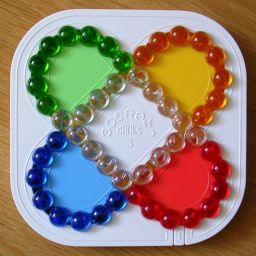
Moeraki Games Nr. 3
Moeraki Game Nr. 3 is a puzzle with two intersecting looped tracks, each containing a number
of coloured beads. The tracks intersect at four places, so they share four of the beads.
All the beads of a loop can move along the track in unison, so the colours can be mixed.
In the solved position, the parts of the tracks between and including the intersections
contain white transparent beads which form a 5 by 5 square. The four remaining sections of the
tracks, the curved outer ends of the loops, each have eight beads of a single colour.
Moeraki is the name of a series of puzzle games designed by Kasimir Landowski, all
consisting of a number of intersecting tracks containing beads. Game number 4
has also been manufactured physically, the others exist only as software. It is named after large
rounded stones that can be found in New Zealand.
If your browser supports JavaScript, then you can play Moeraki 3 by clicking the link below:
The number of positions:
There are 16 white beads, and 8 beads of each of the four other colours, a total of
48 beads. This seems to give a total of 48! / (16! 8!4) = 224,495,221,153,272,679,590,385,977,000
possible positions. However, the beads actually occur in pairs. Any two beads that are diametrically opposite
will always remain so, whatever move you do. Therefore the locations of the red beads determines those of
the green ones, and the locations of the yellow beads those of the blue ones. After all the coloured ones
have been placed, the remaining locations must contain the transparent white beads. The number of arrangements
of the red beads is 48! / (8!·40!), and after that there are 32! / (8!·24!) arrangements for
the yellow ones. The total number of arrangements is therefore
48!·32! / (40!·24!·8!2) = 3,969,069,923,590,200.
Links to other useful pages:
Casland Games, the website of the manufacturer.
Solution:
Let RG denote the loop that should eventually hold the red and green beads, and BY the one
that should hold the blue and yellow ones. A clockwise shift of all the beads in a loop will be
denoted by a positive number indicating how far to shift, and similarly a negative number is used
for anti-clockwise shifts. For example, RG+1 is a shift of the RG loop in the clockwise direction
by 1 bead, and BY-4 is a shift of the BY loop in the anti-clockwise direction by a distance of 4
beads.
Phase 1: Solve the red/green beads
- Hold the puzzle such that the section that should be green is at the top left.
- If the BY loop contains a green bead, turn BY until the green bead is at the top intersection
and then move RG one step to the left to insert the green bead into the green section.
- Repeat step b as often as possible.
- If there is an unsolved green bead in the RG loop that lies along the central square, then
1. Rotate RG clockwise until the unsolved green bead lies at an intersection.
2. Rotate BY until the unsolved green lies at the top intersection, replacing the green bead that was there.
3. Rotate the RG anti-clockwise until it is back where it started (top intersection not green, but with the green row immediately to its left).
4. Go back to step b to solve the displaced green bead.
- If there is a red bead in the RG loop in amongst the solved green beads, then
1. Rotate RG to bring the red bead to the nearest intersection. The opposite intersection will have a green bead, and the other two intersections are neither green nor red.
2. Rotate BY for 13 steps (a half revolution) so that the red and the green beads have swapped.
3. Rotate the RG back until it is where it started (top intersection not green, but with the green row immediately to its left).
4. Repeat step e until all the green (and red) beads are solved.
I will use the letters A to E to denote the five bead locations from the top intersection (A) to the right intersection (E).
Phase 2: Solve the white beads
- If location B does not contain a white bead, then turn BY until A is white, and do RG+2 BY+1 RG+1 BY-1 RG+1 BY+1 RG-2 BY-1 RG-2.
- If location C does not contain a white bead, then turn BY until A is white, and do RG+2 BY+1 RG+2 BY-1 RG-1 BY+1 RG-1 BY-1 RG-2.
- If location D does not contain a white bead, then turn BY until A is white, and do RG+1 BY+1 RG+3 BY-1 RG-1 BY+1 RG-2 BY-1 RG-1.
- The beads in the BY loop will now be rearranged so that you have a row of five white beads together. You can swap any white bead and
with any coloured bead using the following procedure:
1. Find the coloured bead in the BY loop that you want to exchange with a white one.
2. Turn the BY loop to bring that coloured bead to A, the top intersection.
3. Do the move sequence RG+2 BY+1 RG+2 BY-1 RG-1 BY+1 RG-1 BY-1 RG-2. Note that this is the same sequence as in step b.
4. Find the white bead in the BY loop that you want to exchange with the coloured one.
5. Do the move sequence RG+2 BY+1 RG+1 BY-1 RG+1 BY+1 RG-2 BY-1 RG-2. Note that this is the same sequence as in step a.
By using these swaps, the five pairs of white beads in the BY loop can be brought together.
- Turn the BY loop so that the white beads are in their correct location alongside the central square.
Phase 3: Solve the yellow/blue beads
- If fewer than 4 yellow beads are solved, then rotate the BY loop 13 steps (a half revolution).
- If there is a incorrect blue bead, then
1. Rotate BY to bring the blue bead to the nearest intersection. The opposite intersection will have a yellow bead, and the other two intersections have transparent beads.
2. Rotate RG for 13 steps (a half revolution) so that the blue and the yellow beads have swapped (as have all the reds and greens).
3. Rotate the BY back until it is where it started.
- Repeat step b until all the blue and yellow beads are correct.
- If the reds and greens need to be swapped, then rotate RG for 13 steps (a half revolution) once more.


