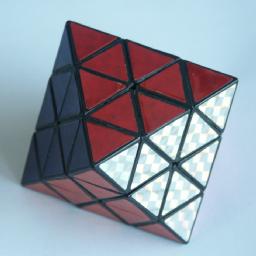
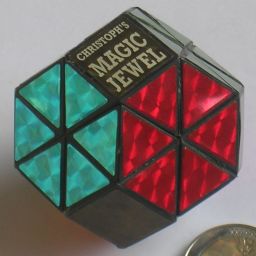
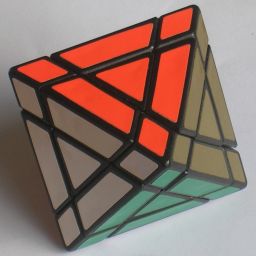
Corner-turning Octahedron / Christoph's Jewel / Trajber's Octahedron
The Corner-turning Octahedron is a regular octahedron, of which each triangular face is divided
into 9 identical smaller triangles, three to a side. A move consist of
rotating a vertex; either just a tip (one triangle to a side) or a larger
part (two triangles to a side). Christoph's Jewel is a very rare version of essentially
the same puzzle except that the tips are missing, much like the Tetraminx is a
Pyraminx without tips.
It is equivalent to a Rubik's Cube puzzle without corners, but with the
face centres marked to show their orientations. If you understand the
solution for the Pyraminx, then you can probably
solve much of this puzzle too, because it acts very similar.
In Trajber's Octahedron the cuts are a little bit deeper, so that each face
also has a face centre piece. These pieces correspond to the corners of the
underlying Rubik's Cube, except that their orientation is not visible. The
picture above shows a very rare original version from the 1980s, which has one
face with gold stickers. It has been remade more recently with different colours.
The number of positions:
There are 6 vertex pieces with 4 orientations, 12 edge pieces with 2
orientations giving a maximum of 12!·212·46 positions. This limit is
not reached because:
- Only half the vertex orientations are possible given a certain
edge position because a quarter turn is an odd permutation (2)
- Only and even number of flipped pieces are possible (2)
This leaves 12!·210·46 = 2,009,078,326,888,000
or 2.0·1015 positions.
If you include the trivial vertex tips then this has to be multiplied by
a further 46.
Trajber's Octahedron has an additional 8 pieces. Just as with a Rubik's Cube,
only even permutations are possible, so for any given position of the rest of
the puzzle, these eight pieces can only be permuted in 8!/2 ways. This gives
Trajber's Octahedron 12!·8!·29·46 =
40,503,019,070,029,824,000, or 4.0·1019 positions, almost as
much as the normal Rubik's Cube.
Notation:
The vertices are denoted by the letters L, R, F, B, U, D (Left, Right,
Front, Back, Up and Down). Clockwise quarter turns are denoted by the
appropriate letter, anti-clockwise turns by the letter followed by an
apostrophe (e.g. L' means turn the Left vertex 90 degrees anti-clockwise),
and half turns by the letter followed by a 2 (e.g.. F2 means turn Front 180
degrees). Since the vertex tips are solved independently from the rest of
the puzzle (see phase 1 below) this notation is not applied to tip moves
but only to the larger moves.
Solution:
Phase 1: Solve tips.
- Rotate the tips on each vertex to match the adjacent vertex pieces.
Phase 2: Solve vertex pieces.
- Rotate the F, B, L, R and U vertices so that their vertex pieces match, and
only the edge pieces have the wrong colour. The D vertex will be done later.
Phase 3: Place the U edges correctly.
- First find any edge that belongs next to the U vertex.
- If the edge is not at the D vertex, then put it there by using this
sequence:
Move FR->DF: Do R'D'R.
This moves the edge between the F and R vertices to a position
between the D and F vertices.
- Hold the puzzle so that the edge belongs at the front, i.e. at FU.
- Rotate D to place the piece at the front, i.e. at DF.
- Use one of the following sequences to place the edge in its correct
position:
To move FD->FU do D F2 D' F2.
To move DF->FU do D F' L D2 L' F.
- Repeat the above until all U edges are at the U vertex. Note that
if all U edges are at the U vertex but they are not all correctly
positioned, then you can bring one down to the D vertex by using one of
the above sequences to displace a U edge.
Phase 4: Place middle edges correctly.
- Find a middle layer edge that lies at the D vertex.
- Hold the puzzle so that the edge belongs at FR.
- Rotate D to bring the edge to the DF position.
- Place the edge piece by using one of the following:
To move FD->FR, do R' D R.
To move DF->FR, do D L D' L'.
- Repeat the above until all middle edges are correct. Note that
if a middle edge is incorrectly positioned, it can be brought down to
the D vertex by using one of the above sequences to displace it.
Phase 5: Solve D vertex piece.
- Rotate D until the vertex piece matches the others. Now only the four D edge
pieces remain unsolved.
Phase 6: Place D edges in position.
- Hold the puzzle so that one of the following sequences will place the
remaining edges in the correct position:
1. To move DR->DF->DL->DR, do R' D R D R' D2 R
2. To move DR->DL->DF->DR, do R' D2 R D' R' D' R.
3. To move DR-DL, DF-DB, do R' D2 R D2 R' D R D2 R' D2 R D'
4. To move DR-DF, DL-DB, do R' D R D' R' D2 R D R' D' R D2
Phase 7: Orient the D edges.
- Hold the puzzle so that one of the following sequences will solve the
puzzle completely:
1. To flip DR, DF, do R D' F D F' D R' D'
2. To flip DR, DL, do R D' F D2 F' D R' D2
3. To flip DR, DL, DF, DB, use b or c to flip them two at a time.
Phase 8: Solve the face centres (Trajber's Octahedron only)
- Hold the puzzle so that there is an incorrect face centre at the DFR face,
and so that the face where it belongs lies in the top half, and so that there
is at least one other incorrect face centre in the top half as well. This is always
possible if there are incorrect centres. If there are only two incorrect centres,
then the puzzle has been taken apart and reassembled incorrectly.
- Move the centres using the following steps:
1. Find the face that the DFR centre belongs to.
2. Turn the U vertex to bring part of that face to the UFR location.
3. Do R' D' R to replace the face centre piece.
4. Turn the U vertex so that the other incorrect face centre lies at the UFR location.
5. Do R' D R to replace the face centre piece.
6. Turn U back to its original state.
- Repeat a-b until all face centres are correct.
