


On this page I will describe some techniques that are used to analyse various peg solitaire puzzles. Standard Peg Solitaire, sometimes sold as Hi-Q, is the classic and most common version of the game. It consists of a board with 33 holes, arranged in the shape of a cross - a 3×3 square with four 2×3 rectangles added to its sides. At the start, all but the centre hole contains a peg. A move consists of jumping one peg over another to land in a vacant hole, and then removing the peg that was jumped over. At the start of the move, the jumping peg, the peg jumped over, and the landing hole must be adjacent and lie in a straight line. The aim of the puzzle is to remove all but one of the pegs, and preferably to leave that final peg in the centre of the board.
There are versions with other board shapes. Not only can you have other board shapes based on a square grid, such as Solo, but it can also be played with boards based on a triangular grid, on three-dimensional surfaces such as the surface of a cube such as with Culica, or even on three-dimensional boards for example based on a cubical grid.
Even given a particular board shape, you can still play different puzzles on it. You can change the location of the empty hole at the start (or have other starting arrangements with more than one empty hole), and you can change the goal pattern too. You can add additional requirements, such as specifying which particular peg has to survive to the end.
Some solitaire versions have been given their own pages, which is where you can find actual solutions to the standard single hole single peg problems.
All of these techniques and much more are described in the book The Ins and Outs of Peg Solitaire by John D. Beasley.
For now let's consider the standard cross-shaped board. The notation we use is explained on the Solitaire / Hi-Q page. Also on that page are tables showing the number of positions that can be reached after each number of jumps. As you can see from the last entries in those tables, if you end the game with a single peg left, then it can be in only a few possible locations. If you start with the hole in the centre, there are only five positions you can reach that have only a single peg left. It is possible to deduce this fact without enumerating all possible game positions.
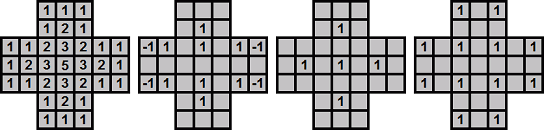
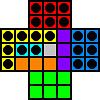
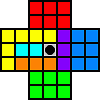
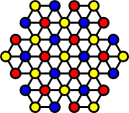
The holes of the board can be coloured with three colours such that any three holes in a row contain all three colours. This shown in the following picture where the board is given coloured diagonals. Every jump will involve three locations of differing colours. There are 11 holes of each colour.
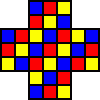
Every jump changes the contents of one hole of each colour, making an empty hole full or a full hole empty. If we look at the total number of pegs for each colour, a jump changes the parity of all of them. So if we start the game with, say, a red empty hole, then there is an odd number of pegs in the blue holes, an odd number in the yellow holes, and an even number in the red holes. After we have cleared the board in 31 jumps, all the parities must have changed (since they changed 31 times), so we must have an odd number of red pegs and even numbers of blue and yellow pegs. The final peg must therefore be in a red hole.
The same argument also works if we coloured the board along the other diagonals. Therefore we find that with a central starting hole, the final peg must be in the centre (d4) or at a distance of three holes from the centre (a4, g4, d1, or d7). In fact, if the starting hole is at any one of the five locations d4, a4, g4, d1, or d7, the ending hole must be at one of them too. Similar reasoning holds for the set of locations d5, d2, a5, g5 (and the rotationally equivalent sets), and for the set of locations c5, f5, c2 (and the rotationally equivalent sets).
On the ordinary Solitaire board, every choice of empty hole at the start can be solved such that the final peg lands in that same hole. This works because in the three-colouring, the number of holes of each colour have the same parity. One colour becomes the odd-one-out due to the starting empty hole, and remains so throughout the game, allowing the final peg to be in that colour hole. This kind of board is called a null-class board. Not all boards have this property however. If the parities for the three sets of coloured holes in one of the colourings are not all the same, then the final peg will never be able to land in the spot that was empty at the start of the game.
Boards based on square grids always have two 3-colourings. Boards based on a triangular grid, on which there are six possible directions in which to jump instead of four, have only one 3-colouring.
There also exist boards without any 3-colouring, for example the surface of a cube as used in Culica for example.
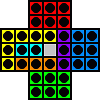
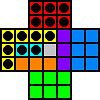
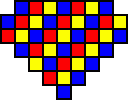
A Resource Count, also called a Pagoda Function, is some function which gives a value to any position of the pegs on the board, and which has the property that any jump performed on the board will not increase the value of function. A simple but useful one is illustrated by the following diagram:
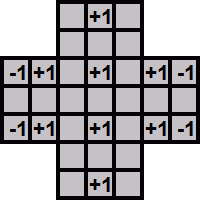
This resource count is calculated by simply adding together all the values of all the filled holes on the board. At the start of the game (with the starting hole is in the centre) the resource count is 4. Whatever jump you do, the resource count will not increase, because for that to happen the newly filled hole that the jumping peg lands in must have value 1, and the only locations that peg could have come from also have value 1 which cancels that potential increase. Most jumps do not change the value of this resource count, and the only ones that do in this case are jumps of a peg of value 0 over a peg of value 1, so they are jumps over one of the four holes in the middle column with value 1, or sideways jumps into a left or right corner.
If a jump lowers the value of a resource count below the value of the final board position, then the game will be impossible to finish. In this way a resource count can sometimes show you that certain jumps are bad. A resource count can even sometimes be used to prove that from certain starting positions it is impossible to reach the goal.
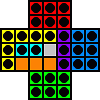
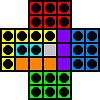
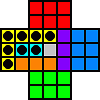
Some other interesting resource counts are shown above. A 3d graph of the first one shows where the alternative name "Pagoda Function" comes from.
Suppose that instead of 1 peg in every hole apart from one, each hole actually contains 101 pegs except for one hole with just 100, and that a hole can contain any number of pegs. We can still perform any normal solution sequence to leave the board with 100 pegs in each hole except for one with 101. This puzzle is much easier however, as you can do the moves in any order - for any jump there is always a peg available to jump with, a peg being jumped over that you can remove, and a hole behind that which can accommodate an extra peg.
Instead of having 100 extra pegs everywhere, a more common way is to allow a hole to contain any number of pegs including a negative number - it's exactly the same as above except all the numbers are 100 less than before. In this case you can remove a peg from en empty hole to leave -1 pegs behind. You don't have to wait for that peg to be available, as long as at some point in the solve that debt is repaid by landing a peg there to make it a normal empty hole.
Using such debts, or virtual pegs, allows you to get jumps that will at some point have to be done out of way by doing them first. If you know that there is only one jump that removes a particular peg, then you can do it even if at that time the jump would not really be legal. When you have found a solution containing such virtual jumps then you must still convert it to a real solution if possible, by reordering the jumps so that they all become legal. Note that it may not actually be possible to do so.
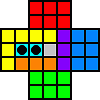
There are some jump sequences that remove a small number of pegs, but leave the rest of the board in the same state. Here is one very useful example that removes a 2×3 block.

| c1-c3 |

| b3-d3 |

|
a1-c1
a2-c2 |

| c1-c3 |

| d3-b3 |

|
Note that this block removal needs one of the holes b3 or d3 to be empty, and the other to contain a peg which acts as a catalyst. This catalyst peg will end up where it started. The hole c3 is shown as empty here, but if it full then this block removal is still possible by doing the moves in a slightly different order.
By thinking of the board as being dissected into blocks that can be removed in this way, it becomes very much easier to solve as you can look ahead further.
Note however that you need not remove each block completely in one go. It may be the case that at some point during the removal of one block, the catalytic conditions are provided for a different block removal to be performed, which you can then do before returning to the removal of the first block.
Here are some other useful block removals.

| c1-c3 |

| a2-c2 |

| c3-c1 |

|

| c1-c3 |

|
a2-c2
d2-b2 |

|
a4-a2
a2-c2 |

| c3-c1 |

|
Here is an example of a solution for the standard board, composed entirely of block removals, except for the last move.
|
d6-d4
b5-d5 d4-d6 |
|
f5-d5
e3-e5 d5-f5 |
|
e7-e5
f5-d5 c6-e6 c7-e7 e7-e5 d5-f5 |
|
g3-e3
e2-e4 f5-f3 g5-g3 g3-e3 e4-e2 |
|
e1-e3
d3-f3 c2-e2 c1-e1 e1-e3 f3-d3 |
|
c4-c2
a3-c3 d3-b3 a5-a3 a3-c3 c2-c4 |
| b4-d4 |
| |
I will now briefly discuss several other types of board, in order to show some more examples of the techniques above in action.
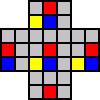
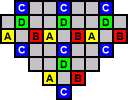
The 3-colouring of this board gives 13 holes (including the centre hole) of one colour and 12 holes of each of the other two colours. If you start with the centre hole empty, then you have equal numbers of pegs in each colour. Every move keeps the parities of the three numbers equal to each other, so it is then impossible to finish with only a single peg.

This same reasoning holds for any hole with the same colour as the centre
hole in either of the two 3-colouring patterns. The only starting holes with
which you could possibly finish with a single peg are therefore the ones shown
in the diagram on the left.
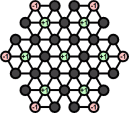
If you start with a hole at one of the locations marked A, the final peg will end
at one of the locations marked B, and vice versa, and similarly with the holes marked
C and D.
For solutions to this version, see the Solo page.
There are 12, 13 and 16 holes of each colour (here red, yellow, blue respectively). Yellow has a different parity than the others, so by the same reasoning as with the French board above, if the single starting hole is any of the yellow squares (or in the symmetrically opposite hole), then it impossible to reduce to a single peg.
If you start with a hole at one of the locations marked A, the final peg will end at one of the locations marked B, and vice versa, and similarly with the holes marked C and D.

There are 8, 9 and 8 holes of each colour (here red, yellow, blue respectively). Yellow has a different parity than the others, so by the same reasoning as with the boards above, if the single starting hole is any of the yellow squares (or in the symmetrically opposite hole), then it impossible to reduce to a single peg.

If you start with a hole at one of the locations marked A, the final peg will end at one of the locations marked B, and vice versa, and similarly with the holes marked C and D.
For solutions to this version, see the Think & Jump page.
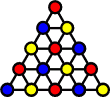
The triangular grid has only one way to 3-colour it. There are 12, 13 and 12 holes of each colour (here red, yellow, blue respectively). Yellow has a different parity than the others, so by the same reasoning as with the boards above, if the single starting hole is any of the yellow holes, then it impossible to reduce to a single peg. So you should not start with the centre hole empty, nor with an empty corner hole. If you start with an empty red hole, the final peg will end at one of the blue holes, and vice versa.
There is a very useful resource count for this board. At the start of the game this resource count is 1 or 0, depending on where the starting hole is, and similarly at the end of the game too. Jumping over one of the locations of value 1 is therefore generally a bad idea, except when the jumping peg comes from a corner of the board. If the starting hole is not at a value 1 location, then you can afford to do such a jump only once, and otherwise not at all.
Let's assume that if we can afford one bad jump then we will do it over the centre. Then all the other value 1 pegs can only be jumped over by a corner peg. We can remove some edges from the board to illustrate that.
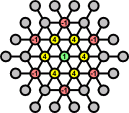
It becomes clear now that all the pegs along the outside of the board have only one direction to jump in. We can do all these 18 moves virtually to see what is left, as shown here. One of these values still has to be decremented due to the empty starting hole. Clearly most of the remaining moves will involve a pair of adjacent locations next to the centre.
For solutions to this version, see the Triangular Solitaire page.
The triangular grid has only one way to 3-colour it. There are 5 holes of each colour. Therefore the final peg must end in a hole of the same colour as the starting hole.

A very useful resource count for this board was named the SAX count by its discoverers Irvin and Robert Hentzel. Consider the hole values in this diagram. The three central holes, which the Hentzels marked the letter A, have value 1, while the corners and edge centres, which they marked X, have value -1. It does not yet result in a valid resource count - almost all jumps do satisfy the requirement that the total value does not increase, except for jumping over a -1 value along the edge. With such a jump, the three edge holes involved will decrease their number of pegs from 2 to 1. Let S be the number of edge triplets that have 2 or more pegs in them, and suppose we add that to the diagram values, so that we get S+A-X. This really is a valid resource count because not only is, as we have just seen, any increase of A-X compensated for by a decrease in S, any increase in S is only possible by a jump from the middle which is compensated for by a decrease in A.
This SAX resource count is very powerful, and can be used to prove the impossibility of many tasks. For example, if we start with a hole at an interior location such as b3, then the SAX count is already S+A-X = 3+2-6 = -1. To finish with a single peg, it must be in one of the X holes for the SAX count to be -1, and it must also be of the same colour as b3 in the three-colouring. That leaves only a1 or c5. The only jumps that end at a1 decrease the SAX count so are impossible with the SAX count of this task starting and ending at -1. Therefore the only remaining location for the final peg is c5. This turns out to indeed be possible.
In the same way, the SAX count proves it impossible to end at b3, unless you start at c5. All the other combinations where the starting hole and final peg location have the same colour are possible.