

Introduction:
1. Description
2. The number of positions
Proof of positions counting formula
3. God's Algorithm
Full God's Algorithm results
4. Programs
Solution:
1. Getting into cube shape
Diagram of shapes
Method 1: Gathering corners
Method 2
Method 3: Pairing the edges
2. Solving the pieces
Notation
A short note about odd permutations
Method 1 Separate layers, then solve corners, then edges.
Phase 1: Put pieces in their layers.
Phase 2: Put the corners correct.
Phase 3: Put the edges correct.
Method 2 Solve corners, then edges.
Phase 1: The corner pieces.
Phase 2: Place the edge pieces in their correct layer.
Phase 3: Place the edge pieces in each layer correctly.
Phase 4: Fix the central layer.
Method 3 Solve edges, then corners.
Method 4 Separate layers, then solve each layer.
Phase 1: Put pieces in their layers.
Phase 2: Solve each layer separately.
Method 5 Separate layers, solve parity, then each layer.
Phase 1: Put pieces in their layers.
Phase 2: Fix parities.
Phase 3: Solve first layer.
Phase 4: Solve second layer.
Method 6 Pair up corners/edges, then solve as domino.
Phase 1: Pair up corners and edges
Phase 2: Solve as Domino corners
Odds and Ends
The puzzle is unique in that the two types of pieces intermingle. The edge and corner pieces can freely move between the two outer layers. Of course, the puzzle will not necessarily be a cube shape if the pieces are mixed. The puzzle has six colours, each face has a single colour similar to the Rubik's cube.
Square-1 was patented by Karel Hrsel and Vojtech Kopsky on 16 March 1993, US 5,193,809.
There are 1, 3, 10, 10 and 5 layer shapes with 6, 5, 4, 3 and 2 corners. This means there are 5·1+10·3+10·10+3·10+1·5 = 170 shapes for the top and bottom layers. The middle layer has two shapes (half of it is assumed to be fixed). This means that there seem to be 170·2·8!·8! = 552,738,816,000 positions if we disregard rotations of the layers. Some layer shapes however have symmetry, and these have been counted too many times this way.
To take account of the symmetries we can simply count the number of layer shapes differently. Instead of the numbers 1, 3, 10, 10, 5 we use the numbers 2, 36, 105, 112, 54, which are the number of shapes if we consider rotations different (e.g. a square counts as 3 because it has three possible orientations). By the same method as before we then get 19305·2·8!·8! or 62,768,369,664,000 positions. To exclude layer rotations, divide by 122 to get a total of 435,891,456,000 distinct positions.
It is interesting to note that this number is exactly 15!/3. In fact, even for the generalised version with 2n pieces in each layer, a similarly simple formula holds, viz. 4(4n-1)!/3n. I had proved this in a rather complicated unsatisfactory way, but Mike Godfrey found a neat insightful proof. He even generalised it to 8(C+E-1)!/(2C+E), where C and E are the total number of corner and edge pieces, and E>0.
If instead we wish to count only all those positions where there are no corner pieces in the way of twisting the halves, then we can use the same method but counting only all the different ways each shape can be split into two halves, e.g. a square counts as 2 this time. The numbers to plug in are now 1, 12, 46, 62, and 37 which gives a total of 3678·2·8!·8! = 11,958,666,854,400 twistable positions.
In 2005 Mike Masonjones calculated God's Algorithm for the Square-1 in the twist metric. This shows that every position can be solved in at most 13 twists (10.615 on average) or 12 if the middle layer is ignored. The full results for each shape are on a separate page, but the totals can be seen in the table below.
In 2017 Shuang Chen calculated God's Algorithm for the Square-1 in the face turn metric. Every position can be solved in at most 31 face turns (25.134 on average).
|
|
|
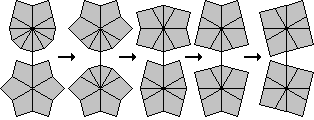
First you must get the puzzle into cube shape. This takes at most 7 twists (ignoring the centre layer shape), and the shortest method is simply using a table to look up the moves since there are only 90 different possible puzzle shapes. Such tables can be found at various websites, but they are not particularly enlightening. Instead I will present three methods here. The first is the most intuitive, and is the most common way of doing this phase. The second method is very different, but interesting as it shows an underlying mathematical constraint that I find quite surprising. The third is a little similar to the first though described in much more detail.
I have made a diagram showing the various shapes. At the top is the solved cube shape, and each successive row below it is one move further away. The blue shapes have 6 corners in one layer and two in the other, and these shapes are used in method 1 below. The red shapes have five and three corners in the layers. The yellow, green and purple ones have 4 corners in each layer, and the three colours signify the type of shape as used in method 2.
This method simply involves bringing six of the corners into one layer, which leaves the remaining pieces (2 corners and 8 edges) in the other layer. From such a position it is fairly easy to recover the cube shape.
I will not go into detail on bringing 6 corners together as it is quite easy. Once you have three corners together in half of one layer, then move these pieces around to the left half of the bottom layer. Now keep them there, so only use twists of the right hand side and turns of the top layer, and try to bring three more corners together in the top layer. Finally bring these two sets of three together in one layer.
Hold the puzzle with the six corners in the bottom layer. The top layer has two corners and six edges. There are only 5 possible shapes it can have, because there must be anywhere from 0 to 4 edge pieces between the two corner pieces. The diagrams below show how the cube shape can be recovered in each case.
| 0 | /(-2,-4)/(-1,-2)/(-3,-3)/ | 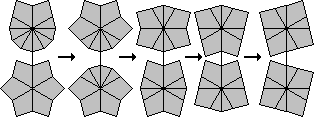 |
| 1 | /(2,-2)/(-3,-4)/(4,-3)/(-5,-4)/(6,-3)/ | 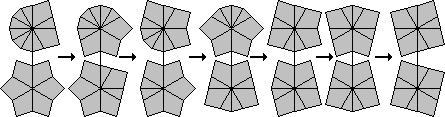 |
| 2 | /(-4,-2)/(-1,4)/(-3,0)/ | 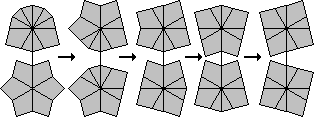 |
| 3 | /(-4,0)/(5,4)/(2,-3)/(-5,-4)/(6,-3)/ | 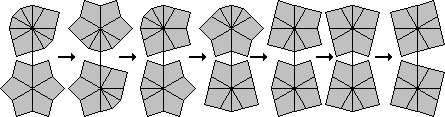 |
| 4 | /(2,2)/(0,-1)/(3,3)/ | 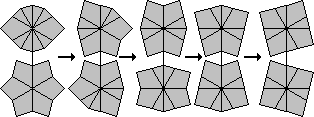 |
The notation used here will be explained later when it will be more extensively used instead of diagrams.
[ Skip to Section 2: Solving the pieces ]
Method 2:
This is a method found in the rec.puzzles archive.
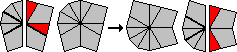
There are 10 shapes with 4 edges (e), 4 corners (c) that a layer can have.
Looking clockwise around the layer, they are:
|
|
If you are in a position with two of these shapes, look up the numbers associated with them in the list above and add them to get a number. Whatever move you do that keeps 4 corners in each layer, the number arrived at will not change (modulo 4). In particular if the number is not 0 (or 4) you cannot get it into a cube shape without first moving to a position that does not have 4 corners on each side. You then have to move back to a position with 4 corners in each layer and that does have a 0 or 4 sum.
If you do get a 0 (or 4) sum then the following list shows you how far away you are from the cube shape:
| |||||||||||||||||||||||||||||
|
| ||||||||||||||||||||||||||||
In the diagram of all the various shapes, the types of position can be seen. The yellow shapes have sum 0, the green have sum 2, and the purple have sum 1 or 3. The mirror image of a shape with sum 1 will have sum 3 and vice versa. Only one of each such pair is shown in the diagram. Note that shapes with only one non-symmetric layer will always have sum 1 or 3.
[ Skip to Section 2: Solving the pieces ]
Method 3: Pairing the edges
I am indebted to Robert Richter for the following method of restoring the
square 1 puzzle to cube form. I have worked out his method in great detail,
because I find it an interesting approach. Once you develop a feeling for it,
it becomes easy and you will not need to remember any move sequences.
The main idea is to combine all the edge pieces into adjacent pairs of edges. Once this has been done, it is easy to bring all four pairs together and from there get the cube shape using the first move sequence in the first method above. The great advantage of having only pairs of edges is that they take exactly the same amount of room as corner pieces. Each layer therefore will consist of six parts of equal size (corners and/or edge pairs) which can be moved around without obstruction.
I'll explain below in more detail how to make edge pairs, but before I do it is important to be able to distinguish between edge pairs and single edges. This is usually really obvious, but sometimes when there are an odd number of edges together in a group it is not immediately clear which of them is the single edge and which ones form the pairs. A simple way to determine this is to remember that the single edge is always one of those at the outside of the group, never one in the middle. Often one of those outside edges cannot be moved because the seam that separates if from the others does not extend all the way through the layer. As it cannot be separated, it must form a pair with the one next to it, and the edge at the other end of the group is the single one. If both edges can be moved then either one of them (but not both) can be considered to be single.
Another way to determine the single edges is by seeing how close the layer is to being made of six equal sized parts. There are several shape types:
 Sometimes a
layer is ambiguous, because it belongs to both cases 3 and 4 above. In particular,
the layer shape CCECEEEEE can be split as EE-EE-C-C-ECE, or as
C-EE-EE-ECCE. We will use this ambiguity later on.
Sometimes a
layer is ambiguous, because it belongs to both cases 3 and 4 above. In particular,
the layer shape CCECEEEEE can be split as EE-EE-C-C-ECE, or as
C-EE-EE-ECCE. We will use this ambiguity later on.
So, the first thing to do to move towards the cube shape is to pair up the edge pieces. Getting three pairs is fairly easy, in fact, in more than half the configurations there are already three pairs. In nearly all other cases there will be unpaired edges in both layers. It is then possible to bring an unpaired edge in the top layer to the front to the left of the seam, and an unpaired edge in the bottom layer to the back to the right of the seam so that a single twist brings the two edges together and does not split any already paired edges. This process can be repeated if necessary until you have at least three edge pairings. There is one special case you should be aware of, where all unpaired edges are in a single layer which only occurs when it is a square shape. In this case simply do any twist (that does not split any pairs in the other layer) to spread the unpaired edges to both layers and then continue the process outlined above to bring them together.
You will now have at least 3 pairs of edges. There are now three possibilities left:
 You have two single edges that are 90 degrees apart, i.e. they are separated by
exactly one corner piece. Turn the layer with these two edges so that they both
lie on the same side of the seam, and turn the puzzle so that they are in the left
half of the bottom layer. Using only turns of the top layer and twists of the right
half of the puzzle bring (at least) two of the edge pairs together in the top layer
to make a group of 4 (or 6) adjacent edges. It is now always possible to bring the
single edges and the group of 4 together in one layer to make the layer shape
CCECEEEEE (or its mirror image CCEEEEECE), and this leaves (or moves) the
remaining edge pair to the other layer. Because of the ambiguity of the
edge pairings in this shape, you can consider the two edges on either side
of the two adjacent corners to be the unpaired ones instead. This can
therefore be solved as in case 2 above.
You have two single edges that are 90 degrees apart, i.e. they are separated by
exactly one corner piece. Turn the layer with these two edges so that they both
lie on the same side of the seam, and turn the puzzle so that they are in the left
half of the bottom layer. Using only turns of the top layer and twists of the right
half of the puzzle bring (at least) two of the edge pairs together in the top layer
to make a group of 4 (or 6) adjacent edges. It is now always possible to bring the
single edges and the group of 4 together in one layer to make the layer shape
CCECEEEEE (or its mirror image CCEEEEECE), and this leaves (or moves) the
remaining edge pair to the other layer. Because of the ambiguity of the
edge pairings in this shape, you can consider the two edges on either side
of the two adjacent corners to be the unpaired ones instead. This can
therefore be solved as in case 2 above.
At this point all eight edges are together in one layer. A single simple sequence of moves now recovers the cube shape. Split the group of edges in two, making both layers into the scallop shape (CCCCEEEE). Now split each set of edges in two again to get both layers into the barrel shape (CCEECCEE). Split one barrel between a pair of corners and the other between a pair of edges, to get both layers into the kite shape (CECEECEC). If you split these between their edge pairs you form two squares.
The above should give you enough information to eventually get two squares. If the middle layer is not square, a single twist can make it so, though it is not yet necessary to do this at this point. The middle layer could well get disturbed in the later stages, but it can always be solved independently at the end.
Turns of the top and bottom layers are denoted by a pair of numbers (n,m). They are the multiple of 30 degrees that the top/bottom layers are to turn respectively. A 3 means clockwise 90 degrees, 1 means 30 degrees (i.e. one edge along) and negative numbers mean anti-clockwise turns. A twist of the right hand side of the puzzle is denoted by a /. As the puzzle is in the cube shape now, the move sequences (1,0)/(-1,0) or (0,-1)/(0,-1) for example both leave the puzzle in cube shape if you ignore the middle layer.
As a shorthand, I will also use letters to denote the possible positions of the pieces in the cube. This notation is based on that of the Rubik's Cube. Let the faces be denoted by L, R, F, B, U and D (left, right, front, back, up, down). Positions of edge pieces can be denoted by two letters, for example the edge position on the left of the top layer is denoted UL. Similarly positions of corners are denoted by 3 letters, for example DFR is the front-right corner position of the bottom layer.
There are several methods for placing the pieces into their correct positions. I will show the most common ones here.
Method 1:
This first method was worked out and given to me by Bobfish. The pieces are first
put into their own layers, then the corners are placed, and finally the edges.
Some of the sequences used in this solution can be made slightly shorter. If you
want, you can look them up in the computer generated tables that are listed in
method 2 below. I have left this solution as is, because Bobfish found these
sequences all by hand without computer. The parity fixer in particular is
especially impressive - it is a much better clean odd edge swap than I ever found
by hand myself.
[ Skip to Method 2: Corners first ]
Phase 1: Put pieces in their layers.
This phase puts all the white pieces in the top layer, and all the green pieces in
the bottom layer. You can always keep the top an bottom layers square throughout
this phase.
Phase 2: Put the corners correct.
This phase puts all the corners correct, while leaving the all edges in their own layers.
Phase 3: Put the edges correct.
Method 2:
This method solves the corners completely, then the edges in their layers, and finally the edges completely.
[ Skip to Method 3: Edges first ]
Phase 1: The corner pieces.
In this phase, every twist will keep the layers square.
Phase 2: Place the edge pieces in their correct layer.
Rotate the top/bottom layers to bring it to a position where one of the
following sequences will place the edges in the correct layer. I have tried to include
as many useful cases as possible in this table, but there is no need to memorise
all of these. If you know only one of the sequences 8 to 13, you can use it repeatedly until
the edges are in the correct layer, though using sequence 3 and 4 will speed things up.
1. Swap DF-UF, DR-UR, DB-UB, DL-UL (3,2)/(1,1)/(-3,3)/(-1,-1)/(0,-5) [4*|13*] 2. Swap DF-UF, DB-UB (0,5)/(1,1)/(-1,6) [2*|7*] 3. Swap DF-UB, DB-UF (0,-1)/(1,1)/(-1,0) [2*|6*] 4. Swap DR-UR, DB-UB (0,2)/(0,3)/(1,1)/(-1,-4)/(0,-2) [4*|11*] 5. Swap DR-UB, DB-UR (0,2)/(0,3)/(1,-5)/(-1,5)/(0,3)/(0,-2)
/(0,3)/(0,-4)/(1,1)/(-1,3)/(0,-3)/[5*|13*]
[6|13*]6. Swap DB-UB, DR-UF /(-3,0)/(0,5)/(6,1)/(0,3)/(-5,0)/(-1,6) [6*|14*] 7. Swap DB-UF, DR-UB (1,0)/(0,5)/(0,-3)/(-1,6)/(0,-5)/(0,3)/(0,6) [6*|14*] 8. Swap DR-UF, UR-UB (1,0)/(0,-3)/(-1,2)/(1,1)/(0,-3)/(0,3)/(-1,0) [6*|15*] 9. Swap DR-UR, UF-UB (1,0)/(0,-3)/(-1,-4)/(1,1)/(0,3)/(0,3)/(-1,0) [6*|15*] 10. Swap DR-UB, UF-UR (0,-1)/(0,3)/(0,-3)/(1,1)/(-1,2)/(0,-3)/(0,1) [6*|15*] 11. Cycle UF->UR->DR (-5,-3)/(5,0)/(0,3)/(-5,0)/(5,0)/(0,-3)/(0,3) [6*|14*] 12. Cycle UF->UB->DR (1,0)/(-1,0)/(0,3)/(-5,0)/(5,0)/(0,-3)/(1,0)/(5,0) [7*|15*] 13. Swap UF-DF (0,-3)/(0,3)/(1,0)/(2,-2)/(4,0)/(4,0)/(-4,4)/(0,1)/(0,3)/(-3,-1)/(1,-2)/(-1,0) [11*|27*]
Phase 3: Place the edge pieces in each layer correctly.
Rotate the top/bottom layers to bring it to a position where one of the
following sequences will place the edges correctly. There is no need to memorise all
of the sequences, as only a few of the single layer swaps will be sufficient. Alternatively
any odd permutation together with sequences a4 and a5 will do.
| 1. | Swap UF-UB, UR-UL, DF-DB, DR-DL | (1,0)/(2,-4)/(1,1)/(2,2)/(-5,1)/(5,0) | [5*|15*] | |
| 2. | Swap UF-UL, UR-UB, DF-DL, DR-DB | (0,2)/(-3,0)/(1,1)/(3,-3)/(-1,-1)/(0,3)/(0,-2) | [6*|16*] | |
| 3. | Swap UF-UB, UR-UL, DF-DL, DR-DB | /(3,3)/(0,3)/(1,-5)/(4,-2)/(4,1)/(3,3)/ | [7*|18*] | |
| 4. | Swap UF-UB, DF-DB | (1,0)/(5,-1)/(-5,1)/(5,0) | [3*|9*] | |
| 5. | Swap UR-UB, DR-DB | (0,2)/(0,-3)/(1,1)/(-1,2)/(0,-2) | [4*|11*] | |
| 6. | Swap UF-UB, DR-DB | (1,0)/(0,-1)/(0,-3)/(5,0)/(-5,0)/(0,3)/(0,1)/(5,0) | [7*|15*] | |
| 7. | Swap UF-UB, UL-UR, DF-DB | /(3,3)/(0,-3)/(3,3)/(0,-2)/(-2,4)/(2,-4)/(0,-1)/(3,3)/(0,3) | [9*|23*] |
| 1. | Swap UF-UB, UR-UL | /(3,-3)/(3,-3)/(0,1)/(-3,3)/(-3,3)/(-1,0) | [6*|16*] | |
| 2. | Swap UF-UL, UR-UB | /(3,3)/(0,3)/(1,1)/(-1,-4)/(-3,-3)/ | [6*|15*] | |
| 3. | Cycle UF->UB->UR | (1,0)/(-1,2)/(-5,1)/(0,3)/(-3,0)/(5,2)/(-5,4)/(-4,0) (-3,0)/(3,0)/(1,0)/(0,-3)/(-1,0)/(-3,0)/(1,0)/(0,3)/(2,0) |
[7*|19] [8|17*] | |
| 4. | Swap UF-UB | (3,0)/(3,3)/(-1,0)/(2,-4)/(4,-2)/(0,-2)/(-4,2)/(1,-5)/(3,0)/(3,3)/ | [10*|26*] | |
| 5. | Swap UF-UR | (0,3)/(-3,-3)/(0,-5)/(-2,2)/(0,4)/(0,-4)/(-1,2)/(3,0)/(3,4)/(0,-4)/(0,1)/(3,0)/ (0,3)/(-3,0)/(0,3)/(0,-3)/(0,3)/(2,0)/(0,2)/(-2,0)/(4,0)/(0,-2)/(0,2)/(-1,4)/(0,-3)/ |
[12*|28] [13|27*] | |
| 6. | Cycle UF->UL->UB->UR | (1,0)/(2,2)/(0,-2)/(3,3)/(1,0)/(4,4)/(0,-2)/(2,2)/(0,-1)/(3,3)/ | [10*|25*] | |
| 7. | Cycle UB->UF->UR->UL | (-3,2)/(1,-2)/(-4,0)/(0,3)/(1,0)/(3,-2)/(-4,0)/(-4,0)/(-2,2)/(-1,0)/(0,-3)/ | [11*|26*] |
Phase 4: Fix the central layer.
Method 3: Edges First.
First solve the edges completely, in the same way as phase 1 of method 2. Then put the corners in their layers and
solve them using the sequences in the tables below:
[ Skip to Method 4: Layer method ]
[ Skip to Method 5: Alternative Layer method ]
Phase 1: Put pieces in their layers.
This phase puts all the white pieces in the top layer, and all the green pieces in
the bottom layer. You can always keep the top an bottom layers square throughout
this phase.
Phase 2: Solve each layer separately.
The following table shows all sequences that solve the top layer for each possible case, except for
the ones already listed before, such as those in method 2, part 3b. The bottom layer can be solved
in the same way using the mirror images of these sequences (or by turning over the puzzle first).
Method 5: Alternative layer method
Phase 1: Put pieces in their layers.
This phase is the same as in Method 4.
Phase 2: Adjust the permutation parities of the layers.
This phase make sure that each layer is in itself an even permutation. This cuts down the number of
possibilities, leaving fewer (and generally shorter) sequences in the last phases. It is however slightly
tricky to recognize the parities quickly.
Phase 3: Solve the first layer.
The following table shows the sequences that solve the top layer for each possible case. Note
that these sequences may mix up the (unsolved) bottom layer.
| 1. | Cycle UFL->UBR->UFR, | (-2,0)/(0,-3)/(2,2)/(0,-3)/(-2,4)/(2,0) | [5|13*] | |
| 1. | Cycle UFL->UFR->UBR, | (-2,0)/(2,-4)/(0,3)/(-2,-2)/(0,3)/(2,0) | [5|13*] | |
| 1. | Swap UFL-UBL, UFR-UBR | /(3,3)/(1,-2)/(2,2)/(-3,0)/(-3,-3)/ | [6|15*] |
| 1. | Swap UL-UF, UR-UB | /(3,3)/(0,3)/(1,1)/(-1,-4)/(-3,-3)/ | [6|15*] | |
| 2. | Swap UL-UR, UF-UB | (1,0)/(3,-3)/(2,2)/(3,3)/(4,-2)/(-1,0) | [5|15*] | |
| 3. | Cycle UF->UB->UR | (0,-1)/(0,-3)/(1,1)/(0,-3)/(-1,5)/(0,1) | [5|13*] | |
| 4. | Cycle UF->UR->UB | (0,-1)/(1,-5)/(0,3)/(-1,-1)/(0,3)/(0,1) | [5|13*] |
| 1. | Swap UFL-UBL, UL-UF | (-2,0)/(0,3)/(-3,-3)/(3,0)/(2,0) | [4|10*] | |
| 2. | Swap UFL-UBL, UL-UB | (3,0)/(3,0)/(3,3)/(3,0)/(3,0) | [4|10*] | |
| 3. | Swap UFL-UBL, UL-UR | (-2,0)/(-3,0)/(2,2)/(0,3)/(1,-5)/(2,0) | [5|13*] | |
| 4. | Swap UFL-UBL, UB-UR | (1,0)/(3,3)/(2,-1)/(-2,1)/(-3,-3)/(-1,0) | [5|15*] | |
| 5. | Swap UFL-UBL, UR-UF | /(3,3)/(1,-2)/(-4,5)/(3,3)/ | [5|13*] | |
| 6. | Swap UFL-UBL, UB-UF | (1,0)/(2,-1)/(1,-2)/(2,-1)/(-5,4)/(5,0) | [5|15*] | |
| 7. | Swap UFL-UBL, Cycle UL->UB->UF->UR | (-2,0)/(0,-3)/(3,3)/(2,-1)/(3,3)/(4,-2)/(-1,0) | [6|17*] | |
| 8. | Swap UFL-UBL, Cycle UB->UR->UL->UF | /(3,3)/(1,4)/(2,-4)/(3,0)/(-3,-3)/ | [6|15*] | |
| 9. | Swap UFL-UBL, Cycle UR->UF->UB->UL | (-2,0)/(3,3)/(3,0)/(5,-1)/(1,-2)/(3,3)/(2,0) | [6|17*] | |
| 10. | Swap UFL-UBL, Cycle UF->UL->UR->UB | /(3,3)/(0,3)/(1,-5)/(-4,-1)/(3,3)/ | [6|15*] |
| 1. | Swap UFL-UBR, UR-UF | (-2,0)/(2,-1)/(4,-5)/(-1,2)/(4,-5)/(2,0) | [5|15*] | |
| 2. | Swap UFL-UBR, UB-UF | (1,0)/(-3,3)/(3,-3)/(-1,0) | [3|9*] | |
| 3. | Swap UFL-UBR, UL-UR | /(-3,3)/(3,-3)/ | [3|7*] | |
| 4. | Swap UFL-UBR, UB-UR | (-2,0)/(2,-4)/(0,3)/(1,1)/(-3,0)/(2,0) | [5|13*] |
Phase 4: Solve the second layer.
Turn the puzzle over, and solve the top layer using the sequences in the table below. This
table is very similar to the one in the previous phase, except that the move sequences are
generally a bit longer, because these have to keep the bottom layer intact.
| 1. | Cycle UFL->UBR->UFR, | (1,0)/(0,3)/(2,0)/(-3,0)/(-2,0)/(0,-3)/(2,0)/(3,0)/(-3,0) (1,0)/(-1,2)/(-5,-2)/(-3,0)/(3,0)/(-4,2)/(1,-2)/(-4,0) |
[8|17*] [7*|19] | |
| 2. | Cycle UFL->UFR->UBR, | (3,0)/(-3,0)/(-2,0)/(0,3)/(2,0)/(3,0)/(-2,0)/(0,-3)/(-1,0) (-2,0)/(2,-1)/(-2,4)/(-3,0)/(3,0)/(-1,-4)/(-2,1)/(5,0) |
[8|17*] [7*|19] | |
| 3. | Swap UFL-UBL, UFR-UBR | /(3,3)/(1,-2)/(2,2)/(-3,0)/(-3,-3)/ | [6*|15*] |
| 1. | Swap UL-UF, UR-UB | /(3,3)/(0,3)/(1,1)/(-1,-4)/(-3,-3)/ | [6*|15*] | |
| 2. | Swap UL-UR, UF-UB | /(3,-3)/(3,-3)/(0,1)/(-3,3)/(-3,3)/(-1,0) | [6*|16*] | |
| 4. | Cycle UF->UR->UB | (-2,0)/(0,-3)/(-1,0)/(3,0)/(1,0)/(0,3)/(-1,0)/(-3,0)/(3,0) (-2,0)/(2,-1)/(4,1)/(3,0)/(-3,0)/(5,-1)/(-2,1)/(5,0) |
[8|17*] [7*|19] | |
| 3. | Cycle UF->UB->UR | (-3,0)/(3,0)/(1,0)/(0,-3)/(-1,0)/(-3,0)/(1,0)/(0,3)/(2,0) (1,0)/(-1,2)/(1,-5)/(3,0)/(-3,0)/(2,5)/(1,-2)/(-4,0) |
[8|17*] [7*|19] |
| 1. | Swap UFL-UBL, UL-UF | (1,0)/(0,-3)/(0,3)/(0,-3)/(3,0)/(-3,3)/(2,0) | [6*|14*] | |
| 2. | Swap UFL-UBL, UL-UB | (3,0)/(-3,3)/(3,0)/(0,-3)/(0,3)/(0,-3)/ | [6*|13*] | |
| 3. | Swap UFL-UBL, UL-UR | /(0,3)/(3,3)/(0,3)/(4,0)/(3,0)/(3,3)/(3,0)/(5,0) | [8*|18*] | |
| 4. | Swap UFL-UBL, UB-UR | (1,0)/(3,0)/(-3,0)/(3,0)/(0,3)/(2,5)/(1,4)/(3,3)/(2,0) | [8*|20*] | |
| 5. | Swap UFL-UBL, UR-UF | /(3,3)/(1,-2)/(-4,-1)/(0,3)/(3,0)/(-3,0)/(3,0)/(0,-3) | [8*|19*] | |
| 6. | Swap UFL-UBL, UB-UF | (-2,0)/(-1,-1)/(-3,0)/(3,0)/(1,4)/(-3,0)/(3,0)/(2,-4)/(-3,0)/(0,1) | [9*|22*] | |
| 7. | Swap UFL-UBL, Cycle UL->UB->UF->UR | (1,0)/(0,3)/(0,-3)/(0,3)/(0,-3)/(2,0)/(-3,3)/(3,-3)/ (-2,0)/(3,3)/(2,-1)/(1,-2)/(0,3)/(-3,-3)/(-3,0)/(-1,0) |
[8|18*] [7*|19] | |
| 8. | Swap UFL-UBL, Cycle UB->UR->UL->UF | /(3,3)/(1,4)/(2,-1)/(3,0)/(-3,-3)/(0,-3)/(0,-3) | [7*|18*] | |
| 9. | Swap UFL-UBL, Cycle UR->UF->UB->UL | /(-3,3)/(3,-3)/(-2,0)/(0,3)/(0,-3)/(0,3)/(0,-3)/(-1,0) (1,0)/(3,0)/(3,3)/(0,-3)/(-1,2)/(-2,1)/(-3,-3)/(2,0) |
[8|18*] [7*|19] | |
| 10. | Swap UFL-UBL, Cycle UF->UL->UR->UB | /(-3,0)/(3,3)/(3,0)/(1,-2)/(-1,2)/(-3,-3)/(-3,0) | [7*|18*] |
| 1. | Swap UFL-UBR, UR-UF | (1,0)/(2,2)/(3,0)/(0,-3)/(4,1)/(3,0)/(-3,0)/(5,-1)/(0,3)/(0,-2) | [9*|22*] | |
| 2. | Swap UFL-UBR, UB-UF | (1,0)/(3,3)/(3,0)/(3,3)/(3,0)/(3,3)/(2,0) | [6*|16*] | |
| 3. | Swap UFL-UBR, UL-UR | /(3,3)/(3,0)/(3,3)/(3,0)/(3,3)/(3,0) | [6*|15*] | |
| 4. | Swap UFL-UBR, UB-UR | (1,0)/(3,0)/(3,3)/(3,0)/(5,0)/(0,3)/(3,3)/(0,3)/(3,0) | [8*|19*] |
If you find that you have erred, and have a last layer with an odd
permutation parity, the following move sequence will fix it while keeping the bottom layer intact.
/(-3,0)/(0,-3)/(2,0)/(0,2)/(-2,0)/(4,0)/(0,-2)/(0,2)/(-4,1)/(3,0)/ [11|22*]
Method 6: Pair up corners and edges
This is the solution I now use myself because it is so easy to remember. It essentially only uses one simple move sequence, plus any parity fixing sequence.
Phase 1: Pair up corners and edges.
This phase pairs up each corner with a matching edge so that the layers consist
of four such corner/edge pairs.
Each corner forms a pair with the edge that lies adjacent to it in an anti-clockwise direction. So the UFL corner forms a pair with the UF edge, the DFR corner with the DF edge, and so on. At the moment most of these pairs do not have matching colours, but by the end of this phase they should.
Note that you can easily move pairs about without splitting them up by doing (1,0), followed by any combination of quarter turns (0,3) and (3,0), and twists /, and then ending with (-1,0) to return to the cube shape.
Phase 2: Solve the outer layers.
The corner-edge pairs will now remain intact. This phase is equivalent to solving
the corners of a Rubik's Domino.
Phase 3: Fix the central layer.


