Jaap's Puzzle Page

Triplex / Mandorla

Triplex Mandorla

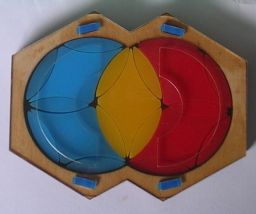
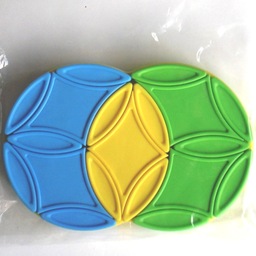
This is a puzzle consisting of two overlapping circular disks, reminiscent of other circle puzzles such as Turnstile and Rashkey. It actually most resembles the Cohan Circle but instead of 6-fold symmetry it has 3 fold symmetry, so it is as if you are playing on a Cohan Circle but restrict yourself to only do 120 degree turns.
Each disk consists of 3 large diamond shaped pieces, and 9 small lozenge shaped pieces of which 6 form the perimeter of the disk and 3 form spokes between the diamond pieces. The two disks share a diamond and its four adjacent lozenges, so all together there are 5 diamonds and 14 lozenges.
The puzzle usually has three colours. In the solved state the overlapping area is one colour, and the rest of the left disk a second colour, and the rest of the right disk a third colour.

The Triplex puzzle was invented by Douglas A. Engel, who also invented various other puzzles such as:

Mandorla is a neat version of the puzzle was produced in Hungary in 2013. It was invented by Ferenc Molnár, who also invented the Equator / Hungarian Globe puzzle.

If your browser supports JavaScript, then you can play the Mandorla/Triplex puzzle by clicking the link below:

JavaScript Mandorla/Triplex Puzzle

The number of positions:

There are 5 diamonds, and 14 lozenges. The lozenges however are split into two orbits of 7 pieces which cannot intermingle.
Only even permutations are possible in each of the three orbits. If the pieces were all unique this would give at most 7!2·5!/23 = 381,024,000 possibilities, and all of these positions are indeed attainable.
The standard version of the puzzle however has many identical pieces. The set of 5 diamonds splits into 2+1+2 pieces of each colour, and the two sets of 7 diamonds each split as 4+2+1 into the three colours. This gives a total of 7!2·5! / (2!4·4!2) = 330,750 possible positions.

I used a computer to calculate God's algorithm for the puzzle, and the results are shown in the tables below. The 3-colour version needs at most 21 moves to solve (16.217 on average), and a version with unique pieces needs at most 33 moves (26.409 on average).

3-colour versionFull version
DepthPositions
0 1
1 4
2 8
3 16
4 32
5 64
6 128
7 256
8 512
9 1,024
10 2,028
11 3,908
12 7,524
13 13,868
14 25,436
15 43,360
16 65,384
17 78,726
18 61,696
19 23,694
20 3,033
21 48
Total330,750
DepthPositions
0 1
1 4
2 8
3 16
4 32
5 64
6 128
7 256
8 512
9 1,024
10 2,048
11 4,096
12 8,168
13 16,216
14 32,260
15 64,092
16 127,440
DepthPositions
17 253,256
18 501,908
19 991,448
20 1,954,584
21 3,830,244
22 7,426,046
23 14,147,662
24 26,111,425
25 45,452,377
26 70,967,409
27 90,367,136
28 78,959,775
29 34,890,134
30 4,811,251
31 102,246
32 710
33 24
total381,024,000

Solution:

This solution assumes that you are using a version with 3 colours. If your puzzle has more colours, then this solution will not work. Further down this page I will give move sequences that cleanly swap some pieces, and those should suffice to solve any version of this puzzle.

Notation:

Let a clockwise 120 degree rotation (1/3rd of a full circle) of the left disk be denoted by L, and an anti-clockwise rotation by L'. Turns of the right disk are denoted in the same way, but using the letter R, so R and R' for clockwise and anti-clockwise respectively.

Phase 1: Solve the five lozenge pieces in the left disk.

  1. First determine where each colour should be. Look at the six lozenge pieces on the perimeter of the left disk. There should be 3 or 4 pieces of the same colour, and that is the colour for the left disk. The same can be done for the right disk. The remaining colour should be the one of which there is only one diamond piece, and will be the colour of the intersection.
  2. Solve the four outer lozenges of the left disk. You can do this by applying these steps until you are done:
    1. If the three lozenges that form the spokes of the right disk all have the left colour, then turn the left disk in either direction.
    2. If two of the spokes of the right disk have the left colour, then turn the right disk so that both lozenges lie in the left disk. Then turn the left disk until at most one of the right disk's spokes have the left colour.
    3. If only one of the spokes of the right disk have the left colour, then turn the right disk so this lozenge points to the right. Then turn the left disk until exactly two of the right disk's spokes have the left colour.
    4. If none of the spokes of the right disk have the left colour, then you have finished this part of the solution.
  3. To solve the final lozenge of the left disk, then turn the right disk until the final lozenge lies in the intersection, and do one of the following depending on whether it lies in the top or bottom half of the intersection:
    Top of intersection: L' R' L' R' L R L
    Bottom of intersection: L R L R L' R' L'

Phase 2: Solve the remaining lozenge pieces.

  1. Rotate the right disk so that its three spoke lozenges are correct.
  2. If the lozenge at the top right of the right disk is not correct, then do the following sequence once or twice until it is:
    RL' RL' R'L' RL' RL RL'
  3. If the lozenge at the bottom right of the right disk is not correct, then do the following sequence once or twice until it is:
    R'L R'L RL R'L R'L' R'L
  4. If the lozenge at the top of the right disk is not correct, then do the following sequence once or twice until it is:
    RL R'L RL R'L R'L' R'L R
  5. If the lozenge at the bottom of the right disk is not correct, then do the following sequence once or twice until it is:
    R'L' RL' R'L' RL' RL RL' R'

Phase 3: Solve the diamond pieces.

  1. Find the diamond that belongs in the intersection. Solve it by using the appropriate sequence below:
    Top-right of right disk: (L R' L' R)5
    Top-left of left disk: (R' L R L')5
    Intersection: do nothing.
    Bottom: Turn puzzle upside down and do one of the above.
  2. Find and incorrect diamond on the left and an incorrect one on the right. To put these correct, seemingly swapping them, do the appropriate sequence below:
    Top-left and top-right: L (R' L R L')5 L'
    Top-left and bottom-right: R' (R' L R L')5 R
    Bottom-left and top-right: L (L R' L' R)5 L'
    Bottom-left and bottom-right: Turn puzzle upside down and do the top sequence.

Useful Move Sequences:

The sequences of phase 3 above move the diamonds without affecting the lozenges at all. Therefore I will list some sequences here that perform 3-cycles of lozenges, with or without affecting diamonds. These are useful if you have a puzzle with a different colour design for which the solution above does not work.

  1. 3-cycles of lozenges of the right disk, diamonds affected:
    1. top→top-left→bottom-left: L (R L R L')2 (R L' R L)3
    2. bottom→top-left→bottom-left: (L R L' R)3 (L' R L R)2 L
  2. Clockwise 3-cycle of the spoke lozenges in the left disk, diamonds affected: R ( LRL'R' LRL'R' LR'L'R )2 R'
  3. 3-cycles of lozenges of the right disk, diamonds not affected:
    1. top→top-left→bottom-left: LRLR L'RL' R'LR'LR'LR' L' RL'RL RL'RL
    2. bottom→top-left→bottom-left: LRL'R LRL'R L' R'LR'LR'LR' L'RL' RLRL
  4. Clockwise 3-cycle of the spoke lozenges in the left disk, diamonds not affected: R L R' ( LRL'R LRL'R L' R'LR'LR'LR' L'RL' RLRL ) R'L'R