Updated 2015-11-29: Gamer libraries were updated to allow infrared communication,
to allow different buzzer tones, and to include my text scrolling and score display routines.
These pages were updated to reflect these changes.
Updated 2021-10-16: Tech Will Save Us no longer exists so their website is not
available. The kit assembly manual is now available for download from this page.
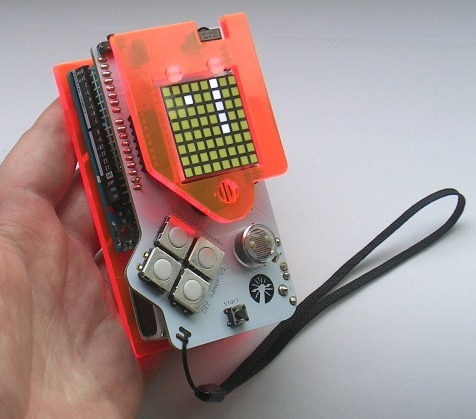
I bought a DIY-Gamer Kit at the Science Museum in London. It is a neat electronics project created by Technology Will Save Us. The core is an Arduino Uno, and the rest is a circuit board onto which you solder various components supplied in the kit (though pre-built kits can be bought too). The finished product is a simple hand-held games computer, which you can then program yourself.
The kit comes in a neat cardboard box, with all the components in clearly marked
zip bags. There is no printed assembly manual - you have to download it yourself. It can
be downloaded from here:
Gamer_Manual_web.pdf (1.44 Mb PDF)
(Skip section 3 of the manual if you have a later version DIY Gamer without the LDR)
There are also YouTube videos that take you through the process:
Video 1
Video 2
The manual is very clear, and goes through the construction in great detail. Soldering the kit is not terribly difficult, as all the most heat-sensitive components are placed in sockets rather than soldered directly. The hardest parts to solder for me were the battery connectors. They are large, and don't fit the PCB holes very well. This makes it difficult to get the parts hot enough for the solder to spread properly. These connectors take some physical abuse when you remove the battery (which you have to do whenever you want to access the USB port for programming) so it is important for them to be securely attached.
The Arduino Uno that is supplied with the kit comes with a Snake game pre-installed. This is why the packaging of the kit's Arduino has already been opened. The finished Gamer just fits back into the box for safekeeping.
The DIY-Gamer has the following features:
The Arduino itself has an USB port which in the DIY-Gamer is hidden behind the 9V battery. The port can therefore only be used after the battery is removed. When you connect it to a PC, it can draw enough power that the battery is unnecessary. Note that the On/Off switch then no longer works, as it only affects the battery circuit.
To program the DIY-Gamer, you need to install the Arduino IDE, and then add the Gamer Library. You used to have to download and install that yourself, but now the Gamer and GamerIR libraries can be installed from within the IDE through its library manager. The latest release of the Gamer Library can also be found on GitHub.
I have made an overview of the various commands that the Gamer library supplies, as well as a quick overview of the Arduino's own commands. You can find this on a separate page: DIY-Gamer Programming Overview
I have written several games and programs for the DIY-Gamer. These included a scrolling text routine and a routine for displaying a 2-digit score. Those two routines have been incorporated into the Gamer library itself so they are no longer available here.
© Copyright 2015-2016 Jaap Scherphuis, diygamer a t jaapsch d o t net.