Bolaris
Bolaris is a spherical sliding piece puzzle from Finland. It is similar to the
Equator, in that it has square tiles sliding on three tracks
on a sphere, and the Massage Ball in that it has a gap
into which the pieces can slide. The puzzle has three intersecting rings of 8 tiles,
and there are 6 intersection points, leading to 18 tile locations filled with 17
square tiles.
The puzzle exists in various colours and designs. The most difficult has a
picture of the globe on it so that all the pieces are unique and their
orientations are visible. The easiest has just four colours of tiles
which have no prescribed orientation.
This puzzle was invented by Hannu Hjerppe, and has the patent
WO2009/068726,
published on 4 June 2009.
The number of positions:
There are 17 tiles and a blank space, and each tile has 4 possible orientations,
giving a maximum of 18!·417 positions. This limit is not quite
reached because the permutation parity is odd or even depending entirely on the position
of the blank space. This leaves 18!·417/2 = 54,995,971,365,744,175,742,976,000
or 5.5·1025 positions for the globe design.
The table below gives an overview of all the designs and their number of positions.
| Image |
Name |
Description |
Tiles |
Permutations |
× |
Orientations |
= |
Positions |
 |
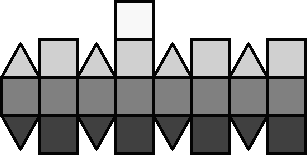
Harmaa |
Greyscale layers |
1, 4, 8, 4 |
18! / (1! 4! 8! 4! 1!) |
× |
1 |
= |
275,675,400 |
 |
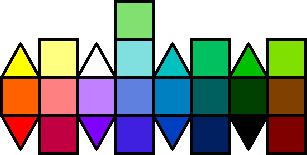
Vastaväri |
Rainbow Colour Wheel |
17×11 |
18! / 2 |
× |
1 |
= |
3,201,186,852,864,000 |
 |
Domino |
Domino tiles |
41, 64, 74 |
18! / (1! 6! 7! 4!) |
× |
413 |
= |
4,933,403,447,132,160 |
 |
Maailma |
Earth Globe |
17×14 |
18! / 2 |
× |
417 |
= |
54,995,971,365,744,175,742,976,000 |
Note that in its solved state the Harmaa (greyscale) design has four-fold
symmetry. This means that the number of really distinct positions is only
about a quarter of the number given above. To get the exact number of positions
we need Burnside's Lemma, which gives the
number of positions as ( 18!/(1!4!8!4!1!) + 2·2!4!/(1!2!1!) + 2!8!/(2!4!2!) )/4
= 68,919,072.
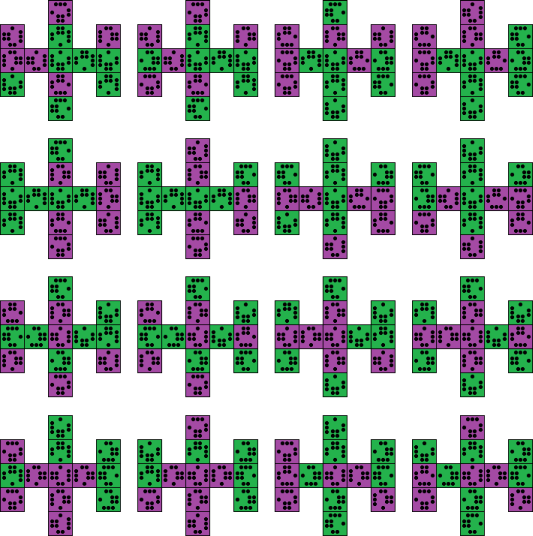
The domino design needs some explanation. It has 13 tiles with dots on them like
dominos. The dots mark the edges of those tiles with the numbers 1 to 4. There are six
identical purple tiles, with markings 1, 3, 2, 4 clockwise around the border. Seven
identical green tiles have markings 1, 2, 4, 3 in that order. The remaining four tiles
are brown and have no markings. The aim of the puzzle is to arrange the tiles such that
the dotted tiles fill the equator and the Northern hemisphere above it, and also that tiles
that are adjacent have matching numbers on their touching edges. The Southern hemisphere
contains the brown tiles with the blank space at the South pole.
The Harmaa (greyscale) design has few enough positions for God's Algorithm to be
fully calculated by computer. I'll only count the positions where the blank space
is at an intersection, and a single move consists of sliding two tiles so that the blank
is at another intersection. These numbers are not reduced for symmetry, so any
non-symmetrical position is counted 4 times. The results are as follows:
| | | Bolaris Harmaa | | |
|---|
| Depth | # Positions | Depth | # Positions |
|---|
| 0 | 1 | 15 | 2,012,932 |
|---|
| 1 | 4 | 16 | 3,836,806 |
|---|
| 2 | 12 | 17 | 6,678,773 |
|---|
| 3 | 32 | 18 | 10,367,460 |
|---|
| 4 | 92 | 19 | 14,107,959 |
|---|
| 5 | 264 | 20 | 16,225,142 |
|---|
| 6 | 726 | 21 | 15,322,263 |
|---|
| 7 | 1,972 | 22 | 11,464,961 |
|---|
| 8 | 5,160 | 23 | 6,642,892 |
|---|
| 9 | 13,196 | 24 | 2,701,930 |
|---|
| 10 | 33,604 | 25 | 716,701 |
|---|
| 11 | 82,798 | 26 | 47,807 |
|---|
| 12 | 196,588 | 27 | 115 |
|---|
| 13 | 450,019 | 28 | 1 |
|---|
| 14 | 981,590 | total | 91,891,800 |
|---|
This shows that any position can be solved in at most 28 moves, or 56 single tile moves.
That single antipode that needs 28 moves is the position where the four light grey tiles
are swapped with the four dark grey ones.
Links to other useful pages:
Bolaris, the website of the manufacturer.
Solution:
Observations:
The tracks in which the tiles slide can be thought of as eight triangles.
Slide the blank space around a triangle 5 times. The 5 tiles will all
have gone around the triangle once, in the oppostie direction to the blank space,
returning to their starting locations. They have all been twisted by one quarter
turn. In this way you can twist any piece as long as it lies in (or can be brought
into) a triangle that has not yet been solved.
When solving the puzzle, it is easiest to start from the opposite side of the
puzzle to where the blank space belongs at the end. On the Globe design the space
ends up on the South Pole, so it is best to start solving the Northern hemisphere
first. The greyscale design has the space functioning as the black tile at the end,
so you should start with the white and light grey tiles. On the rainbow design,
start with the pale green tile.
Phase 1: Solve everything above the equator.
- Hold the puzzle such that the bottom intersection will be where the blank
space ends up once it is solved.
- Find the tile that belongs at the top intersection. Solve this tile. Just bring
it into position, and if it is incorrectly oriented, twist it by moving the
tile around one of the triangles until it is correct.
- Find a tile that belongs in a location adjacent to the top intersection, but which
lies on or below the equator. If you cannot find any such tiles, then you can
use the move sequence in step f to replace any incorrect tile adjacent to the
North pole. The displaced tile now fits the criteria.
- Hold the puzzle so that the location this tile belongs is at the front. Bring
the tile the front intersection, just below where it belongs.
- Orient the tile correctly if necessary. You can twist the tile by moving it around one of the
bottom triangles.
- Insert the tile up into its proper location as follows:
1. The starting situation has the tile you wish to insert at the front intersection,
above it lies the location you will insert it into, and the blank space is the right of the tile.
2. Shift all the pieces around the top right triangle in an anti-clockwise direction.
This moves the incorrect tile downwards.
3. Move the pieces around the bottom right triangle in an anti-clockwise direction. This replaces the
incorrect tile with the correct one.
4. Move the pieces around the top right triangle clockwise. This puts everything
back into position.
- Repeat steps c-f until everything above the equator is solved.
Notation:
Suppose the blank space lies at one of the three locations between the front left and
front right triangles of the top half of the puzzle. We can move the pieces around either
of these triangles in either direction. Let L denote the clockwise movement of the 5
pieces around the front top left triangle (the space moves anti-clockwise) until the space is
back where it started. Let L' denote the anti-clockwise movement of those pieces. Similarly
I'll use R and R' to denote the clockwise/anti-clockwise shift of the pieces around the top
right triangle.
Phase 2: Solve everything except the tiles around one triangle.
- Turn the puzzle upside down, so that everything below the equator is solved.
- Find the tile that belongs to the left of the front intersection, and solve it. Just
bring it into position, and if it is incorrectly oriented, twist it by moving the
tile around one of the triangles until it is correct. (L five times twists it
clockwise, L' five times twists it anti-clockwise.)
- Find the tile that belongs at the front intersection, and solve it. Just
bring it into position without disturbing the solved tile(s), and if it is
incorrectly oriented, twist it by moving the tile around the top right triangle
until it is correct. (R five times twists it clockwise, R' five times twists it
anti-clockwise.)
- Turn the whole puzzle to the left, so that the previously solved tile lies at
the left intersection.
- Find the tile that belongs to the left of the front intersection. If the tile happens to
lie to the left of the top intersection, you can extract it by doing L R' L'.
Bring the tile to the front intersection, with the blank space above it
If necessary, orient it in the same way as before in step c.
- Put the tile into place by doing L' R' L. This moves the tile from the front
intersection to the location to its left without disturbing any other tiles on the
left.
- Find the tile that belongs to the left of the top intersection, and bring it
to the top intersection, with the blank space in front of it. If necessary, orient it
in the same way as before in step c.
- Put the tile into place by doing L R L'. This moves the tile from the top
intersection to the location to its left without disturbing any other tiles on the
left.
- Repeat steps c-h once more. Now only the tiles in the R triangle remain to be solved.
Phase 3: Position the 5 remaining tiles.
- Do R or R' to cycle the 5 unsolved tiles around until as many of them as possible are in
their correct locations.
- If the tiles are not yet correctly positioned, then examine them to determine which pair
of them needs to be swapped in order to improve the situation.
- To swap two tiles that are adjacent to each other in the loop of 5 tiles, do the following:
1. Do R or R' until the two tiles you want to swap are at the top intersection and the location
directly to the right of the top intersection.
2. Do LL R L'L' R'R' L.
3. Undo the move of step 1 by doing R or R' until as many of the tiles as possible are correctly positioned.
Note that this will also swap two tiles that lie in the L triangle on the equator. On the Harmaa version of the
puzzle this will not be visible. On other versions you can just ignore this, as they should automatically be
swapped back once the R face tiles are positioned correctly.
- To swap two tiles that are not adjacent to each other in the loop of 5 tiles, do the following:
1. Do R or R' until the two tiles you want to swap are at the front intersection and the location
directly to the right of the top intersection.
2. Do L' R' L' R L L.
3. Undo the move of step 1 by doing R or R' until as many of the tiles as possible are correctly positioned.
Note that this will also swap two tiles that lie in the L triangle on the equator. On the Harmaa version of the
puzzle this will not be visible. On other versions you can just ignore this, as they should automatically be
swapped back once the R face tiles are positioned correctly.
- Repeat steps a-d until all the pieces are in their correct locations.
Phase 4: Orient the 5 remaining tiles
This phase is only needed on the Maailma/globe design where the orientations of the tiles is visible.
- Examine the orientation of the tiles, and calculate the total twist of the tiles. A tile that is twisted clockwise
counts as 1, a tile that is twisted 180 degrees counts as 2, and a tile that is twisted anti-clockwise counts as 3.
We want the total twist, the twist of all the tiles added together, to be a multiple of 4. If it is one less than a
multiple of 4 (i.e. 3, 7, 11, 15) then do R5 to fix it. If it is one more than a multiple of 4 (i.e. 1, 5, 9, 13) then
do R' 5. Finally if it is even but not a multiple of 4 (i.e. 2, 6, 10, 14) then do R10. Check that the total twist
now really is a multiple of 4 before you proceed to the next step.
- Find a tile in the R triangle that needs to be twisted, and remember by how much it should be twisted.
- Do R moves until the twisted tile lies at the front intersection.
- Depending on how much twist it needs, do one of the following:
1. To twist by an anti-clockwise quarter turn: Do L R5 L'.
2. To twist by a half turn: Do L R10 L'.
3. To twist by a clockwise quarter turn: Do L R'5 L'.
Note that what this actually does is turn all the other pieces in the R triangle in the opposite direction,
so that relatively speaking they match the orientation of the current tile.
- Do R moves until the tiles are in the correct positions again. If you wish, continue until they mostly have the same orientation as they had after step a.
- Repeat steps b-e for each of the twisted tiles in the R triangle. Note that the above steps will also have twisted
the tile to the left of the top intersection. If you did step a correctly, this tile will automatically be correct
again once all the R tiles have been oriented correctly.
The domino has the extra challenge of actually finding an arrangement of the tiles
such that all the values match. It turns out to have only 16 solutions, which are
shown in the following diagram: