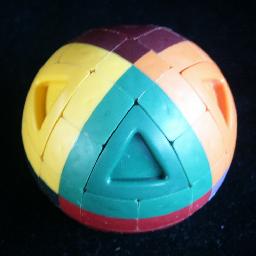
This cleverly designed puzzle is in effect a combination of the
Equator puzzle and the Rubik's
Cube. It is a ball with three intersecting rings of moving pieces which
divide the remaining surface of the ball into eight triangles. There are 12
square tiles each ring, making 30 pieces in all because there are 6 places
where the rings intersect. There is no space so the pieces do not move
singly. Instead, all 12 pieces of a ring can be shifted as one just like the
Equator puzzle. Furthermore, a cap consisting of 4 of the triangles and the
tiles between them can rotate.
There are various colour schemes for the Mozaika puzzle. The most difficult
version, the Offset, has 8 colours; each octant of the ball has its own
colour. Therefore the 6 tiles which lie at the crossings (the intersections
of the rings) have 4 colours, all other tiles have two colours, and the
triangles have only one. Other patterns include the Quad, which is
coloured just like the Equator, or the Half which
simply has two differently coloured hemispheres. Note that the patterns can
also have some colours duplicated to make it easier. I will only discuss
the 8-colour version.
The Mozaika was invented by Rudolf Destics, and patented on 22 October 1996,
US 5,566,941.
The number of positions:
There are 30 tiles and 8 triangles. The tiles all have 4 possible
orientations, which gives a maximum of 8!·30!·430 positions. This limit is
not reached because:
- The orientation of the whole puzzle does not matter (24)
- There are 12 indistinguishable tile pairs (212)
- The permutation parity of the triangles equals the
parity of the number of tiles that need a quarter turn (2)
This leaves 8!·30!·430/(24·213) =
62,716,115,731,979,958,427,000,055,726,386,372,096,819,200,000,000
or 6.2·1049 positions.
Notation:
A similar notation as the cube will be used. Hold the puzzle so that the
rings intersect at the front, back, left and right. Denote these 6 crossings
by the letters F, B, L, R, U and D. A clockwise quarter turn of the cap
around such a crossing is simply denoted by the relevant letter. Half turns
and anti-clockwise quarter turns are denoted by the relevant letter followed
by a 2 or an apostrophe (') respectively. A clockwise move of a ring of
tiles is denoted by a lower case letter indicating its adjacent cap, followed
by a number indicating the number of tiles to move the ring along. For
example u1 means rotate the ring around the equator westwards one tile, and
d1 means rotate the equator ring eastwards one tile.
The positions of tiles can be denoted by a combination of letters: The
crossing points by a single letter (e.g. F for the front crossing point), the
other tiles by two letters (e.g. FD, FL, FU, FR for the 4 tile positions
adjacent to the front crossing point; don't confuse FU with UF etc.).
Solution:
Phase 1: Place 4-coloured tiles in position
In this phase the tiles with 4 colours will be placed in position at the
intersections of the rings of tiles. Their orientation is not important
yet. Note that when the 4-coloured tiles are correctly positioned, each
should have 2 colours in common with the 4 nearest 4-coloured tiles, and
none with the tile on the opposite side.
- Move any ring to place one of the 4-coloured tiles at a crossing
point. This tile is considered to be correctly placed.
- A second 4-coloured tile can usually be placed in position by twisting
the ring that does not contain the first tile.
- The remaining 4-coloured tiles can be put in position as follows:
- Find a 4-coloured tile that is not in its correct position.
- If it lies at a crossing point, then hold the puzzle so that the
piece is at the front and do b1 u1 F d1 f1.
- Turn any caps to bring the 4-coloured tile next to the crossing
point where it belongs.
- Hold the puzzle so that the crossing point is at the front, and
the 4-coloured tile below it (at FD) and do b1 u1 F d1 f1.
- Repeat the above steps for each remaining 4-coloured tile.
Phase 2: Orient the 2-coloured tiles.
In this phase each 2-coloured tile is given a quarter turn if necessary so
that the line dividing its colours runs along the ring it's in rather than
across it. In other words, one of its colours is adjacent to one triangle,
the other colour is adjacent to another triangle.
- Find a tile that needs a quarter turn.
- Hold the puzzle so that the tile lies at position FD.
- Do the sequence r1 d3 R u3 l1.
- Repeat steps a-c until no more tiles need twisting.
Note that it may be quicker at first to twist 4 tiles at a time as
follows:
- Use any cap moves to bring tiles that need twisting at the
positions FD, BU, FL, BR. Note that these are two antipodal pairs.
- Do the sequence d2 r1 u1 l1 u1
Similar sequences can be used to twist any two antipodal pairs.
Phase 3: Pair up the 2-coloured tiles.
In this phase each pair of indistinguishable 2-coloured tiles will be brought
next to each other, preferably in the same orientation.
- Find any pair of identical 2-coloured tiles which are not yet next to
each other. It is best to find a pair which are in the same orientation
with respect to the adjacent crossing tile (i.e. if you hold the puzzle
with one of the tiles at position FD, you will have the same colour on
the right hand side as when you hold the other tile at FD.)
- Hold the puzzle so that one of the tiles lies at FD.
- Use any cap turns necessary to keep the FD tile in place and move the
other tile to the UB position (i.e. adjacent to the BU position which is
exactly opposite the FD tile)
- Do the sequence r1 u6 l1 to bring them together. (Note that this will
move the 4-coloured tiles around but that will be fixed in the next phase
if necessary).
- Repeat steps a-d until all 2-coloured edges are in pairs.
Phase 4: Solve the 4-coloured tiles.
The previous phase may have disturbed the 4-coloured tiles, so that will be
fixed now.
- Turn the U and R caps so that the 4-coloured tiles at U and R are in
the correct orientation relative to each other (i.e. the two colours they
have in common are nearest to each other).
- Turn the D and L caps to orient their 4-coloured tiles.
- Try to orient the F and B tiles by turning the F and B caps. This may
not be possible, and then the F and B tiles need to be swapped. This
can be fixed by the sequence:
u1 r1 u1 l1 u1 r1 u1 l1 u2 r1 d5 l1
Phase 5: Position nearly all the pieces
The puzzle can now be nearly solved just like the Rubik's
cube. Each triangle corresponds to a corner of the cube (though without
visible orientation), each pair of 2-coloured tiles corresponds to an edge
piece of the cube, and the 4-coloured pieces are the face centres. Nearly
any method to solve the cube can be applied now, but it must be borne in mind
that the centres have visible orientation now. There are several points to
remember:
- You will probably have tile pairs which are not oriented properly with
respect to each other. Treat these like any other proper edge pair. Note
however that the orientation of this pair treated as a single 'edge' is
not visible.
- You may find that two edges (tile pairs) need to be swapped in the end,
which does not occur on a normal cube. This will be fixed in the next
phase.
- You may find that one edge (tile pair) needs to be flipped in the end,
which does not occur on a normal cube. This will be fixed in the next
phase. Note however that you might flip such a 'single edge' in
combination with a tile pair that are not oriented properly with respect
to each other. This can usually get rid of any apparently single flipped
'edges'.
- If you use an edges first method, or a layer method in which the final
layer is solved edges first, then in the end you may find you have two
corners (triangles) which need to be swapped. In this case swap two edges
and solve the corners again.
- Layer methods and edges first methods can be easily adapted so that the
orientations of most face centres will be correct. Nevertheless you will
probably need to fix the orientation of some centres, and this can be
done with the following sequences:
To turn the F tile 180 degrees, do R L F2 R' L' F twice.
To turn the R tile clockwise 90 degrees, and the U tile anti-clockwise
90 degrees, do l3 u3 r3 U l3 d3 r3 U'.
Phase 6: Fix remaining problems
Now you may still need to swap two pairs of tiles, and will almost certainly
need to orient a few of the 2-coloured tiles.
- The FD/DF tile pair can be swapped with the BU/UB pair by the
sequence r1 u6 r1 u6 l2. Note that any tile pairs can be swapped with
this sequence, for example:
To swap the FD/DF pair with the FU/UF pair, do U2 r1 u6 r1 u6 l2 U2.
To swap the FD/DF pair with the FR/RF pair, do R2 B r1 u6 r1 u6 l2 B' R2.
- The FD tile can be flipped by the sequence
r1 R L F2 R' L' F R L F2 R' L' F l1
All tiles that need to be flipped can be corrected in this way. Note
that if you have a single 'flipped edge' from the previous phase, then
you can flip the two tiles separately.
Compare this sequence with the sequence used in the previous phase
to rotate the F tile 180 degrees.


