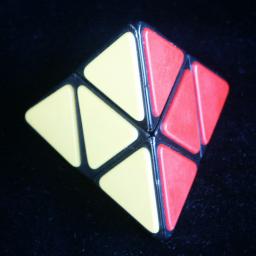


The Pyramorphix puzzle is a regular tetrahedron where each face is divided into 4 smaller triangles. This puzzle is related to the 2×2×2 Rubik's Cube; it is like a cube where the pieces forming one tetrad are flat and have one colour, the other tetrad forms the vertices of the tetrahedron and have 3 colours each. This puzzle does not maintain the same shape, making it somewhat confusing to solve.
Another way to see this puzzle is as a small octahedron, on which the four faces meeting at a vertex can rotate about that vertex. Four of the faces of the octahedron have tips stuck on them, the other faces are just flat.
The Pyramorphix is currently being manufactured and sold by Uwe Meffert.
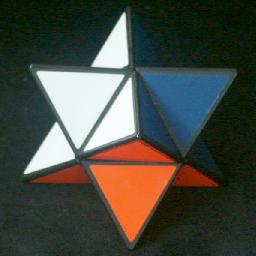
In the early eighties, this puzzle was made in East Germany under the name Figurenmatch. A patent was granted to Manfred Fritsche on 11 August 1983, DE 3,245,341. The same manufacturer also made a related puzzle called Stern, pictured above right. It is in the shape of a Stella Octangula - the pyramorphix would be obtained from this if four of its corners (the ones that only have one colour) are flattened.
If you have two spare pocket pyramorphix puzzles, you might want to take them apart and reassemble them with all the corner pieces on one puzzle and all the face pieces on the other. You now have two new puzzles, an octahedron and a Stella Octangula. It is a good idea to give them a different colour scheme.
Octahedron:
If you have four colours, two faces of each colour, then this is a really
easy puzzle. There are only 8!/24/24 = 105 essentially different positions.
Stella Octangula:
This puzzle would be most interesting with 8 colours. It is then possible to
end in a seemingly impossible position where one tip is twisted. In fact, it
is the other three pieces of that tetrad which need to be swapped around.
This puzzle has as many positions as the 2x2x2 cube, but there are four
positions which can be considered solved.
There are 8 pieces, 3 orientations each, giving a maximum of 8!·38 positions. This limit is not reached because:
This leaves 7!·33 = 136,080 positions.
I used a computer search to find God's Algorithm, i.e. the shortest solution for each position, and the result is shown in the table below. It shows that any position can be solved in at most 9 moves (6.6337 on average) if a half turn is considered a single move and 11 moves (8.0529 on average) if a half turn is counted as two moves.
| Face turn metric | ||||||||||||
|---|---|---|---|---|---|---|---|---|---|---|---|---|
| Q u a r t e r t u r n m e t r i c |
0 | 1 | 2 | 3 | 4 | 5 | 6 | 7 | 8 | 9 | Total | |
| 0 | 1 | 1 | ||||||||||
| 1 | 6 | 6 | ||||||||||
| 2 | 3 | 24 | 27 | |||||||||
| 3 | 24 | 96 | 120 | |||||||||
| 4 | 6 | 144 | 384 | 534 | ||||||||
| 5 | 72 | 768 | 1416 | 2256 | ||||||||
| 6 | 9 | 552 | 3692 | 4380 | 8633 | |||||||
| 7 | 126 | 3456 | 14640 | 7952 | 26174 | |||||||
| 8 | 5 | 1044 | 15524 | 29080 | 2932 | 48585 | ||||||
| 9 | 108 | 4812 | 26396 | 7972 | 24 | 39312 | ||||||
| 10 | 180 | 4972 | 5084 | 24 | 10260 | |||||||
| 11 | 24 | 132 | 16 | 172 | ||||||||
| Total | 1 | 9 | 54 | 321 | 1835 | 9716 | 39536 | 68424 | 16120 | 64 | 136080 | |
In Sloane's On-Line Encyclopedia of Integer Sequences this is included as sequence A079764.
Although any solution for the 2x2x2 cube will work here, I will give different solutions that uses the peculiarities of this puzzle.
I was asked by Geert Hellings to devise a simple solution to the Pyramorphix, when he arranged for the Mikrocentrum in Eindhoven to give out advertising Pyramorphixes at a conference. The solution I had at that time (solution 2 below) was much more complicated.
Phase 1: Make a pyramid shape.
 Notation:
Hold the puzzle with one corner pointing towards you (the others pointing left, right
and upwards), as shown in the pictures. That front corner is considered correct, and
is used as a reference to place all the other pieces around it. The letters L, R, and
D are used to denote moves, clockwise quarter turns of the back-left, back-right, and
back-down sections of the puzzle, shown as grey in the pictures. Half turns, which
don't change the pyramid shape, are denoted by L2, R2, en D2, en counter-clockwise
quarter turns by L', R', en D'.
Phase 2: Put the corners in their correct positions.
One or two half turns are all that is needed to put the corners in their correct
positions. The corners probably will still need to be twisted, but we will do that later.
Phase 3: Put the flat pieces in their correct places.
Phase 4: Orient the corners.
Phase 5: Orient the flat pieces. (optional)
This phase is only necessary if the orientation of the flat faces is visible.
This might be the case due to advertising logos, or a grain in the stickers or tiles.
This solution has become obsolete, given the solution above, but it remains here for completeness. Some of its sequences may be useful if you wish to speedsolve.
In this solution, the same notation as the cube will used. The octahedral centre of the puzzle is considered fixed in space, and its vertices are denoted by the letters L, R, F, B, U and D (Left, Right Front, Back, Up and Down). Clockwise quarter turns of a face are denoted by the appropriate letter, anti-clockwise quarter turns by the letter with an apostrophe (i.e. L', R', F', B', U' or D'). Half turns are denoted by the letter followed by a 2 (i.e. L2, R2, F2, B2, U2 or D2).
Note like the 2x2x2 cube, the moves LR' perform a rotation of the whole puzzle. Similarly FB' or UD'. Therefore moving only three adjacent faces is enough to solve it. If we only use the F, R and U faces to solve it, then the DBL corner is never moved from its place, and the other pieces are simply placed so they line up with it. The solution below will mostly use this method.
Phase 1: Get it in shape.
There are only 6 possible wrong shapes that can occur, and the pyramid shape
can always be reached in at most 3 moves. This is quite easy to do, so there
is no need to give details.
Phase 2: Get the tips correctly positioned.
Phase 3: Get the tips correctly oriented
Phase 4: Put the other pieces in position
This solution takes at most 3+2+6+8=19 moves, or even 18 because of a possible cancellation between phases 1 and 2. This is quite low for such a puzzle. It could be extended to a solution for the 2x2x2 cube, by using a phase 5 which orients the 4 remaining pieces (which takes at most 8 moves).