The Advanced Pocket Computer is a version of the Psion XP Organiser. It was sold by Handheld Products, and they provided their own version of the manual to go with it. You can see a picture of this Organiser in the Gallery.
INTRODUCTION CHAPTER 1 PHYSICAL OVERVIEW OF THE APC CHAPTER 2 GETTING STARTED INSERTING THE BATTERY REPLACING THE BATTERY POWERING ON KEYBOARD ON/CLEAR EXE Cursor Keys SHIFT DEL THE MAIN MENU SCANNING THE MENU FIND SAVE DIARY CALC PROG ERASE ALARM TIME INFO COPY RESET OFF SELECTING AN OPTION CHAPTER 3 THE TIME FUNCTION SETTING THE TIME CHAPTER 4 POWERING THE APC OFF AUTOMATIC SLEEP MODE CHAPTER 5 SAVING AND FINDING DATA SAVING DATA FINDING DATA EDITING RECORDS CHAPTER 6 ERASING DATA CHAPTER 7 MEMORY MODULES CHANGING MEMORY MODULES RAM VERSUS MEMORY MODULES CHAPTER 8 THE CALCULATOR PCL FUNCTIONS CALCULATOR MEMORIES EDITING A RESULT USING PROCEDURES IN THE CALCULATOR CHAPTER 9 THE DIARY ALARMS WHEN ALARMS OVERLAP TURNING A DIARY ALARM OFF THE DIARY SUB-MENU PAGE LIST FIND GOTO TIDY SAVE RESTORE DIR ERASE CHAPTER 10 ALARMS REPEATING ALARMS CANCELING ALARMS CHAPTER 11 PROG LANGUAGE OVERVIEW CHAPTER 12 INFO CHAPTER 13 COPY CHAPTER 14 RESET CHAPTER 15 HINTSABOUT RECORDS CHAPTER 16 CUSTOMIZING THE MENU DELETING MENU ITEMS REPLACING MENU ITEMS CHAPTER 17 INTRODUCTION TO PCL THE PROG MENU EDIT LIST DIR NEW RUN ERASE COPY CHAPTER 18 CREATING A PROCEDURE TRANSLATING PROCEDURES QUIT TRAN SAVE EDITING A PROCEDURE CHAPTER 19 VARIABLES VARIABLE NAMES DECLARING VARIABLES INTEGERS CALCULATOR VARIABLES CHAPTER 20 STRING VARIABLES STRING VARIABLE CONVERSION JOINING STRINGS TOGETHER STRING SLICING CHAPTER 21 ARRAY VARIABLES NUMERIC ARRAYS STRING ARRAYS CHAPTER 22 OPERATORS OPERATOR PRECEDENCE LOGICAL EXPRESSIONS COMPARISON OPERATORS LOGICAL OPERATORS CHAPTER 23 PROCEDURES GLOBAL AND LOCAL PROCEDURE PARAMETERS RETURNING VALUES RUNNING PROCEDURES PROCEDURE MENUS QUITTING PROCEDURES CHAPTER 24 DATA FILE HANDLING FILES AND RECORDS FIELDS CREATING A DATA FILE OPENING A FILE CHANGING FILES ADDING RECORDS TO A FILE FIRST, NEXT, BACK, LAST AND POSITION ERASING A RECORD FINDING A RECORD CLOSING A FILE DELETING A FILE COPYING A FILE CHAPTER 25 LOOPS, LABELS, JUMPS AND BRANCHES THE DO...UNTIL LOOP THE WHILE...ENDWH LOOP LABELS AND JUMPS BRANCHES CHAPTER 26 ERROR HANDLING TRAPPING ERRORS ERROR MESSAGES RUN-TIME ERRORS COMMON ERRORS PUNCTUATION ERRORS PARAMETER ERRORS INTEGER SIZE ERROR STRUCTURE ERRORS ENDLESS LOOPS CHAPTER 27 PRINTING PROCEDURES CHAPTER 28 PROCEDURE DIRECTORY CHAPTER 29 ERASING PROCEDURES CHAPTER 30 COPYING PROCEDURES CHAPTER 31 EXAMPLE PROGRAMS STAT MORTGAGE CALCULATOR APR NOISES OFF PASSWORD PRIME TAX CALCULATOR CHAPTER 32 PCL COMMANDS APPEND BACK AT BEEP BREAK CLOSE CLS CONTINUE COPY CREATE CURSOR ON/OFF DELETE DO/UNTIL EDIT ERASE ESCAPE ON/OFF FIRST GLOBAL GOTO IF/ELSEIF/ELSE/ENDIF INPUT KSTAT LOCAL NEXT OFF OPEN ONERR PAUSE POKEB POKEW POSITION PRINT/LPRINT RAISE RANDOMIZE REM RENAME RETURN STOP TRAP UPDATE USE WHILE/ENDWH CHAPTER 33 PCL FUNCTIONS ABS ADDR ASC ATAN COS COUNT DAY DEG DISP EOF ERR EXIST EXP FIND FLT FREE GET HOUR IABS INT INTF KEY LEN LN LOC LOG MENU MINUTE MONTH PEEKB (Peek byte) PEEKW PI POS RAD RECSIZE RND SECOND SIN SPACE SQR TAN USR VAL VIEW YEAR STRING FUNCTIONS CHR$ DATIM$ DIR$ ERR$ FIX$ GEN$ GET$ APPENDIX A: BAR CODE READING INTRODUCTION THE BAR CODE READER ATTACHING THE BAR CODE READER USING THE BAR CODE READER THE BAR$: FUNCTION EXAMPLE PROGRAMS
The HHP Advanced Pocket Computer (APC) is a powerful computer that fits into a pocket - an expandable system with a microprocessor more advanced than those found in micros many times its size.
The APC is ready for immediate use, and has its own built-in memory (Random Access Memory, or RAM) which retains data even after the APC has been powered off.
The APC also has two unique and versatile solid- state devices under the protective sliding cases. These units, called memory modules, are the key to the open-ended power of the APC. The 32K Random Access Memory (RAM) of the APC can be expanded by up to 256K through the use of these memory modules.
Additional memory modules allow the user to create a large and secure information base, which, when used in conjunction with program packs from the software library, provides unbeatable processing power in your pocket.
The APC has a built-in Diary capable of keeping track of personal appointments and engagements. An alarm may be set on any or all diary entries. The APC may also be used as an alarm clock.
The APC is a sophisticated calculator, with the ability to carry out complex calculations. It has mathematical and scientific functions and provides ten standard memories. Data and formulae may be entered in "plain English". The APC also has its own built-in programming language, PCL, designed to handle database applications and to allow the user to program it for truly customized applications.
A selection of peripherals and program packs allow the user to read barcode, print out information stored in the APC, connect it to another computer or send information over a telephone line.
The APC makes personal notebooks, diaries, clocks and calculators obsolete and, in addition, puts unparalleled database processing power into one pocket-sized computer.
A wide range of peripherals and program packs is available for the APC, including a power adapter, RS232 communications, a bar-code reader, magnetic strip reader, Math Pack, Finance Pack and Spelling Checker.
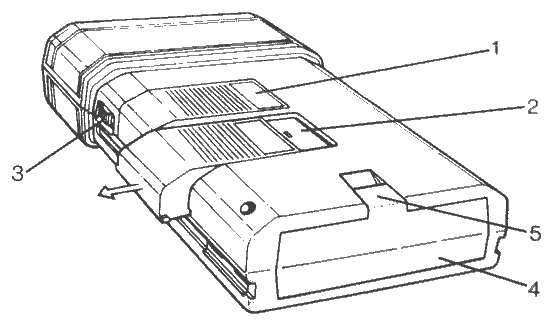
Figure 1. Rear view with protective case removed

Figure 2. Front view with keyboard exposed.
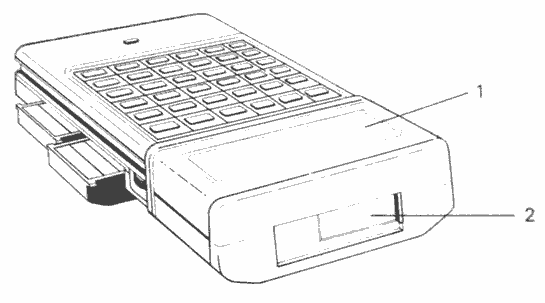
Figure 3. Top view of APC
The APC uses a 9-volt battery. Alkaline batteries or rechargable Ni-Cad batteries are recommended, particularly if memory modules are being used.
Hold the protective case (Fig 2.3) just below the separation point (Fig 2.4) and pull downwards until it is free of the APC. Find the tab of the battery cover at the back of the APC, and pull it to remove the cover. The battery connection will be visible on the side wall of the battery compartment.
To insert the battery, slide it into the opening, positive terminal first. Check that both terminals on top of the battery slide all the way into the battery well. If the battery slides only half-way in, it has been incorrectly inserted. Turn the battery over so the other metal contact slides into the battery connector first, and reinsert.
To replace the battery cover, slide the lip into the corresponding groove just inside the battery compartment. Clip the tab in place and the APC is ready for use.
When the battery runs low, a LOW BATTERY message will be displayed on the APC's screen. This message will be displayed for four seconds before the machine turns itself off. The battery must be replaced before the machine can be used again.
NOTE: If the LOW BATTERY message comes on while information is being saved to a memory module, the record currently being saved will be completed. Then, however, the low battery message will appear and the machine will power off.
Information stored in the APC (in the Diary and main data file, for instance) relies on the presence of the battery to keep it safe.
When the battery must be changed, check that the machine is powered off. If this is not done, all data will be lost from the internal RAM of the APC as soon as the old battery is disconnected. Follow the instructions above for changing the battery. When the old battery is removed, there is a limited time to replace it. Once the old battery is removed, if the new one is not inserted in the machine within 30 seconds, the system time, as stored in the TIME function on the main menu, will be lost. This can be reset when the new battery is safely installed, and no other losses will occur.
If a new battery has not been successfully installed within 90 seconds of removing the old one, the contents of the machine's RAM will be lost. Data stored on memory modules is safe however.
Alternatively, the HHP Adapter may be used to power the machine during a change of batteries. This insures that the power supply to the APC is uninterrupted; the user is not, therefore, limited to the above times to fit the new battery.
To activate the APC, press ON/CLEAR, the top left hand key on the keyboard. The screen will show the MENU. If the display appears blank or difficult to read, adjust the contrast, using the dial on the right hand side of the casing. Experiment until the most legible display is found.
Most keys on the keyboard have labels both on the keys themselves and above them. The letter keys normally produce capital (upper case) letters on the display. The position on the screen where the character will appear is marked by a flashing cursor. When the APC is powered on, the cursor will flash alternately as a block and a line underneath the character.
Holding down SHIFT while pressing one of the letter keys accesses the symbols and numbers marked above the keys. When SHIFT is held down, the cursor is a solid (as opposed to flashing) line underneath the character.
Holding down SHIFT and pressing NUM acts as a "CAPS lock", so that SHIFT does not have to be held down. This is useful when long sequences of numbers must be entered. Repeating the process returns the keyboard to normal upper case operation.
To enter lower case letters, hold down SHIFT and press CAP and the UP cursor key. To return the keyboard to upper case mode, repeat the process.
The top row of keys on the keyboard, and some of the bottom row, are command keys. These keys are explained below.
When first powered on, the APC display will look like this:
FIND SAVE DIARY CALC PROG ERASE
The first character of the first word on the display is covered by a flashing cursor. To move the cursor, use the four arrow keys on the top row of the keyboard. These are the cursor keys. In this manual, the right arrow key will be referred to as the ⇒ key, the left arrow as the ⇐ key, the up arrow as the UP cursor, and the down arrow as the DOWN cursor.
Pressing the ⇒ or ⇐ keys will move the flashing cursor to the first letter of the next (or previous) item on the menu. Pressing the same key repeatedly will move the cursor across the screen and on to the next line. When the cursor is positioned on the last item visible on the screen, pressing the ⇒ key again will bring up the next line of the menu.
The UP and DOWN cursor keys allow for scanning of the menu one line at a time, as opposed to one item at a time. When the end of the menu is reached, the last item will be OFF. Pressing the ⇒ or DOWN cursor keys once more will return you to the top line of the menu. The full range of menu items available on the APC are:
There are two methods of selecting an option from the menu. At the bottom right of the keyboard is a key labelled EXE. To select an option from the menu, use the cursor keys to position the cursor over the desired function and press EXE. The alternative is to press the key corresponding to the first letter of the option required. For example, press T to move the cursor to the TIME option in the menu. The APC will go directly to the selected menu item. In cases where more than one function have the same initial, press the key several times. Each time that key is pressed, the cursor will move to the next word starting with that letter, until it returns to the first entry.
When the cursor is over the desired function, press EXE to enter that option.
Select the TIME function from the menu as described in the previous chapter, by either of the two suggested methods. The day, date, and time will be displayed on the screen in this format:
WED 1 JAN 1986 00:03:06
When the battery is first inserted, the time will be set to 00:00:00, and the date to 01 January 1986. To set the current time and date, press MODE, and the cursor will appear over the day of the month. Press the UP cursor key and that figure will advance. Continue pressing UP until the correct day of the month is displayed. Note that the day of the week changes automatically whenever the date is changed.
To set the month, year and time, follow the same procedure. The time is displayed in 24 hour format, including seconds, so 4:30 P.M. will be displayed as 16:30:00.
After setting the correct time and date, press EXE to remove the cursor. Pressing ON/CLEAR will return you to the main menu. The time and date need only be set once, providing the battery is not removed from the APC for any considerable length of time. (See Chapter 2, Replacing the Battery.)
To check the time or date, select TIME from the menu and the clock and calendar will be displayed. Press ON/CLEAR to return to the main menu.
Select the OFF option from the main menu either by pressing the O key or by using the cursor keys and EXE. Pressing ON/CLEAR will power it on again, displaying the main menu.
If the APC is left on for five minutes without any activity, it will go into a "sleep mode" to conserve battery power. If this should happen while information is being entered, the data will not be lost; pressing ON/CLEAR once will reawaken the APC at the exact point at which it went into its sleep mode. All data remains intact and data entry can continue as before.
One of the the major advantages of the APC is its use for storing and retrieving large amounts of information in any desired format. This can be done either from the main menu, or from a customized application. Customized applications are covered in Section Two, in a full description of the APC's programming language, PCL.
Using the APC as a data base for names, addresses and telephone numbers is simple. Suppose, for example, the following information is to be stored:
Hand Held Products
Tel (704) 541-1380
P.O. Box 2388
Charlotte, NC 28211
Telex: 810-621-0380
FAX: (704) 541-1333
If the main menu is not currently displayed, press ON/CLEAR until it is. Select SAVE from the menu; the screen will show:
SAVE A:
Start typing in the information for Hand Held. As the first name is entered, the letters will appear to the right of the SAVE A: message on the screen. If the text to be entered contains more than 16 characters, the line will scroll to the left, leaving room to complete the line.
SAVE A:Hand Held
Once the name has been entered, you may wish to put the telephone number on a new line. To do this, press the DOWN cursor key once. This will take the cursor down to the next line, and allow entry of the number. By starting a new line, information can be arranged in whatever format is most legible.
Dividing information into a number of short lines rather than one long one allows the user to view a screenful of data at a time; in this case, Hand Held's name and phone number will both be visible on the screen at the same time.
This process is repeated until the last line of the address is entered. If it is necessary to correct an entry while typing it in, use the cursor keys and DEL to make any necessary changes. Once the information is entered and edited, press EXE and the information will be saved to memory. This item can then be found at any time by using the FIND option (see below).
NOTE: DEL deletes the character to the left of the cursor. By holding down SHIFT when DEL is pressed, the character directly under the cursor is deleted, and the text to the right moves over to fill the gap.
To combine two lines into one longer line, place the cursor on the first character of the second line and press DEL once.
One line, however, cannot be split into two shorter lines, nor can a line be inserted into the middle of a record.
Once the record has been saved to memory, you will be returned to the main menu.
To exit a half-finished record without saving it to the APC's RAM or a memory module, press ON/CLEAR. The screen will display the main menu, and the record will be discarded.
Each record may contain as many as 16 lines and 254 characters. Each line may contain any number of characters, subject, of course, to the above limit.
If a memory module has been added to the APC in one of the slots on the back of the casing, records can also be saved to the memory module. To do this, use MODE to select the appropriate memory module, either before, or at any time while entering the information.
If, for example, data has been keyed in for a record, before pressing EXE, press MODE, and the display will show which memory bank has been selected for saving.
The RAM of the APC is treated in the same way as the memory modules, if any have been added, and is referred to as the RAM, or memory bank A: (as opposed to memory modules, B: and C:; see Figure 1, Chapter 1.) This memory is always available, so there will always be at least one destination for data (or source if data is being retrieved). If the APC RAM is the current "drive", the screen", after the information has been typed in, will look like this:
SAVE A:Hand Held Tel (704) 541-13
Press MODE once, and, assuming a memory module has been added to the APC, the screen will show:
SAVE B:Hand Held Tel (704) 541-13
Naturally, if the memory module has been inserted into the second (lower) slot, the display will say C: instead of B:.
If the main menu is not currently displayed, press ON/CLEAR once or twice until it is, and select FIND from the menu. The screen will clear, and then show:
FIND A:
To find any item, type a three or four character search string. For example, if you had previously saved the record for Hand Held Products, and now want to retrieve it you could type in "HAND". The screen would then show:
Hand Held Produc Tel (704) 541-13
The APC operates far more flexibly than a card index or telephone directory, as it will access the required information from any part of the text in the record. For example, the record on Hand Held Products would be found by entering any of the following search strings:
FIND A:HAND FIND A:HELD FIND A:PRO FIND A:CHAR
Thus, entire records may be accessed by just typing in part of the first name, last name, job title or any part of the address.
Pressing the DOWN cursor key a number of times will move the other lines of the record into view, one at a time, until the last line is reached. Occasionally, a record may contain a line which has more than 16 characters, making it impossible for the entire line to be displayed on the screen at once.
When this happens, if the record has only one line, it will automatically scroll from right to left. When it reaches the end, the line returns to the beginning so a continuous display of its contents is shown. By holding down the ⇒ key, the line will scroll more quickly, allowing you to scan to the end of the line rapidly.
If the record has two or more lines, any of which are more than 16 characters long, use the UP and DOWN cursor keys. Each of the lines can then be scanned, and any long lines will automatically scroll on the display. Under normal circumstances, long lines will scroll on the lower line of the display. When the first line is over 16 characters, however, the top line will scroll.
While a line is scrolling, the direction of movement can be altered by using the cursor keys. If the line is scrolling to the left, press the ⇒ key once and the line will stop. Press it again and the line will scroll to the right. Use the ⇐ key to reverse the process.
If the record displayed is not the one desired, press EXE and the next matching record will be displayed in the same way.
If there are no records that match, or the last matching record has been displayed, the following message will appear:
**************** ** END OF PACK *
Press EXE again and the first matching record will be displayed again. To return to the main menu, press ON/CLEAR.
The FIND function is not "case sensitive"; i.e., it does not matter if the stored record is in upper case, and the string typed in after the FIND message is all in lower case letters, or vice versa. Records may be in any combination of upper and lower case letters, and they will still be found. Thus, the string ANN will successfully find both Anne and Joanne.
To look through stored records, select FIND from the main menu, and press EXE without specifying a string. The first record in the main file will be displayed, and, by repeatedly pressing EXE, subsequent records will be shown.
After the last record has been displayed, the END OF PACK message is shown. Press EXE once more and you will return to the first record.
To return to the main menu, press ON/CLEAR.
Data will, at times, need to be edited. If, for example, a telephone number or address changes, that record will need to be updated. To EDIT a record, FIND it, using whatever search string you choose. The record, will be displayed on the screen like this:
Hand Held Produc Tel (704) 541-13
To edit, press MODE. The screen will now show:
SAVE A:Hand Held (704) 541-1380
Use the cursor keys to move through the record and insert or delete text. Any of the lines can be altered, and new lines can be added onto the end of the record. New lines can not, however, be inserted between old ones.
The entire record may be deleted at this point by pressing ON/CLEAR. The record will disappear and the screen will show:
SAVE A:
Should ON/CLEAR be pressed accidentally while editing, the record can be retrieved by pressing ON/CLEAR once more. You will then be returned to the main menu; the record will be undamaged and can be retrieved again with the FIND function. Should you want to delete the record, after pressing ON/CLEAR once, press EXE and the record will be erased.
Once the record has been successfully edited, press EXE. The new record will be saved to the current memory bank, the old record will be deleted and the APC will return you to the main menu.
If the edited record is retrieved from one memory bank and saved onto another, the old record (on the original memory bank) will not be erased.
On occasion, it may be necessary to erase one or more records from within a file. To do this, select ERASE from the main menu. The screen will display this message:
ERASE A:
Pressing EXE will find and display the first record in the current file, and allow the user to examine it, using the cursor keys.
To erase the record currently displayed on the screen, press DEL. The top line of the screen will be unchanged, but the bottom line will show:
DELETE Y/N
Pressing Y will erase the record and the next record will be displayed. If you do not wish to erase the record, press N and the next record will be displayed. By pressing EXE repeatedly, all records may be reviewed.
A search string may be specified at the ERASE prompt to erase any records containing that string. If no record is found containing that search string, the END OF PACK message will be displayed. As each record matching the search string is found, the user may either press DEL or continue on to the next record.
To return to the main menu, press ON/CLEAR once.
There are two solid-state ports in the back of the APC (see Chapter 1, Figure 1). When first purchased, the APC is fitted with covers to protect the electrical connections inside the ports. Therefore, to safeguard against dust and dirt causing possible damage to these ports, keep a memory module, a program pack, or the protective cover over the ports at all times.
The memory modules slide in and out of their ports, and have a corrugated outer surface to allow for easier handling. Avoid pressing any key while removing or fitting a memory module. This is easily avoided by placing the APC face down on a flat surface, as the keyboard is slightly recessed.
Press down gently and slide out the ribbed portion of the memory module, until it is free of the casing.
To fit a memory module, just slide it into the desired port until it "clicks" into place.
Use the white label on your memory module to mark it for identification later.
Memory modules are available with capacities of approximately 8K, 16K, 32K 64K and 128K to suit virtually any application. An entire library of memory modules can be created, each meeting a different need. For example, the names, addresses and telephone numbers of all business contacts could comfortably be held in one memory module; over 2000 entries of up to 30 characters each may be saved on one 64K memory module. HHP also offers RAM memory modules which allow 32K of battery backed-up read/write/erase capability.
When a new memory module is added to the APC, the APC will ascertain that it is a new memory module, and this message will appear:
SIZING PACK B: PLEASE WAIT
The APC is checking the size of the new memory module, and determining that it is completely blank. After two or three seconds, the screen will clear and regular operation of the APC will be resumed. At this point the user can either use the memory module that was just sized, or select another one,by pressing MODE until the desired memory bank is indicated in the display.
For example, after entering a record with the screen showing SAVE A:, you might wish to add a new memory module to port B: and save the record to that pack. Remove the cover from the top slot on the back of the casing (device B:) and add the new memory module. The display will show:
SAVE A:Hand Held (704) 541-1380
Press MODE once:
SIZING PACK B: PLEASE WAIT
There will be a short pause, and then the screen will show:
SAVE B:Hand Held (704) 541-1380
Pressing EXE will save the information in the record to the current memory module as shown on the screen.
Any memory module will only be sized once, so inserting a previously sized memory module allows for immediate use of that memory module.
Many of the activities available from the main menu, such as FIND and SAVE, can be performed on either the RAM of the APC or one of the two memory modules. These are referred to as memory bank A:, B: and C:, respectively (See Figure 1, Chapter 1).
The APC checks which ports have memory modules, and, at the appropriate time, offers only these as options.
Once a memory bank has been specified, the APC will continue accessing it until another memory bank is selected.
If no memory modules have been added to the APC, pressing MODE when trying to SAVE or FIND information will have no effect; memory bank A:, the RAM, will remain the active memory bank.
The built-in RAM of the APC differs in several ways from the memory modules. The most obvious difference is that the RAM is dependent on the battery to secure its data. The second point, however, is also significant.
When records have been stored in the RAM of the APC, erasing any of these records will actually remove them from memory, and the space thus freed can be utilized by another record.
In this regard, memory modules differ: erasing a record from a memory module is similar to crossing out a page in a book. It is still there, occupying space, but it is no longer accessible.
The advantages of memory modules are portability, security in case of battery failure, expandability, and use as a "filing cabinet", in that different types of data may be stored on different memory modules.
With memory modules, however, repeatedly saving and erasing information will use up storage space which will, eventually, come to an end. Therefore, it is advisable to keep unnecessary SAVEs and ERASEs to a minimum.
At some point, however, memory modules will be filled. The next time a SAVE is attempted to that particular memory module, the APC will display a PACK FULL message. Further attempts to save information on that memory module will produce the same message.
Although memory modules store information permanently, an entire memory module may be cleared using a process called erasing. This is achieved by controlled exposure to ultra-violet light in a purpose-built machine called an EPROM eraser.
The erased memory module will be blank, and when reinserted into the machine, will be seen as such, and re-sized as if it were new.
Note that the white label on the underside of each memory module is to protect it from excessive exposure to light and must be removed before erasing can occur.
The problem of a memory module becoming filled with information (which, although "erased", is still occupying space), can be resolved by copying the rest of the information to another pack. During copying, the erased records and files are ignored, so only valid information will be copied. The old pack may then be erased in an EPROM eraser, and is ready for re-use.
The CALC option on the main menu performs sophisticated arithmetic calculations as required. Select CALC from the menu, and the screen will show:
CALC:
The keyboard will be automatically go into numeric mode so that numbers can be accessed without the use of SHIFT.
The basic arithmetic operators, + (plus), - (minus); / (divide), * (multiply) and ** (raising to a power) are utilized in the same way that they would be in written calculations. For information on the precedence of these operators, see Chapter 23.
Calculations may be typed in on the top line of the display, just as they would be written. For example, if the following were typed in:
4*7/9
and EXE pressed, the screen would show:
CALC: 4*7/9 =3.111111111111
When the result is displayed on the bottom line of the screen, the actual calculation string is displayed on the top line. If this string is longer than 16 characters it will be scrolled from right to left. Parentheses may also be used in calculations.
Results are displayed with up to 12 decimal places, but this can be changed at any time when the CALC: prompt is shown. Simply type in FIX=n where n is a number between 0 and 12. Results will then be displayed to that number of significant decimal places. To return to the default, type FIX= without a number.
Thus, by typing FIX=3 at the CALC prompt, the calculation above would return the answer 3.111
In using the calculator, any mathematical functions from the APC's programming language PCL (see Chapter 34) may be used. These enable the user far more options than are available on an ordinary calculator. For example:
SIN(PI)/(3.8*COS(1.2))
Here the SIN, COS and PI functions from PCL are used, but any of the numeric functions can be used. When EXE is pressed, an equal sign will be displayed on the lower line of the screen, followed by the result.
If a mistake has been made in the calculation string entered, an error message will be displayed. To return to the place in the string where the error occurred, just press SPACE. The calculation will then be redisplayed with the cursor flashing on the first character which was not recognized.
If, for instance, a character was included which was neither a procedure on the current memory bank nor an arithmetic operator, like this:
10*P/(22/7)
the cursor would be flashing on the P, as that character would not be recognized by the calculator.
NOTE: The percent key (%) does not operate as the percent key on ordinary calculators. This key simply produces the % character for use in the APC's programming language, PCL. To calculate percentages, they must be entered into the calculator in decimal or fractional form. Thus, to calculate 37% of 250, it must be entered as follows:
37/100*250,
or
.37*250
Built into the APC are ten memory storage areas which may be used either in CALC or in PCL.
These may be used to store and retrieve numbers for use in calculations, and may be added to, subtracted from and cleared.
When numbers are stored in these memories, they are accessible by PCL and vice versa. Regardless of whether or not the APC has been powered off between using one and the other, any numbers in memory are held until they are deliberately cleared or until the machine is RESET, using that option from the main menu.
Whether in the calculator or PCL, these memories are referred to as M0 to M9. Either upper or lower case letters may be used.
To store the result of a calculation to memory, press MODE while the result is on screen. The top line of the display will then show:
M: PRESS 0-9
Next press one of the numeric keys, for instance 0, and the top line will show:
M0: +,-,EXE,DEL
At this point, there are four options:
Choose one of the above options by pressing the appropriate key, or press ON/CLEAR to return to the calculator with no change to any of the memories. The calculation will still be displayed on the top line and the result on the bottom line.
When a result has been stored to one of the memories, it may then be used in another calculation. For instance, the calculation string:
2+3+M0
would add 2 and 3 and the contents of M0.
To address the contents of a particular memory, type the name of that memory (M0 to M9) and press EXE. Its contents will then be displayed.
To edit the original calculation, (for instance, to vary a parameter for a "what-if" calculation), press one of the cursor keys, EXE or DEL.
If EXE is pressed, the result will disappear from the bottom line, and editing will be enabled. Pressing the ⇐ or ⇒ keys will erase the result and allow for editing of the calculation, but the cursor will have moved as if EXE and that particular cursor key had been pressed. Therefore, if the ⇐ key is pressed, the result will disappear and the cursor will now be moved one character from the end of the calculation.
If DEL is pressed, the result will disappear and the last character of the original calculation string will be erased. Further presses of the ⇐ and ⇒ keys will enable the calculation to be edited and recalculated.
If the result from one calculation is used as part of another, press any of the operator keys (+, -, *, /) and that result will be displayed on the top line. It can then be added to, in order to form a new calculation.
At any time, the current calculation string and/or result may be cleared by pressing ON/CLEAR. Press the same key again to return to the main menu.
Programs which have been written in the APC's programming language and saved to the current memory bank may also be used in CALC. Any procedure called in this way may need one or more parameters supplied in parentheses. It could also operate on one or more of the calculator memories and will return a value as would a standard numeric function. For example, if, on the current memory bank, there is a program called FACT: which works out the factorial of a number passed to it, then this could be included as a part of a calculation string, such as:
587*2.883/(4+fact:(3))
The value 3 is being passed to the program, "FACT". The returned value is then added to 4 and the rest of the calculation performed on the result.
All parameters passed to procedures from the calculator are passed as floating point numbers unless otherwise specified. To pass an integer to a procedure, the INT function from PCL must be used:
5/3+proc:(INT(8))
Any procedures called from the calculator must return either a floating point number or an integer, or return nothing at all.
Any procedure called from the calculator which results in an error will be treated in this way: the usual message for the error in question is displayed on the top line of the screen. The bottom line shows the name of the procedure where the error occurred, for instance:
SYNTAX ERR IN COUNT:
Press SPACE to return to the calculation string.
One of the most useful standard applications in the APC is the DIARY, selected from the main menu.
DIARY slots are spaced at 30 minute intervals, i.e., on the hour and half-hour of each day. On first entering the DIARY environment, the next DIARY slot from the current time and date will be displayed. For example, if today's date and time are January 1, 1987, 9:15 A.M., on entry to the DIARY function, the display will appear as:
JAN:01:THU:09:30
On first accessing the DIARY, since no appointments have been entered for that date or time, the bottom line of the display will be blank.
The current DIARY date can be altered using the ⇐ and ⇒ keys. Press the ⇒ key to move forward through the month, one day at a time, or the ⇐ key to go backward until the desired date is reached.
Holding any of the cursor keys down continuously will cause them to auto-repeat, changing the date more rapidly without having to repeatedly press the cursor key. If the ⇒ key is pressed while the DIARY is displaying the entry for the last day of the month, the display will return to the first day of the following month. To scroll backward through the days of the month, use the ⇐ cursor key. On scrolling forward from December 31st, 1986, you will move to 1st January 1987 and vice versa.
To change the current DIARY time, i.e., the time slot currently being displayed by the DIARY, use the UP and DOWN cursor keys. To move forward in half hour increments, press the DOWN key. Move back in 30-minute steps by pressing the UP key.
Think of the DIARY as a large sheet of paper divided into window-sized boxes. The display acts as a window which can be moved across or up and down the sheet, viewing the contents of one box at a time. This is the PAGE mode. It is the only mode in which the contents of the DIARY can be changed. You must be in this mode to type in or change any DIARY entry.
While PAGing through the DIARY slots for the first time, there will be nothing displayed on the bottom line of the screen, since no entries have been made as yet. To create an entry, simply type it in. The cursor will appear on the bottom line of the display with an EDIT: prompt and text may be entered as it would in a regular appointment book. If the entry is more than sixteen characters, text will scroll left, as usual with long lines.
Keep DIARY entries short, as each entry uses up memory space, and longer entries must be scrolled on the display to be seen in full. All DIARY entries may, however, be up to 64 characters long.
When an entry has been typed in, press EXE and the APC will offer the option of setting an alarm when that entry becomes current, as in the example below:
JUN:30:MON:17:00 ALARM (Y/N)
If an alarm is not needed for this entry, press either N or ON/CLEAR. If an alarm is desired, press Y. Any other keyboard entry will be ignored. The display will now show:
JUN:30:MON:17:00 MINUTES : 15
At this point, you are being asked to specify how many minutes before the actual time of the entry the alarm should go off. The default is 15 minutes as the advance warning time, but this figure is easily changed. Press the UP key to increase, or the DOWN key to decrease the number of minutes. One press of either of these keys changes the number of minutes by one, and as with the time and date functions elsewhere on the APC, if the number of minutes is decreased when the number shown on the display is 0, the display will return to 59 minutes and vice versa.
Having entered how many minutes advance warning of the DIARY entry are needed, press EXE and the display will now show the text on the bottom line, with an indicator that the alarm has been set, like this:
JAN:02:THU:08:00 (A)Dentist
If the text is longer than 16 characters, the alarm indicator will scroll around with the text.
If data is entered in a time and date slot previous to today (if yesterday's meeting is recorded, for example), the option of setting the alarm will not be offered.
Since the DIARY is divided into half hour segments, two advance warning alarms could conceivably overlap. For instance, an advance warning alarm could be set to go off 45 minutes before a ten o'clock appointment, i.e., at 09:15. An additional alarm could be set to go off 15 minutes before a 09:30 appointment, again at 09:15.
In such cases, the APC will sound the alarm from the first DIARY entry, followed by the alarm from the second one.
When a DIARY entry becomes due, a series of "beeps" alerts the user. The date and time of the DIARY entry will appear on the top line of the display and the actual DIARY entry on the bottom line. If the entry is longer than 16 characters, it will scroll across the display.
The entry will remain on the display for one minute, at the end of which time the APC will return to whatever operation was in progress before the alarm was sounded.
Alternatively, pressing ON/CLEAR before the minute has expired will immediately return the APC to its original function.
Certain functions in the APC are never actually "off", but are in a "sleep mode", i.e., the real-time clock remains active, as do any alarms that were set. Therefore, if the APC has been powered off when an entry becomes due, the APC will "awaken" itself. From that point on, the alarm process is the same as above: there will be the audible alarm warning, the date and time of the DIARY entry will be shown on the top line of the display, and the entry itself will appear on the bottom line. These will be displayed for one minute before the APC returns to whatever operation was being carried out when the machine was powered off. Pressing ON/CLEAR at any time during that minute will return the APC to its previous function immediately.
If an alarm is set for a time when the APC is not with you, the alarm will sound as has been described above. After five minutes without any keys being pressed, the APC will automatically go into its "sleep mode".
After an alarm has sounded and the reminder has been displayed, the DIARY entry will remain intact until deleted. The alarm indicator at the beginning of the entry, however, will disappear.
If it becomes necessary to cancel the alarm for any entry, go to the entry and press the EXE key. The EDIT: prompt will appear in front of the text. Pressing EXE again will offer the ALARM Y/N option. Press N and the alarm will be canceled.
Pressing MODE will allow the user access to the full range of options available through the DIARY menu. This is a sub-menu of options relevant to the operation of the DIARY, and not accessible anywhere but within the DIARY function. When the DIARY sub-menu is selected, the display will look like this:
PAGE LIST FIND GOTO SAVE TIDY
Listed below are additional menu options available through the sub-menu:
Menu items are selected in the same way as those in the main menu. Each menu option will be covered more fully below.
This selection scrolls backward through the DIARY one page at a time. Press EXE when the cursor is over the P of PAGE or press the P key and the original DIARY entry will be visible again. Pressing MODE again will return you to the DIARY menu.
The LIST function displays the first DIARY entry from the current time and date onwards. If, for instance, the current date and time is August 26th 08:00, selecting LIST will display all DIARY entries made for any time after that. Any entries in time/date slots which have already passed, however, will not be displayed.
The first slot encountered which contains any text will be displayed with the date and time on the top line, and the entry on the bottom line. If the entry is longer than 16 characters, after a delay of two seconds it will scroll to the left allowing the entire line to be viewed.
If an alarm was set when that DIARY entry was typed in, the text on the bottom line of the display will use an alarm indicator- an (A)- showing that the alarm is, in fact, set, as illustrated below:
JUN:18:THU:12:00 (A)N.P. BIRTHDAY
Pressing EXE will cause the next DIARY entry to be displayed and so on. When the last slot which contains an entry has been viewed, press EXE once more and an END OF DIARY message will be displayed. Pressing EXE again will return you to the first DIARY entry.
The DIARY FIND function works in a slightly different way than the main menu FIND function. Any entry located with the FIND facility may be edited by pressing MODE to produce the EDIT: prompt. Editing of the entry may then be carried out in the usual way.
The GOTO option is used to move from the current DIARY date to another date and/or year. When selected, the display shows the current date:
1986 OCT 10
with the cursor flashing over the year. Press the ⇒ key to move the flashing cursor over to the month, and again to move it to the day of the month. The ⇐ key will move the cursor back again. The year, month or day of the month can be advanced by pressing the UP key or counted back by pressing the DOWN key.
When the desired date is reached, press EXE to go to that DIARY slot.
As entries made in the DIARY become outdated, erasing entries that are obsolete will free RAM memory space . This can be done as often as needed to make use of space which would otherwise be wasted.
To do this, select TIDY from the DIARY menu. The display will clear, show the time and date of the current entry, and ask for confirmation that all DIARY entries up to (but not including) this date be deleted. (See illustration below.)
AUG:09:THU:08:00 DELETE UPTO Y/N
If Y is pressed, all DIARY entries before the current date and time will be deleted and you will be returned to the DIARY menu.
If you decide not to delete these entries, press N and you will be returned to the DIARY menu with all DIARY entries intact. Pressing any other key when the Y/N prompt is visible will have no effect.
The entire contents of the DIARY can be saved at any time either to the internal RAM of the APC or to a memory module. Select the SAVE option from the DIARY menu and the display will show:
SAVE A:
MODE may be used to change destinations. When the desired memory bank has been selected, type in a file name and press EXE. The contents of the DIARY will be saved to the selected memory bank under the assigned file name. These contents may then be loaded back into memory with the RESTORE option as described below.
A file name may be up to eight characters long. It must begin with an alphabetic character but the rest of the name may be numeric or alphabetic.
When the contents of the DIARY have been saved, that DIARY can be RESTOREd (or loaded) to memory at a later date by using the RESTORE option.
Select the RESTORE option, and the top line of the display will show:
RESTORE A:
MODE is used to select the desired memory bank; the file name under which the DIARY has been saved may be typed in. The DIARY will be retrieved from the current memory bank and displayed. The APC will then return to the DIARY sub-menu.
When a number of different diaries have been saved, it may be necessary to review the names of all of the diaries in that memory bank, through means of the DIR option. When DIR has been selected, the top line of the display will show:
DIR A:
MODE may be used to select another memory bank. When the required memory bank is selected, press EXE and the name of the first DIARY saved to that memory bank will be displayed on the top line of the display.
When the name of the last DIARY on the current memory bank has been displayed, the usual END OF PACK message is given. Press ON/CLEAR to return to the DIARY menu.
To erase a saved DIARY from a memory bank, the ERASE option is used from the DIARY menu. Once selected, the top line of the display will show:
ERASE A:
The MODE key may be used to select another memory bank. When the desired memory bank is selected, the name of the saved DIARY is typed in. That DIARY will be erased from the memory bank and the display will return to the DIARY menu.
The ALARM option of the main menu allows up to eight individual alarms to be set to sound at any time of the day up to a week ahead. Each of the alarms may be set to repeat weekly, daily or hourly.
The ALARM option is selected from the main menu. Initially, the display will show:
1) FREE press EXE to set
The alarms are numbered 1 to 8, but may be set in any order to any time. Number 1 need not be set to sound before number 2, etc. Press the UP or DOWN cursor keys to change the alarm number.
To set an alarm, press the EXE key. The display will then show the alarm number and the current day of the week and time of day. Alarms can be set on any of the seven days, starting with the current one. This means that individual settings can be made for up to a week ahead.
The display will show:
1) WED 12:25
The cursor will flash over the day of the week. That day may be changed by pressing the DOWN cursor key. To advance to the hour and the minute, press the ⇒ and/or ⇐ cursor keys.
The hour and the minute may then be changed in the same way as the day, by using the UP cursor key to go forwards and the DOWN cursor to go backwards.
When the required time has been set, press EXE and the cursor will disappear. To return to the main menu, press ON/CLEAR.
Additional alarms may be accessed when one has been set by pressing the DOWN cursor key. This can then be set in the same manner as the first.
Any alarm may be set to repeat weekly, daily or hourly. When the time of the alarm has been set as above, press MODE and an R will appear under the part of the time where the cursor is positioned.
Move the repeat marker to either the day, so that the alarm repeats every week on that day; the hour so it repeats every day at that hour, or the minute so it repeats every hour at that number of minutes. To confirm the selected setting, press EXE.
You may return to the main menu as above by pressing ON/CLEAR.
To cancel the repeat feature on any alarm, select that alarm as described above. Press EXE and then press MODE. The R will be removed and the alarm will no longer repeat.
Select the alarm to be canceled as described above. Press DEL and the alarm will be turned off. Press ON/CLEAR to return to the main menu.
The APC has a built-in programming language called PCL. This language is ideally suited to the processing of data and the handling of data files like the one created from the main menu.
It utilizes a full command set, scientific and mathematical functions, and comprehensive file handling facilities.
In Section 2 of this book, a complete explanation of the structures and programming methods is given, along with a definition of each of the commands and functions available.
Chapter 31 contains several useful example programs. These will demonstrate the full potential of PCL. Parts of each program represented may be modified and used in your own custom applications.
PCL is a procedure based language. Any program may consist of a number of procedures. The first procedure may call another procedure which, in turn, may call another procedure and so on. There is no limit to the number of procedure calls that may be designed into a given program.
Each procedure is broken down into a number of program lines containing one or more instructions to the APC. Lines with more than one instruction (multi-statement lines) have individual statements separated by colons preceded by a space, as illustrated below:
instruction :instruction :instruction
One procedure may pass values down to the next, and procedures may also pass values back up to the procedure which called them.
The commands and functions which make up PCL include database functions and allow the user to write programs which create and access data files.
PCL is covered in depth in the second section of this book.
The INFO option on the main menu reports the amount of storage space left in the RAM of the APC and any memory modules that may have been added.
Select INFO from the main menu in the usual way.
The top line of the display will show the number of free bytes (one byte per character) in the APC's RAM. The bottom line scrolls to display the amount of storage space used in terms of percentages of the total available.
The APC has 32K of internal memory, or RAM (Random Access Memory), but a small amount of this is used up by the machine for internal "housekeeping" purposes.
If a memory module has been installed into the B: drive, a number of DIARY entries and some data stored in both devices, the bottom line will show something like this:
DIARY 4% PACK A: 15% PACK B: 36% FREE 81%
The amounts of storage space occupied are:
4% of RAM for the DIARY:
15% of RAM on pack A: data, and
36% on pack B: data.
This leaves a total of 81% of the RAM free, as shown by the last part of the line.
This display will scroll around continuously until ON/CLEAR is pressed.
The active DIARY is always resident in the RAM of the APC, unlike SAVEd diaries which may be stored on memory modules. Thus if extensive use is made of the DIARY facility, the RAM available for other activities will decrease proportionately.
If at any point an uninitialized memory module is found in one of the ports, the APC will initialize it immediately without further instruction.
The COPY facility in the main menu is for copying data files from one memory bank to another. Information may be copied from the RAM of the APC to one of the memory modules, or vice versa, or from one memory module to another. To copy programs written in the APC's programming language, PCL, see the COPY facility in Chapter 31.
Select COPY from the main menu. When EXE is pressed, the display will prompt you, on the top line of the display, with the message:
FROM
At this point, type in a memory bank (i.e., A:, B: or C:) and, if desired, a filename. This is the source memory bank and file.
After typing the memory bank and filename, the display will prompt you for a destination and file name, on the bottom line of the display:
TO
Specify a destination, and again, if desired, a file name.
At the FROM prompt, if a memory bank is specified without a file name, all data files on that memory bank will be copied to the destination. The information is copied file by file. If there is a file on the destination memory bank with the same name as one being copied from the source, all of the records being copied are appended to the end of that file in the destination memory bank.
So for example, if the MAIN file on the APC's RAM (Memory A:) contains ten records, and you choose to copy all of the files from A: to B:, then any records in A:MAIN will be added to those already in the file B:MAIN. Each file on the source memory bank will be treated in the same way.
NOTE. The file with the name MAIN is automatically created by the APC when the top- level SAVE option is used, and accessed with the top-level FIND option.
If files on the source memory bank do not have a corresponding file on the destination memory bank, a new file is created in that name on the destination memory bank.
If, at the FROM prompt, a file name is entered in addition to the memory bank, just the contents of that file will be copied to the destination. When copying a single file, if a file name is supplied at the TO prompt, the records will be copied into that file name on the destination memory bank.
The copying process may take several minutes if a very large amount of information is being copied. The amount of time taken to copy files will vary, depending on the amount of information being transferred.
RESET enables the user to erase all information in the RAM of the APC. All DIARY entries are lost, along with any files or procedures saved on the RAM. Data saved to memory modules is unaffected by this option.
Select RESET from the main menu and the display will show:
ALL DATA WILL BE LOST - PRESS DEL
If you do not wish to reset the machine, press ON/CLEAR and you will be returned to the main menu with all data intact. Otherwise press DEL and the display will show:
ARE YOU SURE PRESS Y/N
By pressing N, you will be returned to the main menu and all data will remain intact. If you are sure you wish to erase all data in the machine, press Y. You will then return to the main menu after the data has been erased.
When entering information with the SAVE facility, keep in mind that you will eventually have to FIND it and structure it to give maximum retrieval efficiency. Points to remember:
* Include a key word for use as a search string. For instance, for the name and phone number of a plumber, include the word "plumber" so it can easily FIND the number when needed, although you may have forgotten the plumbers name.
* When a record is recalled, the first sixteen characters of its first two lines are displayed immediately. Use these two lines for the information most often needed. Thus, when a record is displayed, the important information is immediately visible, without having to scan the record with the cursor keys.
* If it becomes necessary to categorize several records which do not share an obvious search string, include the same unique character string anywhere in the record, say at the start or end of the record. (For instance, when entering records of things concerning your car, include the characters "CAR").
FIND SAVE DIARY CALC PROG ERASE
When the APC is first turned on, the menu will appear as shown above. This is known as the default menu. It is possible, however, to change the order in which items appear in the menu, or to erase them completely.
The only menu item that cannot be moved or deleted is OFF. The APC will not allow any menu items to be added after the OFF command, nor will it allow the OFF command to be deleted.
If one of the resident functions from the menu is deleted, such as FIND or SAVE, it can be reinstated at a later date. It does not, however, have to be put back in the same place. This allows for rearrangement of the menu into whatever order which suits you best.
If, for instance,the primary use of the APC will be the Diary function, the most convenient placement of the DIARY prompt would be in the first position on the menu, where it can be accessed immediately after turning the APC on.
To remove an item from the menu, place the cursor over the first letter of that entry in the usual way, and press DEL. Thus, if you wish to remove FIND from the menu, place the cursor over that menu item, press DEL and the display will show:
FIND DELETE (Y/N)
The top line shows the menu item to be deleted, and the bottom line prompts for confirmation that this item is to be deleted.
You now have the opportunity to change your mind. Press N and you will return to the main menu without making any deletion.
However, pressing Y will cause the menu to reappear without the FIND option being displayed.
That option may, however, be restored. If FIND is re-inserted, the APC will acknowledge the default function of that name, even though it might now be at a different place in the menu. Therefore, when FIND is selected, the usual FIND function will be accessed.
This also means that even if one of the default menu items is deleted from the menu, a new procedure with the same name cannot be inserted; the original function will continue to be offered under that name.
Similarly, the APC will not allow a menu item to be inserted under a name which already exists in the menu.
NOTE. When using PCL, it is possible to give a procedure a name which already appears in the default menu. This will not, however, be either visible or available from the main menu. A full description of procedures and the APC's programming language can be found in Section 2.
To replace a deleted menu item, either in its original position or in another position, place the cursor in the menu where you wish the item to appear. Pressing MODE will cause the display to show:
INSERT ITEM
Type the name of the insertion, and press EXE. The new item will appear at that position in the menu, pushing successive items one position to the right.
Therefore, if FIND has been deleted from its position at the top of the menu and reinserted further down, the APC will acknowledge that this "new" item is really one of the resident functions, and it can now be accessed from its new position.
The APC, as does any computer, relies on sets of instructions to make it work. The language PCL (Pocket Computer Language) is available from the main menu under the option PROG. It allows the user to write, edit, save, copy and run programs, using an extensive and flexible command set.
Instructions are given to the computer in the form of a list of statements and commands. These are all part of what is called the computer's programming language.
What makes a computer truly useful is not just its ability to follow a set of instructions, but its ability to store that set of instructions and re-use it at a later date.
A program consists of one or more procedures, or program segments. Each procedure must be given a unique name in order to be saved, recalled, edited and run.
A simple program may consist of a single procedure. More complex programs will normally be composed of several procedures, one of which will be the main or top level procedure. The main procedure controls the flow of any secondary procedures, when needed to do specific tasks.
The most effective way of using PCL is to write short procedures which can be tested individually. Once they are fully operational, they can be linked together to form a complete program.
Each procedure may be as long or short as necessary, and should ideally perform one specific task, so that programs with similar requirements can share a common procedure to do a common job. This avoids duplicating a procedure to perform the same task in two different places.
Throughout this section of the manual, references will be made to programs made up of a number of procedures, but all points are equally applicable to programs which are self-contained, and comprise just one procedure.
When PROG is selected from the main menu, a sub- menu is displayed which contains the following items:
EDIT /LIST /DIR /NEW /RUN /ERASE /COPY
These options may be selected in the same way as the items on the main menu.
Here is a simple example of a procedure:
now: CLS PRINT "IT IS NOW",HOUR;":";MINUTE GET
The procedure's name is now:. It clears the APC's display and prints the current time in hours and minutes. The time remains on the display until you press a key. This chapter shows you how to enter this procedure into the APC and how to save and use it. By selecting the NEW option from the menu, the display will show:
NEW A:
The memory bank follows the word NEW; in this case it is memory bank A:. Although the RAM (internal memory) is referred to throughout this section, the description applies to any memory bank. Simply press MODE to change devices.
The first thing needed is a name for the new procedure. This may be up to eight characters long and must start with a letter. The remaining characters may be letters or numerals. Type in the name now as the name for this procedure. When EXE is pressed, the procedure name will be shown on the top line of the display, followed by a colon. The cursor will now be flashing at the end of the procedure name:
NOW:
Press EXE to move the cursor down to the next line and begin typing commands. At the end of each line, press EXE to indicate that the line is finished.
Start with the command CLS. This is an instruction to PCL to clear the display of all characters. When you have typed CLS and pressed EXE, the lines of text will scroll upwards on the display, leaving the cursor on a blank line ready for the next command.
Now type in the following line:
PRINT "IT IS NOW",HOUR;":";MINUTE
Make sure that the line appears on the display exactly as it does here. Programming languages are very sensitive to how commands are entered, and even the spaces between parts of a command can be as important as the command itself. This line is more than 16 characters long, so it will scroll to the left as you continue typing beyond the width of the display, enabling you to finish the line.
In the procedure just entered, the first part, the instruction PRINT, indicates to PCL that what you are about to enter is to be shown on the display. This is followed by a space, and a piece of text which has been enclosed in quotation marks. These indicate the exact content of the text to be printed.
Any list of characters like this is called a string. Any such string entered between quotation marks will be displayed exactly as it appears.
The next character, a comma, indicates that anything else to be displayed on the screen will follow on the same line as the existing text, separated from it by a space.
Following the comma is HOUR, a function that will result in the current hour from the system clock being printed on the display.
The semi-colon means that the text following it must be placed immediately after the previous item, with no separating space. The next item to be printed is another string. This time the string is just one character, a colon, but it must still be enclosed in quotation marks, and will appear on the display after the current hour.
The final part of the line is another function, MINUTE. This allows access to the current number of minutes from the system clock. It too will be printed out on the same line of the display, completing the current time.
The final line, GET, waits for any key to be pressed on the keyboard. When a key is pressed, the APC will continue executing the rest of the program. This means that the message printed to the display will remain there until a key is pressed. The rest of the procedure will not be executed until this happens. In this example there are no further instructions, so the program ends.
At any time during the entry of a procedure, editing can take place by using the cursor keys. Press the UP cursor key to move to a previous line. The line can then be edited in the usual way.
Should it be necessary to insert a new line between two existing lines, position the cursor at the start of the line where the new line is to be inserted and press EXE.
When a procedure has been entered into the APC, it is held in the RAM of the machine in exactly the form in which it was typed. There are then three options:
| TRAN | slate, or "compile", the procedure into a form which PCL can execute; |
| SAVE | the procedure as it is to any of the memory banks; |
| QUIT | and abandon the procedure which has just been entered. |
Press MODE to select a menu of these options. The screen will clear and then display:
TRAN SAVE QUIT
This is a sub-menu similar to the PROG menu, and a selection can be made from it in the usual way. Here, however, after a choice has been carried out, you are returned to the PROG menu.
When the QUIT option is selected after typing in a NEW program, you will be prompted with the message
ARE YOU SURE Y/N?
Pressing Y will discard the entire text of the procedure entered so far. Any procedures previously typed in and either saved or translated (see below) are unaffected. Pressing N will return you to the editor and allow continued editing of the procedure.
NOTE. Once a procedure has been abandoned with QUIT, unless it had been previously SAVEd, there is no way to restore it.
When the above example, "NEW:", has been entered, select the TRAN option from the TRAN/SAVE/QUIT sub-menu. The procedure will be translated internally into a form that PCL will be able to execute. This process, similar to "compiling", takes only a few seconds, during which a message will be displayed on the screen indicating that translation is in progress.
When the procedure has been translated, the display will show the prompt SAVE A: followed by the procedure name like this:
SAVE A:now
The procedure may now be saved to any available memory bank, RAM or a memory module. Press MODE to change memory banks and EXE to save the procedure.
When the new procedure has been saved to one of the memory banks, the original text is also saved. Thus, there is now a version of the program which can be executed directly, and a version which can be edited. These are both stored under the same procedure name, and, at this level, can be thought of as a single entity.
If a typing error was made while entering a procedure, PCL will recognize it during the TRAN function. If, for example, the word PRONT was typed instead of PRINT, or a set of quotation marks around the text after the PRINT command was omitted, PCL would pick it up. If the procedure contains any logical ("run time") errors, however, these will not arise until the procedure is actually run. It is the user's responsibility to check for any logical errors.
When an error in a procedure is detected during the translation process, you will be returned to the text of the procedure. The cursor will be positioned in the line containing the error, near the first character of the unrecognized command.
The line may then be edited in the usual way until it reads correctly and will be accepted by PCL. Having done this, press MODE to return to the TRAN/SAVE/QUIT menu and select TRAN again.
This time, if PCL detects no other errors, the translation will be successful and you will be given the SAVE prompt.
If part of a procedure has been typed in with the intention of returning to it later to complete it or make alterations, use the SAVE option from the TRAN/SAVE/QUIT menu. This allows the text of the procedure to be saved just as it was typed in, without wasting memory by producing an unnecessary translated version.
When a procedure is saved rather than translated, no form of error checking is carried out. The text is saved exactly as it was typed in and will only be checked for errors in syntax when it is translated.
NOTE. Saving procedures to memory modules, like saving records from the main menu, takes up space which can only be recovered when the memory module is reformatted. The most economical way of using the memory modules is therefore to develop a program using the RAM of the APC. Then, if a procedure takes more than one version before it runs correctly, each edit will not be using up valuable space on the memory module.
When a procedure stored on the APC RAM is edited, each time the new version is saved or translated, the old one is erased completely. On memory modules, the old versions remain in place but are no longer accessible- they just take up storage space.
When a satisfactory version of a procedure has been produced, it can be copied to a memory module with the COPY option in the PROG menu. (See Chapter 31.)
The EDIT option from the PROG menu allows you to return to a half-written procedure to complete it. When selected from the menu, the display shows:
EDIT A:
Enter the name of the procedure you wish to edit and press EXE. Once returned to the procedure, you can add or delete lines or make alterations to the text. When the procedure is complete, use the TRAN option from the TRAN/SAVE/QUIT menu to translate it, as described earlier.
Once a procedure has been successfully translated it can then be RUN, i.e, PCL will be instructed to execute that particular set of commands.
When the RUN option is selected from the PROG menu, the display shows:
RUN A:
Type in the name of an existing procedure on that memory bank. To continue the example used earlier, type in the name now and press EXE.
The display will clear and show something like this, depending on the current time:
IT IS NOW 16:35
PCL will then execute the next line of the procedure, namely, GET. This command simply waits until any key is pressed on the keyboard. The actual key pressed is unimportant, as it will not be remembered or recorded in any way. This command simply gives the user a chance to read the display and decide when to continue.
When a key is pressed, PCL detects that the procedure has ended and returns the APC to the PROG menu.
While that was a very simple example, the procedures in Chapter 32 will be more complex. They will, however, be taken a step at a time in order to enable you to learn about the functions offered by PCL, and how to make the most of the APC.
A variable is a named area of memory in which a program can store either a number or text. For example, you could say, as in algebra, that X=10. In this statement, X is a numeric variable.
The program stores the value 10 in the region of memory referred to by the name X. Later on in the program the value of X could be changed by saying X=X-1. While in algebra, that statement would not make sense (no number being equal to itself minus one), programming languages have a different interpretation of the equals sign. In programming, the equal sign means becomes equal to, so the left hand side of the equation becomes equal to the right hand side. Thus X=X-1 means let X become equal to the original value of X, minus 1.
Variable names may be up to eight alphanumeric characters long, beginning with a letter. This allows for use of meaningful variable names, such as age or price. They may also contain numbers, so a1, for example, is a valid name. The first character, however, must be alphabetic.
All variables must be declared before they are used. To illustrate this, look at the example below:
procname: GLOBAL a,b,c a=1.2 b=2.7 c=3 PRINT a+b+c GET
The first program line of this procedure contains the command GLOBAL. It declares the variables which will be used throughout this program. Every variable used in a program occupies memory space. In order for PCL to allocate sufficient storage space, all variables to be used must be declared at the start of the program or procedure.
The next three lines of the procedure define the values which will be assigned to the variables a, b and c. Notice that the first two numbers, those assigned to a and b, have decimal points. They are floating point numbers. All floating point numbers are stored to an accuracy of 12 digits and must lie within the range of plus or minus 1E100, inclusive.
The last line of the procedure adds the values of the three variables and prints the result to the display. In this case the result is 6.9
PCL supports two types of numeric variables, integer and floating point variables. An integer is a whole number such as 10 or 537, and, unlike a floating point number, does not have a decimal point.
Using integer variables wherever possible allows programs to execute many times faster than if floating point variables are used. This has its obvious benefits, provided the 12 digit accuracy of floating point variables is not required. Integer variables also occupy less memory than floating point variables, needing two bytes of memory compared to eight bytes for a floating point number. Integer variable names end with a percent sign (%) while floating point variable names do not. The name must not be more than eight characters long including the percent sign.
In the example above, variable names a, b and c were used. If the numbers to be assigned to them had been integers, the variable names would have been a%, b% and c%.
PCL will only accept numbers as being integers if they are within the range of -32768 to +32767. Any number outside this range will automatically be treated as a floating point number.
A procedure using integers and integer variables might look like this:
procname: GLOBAL x%,y% x%=7 y%=3.5+x% PRINT y% GET
This procedure follows the same format as the last one.
There is, however, a potential mistake in this procedure: the variable y% is an integer variable, but in the third program line it is assigned a floating point value. In this case PCL will not report an error; instead an automatic type conversion is carried out internally on the value assigned to that variable. The right hand side of the assignment is evaluated as 10.5, but the fractional part of the number is dropped before the result is assigned to y%. The PRINT statement will therefore display the value 10. Since PCL will not report this as an error, it is up to the programmer to ensure that this does not happen- unless, of course, integer equivalents are the desired result. Be careful when mixing variable types that the answer produced is the expected one.
Looking back to the previous example where only floating point variables were used, you can see that another type conversion was made there which did not have any significant effect on the value. In that procedure, the floating point variable c is given the integer value 3. An automatic type conversion is carried out on such assignments, and in this case the result was 3.0, so the real value of the variable remained the same.
If a floating point number is assigned to an integer variable, the integer assigned will be rounded down. Thus in an equation such as a%=2.3, the value of a% will be 2. If a negative floating point number is assigned to an integer variable, the number is still rounded down (rather than toward zero). Therefore, in the statement a%=-2.3, a% will take the value -3. In each case, the programmer is in ultimate control and therefore has the responsibility of ensuring that the correct type of variable be used in every case.
If a floating point number is expected, the correct types of number must be utilized within the expression.
If this rule is not followed, unexpected results could occur. For example, if a program was needed to round floating point numbers to the nearest half (i.e., 2.4 would round to 2.5 and 2.2 would round to 2), the following statement might be used:
r=INT(2*n+0.5)/2
where n is the number to be rounded.
This would produce an incorrect result. To see why, substitute a trial value, say 3.4, for the value of n. The expression becomes INT(2*3.4+0.5), i.e., INT(7.3), returning the integer 7. This is divided by 2, another integer, so the result will be the integer 3, not 3.5. To obtain the required value of 3.5 you must force the division to give a floating point result. In this case the simplest way to do this is to divide by the floating point value of 2.0, instead of the integer 2. Thus, the following expression:
r=INT(2*n+0.5)/2.0
will give the required result.
Other errors are possible through careless assignment of variables, but these can be avoided by understanding just how PCL deals with arithmetic expressions (see Chapter 23).
There are ten floating point variables which are always available. These are the calculator memories m0, ml, m2... m9. These need not be declared as variables, as they are already in existence (If they are declared, an error will be reported). Values may be assigned to these at any time in any procedure, and they will retain the values assigned to them when you leave the PCL environment. They may then be accessed from the calculator by the same names, and will have the values last assigned to them in the language.
A string is a sequence of characters which will be treated literally. Strings have quotation marks at the start and end, i.e., "this is a string."
Strings may be stored in variables, but you must differentiate between string variables and numeric variables. String variable names must end with a dollar sign ($) and may be up to eight characters long, including the dollar sign.
Strings may be up to 255 characters long but a null string (i.e., a string containing no characters), may be assigned to a variable.
When a string variable is declared, you must specify exactly how much room to set aside for its storage, as in the example below:
procname: GLOBAL this$(10),that$(4) this$="Alphabetic" that$="ally" PRINT this$;that$GET
The string variable this$ will be allocated room for ten characters, and that$ will be allocated room for four. The declaration of a string variable automatically assigns a null string to the variable.
The next two program lines assign values to the two variables. In each case the maximum possible length has been used, but this is not obligatory. A variable may be any length up to, and including, the length stated in the declaration. If the declared length is exceeded, PCL will display an error message ("STRING TOO LONG").
If a number is allocated to a string variable, an error ("TYPE MISMATCH") will be reported. There is no automatic type conversion between string and numeric variables. PCL, however, does have facilities for forcing conversion of numbers to strings and vice versa, in the form of the SCI, FIX, GEN and NUM functions (see Chapter 34).
Adding two numeric variables is simple; use a plus sign and assign the result to another variable, eg., a=b+c. Adding strings together ("concatenating" strings), is just as simple. If a$ is "DOWN" and b$ is "WIND", then the statement c$=a$+b$ will assign to c$ the value of "DOWNWIND". This value can also be assigned to c$ with c$="DOWN"+"WIND".
When concatenating strings, it must be remembered that the maximum length of a string must not be exceeded, i.e., trying to join a string which is 200 characters long to another which is 100 characters long would generate an error ("STRING TOO LONG") as the 255 character maximum would be exceeded. The maximum declared length of any string must likewise be adhered to.
In working with a string which includes quotation marks (ASCII character 34), this character must be included twice in the string definition. Thus, a$="ABC""DEF""GHI" will assign the value of ABC"DEF"GHI to a$.
Having combined two or more strings, it may later become necessary to separate them again, or to extract, for instance, just the first five characters of a string. These processes are known as string slicing.
String slicing is performed through three commands: LEFT$, RIGHT$ and MID$. These allow access to the left, right or middle portions of a string respectively.
If, for example, a$="ABRAHAM", then by giving the command, b$=LEFT$(a$,4), you are assigning to the variable b$ the string "ABRA", i.e., the first four characters of a$. The RIGHT$ function works in a similar fashion.
The MID$ function requires that the user supply the string to be sliced, the start position of the sub- string, and the length of the string to be returned.
With this in mind, if a$ still equals "ABRAHAM", the command b$=MID$(a$,4,3) will return the value of b$ as "AHA"; you have taken the 3 characters starting at character 4 of a$.
All string slicing operations leave the original string unchanged, unless the left hand side of the equation is the same string as appears in the right hand side. Thus, a$=LEFT$(4,a$) would return a string containing the leftmost four characters of a$ and assign it to a$, overwriting the original value.
Array variables allow variables to be placed together into related groups. These fall into two types, numeric arrays and string arrays.
Several numbers may be stored under the same name, differentiated by a numerical index. These variables may be integer or floating point, and look like this:
a%(6), b(4).
Numeric array variables can be thought of as a column of numbers. All the variables are listed under the same name, but each is then given a unique number to distinguish it from the other members of the array, as in Figure 21.1 on the next page:
| a%(6) | b(4) |
|---|---|
| 1) 1 | 1) 1.75 |
| 2) 72 | 2) 4.1234567 |
| 3) 637 | 3) 2.6 |
| 4) 9 | 4) 562375.276 |
| 5) 12 | |
| 6) 3629 |
Figure 21.1: Numeric Arrays
When the array is declared, the number in the parentheses denotes the number of elements in the array. Below is a simple example which assigns values to the elements of an integer array:
procname: LOCAL num%(5) num%(1)=l num%(2)=3 num%(3)=5 num%(4)=7 num%(5)=11 PRINT num%(1)+num%(2)+num%(3)+num%(4)+num%(5) GET
This is a very crude way of finding the sum of the five elements in the array, but it shows how the elements of the array are used. Floating point arrays are used in exactly the same way except the percent sign is omitted from the variable name.
String variables may be grouped into arrays in the same way as numeric variables. The difference is that with strings, not only the number of elements in the array must be declared, but also the maximum length of the string, just as when you declare the length of an ordinary string variable.
This is done when the arrays are declared; therefore,
GLOBAL array$(5,10)
would allocate room for five strings in the array array$, each up to ten characters in length. The, as yet, empty array can be thought of as a table like this:
array$(1)="" array$(2)="" array$(3)="" array$(4)="" array$(5)=""
Even though at this stage, nothing has been assigned to any of the elements of the array, enough memory has been set aside for all five strings when full. Until an element has something assigned to it, it will contain a null string.
So far, the example procedures have only used one arithmetic operator, plus (+). There are, of course, more functions than just this one available in PCL, and the full range is shown below. They are divided into three classes; arithmetic, comparison and logical:
The various operators have differing precedence when they are encountered by PCL. The operators are shown here in order of precedence, with operators of equal precedence on the same line.
| NOT, -n | (HIGHEST) |
| ** | |
| *, / | |
| +, - | |
| =, >, <, <>, >=, <= | |
| AND, OR | (LOWEST) |
(The logical operators AND, NOT and OR are covered in greater depth later in this chapter.)
An arithmetic expression such as a+b+c presents no problem because whichever addition is done first, the result will be the same. But in the expression a+b*c, the result will be different depending on which is done first, the addition or the multiplication.
Add and subtract have equal precedence, and in turn have a lower precedence than multiply and divide. An expression such as:
a+b*c/d
would be evaluated in the order: b*c divided by d, the result of which would then be added to a.
If you want to change the order of precedence of the operators, you can do so by the use of parentheses. Any operation in a pair of parentheses has a higher precedence than one outside. Using the equation above, to perform the addition first, followed by the division and then the multiplication, you would write the equation like this:
(a+b)*(c/d)
In an expression where all of the operators have equal precedence, they are evaluated from left to right, except in the case of powers which are evaluated right to left. In the expression:
a%**b%**c%
b% will first be raised to the power of c% and the resulting value will be used as the power of a%.
While this might seem confusing, there is a simple way to proceed if you are not sure of the precedence of one operator over another: use parentheses! They force the expression within to be evaluated first.
Although PCL distinguishes between integer and floating point values, you are free to mix them in any order in an expression. You should, however, be aware of how PCL handles such a mixture.
A procedure may include the expression:
a%=b%+c
This mixture of variable types would be evaluated like this: Floating point numbers take priority over integers, so on the right hand side of the equation the value of b% will be converted to floating point before the addition is performed. The resulting floating point value will then automatically be converted to an integer before being assigned to the variable a%. Any fractional part of the result of the right hand side of the expression will be lost in the conversion to an integer.
All logical expressions represent some type of condition. They evaluate to either zero, if the condition is false, or a non-zero value (usually minus one) if the condition is true.
Therefore, if the value of variable a is less than or equal to the value of b, the statement:
PRINT a>b.
will print zero. If a is greater than b, it will print minus one.
In this example a>b is evaluated as a logical expression. The result has one of only two possible values, depending on whether or not a and b are equal.
When a logical value is expected, PCL will accept zero to mean false, and any non-zero result to mean true. For example, the two expressions:
a<>0 and a
are equivalent. They will both be interpreted as logically true values if a is non-zero.
The comparison operators in PCL always give an integer result. They are listed in the following table. They may be used either with string values or with any mixture of integer and floating point values. Their effects are summarized in the following table.
| Operator | Example | Integer | Result |
|---|---|---|---|
| < | a%<b | -1 (true) | if a% is less than b |
| > | a%>b% | -1 (true) | if a% is greater than b% |
| <= | a<=b | -1 (true) | if a is less than or equal to b |
| >= | a>=b% | -1 (true) | if a is greater than or equal to b% |
| <> | a$<>b$ | -1 (true) | if a$ is not equal to b$ |
| = | a=b | -1 (true) | if a is equal to b |
PCL will report an error if an attempt is made to use any of these operators with a mixture of string and numeric values, for example:
a$<b
The operators AND, OR and NOT are logical operators, and may only be used to operate on numeric values. AND and OR combine two values to give a single result, whereas NOT acts on a single value. These three operators have different effects, depending on whether they are used with integers or with floating point numbers.
When used with floating point values, they interpret any non-zero value as being true, in a way similar to the comparison operators. Their actions are as described in the following table.
| Operator | Example | Integer | Result |
|---|---|---|---|
| AND | a AND b | -1 (true) | if both a and b are non-zero |
| OR | a OR b | -1 (true) | if either a or b is non-zero |
| NOT | NOT a | -1 (true) | if a is zero (reverses value) |
When used with integer values, AND, OR and NOT are bitwise logical operators. For example, the statement:
PRINT 12 AND 10
will print the value 8. To understand this, it is necessary to write down the two integers in binary notation.
| Decimal | Binary |
|---|---|
| 12 | 1100 |
| 10 | 1010 |
AND acts separately on each pair of corresponding binary digits in the two numbers. Thus, working from left to right:
1 AND 1 → 1 1 AND 0 → 0 0 AND 1 → 0 0 AND 0 → 0
The result is therefore the binary number 1000, or 8 in decimal notation.
What result would the statement:
PRINT 12 OR 10
give?
Again, write down the numbers in binary notation and apply the operator to each corresponding pair of digits:
1 OR 1 → 1 1 OR 0 → 1 0 OR 1 → 1 0 OR 0 → 0
The result is the binary number 1110, or 14 in decimal.
The NOT operator simply complements an integer, that is, it replaces every 1 by a 0 in the binary representation of the number, and vice versa. To calculate the result yourself, all 16 binary digits must be written down. For example, to find the value of NOT 7, write 7 in binary notation with 16 digits:
0000000000000111
Then complement the value, giving:
1111111111111000
This is the binary representation of the decimal integer -8.
HINT: A quick way of calculating the result of NOT for integers is to add 1 to the original number and reverse its sign. Thus, NOT 23 is -24, NOT 0 is -1 and NOT -1 is 0. Note that the last two results are the same as when using NOT on floating point numbers.
Procedure names may be up to eight characters long. The first character must be alphabetic, but the rest may be any mixture of alphabetic or numeric. The procedure may also be given a qualifier, according to the value it will return (if any).
So the procedure PROC$: will return a string. The qualifier ($ for string procedures and % for integer procedures) must be part of the eight characters, so the name PARTICLE%:, for example, would be invalid, resulting in an error message ("NAME TOO LONG"). The procedure name is always followed by a colon.
A program is constructed from one or more procedures. The top level procedure will call one or more other procedures, each of which has a specific job to do. Procedures may also call themselves.
If the top level procedure is being run from memory bank A:, for example, procedures called by it will be looked for on that device first. If the procedure is not found then it will search the next device (B:) and so on.
If the top level procedure is on device B: then PCL searches device B: first, then C: then A:.
In earlier chapters the command GLOBAL was used to declare variables. This is one of two commands which do a similar job. The other, which is explained below, is LOCAL.
Their uses are similar, in that both are used to declare lists of variables which the program will use, but with an important difference. The variables declared by the GLOBAL command may be used in not only that procedure, but in any procedure called by it. The values assigned to global variables in any procedure will be available to all other procedures called by it.
Any procedure may contain a GLOBAL command, but the variables declared by it will only be global from that level downwards, i.e., in that procedure and any procedure called by it.
The LOCAL command may be used in any procedure to declare any variables which will be used in only that procedure. Each procedure may declare its own set of variables with the LOCAL command. These variables are available only to the procedure in which they are declared. If the same name is used for two local variables in two different procedures, the two variables will be distinct and will not affect each other.
Any variable not declared in the current procedure will be assumed to have been declared as a global variable in a prior procedure. This is called an external variable as it has been declared outside the current procedure.
GLOBAL and LOCAL commands may be used as needed, provided they occur before any other procedure statements. Attempting to use a variable which has not previously been defined with one of these commands will result in an error being reported when the program is run.
When one procedure calls another, the one being called is said to be below the calling procedure. This in turn may call other procedures which will then be below it in the hierarchy.
It is up to the programmer to ensure that the right variable becomes available to a procedure wherever there are different variables with the same name.
Procedures communicate by means of global variables as described earlier. Values may also be passed to a procedure via parameters.
When writing a procedure, the procedure name may be followed by a number of parameters which will be used to carry external values into the procedure. The names of these parameters, as with local variables, will not be recognized outside the procedure. Here is an example:
fact:(n) IF n=0 RETURN 1 ENDIF RETURN n*fact:(n-1)
The procedure calculates the factorial of a number which is passed to it via the parameter n. To do this, it calls itself as many times as necessary.
Unlike the examples seen so far, the name of this procedure is followed by a pair of parentheses containing the name of a parameter. This is why, when writing the procedure in the NEW option of the prog menu, the cursor is initially positioned at the end of the procedure name. You are given the option to add a number of parameter names after the procedure name.
The following procedure could be run from the main menu or the PROG menu; it calls the procedure fact:
dofact: LOCAL result,num PRINT "Number for" PRINT "factorial "; INPUT num result=fact:(num) PRINT result GET
The second procedure is RUN from the PROG menu, and prints a prompt to the screen. Any number entered is passed to the second procedure which returns its factorial. This result is printed to the screen. The last line of the top level procedure just waits for a key to be pressed before returning to the PROG menu.
As you can see, the line result=fact:(num) in dofact: is the one which passes the value of the variable num to fact: and then assigns the returned value to the variable result. (Floating point variables have been used rather than integers, because the range allowed for integers would be exceeded for factorials of numbers greater than 7.)
A similar method is used to pass values to procedures which have more than one parameter. The parameters are supplied in parentheses, separated by commas, i.e., proc:(a,b,c).
The values passed to a procedure must match the parameters declared in the procedure in number, order and type. A parameter can be referred to only by its declared name.
Parameters differ from true variables in that their values may not be changed. In the procedure fact, for example, it would have been illegal to have tried to assign another value to n, by saying; n=n-l.
At the end of a procedure, control automatically returns to the point from which the procedure was called. The RETURN command may be used anywhere in a procedure to force the procedure to terminate at a specified point other than its natural end. This command may also be used to pass a value back to the calling procedure or the calculator.
Only one value may be returned by any procedure by use of the RETURN command, but any number of values can be passed back by the use of global variables.
Any value which is to be returned to the user from the top level procedure (to the calculator, for instance) must be passed with the RETURN command. If a value is expected from a procedure and none is passed by this command then the value will be assumed to be zero or a null string.
If a procedure has been declared as a string procedure, for example, proc$:, it must return a string or nothing at all. If the RETURN command passes back a numeric value to the calling procedure an error will be reported.
Chapter 16 described how to insert new items into the top level menu of the APC. It is possible to put a new item into that menu' (for example, the procedure proc:), which can then be run from the top level menu. The trailing colon is omitted when adding procedure names to the top level menu, and any lower case letters will be automatically converted to upper case.
The procedure may be run from the RAM of the machine or from a memory module.
When the item PROC is selected from the main menu in the usual way, the screen will clear and the procedure will run as if it had been called from the PROG menu. When the program is finished, the APC will return to the main menu, not the PROG menu.
It is not possible to pass values to a procedure which is run from the main menu. However, by inputting values to the top level procedure in the usual way, values may be passed down to other procedures.
By using the MENU function, any procedure may display a menu from which selections may be made in the same way as from the built-in menus of the APC.
Any procedure which is run from the main menu may then display a menu which offers a number of choices relevant to the use of the procedure. Each of these selections may lead to other procedures being called which in turn use a menu to show the choices available for differing courses of action.
To halt the execution of a procedure, first press ON/CLEAR. This will pause the procedure indefinitely. You may now quit the procedure by pressing Q. The display will show:
ESCAPE IN A:procname
Now press SPACE to return to the point from which the procedure was called.
NOTE: This method of halting a procedure will not work if the ESCAPE OFF command has been used. This command disables ON/CLEAR for the purpose of pausing or halting procedures.
If the ESCAPE OFF command has been used and your procedure enters a loop which has no logical end, the battery will have to be removed from the APC, and all data in the RAM of the machine will be lost.
Before storing information in the APC, it is essential to decide upon the format to be used for the information recorded.
Information is stored in the APC in the form of files, each of which is given a unique file name. Each file is in turn divided into records. A file is similar to an index card file, divided into individual cards. Each file card holds information in a particular format. Each of these cards corresponds to a record in an APC file.
The records within a file all contain information in the same format, but the information on each card is different from the next. In a name and address file for example, each record would contain a name, telephone number and address.
In a card index, the information stored in each record is organized in a standard format; different parts of the card are used for each piece of information. APC files are arranged in a similar way. Each item is stored in a separate area of the record, known as a field. So in a name and address file, there would be a name field, a telephone number field, and separate fields for each line of the address.
When the APC is displaying the main menu, it assumes that any operations (such as SAVE or FIND) will be carried out on a file in whichever memory bank is current at the time. This file is called MAIN. However, when using the APC from the main menu, it is unnecessary to enter a file name, as only the contents of that one file will be visible and accessible to you.
PCL allows you to create other files which can then be manipulated through PCL. Even the file MAIN can be accessed.
The language PCL has a number of commands which are specially applicable to data file handling. These enable you to manipulate data in various ways. Combined with the other tools which are part of PCL, these commands allow for a wide range of data handling power in one pocket-sized unit.
Before data can be entered into a data file, you must create that file and issue it both a name and a format on one of the memory banks using the CREATE command.
The CREATE command must be supplied with a number of parameters, in the following format:
CREATE <spec$>,logname,fldnm1,fldnm2
The device and filename which make up the parameter <spec$> may be either a string literal, i.e., "B:filename" or a string variable, i.e., spec$. The file name may be up to eight characters long. The next parameter is the logical file name. The APC allows you to work with up to 4 files at once, and distinguishes one file from the other by designating them by logical file names, A, B, C or D. The file is then referred to by this name from within the program.
Next come the field names. There may be up to 16 fields in any record, and these may be given a qualifier, either % or $ to signify integer data or string data, respectively. Fields containing floating point data need no qualifier. Field names may be up to eight characters long including any qualifier used.
When a file has been created, it is automatically open; records can be saved to it immediately, without use of the OPEN command. This file is then current and all file commands will be on this file, until another file is made current with the USE, CREATE or OPEN commands.
To open an already existing file, the syntax of the OPEN command is exactly the same as for the CREATE command. As was mentioned previously, up to four files may be open at any one time. These may be spread over any of the three memory banks, i.e., with two files open on A: and two others on B:, or one file each on A: and B: and another two on C:.
When a file is CREATEd or OPENed, that file is then automatically the current file and all access is to that file. If more than one file is open, to change the current file, the USE command is employed.
For example:
USE B
In this example the file with the logical file name B becomes the current file. All access is now to this file until it is changed with another USE command or another file is OPENed, CREATEd or CLOSEd. If an attempt is made to USE a file which has not previously been opened, an error ("FILE NOT OPENED") is reported.
To add a record to the open file, you must first assign some values to tne current field names. The field names act in a similar way to variables, and for example can be either assigned values or used in INPUT statements.
To INPUT a value to a data field, the field name must be used with the logical file name like this:
INPUT B.field$
where B is the logical file name and field$ is the name of the field. These are separated by a period.
When the fields have been assigned values, you can add them to the open file with the APPEND command. The fields of the record will consist of the values currently assigned to all the field variables for that file. The APPEND command has no parameters; the field values are automatically added to the file in the correct order and format.
Some other points to remember about records:
The current record may be changed by using any of the above five commands. The FIRST command, as the name suggests, moves to first record in a file.
The NEXT command moves to the following record in a file. If the end of the file is passed, NEXT does not report an error, but the EOF function will return true (see Chapter 34). The current record will then be null.
The BACK command moves to the previous record in the file. If the current record is the first record in the file, the current record does not change.
The LAST command moves to the last record in the file.
You can move to a particular record by using the POSITION command. For example, the instruction POSITION 3 makes record 3 (the first record being record 1) the current record.
The current record number can be displayed by using the POS function which returns the number of the current record.
To erase a record, simply make that record current by use of one of the above commands (FIRST, NEXT, BACK, LAST or POSITION) and use the ERASE command. This removes the current record from the file and renumbers the following records.
If you want to find any records in a file that contain a particular piece of text, the FIND function may be used.
This acts like the FIND facility in the top level menu. The difference is that whereas the main menu FIND prints the found text to the screen, this function returns a record number.
If the text is found, the APC returns the number of the record containing that value, and that record is made current. If no such text is found in the current file then the number returned is zero.
So the line r%=FIND("Abraham") would make the first record containing the string "Abraham" the current record and return the number of that record to the variable r%.
When you have finished accessing a particular file, that file can be closed with the CLOSE command.
Any data file may be deleted by using the DELETE command. The file to be DELETEd must be CLOSEd when this command is issued or an error message ("FILE IN USE") will be reported. The memory bank and the file name must be specified thus:
DELETE <spec$>
The memory bank and filename which make up the
parameter <spec$> may be either a string literal,
i.e., "B:filename" or a string variable, i.e., spec$.
NOTE: Once a file has been deleted there is no way
of restoring it to memory; it will be permanently
inaccessible.
The COPY command acts in a similar way to the COPY facility in the main menu. There are three possible courses of action: a copy may be made of a file under the same name as the original, a copy may be made under a different name, or all data files from one memory bank may be copied to another. This is how the three versions would appear in a program:
COPY "memory1:filename1","memory2:" COPY "memory1:filename1","memory2:filename2" COPY "memory1:","memory2:"
All string literals in these examples may be replaced with string variables.
So far we have only considered programs which run in a straight line from start to finish. They consist of a number of instructions which are executed in the order they appear in the program. If you wish to carry out an instruction more than once, that instruction would ordinarily have to appear however many times you want it carried out.
Obviously, that is a waste of the programmer's time. A far more efficient method is for the program to be able to loop around a particular part of the program as many times as required, or until a certain condition is met.
This is a vital part of the stored program concept, and there are a number of ways of doing this in PCL.
The first two are the DO...UNTIL and the WHILE...ENDWH loops. These are known as program flow control commands, because they do nothing independently; they simply control the flow of the other commands, causing them to repeat until certain conditions are met. They operate in a similar way to each other, the distinction being that the DO...UNTIL structure tests for a condition being fulfilled at the end of the loop, while the WHILE...ENDWH structure tests the condition at the beginning of the loop.
First, let's look at an example of DO...UNTIL:
a%=10 DO PRINT "A=";a% a%=a%-l UNTIL a%=0
The first line assigns the value 10 to the integer variable a%. The loop itself starts on the next line, with the instruction DO. This is the instruction which instructs PCL to execute all of the following lines of program until an UNTIL condition is met. If the condition following that instruction is not met, repeat the same set of instructions until it is.
The next line tells PCL to print a short text string to the display, followed by the value of the variable a%. The first time through the loop, the value of a% will be 10.
Next, the value of a% is the original a%, minus 1. That now makes the value of a% 9. Now comes the UNTIL instruction, followed by the condition. The condition is that a% is equal to zero.
As this is the first time through the loop, the value of a% is non-zero, so the program control returns to the DO instruction and the loop is repeated. This time the value of a% decreases to 8, and again the condition fails. This process continues until a% equals zero. At that point, the condition is met and the program control can now continue in a straight line to the instruction following UNTIL.
The first of the statements between the DO and UNTIL commands may be on the same line as DO. So in the procedure above, the line:
DO PRINT "A=";a%
would have been valid.
The WHILE...ENDWH structure operates in a very similar way; below is an example:
a=4.1 b=2.7 WHILE a>b PRINT "a is greater" PRINT "than b" b=b+1.04 ENDWH
In this structure, the test condition is at the beginning of the loop. With either of these structures, if the program contains the beginning of the structure (DO or WHILE), but does not have the corresponding end to the loop, then an error ("STRUCTURE ERR") will be reported.
However many loops are nested within each other (to a maximum of 8), PCL will keep track of the number and make sure that each loop has both a start and an end of the correct type. If you try to match, say, a DO with an ENDWH, when you translate the procedure a structure error will be reported.
NOTE. Tests may be made using the logical operators available to PCL. See Chapter 23 for more information on these operators.
Another command which can control the program flow out of a straight sequence is GOTO. This indicates that the program control should jump to another part of the procedure altogether. This part is referred to by a label.
The label used must be in the same procedure as the GOTO command, and the jump is not conditional, i.e., it will always be executed.
GOTO exit:: PRINT "MISS THIS LINE" PRINT "AND THIS ONE" exit:: PRINT "THIS IS THE FIRST LINE SEEN"
In the above example, the program, on reaching the line containing the GOTO instruction, would jump to the line beginning with the label exit::. Note that all labels must end with a double colon.
The GOTO is one of the ways of branching within a program, but it is not the most efficient way of branching, as it can lead to programs which are difficult to read and de-bug.
A more direct method of performing a branch, in this case a conditional branch, is the IF...ELSEIF...ELSE...ENDIF structure.
This structure is used to perform one or more instructions, IF a condition is met. If that condition is not met the ELSEIF instruction may follow, to test an alternate condition. There may be any number of ELSEIF instructions within an IF...ENDIF structure.
After all likely eventualities are provided for by the ELSEIF instructions, any other possibilities can be covered by an ELSE statement, followed at the end by the ENDIF statement.
Here is an example to illustrate how this might be used:
report: LOCAL g% g%=GET PRINT "THAT KEY IS" IF g%>64 AND g%<91 PRINT "UPPER CASE" ELSEIF g%>96 AND g%<123 PRINT "lower case" ELSE PRINT "NOT A LETTER" ENDIF GET
The program waits for a key to be pressed at the keyboard, and then states whether it is an upper case or lower case letter. If it is not a letter, then that is stated, as allowed for by the ELSE statement. The ELSE statement needs no condition as it allows for all other possibilities other than those specifically outlined in the conditions of the ELSEIF statements.
The ELSEIF and ELSE statements are optional, but for every IF there must be a corresponding ENDIF, otherwise an error ("STRUCTURE ERR") will be reported.
It is also valid for the statement following the ELSE part of the structure to be on the same line as ELSE. So in the procedure above, the line:
ELSE PRINT "NOT A LETTER"
would have been valid.
At various points in this manual it has been stated that if an argument or parameter is supplied incorrectly, or the required syntax for a particular command is not followed, an error will be reported.
Under normal circumstances, the screen will clear and then display an error message corresponding to the particular type of error encountered by the program.
In such a case, execution of the program is ended. There are ways to avoid this, but they put the programmer in full control, and must be used carefully.
The commands used to control error reporting are ONERR, TRAP and RAISE, and the ERR and ERR$ functions.
The first of the commands, ONERR, is used to detect the occurrence of an error and to redirect program control to another part of the procedure to deal with that error.
The ONERR instruction must be followed by a label which is found elsewhere in the same procedure, like this:
ONERR zero:: PRINT PI/0 PRINT PI zero:: PRINT "YOU CANNOT" PRINT "DO THAT" ONERR OFF
The first line instructs PCL to branch to the line beginning with the label zero:: on the occurrence of any error. The next line tries to perform a division by 0 which would cause an error to be reported, so the program branches to the label.
Here the programmer's own message is displayed. Note that, in this example, the line after the one containing the error is never executed.
After the ONERR command is used, all subsequent program errors - even in other procedures - will result in the program being directed to the same point, the label zero::. If you wish to direct the program elsewhere, the ONERR command must either be used again with a different label, or canceled with the ONERR OFF command. The ONERR OFF command turns the error trapping facility off, so any further errors will be handled by PCL which will, in turn, display a suitable error message. For example:
procl: ONERR label: ... a=LOG(-l) ... ... label:: ... proc2: ... proc3: ... PRINT 2/0 ...
The error in the procedure proc1 (a=LOG(-l)) will mean that control is re-routed to the point marked by label::, where it will be dealt with accordingly. However, if the ONERR OFF command is not used to switch off this command, then in any procedure called by proc1 - for instance, proc3 - an error will mean that control will return to the same point, label::
This may or may not be the required result, and you must ensure that if you do not want all errors to return control to the same point that the ONERR label:: and ONERR OFF commands are used appropriately.
The next error handling tool at your disposal is the TRAP command. This can be used with any of the commands listed below:
| APPEND | BACK | CLOSE | COPY |
|---|---|---|---|
| CREATE | DELETE | ERASE | EDIT |
| FIRST | INPUT | LAST | NEXT |
| OPEN | POSITION | RENAME | |
| UPDATE | USE |
The TRAP command immediately precedes any of these commands, separated from it by a space. Here is an example:
TRAP INPUT a%
The INPUT command will be executed in the usual way, but in the event of an error occurring as a result of that command, then the error will be suppressed or trapped, and the next line of the program executed as if there had been no error.
This might happen in the above example if a string was typed in instead of an integer. This allows the program to supply its own error message in such a case, allowing the user another try. If, when using the INPUT command without TRAP, a text string is entered when a number is expected, the display will scroll up and a question mark will be shown, prompting for another (valid) entry.
label:: PRINT "NUMBER "; TRAP INPUT a% IF ERR=226 PRINT "NOT A NUMBER" GOTO label:: ENDIF
In this example, if a text string is typed in instead of a number, then the TRAP statement will still allow the next line to be executed. In that case, the IF statement could find the error, print out a suitable message and then return to the line containing the prompt so that another attempt can be made.
This example also shows you the ERR function in action. This function returns the number of the last error which occurred in the program, according to the table later in this chapter.
The last command which you can use to control error trapping is RAISE. This is used to artificially generate an error.
If you are using the ONERR command to trap errors and handle them yourself, then at some during the development stage of your program you will need to test your error handling routines. The best way to do this is with the RAISE command.
You can generate an error that you think might occur when the program is in use, and see if the error handling routine takes care of it in the way you anticipate.
RAISE is useful when a program is built up from a number of procedures which call one another in sequence. If the procedure currently being executed was called by another procedure, which was called, by another and so on, you might wish to return to the top level quickly, to carry out a particular operation. The usual method would be to use the RETURN command to exit from all of the procedures in turn.
A faster method would be to issue an ONERR statement at the top level procedure. Then, when you RAISE an error at the lowest level, the program control will return to the label following the ONERR statement, even though it is several jumps back in the sequence of procedures.
When an error occurs in a program, the number of the error from the table below is accessible by using the ERR function. This can be used in your program, so that when an error occurs, if it is one of a certain range of anticipated errors, you can TRAP it and deal with it within the program.
The ERR$ function can be used to access any of these strings, given the appropriate error number.
Alternatively, if an error occurs and is not trapped, the program will halt, an error message will be displayed and PCL will offer the option of returning to the EDIT option from the PROG menu. The cursor will be at or near the instruction which caused the error and you will be able to correct the mistake. (This is dependent on the text version of the procedure being available - see Chapter 31 for more details.)
These are the error messages which can occur, their numbers and meanings:
If an error occurs when a procedure is running, and it is not trapped by the procedure itself, then an error message will be displayed and you will be instructed to press SPACE.
If the program was run from the PROG menu you will then be offered the chance to edit the procedure. The screen will show the prompt EDIT Y/N. Press Y to edit the procedure or N to return to the returned PROG menu. This option is offered only if there is a text version of the procedure available.
When the procedure has been edited so that the error no longer occurs, press MODE to return to the TRAN/SAVE/QUIT menu, and make a selection. If you quit at this stage, even if you have made alterations to the procedure, they will be discarded and the old version of the procedure will still be stored on the current device.
Programming languages are particular about the way commands and functions are used, and especially in the way program statements are laid out. They must conform to the syntax for the language in use. The various forms of punctuation are vital to the programs, and ensure that the correct action is performed on each part of the program line.
An area where PCL requires careful handling is in the passing of parameters to procedures and functions and ensuring that the correct types of numbers are used.
Below are a number of errors which can easily occur, and the correct format which should be used. In each case the statement containing the error is marked.
The structures allowed within PCL are DO...UNTIL, WHILE...ENDWH and IF...ELSEIF...ELSE...ENDIF. These may all be nested within one another to up to 8 structures deep. If you attempt to nest more than 8 structures, an error will be reported.
If the three structures are nested incorrectly, for example by matching up a DO command with a WHILE command, an error will also be reported.
| INCORRECT | CORRECT |
|---|---|
| proc1: ... ... DO ... ... WHILE a>2 ... | proc1: ... ... DO ... ... UNTIL a<=2 ... |
It is possible to write a procedure containing an endless loop to which there is no logical exit. If the ESCAPE OFF command has been used, ON/CLEAR will not let you out of that loop; it may only be exited by removing the battery from the APC. (ON/CLEAR can, under normal circumstances, act as a panic button, aborting the current procedure except when the ESCAPE OFF command has been used. See end of Chapter 24.)
Removing the battery will result in the loss of all data in the RAM of the APC, so it should be avoided. Here is one such procedure which contains an endless loop - DO NOT TYPE IT IN!
proc: ESCAPE OFF here:: PRINT "Endless loop..."; GOTO here::
This is a very simple example and it is unlikely that such a mistake would be made. However, when using the ONERR label:: command, it is easy to forget that all errors will result in control returning to the last label specified with that command. This could incidentally result in an endless loop, so great care must be taken when using the ONERR label:: command in conjunction with the ESCAPE OFF command.
When you start writing your own procedures you may, from time to time, want to list a procedure out to a printer. It may help you get a clearer idea of the sequence of the procedure when it is there in black and white on a piece of paper. It is certainly easier to show someone else how a procedure is made up by handing them a piece of paper which they can then take away.
To connect a printer to the APC, you will need the RS232 Communications Link from Hand Held Products. This allows any serial printer to be connected to the APC; it may also be used to communicate with another computer. (See Appendix F)
If no printer is connected to the APC when the LIST option from the PROG menu is selected, a DEVICE ERROR message will be displayed. Press SPACE to return to the PROG menu.
The DIR option in the PROG menu is used to read the directory of procedures which are stored on the current device.
Select DIR from the PROG menu in the usual way. The screen will clear and show:
DIR A:
If necessary, press MODE one or more times to change to the required memory bank; then press EXE. If there are any procedures stored in the current memory bank, the first will be displayed. Each time EXE is pressed, the next procedure name is displayed. After the last procedure name has been displayed, the screen will show an END OF PACK message.
Press ON/CLEAR to return to the PROG menu.
The ERASE option from the PROG menu allows you to erase procedures from any of the memory banks. Select ERASE from the PROG menu and the display will show:
ERASE A:
If necessary, press MODE to change to the required memory bank and type in the name of a procedure to be erased from that memory bank, for example PROC. Press EXE and the display will show:
ERASE A:PROC ERASE Y/N
Press Y to confirm that you wish to erase that procedure, or N to cancel the command. Please refer to Chapter 7 MEMORY MODULES, the section called RAM VERSUS MEMORY MODULES for information on how ERASE affects memory modules as compared to the APC RAM.
The COPY option in the PROG menu is used to copy procedures from one memory bank to another.
When COPY is selected from the menu, the display will show:
COPY OBJECT ONLY Y/N
Press Y if you want to copy just the translated copy of a procedure, the object file, to another memory bank. Press N to copy both the object and text versions. If both are copied, the procedure may be edited in the usual way on the target memory bank after the copy has been made. If, however, only the object file is copied, that copy cannot be edited. Be certain all procedures have been fully tested before making an object-only copy.
The advantage of copying just the object file is that the procedure will then occupy only about half of the memory space occupied by the original.
The COPY option operates in the same way as the COPY option in the main menu with one exception; if a file already exists in the target memory bank with the same name as the one being copied, the existing version on the target memory bank will be overwritten. The APC will not allow more than one procedure with the same name on any memory bank.
After the file or files have been copied to the target memory bank, the display returns to the PROG menu.
This chapter contains example programs written in PCL. The programs are not intended to demonstrate all of the features of PCL, but rather as a sampling of how the commands and functions can be used to their best advantage.
Each of the procedures must be entered separately; two procedures cannot be entered in one continuous block.
This procedure acts like the INFO option in the top level menu. It shows the total amount of memory in the machine and the free space (in bytes) on the RAM, and each of the two memory modules, if in use.
stat: PRINT "APC : IF PEEKB(SFFE8)=1 PRINT "Memory: 16384" ENDIF :GET OPEN "A:MAIN",A,A$ PRINT "Free A: ";SPACE CLOSE :GET IF EXIST("B:MAIN") OPEN "B:MAIN",B,B$ PRINT "Free B: ";SPACE GET :CLOSE ENDIF IF EXIST("C:MAIN") OPEN "C:MAIN",C,C$ PRINT "Free C: ";SPACE GET :CLOSE ENDIF
This procedure, taken from the APC Finance Pack, calculates monthly mortgage payments based on the amount and period of the loan, the interest rate and the source of the loan. The procedure calls another procedure, q:, a general input routine.
This can be called by any procedure which needs to prompt the user with a text string to enter a floating point number. The text string is passed to the procedure as a parameter, and the input value is returned. Use of such a general procedure avoids the unnecessary duplication of identical code at several places in a program.
mortgage: LOCAL a%, loan, b,y,i,p ONERR l1:: CLS PRINT "EVALUATE MONTHLY MORTGAGE PAYMENT" PAUSE 30 LOAN=q:("ENTER AMOUNT OF LOAN"+CHR$(63)+" ") DO i = q:("INTEREST RATE % "+CHR$(63)+" ") UNTIL i>0 AND i<99 DO y = q:("ENTER TERM IN YEARS "+CHR$(63)+" ") UNTIL y>.5 AND y<100 a%=MENU("BUILDING-SOCIETY,BANK,OTHER") IF a%=0 : RETURN : ENDIF i=i/100 : b=1+11*(A%/2) p=loan*i/12/(1-((1+i/b)**(-b*y))) CLS : PRINT "MONTHLY PAYMENT",FIX$(p,2,-8) GET l1:: RETURN
q:(a$) LOCAL z ONERR l1:: l1:: CLS :PRINT a$,CHR$(16); INPUT z CLS RETURN(z)
Interest rates on loans may be quoted an a percentage per month and hire purchase transactions, rather than as an annual rate. It is therefore sometimes not obvious which of two quoted interest rates offers the best deal on a particular investment or purchase. The way around this is to calculate an APR (Annual Percentage Rate) for each quoted figure and compare the two. The APR is a comparative measure of the interest rates on an annual basis, and standardizes quotations of interest rates.
This procedure, also from the Finance Pack, allows you to do this quickly and easily. The Finance pack contains not only the procedures listed here, but also a bank account logger, an expenses recording package, calculators for NPV (Net Present Value), IRR (Internal Rate of Return), compound interest and gilts and bonds.
apr: LOCAL i,n% DO CLS : PRINT"ENTER PERIOD IN MONTHS?"; INPUT N% UNTIL n%>=l AND n%<15 DO CLS : PRINT "INTEREST RATE % FOR PERIOD? "; INPUT i UNTIL i>0 AND i<20 i=(1+i/100)**(12/n%) i=(i-1)*100 CLS : PRINT "APR=";FIX$(i,2,-6) GET
The procedure below may be used to mute all audible alarms and beeps from the APC. Mute: acts as a toggle, so the same procedure is used to reactivate the alarms. It is unnecessary to enter the the current status of the alarms; the procedure detects whether they are enabled or disabled and acts accordingly.
mute: PRINT "Sound now <"; IF PEEKB($A4)=0 POKEB $A4,1 PRINT "OFF>" ELSE PRINT "ON>" POKEB $A4,0 ENDIF PRINT "Press any key"; GET
This procedure can be used to provide a degree of security to data held in a procedure ( a data base, for example) in the APC. Enter it as the initial procedure in a program; when executed, it will begin by powering the machine off. When ON/CLEAR is pressed, powering the machine back on, PASSWORD: will still be running, and a password will be requested. If an incorrect password is entered, the machine will power itself off again.
The ONERR command is used to prevent the procedure being halted; the password must be supplied, or the battery removed to gain access to the data in the machine.
password: LOCAL a$(5) ONERR start:: start:: OFF CLS :PRINT "Enter password" INPUT a$ IF a$<>"Barry" GOTO start:: ENDIF
NOTE. In choosing a password, use a word with no direct connection with yourself to insure security.
This program generates the first 30 prime numbers and sends them to the display:
prime: GLOBAL prim(31),j LOCAL i,flag,k,l,m i=3 prim(1)=2 j=2 flag=0 DO l=1 m=l WHILE l<j k=prim(l) IF i=k*INT(i/k) m=0 BREAK ENDIF l=l+1 ENDWH IF m prim(j)=i j=j+1 IF flag PRINT","; ELSE PRINT"Primes: 2,"; ENDIF flag=1 PRINT i; ENDIF i=i+1 UNTIL j>=30 RETURN
This program consists of five procedures, tax:, taxin:, taxout:, taxcalc: and newtax:. The program is used to calculate personal tax payments based on gross income, marital status, expenses, perks and capital gains.
When the program is used for the first time, you are prompted for tax threshold data for the current tax year. This data is put into two files which are then interrogated by the program to determine personal tax levels. All five procedures are needed, and these must be entered and translated separately.
tax: GLOBAL income,gross,capital,tax,dr$(2) LOCAL a$(9) IF EXIST("A:TAXALS") :dr$="A:" ELSEIF EXIST("B:TAXALS") :dr$="B:" ELSEIF EXIST("C:TAXALS") :dr$="C:" ELSE CLS :PRINT"Files Don't Exist";CHR$(16) PAUSE 20 newtax: ENDIF a$=dr$+"TAXALS" OPEN a$,A,yr%,sing%,marr%,capg% OPEN dr$+"RATES",B,thresh,rate taxin: CURSOR OFF :CLS :PRINT" COMPUTING" taxcalc: taxout: CLOSE
taxin: LOCAL an$(1),allow CLS PRINT"Enter Gross";chr$(15);"Income:"; :INPUT gross CLS :an$="" WHILE NOT (an$="m" or an$="s") CLS :PRINT"Married/Single";chr$(15);"(m/s): an$=LOWER$(GET$) ENDWH IF an$="m" :allow=A.marr% ELSE allow=A.sing% ENDIF income=gross-allow CLS :PRINT"Enter Allowable";CHR$(15);"Expenses:"; INPUT allow income=income-allow CLS :PRINT"Enter Taxable";chr$(15);"Perks: INPUT allow income=income+allow CLS PRINT "Enter Capital";chr$(15);"Gains: INPUT capital RETURN
taxout: LOCAL cgt CLS PRINT "Tax on Earned ";chr$(15);" Income=";FIX$(tax,2,8) GET CLS PRINT "Net Earned";chr$(15);"Income=";FIX$((gross-tax),2,8) GET IF capital>A.capg% cgt=(capital-A.capg%)*0.30 CLS PRINT"Capital Gains";chr$(15);"Tax=";FIX$(cgt,2,8) GET :CLS PRINT"Total Tax Bill";CHR$(15);"=";FIX$((tax+cgt),2,8) GET :CLS PRINT"Net Total Income'';CHR$(15);"=";FIX$((gross+capital-tax-cgt),2,8) GET ENDIF RETURN
taxcalc: LOCAL i%,old FIRST WHILE NOT EOF IF income>B.thresh :i%=POS :ENDIF NEXT ENDWH POSITION i% tax=(income-B.thresh)*B.rate/100 old=B.thresh WHILE i%>l i%=i%-l POSITION i% tax=tax+(old-B.thresh)*B.rate/100 old=B.thresh ENDWH RETURN
newtax: LOCAL c%,i%,yr$(5) i%=MENU("RAMFILE,PACKB,PACKC") IF i%=0 :RETURN :ENDIF dr$=CHR$(%A+i%-i)+":" TRAP CREATE dr$+"RATES",A,thresh,rate IF ERR<>0 :PRINT ERR$(ERR) PAUSE 60 :RETURN :ENDIF TRAP CREATE dr$+"TAXALS",B,sing%,marr%,capg% IF ERR<>0 :PRINT ERR$(ERR) PAUSE 60 :RETURN :ENDIF PRINT YR$,"CREATED ON DRIVE",dr$ PRINT "TAXALS CREATED ON DRIVE",dr$ PAUSE 60 :USE A :c%=0 PRINT "Enter data for Tax Rates";YR$ :PAUSE 60 DO PRINT "THRESHOLD :INPUT A.thresh PRINT "RATE :INPUT A.rate APPEND :c%=c%+l UNTIL c%=6 PRINT "Enter data for TAXALS" :PAUSE 20 USE B PRINT "SINGLE "; :INPUT B.sing% PRINT "MARRIED :INPUT B.marr% PRINT "CAP.GAINS."; :INPUT B.capg% APPEND CLOSE :USE A :CLOSE
Most PCL commands require one or more arguments. The arguments may be numeric or string, depending on the command used, and either literal values or variables may be used, in most cases.
In this and the following chapter on the PCL functions, the following methods of specifying the syntax of a command have been used:
If more than one of the same type of expression is required then these will be numbered thus:
<exp%1>,<exp%2>.
| APPEND | |||||||
|---|---|---|---|---|---|---|---|
| Syntax: | APPEND The current field values are appended to the current file as a new record. See also: ERASE, FIRST, NEXT, POSITION, POS, UPDATE | ||||||
| BACK | |||||||
| Syntax: | BACK Makes the previous record in a file the current record. See also: NEXT, FIRST, POSITION, POS, APPEND | ||||||
| AT | |||||||
| Syntax: | AT <exp%1>,<exp%2> Positions the cursor at the display position corresponding to <exp%1>, <exp%2> where <exp%1> is the number of characters across the display in the range 1 to 16, and <exp%2> (1 or 2) indicates the top or bottom line. See also: PRINT, CURSOR, KSTAT | ||||||
| BEEP | |||||||
| Syntax: | BEEP <exp%1>,<exp%2> Sounds the internal buzzer of the APC. The frequency of the sound is determined by the equation Frequency = 921600/(78+<exp%1>)Hz. The sound duration is <exp%2> milliseconds. | ||||||
| BREAK | |||||||
| Syntax: | BREAK Allows program control to break out of a DO/UNTIL or a WHILE/ENDWH loop, and to continue the execution of the program at the instruction following the terminator of the loop (UNTIL or ENDWH). | ||||||
| CLOSE | |||||||
| Syntax: | CLOSE Closes the current file. See also: OPEN, CREATE, DELETE | ||||||
| CLS | |||||||
| Syntax: | CLS Clears the display , and returns the cursor to the home position, i.e., the first character space on the top line of the window. | ||||||
| CONTINUE | |||||||
| Syntax: | DO
<statement list>
IF <exp>
CONTINUE
ENDIF
<statement list>
UNTIL <exp> Used to return program control to the test expression of either a DO/UNTIL or a WHILE/ENDWH loop. In the above example, the CONTINUE command will be executed if the expression following the IF statement returns a logical true result. In this case, program control would then be transferred to the test expression following the UNTIL instruction. | ||||||
| COPY | |||||||
| Syntax: | COPY "<meml>flnml","<mem2>flnm2"
COPY "<meml>flnm1","<mem2>"
COPY "<meml>","<mem2>" Enables files to be copied from one memory bank to another. In the first example, the file on a specified memory bank <mem1> with the name flnm1 is copied to the target memory bank <mem2> into a file called flnm2. If a file already exists on the target memory bank with the same name as that given by the second parameter (flnm2), the records from the source memory bank are appended to the existing file on the target memory bank. Otherwise, a new file is created with that name and the records written to it. In the second example, the file name on the target memory bank is taken to be the same as that on the source memory bank. In this case, flnm1. In the third example, all files on the source memory bank are copied onto the target memory bank, and are given the same names on the target memory bank as they held on the source memory bank. | ||||||
| CREATE | |||||||
| Syntax: | CREATE" <mem>fn",<lfn>,fldl,fld2 Create a file on memory bank <mem>, with the name fn, the logical file name <lfn>, and up to 16 fields as specified by fld1, fld2 etc. The logical file name may be A, B, C or D. Each newly created file is OPEN by default, and up to four files may be open at any one time. See also: OPEN, CLOSE, DELETE | ||||||
| CURSOR ON/OFF | |||||||
| Syntax: | CURSOR ON or CURSOR OFF Activates or deactivates the cursor. The default setting is CURSOR ON. See also: KSTAT | ||||||
| DELETE | |||||||
| Syntax: | DELETE "<mem>filename" Deletes a file with the name filename from memory bank <mem>. The file must be closed before this command is used, or an error will result. See also: CREATE, OPEN, CLOSE, DELETE | ||||||
| DO/UNTIL | |||||||
| Syntax: | DO
<statement list>
UNTIL <exp> The DO command is used to indicate the start of a list of one or more statements which terminate with the UNTIL command. The list of statements will be repeated until the expression after the UNTIL command returns logical true. See also: WHILE/ENDWH, BREAK | ||||||
| EDIT | |||||||
| Syntax: | EDIT <var$> The string variable <var$> is sent to the display, and may then be edited in the usual way by using the cursor keys and DEL. When editing has been completed, pressing EXE displays the edited string. If EXE is pressed without any editing having been performed, the original string will be displayed. If ON/CLEAR is pressed during editing, the string will be cleared and new text may be typed. If, however, the TRAP command is used with EDIT, control will be passed to the next line of the procedure with the ESCAPE error condition being set. | ||||||
| ERASE | |||||||
| Syntax: | ERASE Erases the current record in the current file. The current record will then be the record after the one just deleted. If the ERASEd record was the last record in a file, the current record will be null and EOF will return true. | ||||||
| ESCAPE ON/OFF | |||||||
| Syntax: | ESCAPE ON / ESCAPE OFF ESCAPE ON enables ON/CLEAR to be used to halt the program currently being executed. ESCAPE ON is the default. The ESCAPE OFF has the reverse effect, disabling ON/CLEAR while a program is running. NOTE: If a program enters a loop with no logical exit and the ESCAPE OFF command has been used, the only way to exit the loop will be to remove the battery and wait for two minutes; the program and any other data in the RAM of the machine will be lost. See also: TRAP | ||||||
| FIRST | |||||||
| Syntax: | FIRST Makes the first record in a file the current record. See also: NEXT, POSITION, POS | ||||||
| GLOBAL | |||||||
| Syntax: | GLOBAL gl1%,gl2,gl3$(length),gl4(n) Used to define variables which will be available in the current procedure and any procedure below it in the program. Variable names ending with a percent sign (%) are declared as numeric integers; those ending with a dollar sign ($) are declared as string variables and all others are declared as floating point numeric variables. Array variables may be of any of the above three types. Variable names may be up to 8 alphanumeric characters long, the first of which must be a letter. This length includes the type identifier, eg., % or $. More than one GLOBAL or LOCAL statement may be used, but only in that order and must precede the instructions which make up the procedure. See the Chapter 19, VARIABLES, for more information. See also: LOCAL | ||||||
| GOTO | |||||||
| Syntax: | GOTO label:: Sends the program control to the line containing the label name supplied by LABEL:: The label name must be in the current procedure, and must end with a double colon. Labels may be up to 8 characters long excluding the colons. | ||||||
| IF/ELSEIF/ELSE/ENDIF | |||||||
| Syntax: | IF <exp>
<statement list>
ELSEIF <exp>
<statement list>
ELSE
<statement list>
ENDIF IF statements are immediately followed by an expression. If the result of that expression returns logical true (non-zero), the statements following it are executed. If the expression returns logical false (zero), those statements are ignored. The ELSEIF statement is optional, but if it is included, and the following expression returns logical true, then the next series of statements are executed. There may be more than one ELSEIF, each with its own list of statements. If none of the preceding expressions have returned logical true, then the list of statements after ELSE and before ENDIF are executed. ELSE is optional. | ||||||
| INPUT | |||||||
| Syntax: | INPUT <var%>
INPUT <var>
INPUT <var$>
INPUT <logfile>.fieldname Allows data to be input from the keyboard during program execution. The variable supplied must have previously been declared with the GLOBAL or LOCAL commands, or be a field variable of the current file. If inputting to a string variable, only as many characters as have been set aside for that variable with the GLOBAL or LOCAL commands may be entered. If ON/CLEAR is pressed during editing, the input so far will be cleared and new data may be entered. If the, however, TRAP is used with this command, control will pass to the next line of the procedure with the ESCAPE error condition being set. See also: GLOBAL, LOCAL, TRAP | ||||||
| KSTAT | |||||||
| Syntax: | KSTAT <exp%> Sets the state of the keyboard, i.e., in SHIFT mode, CAPS mode, etc, according to the following table:
See also: CURSOR | ||||||
| LOCAL | |||||||
| Syntax: | LOCAL locl%,loc2,loc3$,loc4(n) Used to define variables which will be available in the current procedure only. Other procedures may use the same variable names for other uses. See also: GLOBAL | ||||||
| NEXT | |||||||
| Syntax: | NEXT Makes the NEXT record the current record in the current file. If use of NEXT is continued beyond the end of a file, no error is reported but the current record will be a null record and the EOF function will return true. See also: FIRST, BACK, ERASE, APPEND, UPDATE, POSITION, POS | ||||||
| OFF | |||||||
| Syntax: | OFF Powers the APC off. Pressing ON/CLEAR will resume program execution at the program line following the OFF command. | ||||||
| OPEN | |||||||
| Syntax: | OPEN "<mem>fn",<lfn>,fldnml,fldnm2 Opens an existing file on memory bank <mem>, with the logical file name <lfn>, with the fields names as specified by fldnm1, fldnm2, etc. That file may then be referred to by the logical file name for all file handling operations. See also: CREATE, CLOSE, DELETE, USE | ||||||
| ONERR | |||||||
| Syntax: | ONERR label:: / ONERR OFF In the event of an error being generated during program execution, the ONERR label:: command will transfer program control to the program line containing that label. The ONERR OFF instruction cancels the ONERR statement as set with ONERR label::, so that any errors occurring below the ONERR OFF statement are no longer referred to the same place in the procedure. | ||||||
| PAUSE | |||||||
| Syntax: | PAUSE <exp%> If <exp%> is:
Therefore, PAUSE 100 would cause the program to pause for five seconds. In the first two cases, the key pressed is stored in a buffer. It is wise to remove this with the GET function like this: <statement list> PAUSE 0 GET <statement list> The procedure will not pause at the GET function in the usual way, because the key press stored in the buffer from the PAUSE 0 command is taken as the input for GET. | ||||||
| POKEB | |||||||
| Syntax: | POKEB <exp%1>,<exp%2> Writes the integer <exp%2>, which must be in the range 0 to 255, into the memory address <exp%1>, which must be an integer. Addresses above 32767 are addressed by negative values or hexadecimal numbers, eg, $FFFF = -1, which corresponds to address 65535. NOTE: Casual use of this command can result in the loss of all data in the APC. See also: POKEW, PEEKB, PEEKW | ||||||
| POKEW | |||||||
| Syntax: | POKEW <exp%1>,<exp%2> Writes the integer <exp%2> into two successive memory addresses, starting with the address <exp%1>, with the most significant byte in the lower address. Note. Casual use of this command can result in the loss of all data in the APC. See also: POKEB, PEEKB, PEEKW | ||||||
| POSITION | |||||||
| Syntax: | POSITION <exp%> Makes record number <exp%> the current record in the current file. If <exp%> is greater than the number of records in the file then makes the last record current. See also: POS, FIRST, NEXT, ERASE, APPEND, UPDATE | ||||||
| PRINT/LPRINT | |||||||
| Syntax: | PRINT <exp>,<exp%>;<exp$> Prints numbers or text to the display. If items in the PRINT statement are separated by commas, a space is inserted between the items as they appear on the display. If items in the list are separated by semi-colons, there will be no spaces between items in the output. A final semi-colon indicates that the next item to be printed will start immediately after this PRINT statement. A final comma indicates that the next item to be printed will follow on the same line with a space inserted between the items. Otherwise the next line is used. The LPRINT command (only available when an HHP APC RS232 cable is connected to the peripheral port at the top of the APC) operates in the same way as the PRINT command except all output is sent to a printer, if connected. See also: AT | ||||||
| RAISE | |||||||
| Syntax: | RAISE <exp%> Artificially generates an error, even though no such error has occurred. If no ONERR statement has been issued previously, the appropriate message for that error number is displayed. The range of possible internal errors is 195 to 255. Refer to the Chapter 26, ERROR HANDLING for a full list of error numbers and messages. See also: ONERR, ERR, ERRS | ||||||
| RANDOMIZE | |||||||
| Syntax: | RANDOMIZE <exp> Gives a new seed value to the random number generator, so that a new sequence of random numbers will be initiated. Use RANDOMIZE if you wish to use the same sequence of random numbers more than once. | ||||||
| REM | |||||||
| Syntax: | REM this is a remark The REM statement precedes a REMark which contains information designed to make the program easier to follow. The APC ignores all text after the REM statement up to the end of that line. | ||||||
| RENAME | |||||||
| Syntax: | RENAME "<mem>fnml","<mem>fnm2" Renames a file on memory bank <mem> called fnml as the file fnm2. | ||||||
| RETURN | |||||||
| Syntax: | RETURN
RETURN <exp%>
RETURN <exp>
RETURN <exp$> Used on its own, RETURN terminates the execution of a procedure and returns control to the point from which that procedure was called. Use of this command at the end of a procedure is optional. RETURN may also be used to pass a value back to the level from which the procedure was called. The value must be supplied after RETURN. | ||||||
| STOP | |||||||
| Syntax: | STOP Halts execution of PCL and returns the APC to the point from which that program started, eg., the main menu or the CALC option in the main menu. | ||||||
| TRAP | |||||||
| Syntax: | TRAP FIRST
(APPEND / BACK / CLOSE / COPY /
CREATE / DELETE / ERASE / EDIT /
FIRST / INPUT / LAST / NEXT / OPEN /
POSITION / RENAME / UPDATE / USE)
TRAP may precede any command in the above list. Any error resulting from the execution of that command will then be TRAPped. The next program line will be executed regardless of whether the error would normally have caused an error message to be displayed. See Chapter 26, ERROR HANDLING, for more details. | ||||||
| UPDATE | |||||||
| Syntax: | UPDATE The current record in the current file is deleted and the current field values are appended as a new record. The last record in that file is then current. See also: APPEND | ||||||
| USE | |||||||
| Syntax: | USE <logfnam> Selects for use the file with the logical file name <logfnam>, which must previously have been opened with the OPEN or CREATE Command. See also: OPEN, CLOSE, CREATE, DELETE | ||||||
| WHILE/ENDWH | |||||||
| Syntax: | WHILE <exp> <statement list> ENDWH This structure is started by the WHILE command which precedes an arithmetic expression. The subsequent list of statements, which must end with the ENDWH statement, is executed while the expression returns logical true (non-zero). See also: DO/UNTIL | ||||||
The convention used throughout this manual is that the receiving variable denotes the return type of the function. So a function shown here assigned to a string variable will return a string and so on.
| ABS | |
|---|---|
| Syntax: | a=ABS(<exp>) Returns the absolute value, i.e., without any sign, of a floating point number. For example, ABS(-10) is 10. See also: IABS |
| ADDR | |
| Syntax: | m%=ADDR(<var>) Returns the address at which the variable inside the parentheses is stored in memory. The variable may be an array, i.e. , a%=ADDR(ARRAY()); subscripts may not be included. See also: USR, USR$ |
| ASC | |
| Syntax: | a%=ASC(<exp$>) Returns the ASCII value of the first character of a string expression. Alternatively, if the ASCII code for one character is required, the form a%=%G may be used, where G is the letter for which the ASCII code is desired. |
| ATAN | |
| Syntax: | a=ATAN(<exp>) Returns the arctangent of the expression inside the parentheses in radians. |
| COS | |
| Syntax: | c=COS(<exp>) Returns the cosine of the expression inside the parentheses. The expression represents an angle expressed in radians. |
| COUNT | |
| Syntax: | c%=COUNT Returns the total number of records in the current file. See also: POS |
| DAY | |
| Syntax: | d%=DAY Returns the number of the current day of the month (1 to 31). See also: SECOND, MINUTE, HOUR, MONTH, YEAR, DATIM$ |
| DEG | |
| Syntax: | d=DEG(<exp>) Returns the value of the expression in the parentheses, representing an angle measured in radians, as a number of degrees. See also: RAD |
| DISP | |
| Syntax: | d%=DISP(<exp%>,<exp$>) DISP controls the format of data sent to the display. The value of <exp%> may be -1, 0 or 1. If the value of <exp%> is -1 then <exp$> is ignored and the current record is displayed with one field on each line of the display. The cursor keys may be used to scroll around the record as in the top level records. If <exp%> is 1 then <exp$> is displayed as above. If <exp$> contains tab characters (ASCII character 9), these divide the string into a number of fields so the string is displayed on a number of lines. If <exp%> is 0 then the last DISPlayed string or record is continued and <exp$> is ignored. If any key other than the cursor keys are pressed then the number of that key is returned. No other commands or functions should be used between using DISP with <exp%> equal to 1 or -1 and DISP with <exp%> equal to 0. For example: a%=DISP(1,a$) WHILE a%<>13 a%=DISP(0,"") ENDWH This waits for EXE to be pressed and continues displaying a$ until this happens. Any command or function which accesses the display in between the two uses of DISP will have to be entered after DISP. Not doing so could result in an error. |
| EOF | |
| Syntax: | DO
<statement Iist>
UNTIL EOF Any program instruction which tries to read past the last record in a file will result in an internal flag being set to show that the End Of File (EOF) has been reached. This can then be tested, as above. |
| ERR | |
| Syntax: | e%=ERR Returns the number of the last error which occurred. See the Chapter 26, ERROR HANDLING to determine the meaning of each of the error numbers. The number returned will be in the range 0 to 255. If 0 is returned, there is no error. See also: ERRS, RAISE, ONERR |
| EXIST | |
| Syntax: | IF EXIST("<mem>fn")
statement
ENDIF Tests for the existence of a file on memory bank <mem> called fn. Returns logical true if the file exists and logical false otherwise. See also: DIRS |
| EXP | |
| Syntax: | e=EXP(<exp>) Returns the value of the arithmetic constant e (2.71828...) raised to the power of the expression inside the parentheses. |
| FIND | |
| Syntax: | f%=FIND(<exp$>) Searches forwards in the current file for the string inside the parentheses. If found, it will return the record number where that string occurs, and makes that the current record. If no such string is found, zero is returned. If <exp$> is a null string, the command operates like the NEXT command and makes the next record current. See also: NEXT |
| FLT | |
| Syntax: | f=FLT(<exp%>) Converts the integer expression inside the parentheses into a floating point number. |
| FREE | |
| Syntax: | f%=FREE Returns the number of free bytes in the built in memory of the APC. See also: SPACE |
| GET | |
| Syntax: | g%=GET Waits for a key to be pressed and returns the ASCII value of that key. See also: GET$, KEY, KEY$, PAUSE |
| HOUR | |
| Syntax: | h%=HOUR Returns the number of the current hour from the system clock (0 to 23). See also: SECOND, MINUTE, DAY, MONTH, YEAR, DATIM$ |
| IABS | |
| Syntax: | i%=IABS(<exp%> Returns the absolute value, i.e., without any sign, of an integer. For example, ABS(-10) returns 10. |
| INT | |
| Syntax: | i%=INT(<exp>) Returns the integer (i.e. the whole number part) of the expression inside the parentheses. Negative numbers are rounded down, so INT(-5.3) will return the result -6 . Used when the returned value will be within the APC's integer range. See also: INTF |
| INTF | |
| Syntax: | i=INTF(<exp>) Used in the same way as INTF, but the value returned is a floating point number and is used when the returned result will be outside PCL's integer range. See also: INT |
| KEY | |
| Syntax: | k%=KEY Returns the ASCII value of any key pressed, if any. If no key is pressed, zero is returned. This command does not wait for a key to be pressed. See also: PAUSE, GET, GET$, KEY$ |
| LEN | |
| Syntax: | l%=LEN(<exp$>) Returns the length of the string expression inside the parentheses. See also: LEFT$, RIGHT$, MID$, LOC, LOWER$, UPPER$, REPT$ |
| LN | |
| Syntax: | l=LN(<exp>) Returns the natural (base e) logarithm of the expression inside the parentheses. |
| LOC | |
| Syntax: | l%=LOC(<exp$l>,<exp$2>) Returns the position in <exp$l> in which <exp$2> occurs. If the second string expression does not occur in the first string expression, then the value zero is returned. For example, LOC("STANDING","AND") would return the value 3 because the substring "AND" starts at the third character of the main string. See also: LEFT$, RIGHT$, MID$, LEN, LOWER$, UPPER$ |
| LOG | |
| Syntax: | l=LOG(<exp>) Returns the base 10 logarithm of the expression inside the parentheses. See also: LN |
| MENU | |
| Syntax: | m%=MENU(menu$)
The string inside the parentheses
takes the form: |
| MINUTE | |
| Syntax: | m%=MINUTE Returns the current minute number from the system clock (0 to 59). See also: SECOND, HOUR, DAY, MONTH, YEAR, DATIM$ |
| MONTH | |
| Syntax: | m%=MONTH Returns the current month from the system clock (1 to 12). See also: SECOND, HOUR, DAY, MONTH, YEAR, DATIM$ |
| PEEKB (Peek byte) | |
| Syntax: | p%=PEEKB(<exp%>) Returns the value stored at the address specified by the expression inside the parentheses. The value returned will be in the range 0 to 255. See also: PEEKW, POKEB, POKEW |
| PEEKW | |
| Syntax: | p=PEEKW(<exp%>) Returns the value of the two byte integer stored at addresses <exp%> and <exp%>+1. See also: PEEKB, POKEB, POKEW |
| PI | |
| Syntax: | p=PI Returns the value of Pi (3.142... ). |
| POS | |
| Syntax: | p%=POS Returns the number of the current record in the current file. See also: POSITION, FIRST, NEXT, ERASE, APPEND, UPDATE |
| RAD | |
| Syntax: | n=RAD(<exp>) Converts <exp> from degrees to radians. See also: DEG |
| RECSIZE | |
| Syntax: | r%=RECSIZE Returns the number of bytes occupied by the current record. No record may contain more than 254 characters, so this function may be used to check that a record may have data added to it without exceeding this limit. |
| RND | |
| Syntax: | r=RND Returns a random floating point number in the range 0 (inclusive) to 1 (exclusive). See also: RANDOMIZE |
| SECOND | |
| Syntax: | s%=SECOND Returns the current number of seconds from the system clock (0 to 59). See also: MINUTE, HOUR, DAY, MONTH, YEAR, DATIM$ |
| SIN | |
| Syntax: | s=SIN(<exp>) Returns the sine of the expression inside the parentheses. The expression represents an angle expressed in radians. |
| SPACE | |
| Syntax: | s=SPACE Returns the number of free bytes in the current memory bank. There must be a file open on the current memory bank for this function to operate. See also: FREE |
| SQR | |
| Syntax: | s=SQR(<exp>) Returns the square root of the expression inside the parentheses. |
| TAN | |
| Syntax: | t=TAN(<exp>) Returns the tangent of the expression inside the parentheses. The expression represents the angle expressed in radians. |
| USR | |
| Syntax: | u%=USR(<exp%1>,<exp%2>) The value of <exp%2> is passed to the D register and the value of <exp%1> is passed to the PC register of the HD6303X microprocessor. The microprocessor then executes the machine language program starting at the address <exp%1> . At the end of the routine, the value in the X register is passed back to the language as an integer. Note. Casual use of this command can result in the loss of all data in the APC. See also: USR$, ADDR |
| VAL | |
| Syntax: | v=VAL(<exp$>) Returns a floating point number which is the value of the string expression inside the parentheses. For example, VAL("470.0") would return the integer 470.0 . A string containing any non-numeric characters will return an error. Scientific notation is allowed, so VAL("1.3E10") would return the value 1.3E10. |
| VIEW | |
| Syntax: | VIEW(<exp%>,<exp$>) Prints <exp$> on line number <exp%> (1 or 2) of the display. If the text is longer than 16 characters, the display scrolls to the left. Pressing the left or right cursor keys allows you to change the direction of the scroll. Pressing any other key halts the scrolling of the text and returns the ASCII value of the key pressed. If VIEW is used again with <exp$> being a null string, VIEWing is continued at the point it was interrupted by a key press. See also: DISP |
| YEAR | |
| Syntax: | y%=YEAR Returns the current year from the system date (1900 to 1999). See also: SECOND, MINUTE, HOUR, DAY, MONTH, DATIM$ |
Hand Held Product's Advanced Pocket Computer (APC) Bar Code Reader is designed to transform the APC into a powerful and versatile data capture unit. It will read a variety of Bar Code types quickly and efficiently. These codes may then be stored, either in the APC RAM, or in a memory module fitted to one of the two ports on the back of the APC.
The Bar Code Reader adds a new function to the APC's programming language, PCL. This is included in two example programs at the end of this section which will enable you to begin reading bar codes immediately.
The APC Bar Code Reader consists of a cable with a medium resolution bar code reader at one end and a 16 pin connector at the other.
To use the Bar Code Reader, power the APC off and plug the connector into the peripheral port at the top of the machine (See Fig. 3.2, Chapter 1). The connector will only go in one way, with the HHP logo at the top.
The software operating the Bar Code Reader is actually stored in the connector which fits into the APC. When the APC's top level menu is displayed, press ON/CLEAR to load the Bar Code Reader software into the APC. The reader is, at that point, ready for use.
The software occupies approximately 3K of memory, so if the RAM of the machine is already nearly full, the OUT OF MEMORY message may be displayed. If this happens, delete any non-vital files or records or use the TIDY option in the DIARY to clear some memory space.
When the cable has been connected and ON/CLEAR pressed to load the software, a new function will be automatically added to the APC's programming language, PCL.
This new option is BAR$:, and may be used like any other function within your own programs. The BAR$ function is covered in more detail later on in this section.
To read a bar code, position the wand so that it can be drawn across the full length of the bar code in one movement. Press the button on the side of the wand and draw the wand across the bar code in a straight line as evenly as possible. The wand is bi- directional, reading bar codes from left to right or from right to left.
The wand may be used at a variety of angles; for the exact range, refer to the wand product manual. It may be used at any speed from 3 to 30 inches per second, but a mid-range speed will be most effective.
The wand uses a red light, so codes printed in red or on a red background might be difficult to read accurately.
After using the Bar Code Reader, power off the machine and disconnect the cable. The software will, however, still be stored in memory, and may be removed by powering the machine back on and pressing ON/CLEAR a second time. The BAR$: function will be removed from the language, and the 3K memory freed again for other uses.
If the cable is disconnected during use, a DEVICE MISSING error will be reported. For obvious reasons, this should be avoided.
NOTE. The Bar Code Reader acts as an extra drain on the APC's battery, so allowances should be made for the slightly shorter battery life when the Bar Code Reader is in heavy use. To reduce the effects of this problem, remove any memory modules which are not being used, as these also drain the APC's power.
The function BAR$ is added to the APC's language, PCL, when the bar code reader software is loaded. The syntax for the function is as follows:
b$=BAR$:(type%, mode%)
The function is given two parameters. The first, type%, is an integer. This defines the types of code which can be read. The four types are:
EAN (8and 13 character)
UPC (all types)
CODE 39
INTERLEAVED 2 OF 5
The value of type% will determine which of these types, or which combination of types, will be recognized by the software. The APC may be set to read just one type, or any combination of types, so that certain types may be excluded if desired. It is always a good idea to disengage any barcodes that won't be in use, as the auto-discrimination process can decrease both speed and accuracy.
If, with the type% parameter, you specify more than one type of code, the software will automatically recognize the type and decode it accordingly. If the bar code encountered is not one of the types activated, the code will be ignored.
The value of type% is decided by the combination of types of bar code which must be recognized. These are specified in the low four bits of the integer given. The least significant bit (bit O), when set, allows EAN barcodes to be read. Bit 1 allows UPC codes to be read, bit 2 activates Code 39 and bit 3 activates INTERLEAVED 2 OF 5. The combinations possible and the values of type% required to read them are given on the following page.
| TYPE | RETURNED TYPE | BIT PATTERN | VALUE |
|---|---|---|---|
| EAN | A | 0001 | 1 |
| UPC | B | 0010 | 2 |
| EAN, UPC | A or B | 0011 | 3 |
| CODE 39 | C | 0100 | 4 |
| EAN, CODE 39 | A or C | 0101 | 5 |
| UPC, CODE 39 | B or C | 0110 | 6 |
| EAN, UPC, CODE 39 | A, B or C | 0111 | 7 |
| INTERLEAVED TWO OF FIVE | |||
| D | 1000 | 8 | |
| EAN, INTERLEAVED TWO OF FIVE | |||
| A or D | 1001 | 9 | |
| UPC, INTERLEAVED TWO OF FIVE | |||
| B or D | 1010 | 10 | |
| EAN, UPC, INTERLEAVED TWO OF FIVE | |||
| A,B or D | 1011 | 11 | |
| CODE 39, INTERLEAVED TWO OF FIVE | |||
| C or D | 1100 | 12 | |
| EAN, CODE 39, INTERLEAVED TWO OF FIVE | |||
| A,C or D | 1101 | 13 | |
| UPC, CODE 39, INTERLEAVED TWO OF FIVE | |||
| B,C or D | 1110 | 14 | |
| EAN,UPC,CODE 39,INTERLEAVED TWO OF FIVE | |||
| A,B,C or D | 1111 | 15 | |
Table 1A: Barcode-TYPE% Conversions
The type of code read will be included as the first character of the string which is returned from the function. This may be read using PCL's LEFT$ function and then removed, leaving the returned string containing the contents of the bar code itself.
If none of the four lower bits of type% are set to 1 then a device call error ("BAD DEVICE CALL") will be displayed.
The second parameter required by the BAR$ function is mode%. The possible values of this integer parameter are shown in the table below:
| VALUE | MODE |
|---|---|
| 0 | Waits until a successful read is made |
| -1 | Waits for a good read of a key press |
| >1 | Waits for a good read or for mode% twentieths of a second |
| <-1 | Waits for a good read or a key press or for mode% twentieths of a second |
Where a time is specified or a key press allowed, if the specified time elapses or any key is pressed before a good read is made, a null string is returned.
Note that if a key is pressed, the ASCII code for that key will be retained in the keyboard buffer. A subsequent use of the GET function will return that ASCII value.
The first of these programs will read EAN-13 bar codes only and will wait until a successful read is made. To exit from the program, press ON/CLEAR.
DEMO1: LOCAL A$(65) ESCAPE OFF PRINT "READY" DO A$=MID$(bar$:(1,-1),2,255) REM EAN ONLY, EXIT ON KEY IF LEN(A$)=13 :REM CHECK EAN-13 BEEP 200,80 CLS :PRINT A$ ENDIF UNTIL KEY=1
This program will read any of the bar code formats stated in Chapter 2 and will end if a successful read is not made before 30 seconds have elapsed.
DEMO2: LOCAL B$(65),T$(1),R$(10),K% ESCAPE OFF R$=" READY" PRINT R$ DO B$=BAR$:(15,-600) IF B$="":REM MUST BE TIMEOUT OR KEY K%=KEY IF K%=0 :cls PRINT "TIMEOUT EXPIRED" PRINT "PRESS ANY KEY", GET CLS :PRINT R$ ENDIF ELSE CLS T$=LEFT$(B$,1) :REM GET TYPE DECODED IF T$="A" :PRINT "EAN" ELSEIF T$="B" :PRINT "UPC" ELSEIF T$="C" :PRINT "CODE39" ELSEIF T$="D" :PRINT "INTERLEAVED TWO OF FIVE" ENDIF PRINT MID$(B$,2,255) BEEP 200,80 ENDIF UNTIL K%=1
Below is Inventory Demonstration, a program using the APC's barcode reading capabilities. The program is explained through the use of REM statements, and should prove valuable in writing your own applications. This program scans the inventory codes and allows the user to key in the appropriate quantity. These entries are then saved to a file. Once all data has been entered, the user is prompted to transmit, after which all files are purged, readying the APC for the next inventory session. When Inventory is next run, it will first check to see if the data last entered has been transmitted. If it hasn't, the program will continue to prompt the user to transmit, eliminating the possibility of overwriting data.
INVENTOR: REM This is an Inventory REM Demonstration Program* REM Written in PCL REM Global Declarations GLOBAL numbox$(6),a$(1),totlwt$(7),flag%,option%,n%,x% REM Start-up activities REM Set barcoder flag to true. x% = 1 REM Allow a back door out of the program with the ON/Clear key. ESCAPE ON REM Clear the screen and put demo REM message on the screen. CLS AT 4,1 : PRINT "Inventory" AT 2,2 : PRINT "Demonstration" REM Wait until a key is pressed to REM continue on. n%=GET REM If key pressed is MODE then abort REM the program. IF n%=2 STOP ENDIF REM Test for the existence of the REM data file "ordfile". IF EXIST("A:ordfile") REM If already exists then clear REM screen and print transmit message CLS AT 1,1 : PRINT "Must Transmit" AT 1,2 : PRINT "First" REM Beep and pause for a count of 60 REM or until a key is pressed then REM return. BEEP 300,200 PAUSE -60 RETURN ENDIF REM Set the keyboard to numeric. KSTAT 3 REM If the data files do not exist REM then create them. IF NOT EXIST("A:ordfiIe") CREATE "A:ordfiIe",A,itmnum$,quant$ CLOSE ENDIF IF NOT EXIST("A:hedfile") CREATE "A:hedfile",B,cstcntr$,dattim$ CLOSE ENDIF REM Open the header file as logical REM file name B and set B as current REM file. OPEN "A:hedfile",B,cstcntr$,dattim$ USE B BACKIN1:: REM This do loop is to get a non-null REM cost center variable. DO REM Clear the screen and display the REM prompt. CLS AT 1,1 : PRINT "Cost Center REM If barcode pen is not installed REM do error routine to inform the REM user. ONERR nopenl:: REM If barcoder flag is true try to REM input with barcode pen. IF x% : b.cstcntrS = BAR$:(-1,-1) : ENDIF REM Turn error trap off. ONERR OFF REM If key was pressed and cstcntrS REM variable is null input from the REM keyboard. IF b.cstcntrS = "" AT 1,2 : TRAP INPUT b.cstcntrS ELSE REM Beep for barcode scanner entry. BEEP 200,200 ENDIF REM Go to procedure to check for a REM null keyboard entry. chcknull:(b.cstcntr$) REM End of do until loop. UNTIL b.cstcntrS <> "" REM Make the dattim$ variable = to a REM dash and the date and time. b.dattim$=" - "+DATIM$ REM Write the data to the file, close REM the file and set the data flag. APPEND CLOSE flag%=1 REM Open the item,quantity file with REM the logical file name A and make REM A the current file. OPEN "A:ordfile",A,itmnum$,quant$ USE A REM This is the item,quantity loop. itmloop:: REM Clear the screen and display the REM item prompt. CLS AT 1,1 : PRINT "Item#" REM Make itmnum$ null at first. a.itmnum$="" REM If the barcoder is not installed REM indicate error, otherwise input REM from barcoder and turn the error REM trap off. ONERR NOPEN2:: IF x% : a.itmnumS = BAR$:(-1,-1) : ENDIF ONERR OFF REM Check for null if key was pressed REM while barcoder was on. IF a.itmnum$ = "" REM Wait for a key to be pressed. n%=GET REM If key was mode key and have REM collected one set of REM item,quantity then finish. IF n% = 4 AND flag% = 0 GOTO finish:: REM Ignore certain control characters REM and null the a$ variable. ELSEIF n% < 48 a$="" ELSE REM If the key hit was a valid number REM make it into a character and REM print it REM on the screen. a$=CHR$(n%) AT 1,2 : PRINT a$ ENDIF REM input the rest of the keyboard REM entry of beep if barcoded in. AT 2,2 : TRAP INPUT a.itmnum$ ELSE BEEP 200,200 ENDIF REM Add the initial character to the REM rest of the item entry. a.itmnum$=a$+a.itmnum$ REM Don't allow a null entry for the REM item. IF flag% = 1 AND a.itmnumS = "" REM Display message, beep and pause REM for a count of 60 or until a key REM is pressed. AT 1,2 : PRINT "1 entry required" BEEP 200,50 PAUSE -60 REM Go back to itmloop. GOTO itmloop:: ENDIF REM Go to procedure to check for null REM entry. chcknull:(a.itmnum$) REM If entry is null go back to REM itmloop. IF a.itmnumS = "" : GOTO itmloop:: : ENDIF REM Set data flag to 0 indicating one REM set of data has been taken. flag%=0 REM Quantity do loop until quantity REM is not null. DO REM Clear the screen and display the REM quantity prompt. CLS AT 1,1 : PRINT "Quantity" REM Input the quantity and trap error REM if it occurs. AT 1,2 : TRAP INPUT a.quant$ REM Go to procedure to check for null REM entry. chcknull:(a.quant$) REM End of do until not null loop. UNTIL a.quant$ <> "" REM Place a comma in front of the REM quantity as a delimiter. a.quant$=","+a.quant$ REM Write the record to the current REM file and go back to itmloop. APPEND GOTO itmloop:: REM Finish collecting the last two REM pieces of data. finish:: REM Close the current file and open REM the header file as logical file B REM with the fields for number of REM boxes,total weight. CLOSE OPEN "A:hedfile",B,numbox$,totlwt$ REM Make the current file logical REM file name B. USE B REM Clear the screen, display the REM prompt for # of boxes and input REM the numbox$ variable. If a null REM entry occurs try again in DO REM loop. DO CLS AT 1,1 : PRINT "Number of boxes" AT 1,2 : TRAP INPUT b.numbox$ REM Go to routine that checks for a REM null entry. chcknull:(b.numbox$) UNTIL b.numbox$ <> "" REM Clear the screen, display the REM prompt for total weight and input REM the total weight variable. If a REM null entry occurs try again in DO REM loop. DO CLS AT 1,1 : PRINT "Total weight" AT 1,2 : TRAP INPUT b.totlwt$ REM Go the routine that checks for a REM null entry. chcknull:(b.totlwt$) UNTIL b.totlwt$ <> "" REM Add a semi-colon in front of REM totlwt$ to delimit numbox$ and REM totlwtS. b.totlwt$=";"+b.totlwt$ REM Write the data to the header file REM and close the file. APPEND CLOSE REM Beep, clear the screen and REM display the prompt for a complete REM order. BEEP 200,50 CLS AT 2,1 : PRINT "Order Complete" REM Pause for a count of 50 of until REM a key is pressed REM then return from the main REM procedure to the APC's main menu. PAUSE -50 RETURN REM Error if the barcode reader is REM not installed. NOPEN1:: REM Clear the screen and display REM message that the barcode reader REM is not there. CLS AT 1,1 : PRINT "Barcode pen not" AT 4,2 : PRINT "installed!" REM Beep, pause for a count of 60 or REM until a key is pressed, set the REM barcode reader flag to 0 then go REM back to backinl. BEEP 200,200 PAUSE -60 x% = 0 GOTO BACKIN1:: REM Same error routine as NOPEN1:: REM but enters from and REM exits to a different place. NOPEN2:: CLS AT 1,1 : PRINT "Barcode pen not" AT 4,2 : PRINT "installed!" BEEP 200,200 PAUSE -60 x% = 0 GOTO itmloop::
TRANSMIT: REM Procedure to transmit the data REM collected in INVENTOR.OPL REM Declare the local variables. LOCAL c%,n%,reol$(1),reof$(1),rtrn$(1),teol$(2),teof$(1),ttrn$(1) REM Assign values to the parameters REM in the LSET command. reol$=CHR$($0D) :reof$=CHR$($1A) :rtrn$=CHR$(00) :teol$=CHR$($0D)+CHR$($0A) teof$=CHR$($1A) :ttrn$=CHR$(00) REM Set up the communication REM parameters. If "no RS232 link" REM error occurs REM trap it and perform error REM routine. ONERR errorout:: LSET:(9600,0,8,l,0,0,0,reol$,reof$,rtrn$,teol$,teof$,ttrn$) ONERR OFF REM Clear the screen and print a REM transmitting message to it then REM beep. CLS AT 3,1 : PRINT "Transmitting" AT 6,2 : PRINT "Order" BEEP 200,50 REM Open up the data file, If the REM file is not there perform "no REM data" error. ONERR nodata:: OPEN "A:hedfile",B,cstcntr$,dattim$ ONERR OFF REM Use the logical file name B until REM a different file is opened and REM start at the first record in the REM file. USE B FIRST REM Print to the RS232 link start REM message and if error do error REM routine. ONERR errorout:: LPRINT "Start of Order" ONERR OFF REM Print the data fields out to the RS232 link. LPRINT b.cstcntr$;b.dattim$ REM Close the B file and open the A REM file with item,quantity fields. CLOSE OPEN "A:ordfile",A,itmnum$,quant$ REM Use the logical file name A for REM current file and make the current REM record REM the first one in the file. USE A FIRST REM Print the item,quantity record REM until the end of file is read. DO LPRINT a.itmnum$;a.quant$ NEXT UNTIL EOF REM Close the item,quantity file and REM open the logical file B with REM number of boxes,total weight REM fields. CLOSE OPEN "A:hedfile",B,numbox$,totlwt$ REM Use the logical file B and make REM the last record the current one. USE B LAST REM Output the number of boxes,total REM weight record and the end of REM order message. LPRINT b.numbox$;b.totlwt$ LPRINT "End of Order" REM Beep, close the file and then REM delete the data files. BEEP 300,70 CLOSE DELETE "A:ordfile" DELETE "A:hedfile" REM Clear the screen on the APC and REM display a finished message. CLS AT 5,1 :PRINT "Finished" REM Pause for a count of 60 or until REM a key is pressed. PAUSE -60 REM Set the communication parameters REM before exiting, then return. rtrn$ = CHR$($0A) LSET:(9600,0,8,l,3,0,0,reoi$,reof$,rtrn$,teol$,teof$,ttrn$) RETURN REM Error routine for no connection REM to the computer. REM errorout:: REM Clear the screen and print REM message the the APC screen. CLS AT 1,1 : PRINT "Not connected to" AT 2,2 : PRINT "Host computer" REM Beep and then pause for a count REM of 100 or until a key is pressed. BEEP 100,200 PAUSE -100 REM return from errorout routine. RETURN REM Routine for no data message. nodata:: REM Clear the screen and print a no REM data message. CLS AT 1,1 : PRINT "No data to" AT 2,2 : PRINT "Transmit" REM Beep and pause for a count of 100 REM or until a key is pressed. BEEP 100,200 PAUSE -100 REM Return from nodata routine. RETURN
chcknull:(tmpS) REM Procedure that checks for a null REM entry in the parameter passed to REM it. IF tmp$ = "" AT 1,2 : PRINT "Required Entry!" BEEP 200,50 PAUSE -60 ENDIF RETURN