INSTALLATION PROGRAM EXTRACTION OR EXECUTION OPERATION 1 ORGANISER MAIN MENU 2 LOGGER MAIN MENU 2.1 'NEW' MENU 2.1.1 SETTING THE CHANNELS 2.1.2 USER DEFINED SCALING 2.1.3 PROVIDING A FILENAME 2.1.4 NUMBER OF RECORDS 2.1.5 THE LOGGING PERIOD 2.1.6 SETTING THE START TIME 2.2 DURING LOGGING 2.2.1 GOING TO SLEEP 3 HAVING A LOOK 3.1 LOOKING AT THE DATA 3.2 STATISTICS 3.3 CHECKING THE PERIOD 3.4 CHECKING ON PROGRESS 3.5 CHECKING THE INPUTS 3.6 CHOOSING A FILE 4 DUMPING THE RESULTS 4.1 TABULAR FORMAT 4.2 GRAPHICAL FORMAT 4.3 OUTPUT TO A COMPUTER 5 CONFIGURING THE SYSTEM 5.1 SETTING THE TIME 5.2 SETTING UP THE PSION FOR THE PRINTER 5.2.1 SETTING THE PRINTER 5.3 DATAPAK (D/PAK) 5.4 QUIET OPERATION 5.5 LOGGING ON REQUEST 5.5.1 REMOTE LOGGING 5.6 C°/F° SELECTION 5.7 Lang 5.8 Baud 6 DELETING FILES (ERASE) 7 SWITCHING OFF 8 SOFTWARE VERSION (?VER) APPENDIX A: DATALOGGER SPECIFICATION APPENDIX B: ELECTRICAL CONNECTIONS APPENDIX C: OPERATION OF STANDARD ORGANISER FUNCTIONS APPENDIX D: INPUT CONVERSIONS FROM OPL Warranty
To install the logger software, place the SF12 Datapak in Datapak slot 'C:' (the lower of the two sockets on your Organiser).
Press the 'ON/CLEAR' key to load the logger's main routine into the RAM of the Organiser. The main menu will now have 'LOGGER' as its first option.
NB: While the logger software is needed, do not remove the SF12 Datapak from the 'C:' socket. To use other Datapaks, place them only in the 'B:' or upper socket of the Organiser.
The logger software will be resident in the RAM even when the Organiser is powered off. If the software Datapak is taken out of the Organiser ensure the 'ON/CLEAR' Key is pressed twice after the Datapak has been taken out (see Psion Organiser manual).
| MODEL XP: | LOGGER FIND SAVE DIARY CALC PROG | MODEL LZ: | Logger Find Save Diary Calc Time Notes World Alarm |
This is the menu presented by the Organiser when it is first switched on with the Logger program installed. On this menu, 'LOGGER' is the only extra option other than those presented by a standard organiser.
To activate the logger, press 'L' or 'EXE' - menu items are always accessed by pressing the initial letter of the option, or by pressing 'EXE' when the cursor is over the required option. The cursor is moved by using the four arrow keys on the top row of the keyboard.
For information on the use 'FIND', 'DIARY' etc., see the instruction manual for the standard Organiser. The presence of the logger software has limited effects on the normal operation of the Organiser. For details see appendix C.
Following the first installation of the SF12 software, Psion Organiser models LZ and LZ64 will automatically select the language that the Organiser is currently operating in. Languages available include English, French, German, Spanish, Italian, and Swedish. If the Organiser is operating in a different language to the options available it will default to English.
For models XP the language menu will be displayed and the user will have to select the preferred operating language:
English Francais Deutsch Español Italiano Svenska
To change operating language at a later date please refer to 'Config' menu section 5, 'Lang' sub section 5.7.
Having pressed 'L', the main logger menu should be presented:
New Look Config Stop Dump Erase View Off ?Ver
Access to any of these options is as opposite, i.e. by pressing the initial letter or moving the cursor and pressing EXE. Some menus have more than one option with the same initial letter. If this is the case, pressing the first letter will toggle between the various options and you must press 'EXE' when the desired option is highlighted.
Pressing the 'ON/CLEAR' key from any menu will return you to the previous menu, or the one above in the hierarchy. Pressing 'New' allows you to start a new logging session.
Internal Datapak
Before selecting 'New' you must decide whether data to be collected is to be stored in the Organiser's internal RAM or in an external Datapak or Rampak. If you wish to log to external memory please refer to section 5 'Config' menu sub section 5.3.
Datapaks have the advantage of larger storage space, and the data is non-volatile, but they use much more battery power and are slower to write to. Logging periods of one second cannot be used when logging to Datapaks. Rampaks, however, use less battery power and can take logs at 1 second intervals.
After selecting 'New' from the main logger menu the following menu will appear:
Chans Name Recs Period Start
Before a session can commence, the logger needs to know several important parameters:
It is also useful to give the session a name, which can be used for future reference, especially if the logger is to be used to store more than one set of readings at any given time.
Before starting a new session, these parameters should be set by the user. If they are not, a default set will be used. This will normally be the same parameters as was last used, i.e. for the last logging session recorded or 'played back' (viewed or dumped). When the software is first loaded, the defaults are:
Inputs: Channel one: thermistor (°C): others unused.
Interval: One Minute
Number of Records: Ten
Name: (see section 2.1.3)
The default values can easily be seen by choosing the various options in the menu (see below). The current value will always be 'highlighted' with a blinking cursor.
Chan.1: N/C Temp RH mV bar U/D
This menu is accessed by choosing 'Chans' from the 'New' menu. Use the arrow keys or the initial letter of your choice, or just press 'EXE' to keep the setting at its current value. As each channel is specified, the screen will move to the next channel ready to accept input. Pressing 'ON/CLEAR' will go back to the previous channel. At least one channel must be specified (i.e. not 'unused'). After setting the fourth channel, this menu will automatically exit back to the 'New' menu.
Pressing 'Temp' invokes another menu which determines which type of temperature sensor is connected:
Thermistor TC960°C TC160°C
TC960°C is Type K thermocouples range -40.0°C to +960.0°C, alternatively TC160°C is -40°C to +160.0°C. Use the arrow keys and/or press 'EXE' to choose your selection, or 'ON/CLEAR' to go back to the main channel selection menu.
U/D is the use defined engineering units, which allows a 0-2500mV * input to have a user-defined 2 characters engineering unit displayed and a user defined scaling of the input in the form o/p = Ax + B where x is the mV input and A and B are user defined.
The SF12 will prompt with a suggested engineering unit display of °C which can then be changed by typing in the required units, e.g. mA, and then pressing 'EXE'. Then the SF12 will ask for the scaling and will prompt with:
| minimum 00000mA - 0000mV | allowable range: -999 to 10,000 |
Using the arrow keys and the numeric keys the desired minimum reading can be entered, e.g. 00000mA 1000mV, then press 'EXE'.
Then the SF12 will ask for the maximum reading with:
| maximum 00100mA - 2500mV | allowable range: 'minimum' to 10,000 |
Again this can be changed using the arrow keys and the numeric keypad. Press 'EXE' to complete the operation.
* All Digitron input modules RVSF, MASF, P5SF and R5SF have an output of 0-2500mV corresponding to their full scale reading. It is not possible to use the modules TKSFL, TKSFH, TKSFL-S and TKSFH-S as the output from these are non-linear.
Special shift keys allow popular lowercase letters or special characters:
shift C = Ω (Ohm)
shift D = ° (degrees)
shift M = m (milli)
shift U = µ (micro)
N.B. If you require to make corrections or wish to enter blanks use the 'SPACE' key. The 'DEL' (delete) key has been disabled.
Name for file? f0153
Choosing 'Name' from the 'New' menu enables you to specify a name for the logging session. When the logger is used to store the results of multiple logging sessions, it is useful to provide meaningful names which will be used in menus automatically when you later wish to view or output a set of readings.
The default filename displayed can be used, if required, or edited. To clear it completely press the 'ON/CLEAR' key. This default name is made up from the current time (hours and minutes) after the letter 'f'.
You may enter up to eight letters (or digits by making use of the SHIFT key), but the name must start with a letter and cannot contain any punctuation.
(maximum 4540) Records: 0010
When you choose 'Recs' from the 'New' menu you will be prompted for the number of records required for the session. In this mode, the digit keys (0-9) will be active rather than the normal letter keys they represent (I,J,K etc). Any number up to the maximum shown may be entered by pressing 'EXE' when the required value is shown.
The 'DEL' key can be used for correcting keying errors, or the 'ON/CLEAR' key for resetting to the default (0010). The maximum allowed will depend on several factors.
With no previous session stored, logging on one channel only and without log-on-request, over 9000 records should be available in the internal memory of an Organiser XP, provided the sessions are long.
Logging Interval 00 mins 05 secs
The logging period can be set between one second and fifteen days. This default screen allows the setting of periods up to 30 minutes, in any combination of minutes and seconds. In this mode, the digit keys (0-9) will be active rather than the normal letter keys they represent (I,J,K etc). Just overtype the values that you require, using the digit keys, then press 'EXE' when the displayed value is correct.
Note that, if data is being saved in a 'Datapak' the minimum period allowed is 2 seconds to allow time to 'blow' the EPROM in these paks. If an interval of more than 30 minutes is required, pressing the 'MODE' key changes the display as follows:
Logging Interval 00day 00hr 01min
or something similar, depending on the current default value.
Any combination of days, hours and minutes up to fifteen days can be entered. Use 'MODE' to go back to the minutes/seconds screen, or 'EXE' to set the desired interval.
If you wish to log at regular intervals AND on request in the same session, go back to the 'Config' menu and choose 'Req' (see section 5.5)
Period too short 1560/1000
If you get an error message like this, either now or when the session actually begins, you will need to make some adjustments. This message means that you are attempting to take a reading every 1000 milliseconds, but that the process of taking a reading takes 1560 milliseconds, so you are attempting the impossible.
Solutions are:
Start logging Now or Later
Selecting 'Start' from the 'New' menu displays this screen. Pressing 'N' (for 'Now') or 'EXE' will commence logging straight away. If 'Later' is chosen (by pressing 'L'), any time up to 21 days in the future can be selected for logging to commence:
Start logging at 13:00:00 01Jan91
Use the cursor keys to select which digit to change, then key in the required time and/or date. To change the month, use the appropriate letter keys, e.g. 'A' will select 'Aug' for August. Successive use of 'J', for example, will toggle between January/June/July. Press 'EXE' when the values have been keyed in. The logger will now remain in a 'dormant' state until the required start time.
This facility is also useful if you would like to start logging now, but to make sure that readings are taken at the exact minute boundaries, for example (with a two min period) at
13:20:00, 13:22:00, 13:24:00 etc.
19.5°C ┌┐ 1134mV 2098mV └┘ ......
When logging commences the current state of the input channels is displayed, showing the latest readings taken in engineering units. For example, with a logging session configured with channel 1 as temperature channels 2 and 3 as millivolts and channel 4 unused, something like the display above will be shown, (Channel 2 is shown in the top right hand corner.) These values will usually be updated every second.
This is the same screen as used for 'View' chosen from the 'Main' menu. The flashing symbols ![]() serve as a reminder that a logging session is in progress. The flashing symbols
serve as a reminder that a logging session is in progress. The flashing symbols ![]() indicate that log-on-request mode is enabled (see section 5.5).
indicate that log-on-request mode is enabled (see section 5.5).
Every time a set of readings is taken, the logger will emit a short tone unless the 'Quiet' option has been selected (see section 5.4). Only three keys are effective whilst this screen is displayed. Pressing the 'ON/CLEAR' or the 'EXE' key escapes to the 'look' menu described in section 3.
If the 'log-on-request' option has been chosen for the logging session, then pressing 'R' (for request) while this screen is displayed will cause a record to be logged. For more details see section 5.5.
If the logging period chosen is less than three seconds then the 'while logging' screen will be displayed, being updated every second, until either the session finishes or there is some user intervention.
To conserve battery power, however, logging intervals of three seconds or more make use of a 'sleep' mode between taking readings. About five minutes after the session starts, the screen will blank out. The logger will then 'wake up' automatically to take readings at the correct times. A short tone will be emitted when each record is taken.
If, while, the logger is asleep, you wish to see what is going on, simply press the 'ON/CLEAR' key to wake up the Organiser. The 'Look' menu will be displayed, allowing you to check on progress.
To stop the logging session prematurely (i.e. before the requested number of readings has been taken), press 'ON/CLEAR' again to jump back to the 'Main' menu then choose the 'Stop' option and confirm by pressing the 'Y' key.
Data Stat Period Recs View File Off
This menu is presented when 'Look' is chosen from the main logging menu. It enables you to examine details of the logging session stored in memory.
If no logging session is taking place, and there is more than one set of records (more than one file) stored in memory, the default file to be looked at will be the last one recorded or the last one looked at previously. To see the filename, or change the file to look at, choose the 'File' option (see section 3.6).
13:23:00 01Jan91 1(1) 20.6°C
Selecting 'Data' from this menu allows examination of stored data, record by record and channel by channel. The first screen presented gives the recorded data for channel no.1 of the first record, as in the example above.
Pressing the arrow keys will change the displayed readings as follows:
| UP | displays the previous record in the current channel; |
| DOWN | displays the next record in the current channel; |
| LEFT | displays the same record, but the previous channel; |
| RIGHT | displays the same record, but the next channel. |
All these effects are cyclic. For example, if the first record is displayed when 'UP' is pressed, the LAST record in the file will be displayed. Similarly, if channel 4 is displayed when 'RIGHT' is pressed, channel 1 will be shown. A short "beep" is emitted when these displays cycle round.
The keys will autorepeat for fast scanning through results, or for faster scanning through large sets of data, the 'F' (for fast) key will increment the record count by 10 at a time. If a logging session is still in progress the scanning action will be slowed down.
Note that if only one channel was in use for the logging session, the 'LEFT' and 'RIGHT' keys will have no effect.
To escape from this display, press the 'ON/CLEAR' or 'EXE' keys.
Ch.1:max: 20.9°C 15:35:00 01Jan91
This is an example of the display shown when 'Stats' is selected from the 'Look' menu.
In this mode, you can view maximum and minimum values logged for each channel, along with the times that these were logged, and the average value for each channel. If the logging session is still underway, then the statistics are calculated on data collected so far.
The keys act in a similar way as for the 'Data' screen:
| UP | for the same channel, but a different statistic; |
| DOWN | for the same channel, but a different statistic; |
| LEFT | for the same statistic on the previous channel; |
| RIGHT | for the same statistic on the next channel. |
To escape from this display, use the 'ON/CLEAR' key as usual.
Logging Interval 02 mins 00 secs
If you wish to check on the period for a session, select 'Period' from the 'Look' menu. This may be useful if your file consist of records taken at many irregular intervals (using the 'log-on-request' function) as well as at regular times.
Records : 23 out of 500
Selecting 'Recs' from the 'Look' menu allows you to see how many records have been taken so far, if this screen is on the display when the logger 'goes to sleep' during a session, the new number of records will be displayed on the screen momentarily every time the logger wakes for a new record.
1975mV ┌┐ 20.7°C 34% └┘ ......
Selecting 'View' from the 'Look' menu provides you with an indication of the current state of the four input channels. If a logging session is in progress, the flashing symbols ![]() will also be displayed (see 'During Logging', section 2.3). This menu 'View' is also available from the main SF12 menu 'New Look Config'.
will also be displayed (see 'During Logging', section 2.3). This menu 'View' is also available from the main SF12 menu 'New Look Config'.
Order of channels:
Chan.1 Chan.2 Chan.3 Chan.4
New values will normally be displayed every second, so this mode may be used as a type of digital meter.
The 'ON/CLEAR' key will escape back to the 'Look' menu.
A:F1056 A:F1057
Choosing a 'File' from the 'Look' menu will display a list of filenames recorded, either in internal memory or in a Datapak. These can be scrolled through using the arrow keys 'UP' and 'DOWN'.
If only one file name is shown in this menu, then either only one file is stored in memory or logging is still in progress. You cannot look at other files until the current logging session has stopped.
To select which file you wish to examine, move the cursor to the file name and press 'EXE', or just use the initial letter if it is unique (this menu works just like all the others, although its contents will change depending on what is stored in the logger's memory).
The filenames are presented in the same order as they were recorded. If there are more files stored than will fit on to the screen, use the 'UP' or 'DOWN' cursor Keys to scroll through the menu.
Note: Files stored in external Datapaks/Rampaks will be stored as:
B:F1058 B:F1059
Printer Computer FileChange
Selecting 'Dump' from the main logging menu will enable transfer of any recorded logging sessions to either a printer or an external computer. (Details of compatible hardware can be found in appendix C). Note that dumping cannot be performed whilst logging is still in progress.
In order to set up the Organiser for either a Psion or standard RS232 serial printer refer to section 5 'Config' menu sub section 5.2 'Print'.
When transmitting data to the Psion Printer II you will first need to remove the datalogger hardware module. With the Organise connected to the printer you will need to press 'ON/CLEAR' button until the Main Organiser menu appears. Then press the 'ON/CLEAR' button twice again, this effectively installs the comms link between the Organiser and the Printer enabling datalogger files to be dumped in text format only.
File change : If there is more than one file stored in the logger's memory, you can choose which file is to be dumped by selecting 'FileChange' - this works in the same way as the 'Look' function - see section 3.6. If you do not select a file, the one dumped will be the last one recorded, or whichever file was dumped or looked at most recently.
Copying files: To copy logging files from internal RAM to a Rampak or Datapak, or a Rampak to a Datapak please refer to COPY INSTRUCTIONS in the Organiser manual.
Selecting 'Printer' will give you a further menu:
Tabular Graphical
Selecting 'Tabular' from this menu will provide a listing of all the records for the chosen logging session in a paged tabular format. The length of the page can be adjusted, if required, using the 'Config' option from the main logger menu (see section 5.2). The maximum, minimum and average values for each logged channel will be printed at the bottom of the table.
Selecting 'Graph' will print a simple graphical output of results. The graph is printed 'sideways' along the paper, with the time axis running along the length so very long logging sessions can be plotted if required. Only printers with the facility of condensed text can print graphically. Please set your printer accordingly (see section 5.2).
Note: You cannot obtain a graphical output when sending data to a Psion printer.
If there is a fault with the printer during printing, an error message may appear. Check that:
Transfer of data can be halted by pressing the 'ON/CLEAR' key, but remember that some printers have large input buffers so that printing may not stop immediately. Turn off the printer if you require an immediate stop.
Selecting 'Computer' from the Dump' menu allows transfer of logging results to an IBM-compatible personal computer. You will need the optional disk which contains the necessary transfer software (SFPC3 or SFPC5 Version 2.0 or later).
The question:
Computer ready?
will be asked and 'EXE' pressed when the PC software has been set up.
Further information on file transfer and conversion appears with the disk software (SFPC3 or SFPC5).
Time Print D/Pak Quiet Req C°F° Baud Lang
Choosing 'Config' from the main menu allows you to set up various logging parameters.
Reset time: 13:59:34 01Jan91
Use 'Time' to check or reset the actual time of the day and date. The main 'Organiser' menu also provides a 'TIME' function but this cannot be accessed while a logging session is in progress. The 'Config' time option allows setting of the time in a more convenient way. Just overtype the figures with new values and press 'EXE' when the time and date are shown correctly. The month can be changed using the appropriate letter keys, more than once if necessary. If you press 'ON/CLEAR', the time will not be reset at all and will remain at its previous value (it will not lose the seconds that have passed while you were looking at the screen).
Time cannot be changed while logging.
Epson Psion
Choosing 'Epson' will configure the logger to download any 'Epson-compatible' printer with a RS232 serial input. The 'Psion' option will allow the use of the Psion printer II. The logger cannot download to a parallel printer unless a serial to parallel converter is used.
Selecting paper length :
Lines per page ?66
After selecting the printer type, you can change the default sheet length for neat formatting of results. You should leave extra lines for the heading of each page output and for top and bottom margins -standard printout paper is 66 lines long, so between 50 and 60 lines per page is a good selection. 66 lines is the default. (Set 0 lines per page for continuous printing with no page feed). After selecting the page length, the option of 'line feed include' or 'no line feed include' is offered. This should be set in conjunction with your printer settings.
RS232 Protocol for the Organiser is: 8 data bits, no parity, 1 start bit and 1 or 2 stop bits. NB: The printer needs to support the 'condensed mode' software command for graphical output.
Internal Datapak
Selecting 'D/Pak' from the 'Config' menu will display this short menu, which enables you to choose where data can be stored. Selecting 'D/Pak' allows data to be collected in a Datapak or Rampak connected to Port B. If Port B is empty and this menu is selected the error message:
?Datapak
will be displayed. Press 'ON/CLEAR' to return to the 'Config' menu.
Enable Disable beep during log
Selecting 'Quiet' from the 'Config' menu will display this short menu, which enables you to choose whether or not you require the logger to emit a 'beep' every time it takes a record. Press 'E' or 'D' as required.
Enable Disable log-on-Request
Selection of 'Req' from the 'Config' menu enables logging records to be taken at times other than the regular intervals defined by the 'Period' option. Press 'E' or 'D' as required. Note that you cannot activate this mode while logging is in progress - you must stop the current session, enable log-on-request, then start a new one.
Having enabled this option, there are different ways of actually requesting a record to be taken at any time.
If the logger is in the 'awake' mode (i.e. it has not 'gone to sleep' between records being taken), you need to select 'View' from the 'Look' menu (or 'V' from the main menu will also work) - this is the screen which will normally be shown while logging with request mode selected.
19.5°C ┌┐ 1134mV 2098mV └┘ unused
The flashing symbols ![]() indicate the request mode. To take a record, simply press the 'R' key. A reading will be taken immediately:
indicate the request mode. To take a record, simply press the 'R' key. A reading will be taken immediately:
log being taken
The 'Look' menu will be displayed automatically after taking the reading.
19.5°C ┌┐ 1134mV 2098mV └┘ unused
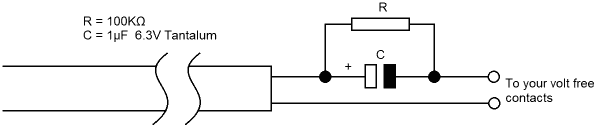
As an alternative to pressing the 'R' key for a log-on-request, a remote logging lead (model SFLR) can be used. As long as the organiser has been turned off, or timed out and turned itself off, a log will be taken as for log-on-request in section 5.5. Logs will be taken every 2 seconds while the contacts are closed. If you require only one reading for each close of the contacts, you must use a circuit like the following:
Selecting this menu allows the user to collect temperature data in either °C or °F. Refer to section 2.1.1 'Setting the channels'. Note: It is not possible to collect data in both °C and °F.
English Francais Deutsch Español Italiano Svenska
Selecting this menu will allow the user to change the presented language in the operating menus.
Baud: 9600 300 1200 4800
Selecting this menu will allow the user to select the Baud rate (data transfer rate, bits/sec) for transferring data to a PC or printer. Refer to PC or printer operating manual to select correct baud rate.
PACK FULL
When the logger's internal memory, or the Datapak, becomes full, this message will appear on the screen when you try to start a new session. You will need to erase some old unwanted files before proceeding (but see overleaf concerning Datapaks).
Erase One file or All files
Press 'O' for one file, or 'A' to delete all files to erase the internal memory or the Datapak. Confirmation will be sought before deleting all the files. If 'One file' is chosen, you must then decide which one to erase:
A:F0029 A:F0719
Selection is made in the usual way with the arrow keys.
F0029 (120) Delete (Y/N?)
When you have selected the file to erase, confirmation of your intentions will be sought. The indicated size may help in determining whether the deletion will be sufficient to begin your new session.
The value given is(Number of records) × (Number of channels active) or, if log-on-request mode is active (Number of records) × (number of channels active + 1). Minimum size is 120.
Pressing 'Y' to this prompt will check with a further 'are you sure?' before deleting the file. Please note that there is no way of recovering the erased data once deleted.
DATAPAKS: Deletion of files on Datapaks is possible but no space can be regained - the space can only 'reformatted' which needs the optional 'Formatter'- see chapter seven of the 'Psion Organiser II' operating manual and chapter thirteen of the LZ manuals.
RAMPAKS: Deletion of files in Rampaks is possible and will free all the space for re-use immediately.
The logger will automatically switch off after about five minutes if no keys are pressed. If you wish to switch off immediately, however, press the 'ON/CLEAR' key repeatedly until you reach the main Organiser menu:
LOGGER FIND SAVE DIARY CALC PROG
(Note however that if a logging session is still in progress, you will not be allowed to access to this menu - use the 'Stop' option from the main logger menu first).
Having reached this menu, press 'O' (for Off) to turn the organiser off.
You can however, switch off at the 'New Look Config' menu if the logging interval is 3 seconds or more.
This identifies the version of software installed, e.g.
Digitron SF12 Version 2.0
| DATALOGGER SPECIFICATION | |||
|---|---|---|---|
| Number of input channels | 4 (Negatives commoned) | ||
| Maximum Number of Records For A Single File | |||
| Internal RAM | 1 channel only | (models XP and LZ) | 9,120 |
| 1 channel only | (model LZ64) | 25,000 | |
| 4 channels | (models XP and LZ) | 2,280 | |
| 4 channels | (model LZ64) | 6,250 | |
| 128K Datapak | 1 channel only | (models XP, LZ & LZ64) | 60,000 |
| Maximum Number of Logging Sessions (Files) | 90 | ||
| Input | When taking reading | 4.7 MΩ | |
| Impedance | Other times | 470 KΩ | |
| Battery Life | Active use, or logging in seconds | 40 hours typical † | |
| Logging to RAM at 1 record/minute | 200 days typical † | ||
| Operating Temperature | 0-50°C | ||
| Dimensions | including Psion Organiser excluding probes | 212×78×30 cm | |
| Input Connections | 180° 5-pin DIN sockets; a separate serial port is located on the side of the SF12 | ||
| PROBE SPECIFICATION | Model | Sensor | Range |
|---|---|---|---|
| Temperature | THSF | Thermistor | -20°C to +100°C |
| TKSFL | Type K Thermocouple | -40°C to +160°C | |
| TKSFH | Type K Thermocouple | -40°C to +960°C | |
| TKSFL-S* | Type K Thermocouple | -40°C to +160°C | |
| TKSFH-S* | Type K Thermocouple | -40°C to +960°C | |
| Pressure | P5SF** | Semi-Conductor Transducer | 0 to 1000 mbarG |
| Relative Humidity | R5SF | Capacity | 0 to 100% RH |
| Voltage | VSF*** | 0 to 2500 mV | |
| RVSF* | Electronic Amplifier | 0 to 10 V | |
| Current | MASF | Electronic Amplifier | 0-20mA |
| Cont. | Model | Display Resolution | System Accuracy |
| THSF | 0.1% | ± 0.3°C (0 to 70) ± 0.4°C (-20 to 0) ± 0.6°C (70+) | |
| TKSFL | 0.1% | ± 0.5°C 0.75% of reading | |
| TKSFH | 0.1% | ± 1.0°C 0.75% of reading | |
| TKSFL-S* | 0.1% | ± 0.5°C | |
| TKSFH-S* | 0.1% | ± 2.5°C | |
| P5SF** | 1mbar | ± 0.5% | |
| R5SF | 0.1% RH | ± 3% | |
| VSF*** | 2 or 3mV | ± 0.1% | |
| RVSF | 0.1% of scale | ± 0.1% full scale | |
| MASF | 0.1% of scale | ± 0.1% full scale | |
* These models allow a variety of Type K Thermocouple plug-in probes to be used and the accuracies quoted for these models account for instrument and Type K interface accuracies only.
** Model P5SF has a multi-turn potentiometer located on top of the instrument to allow for zero control. The connection required for the push-fit plastic tubing is 3mm I.D.
*** Model VSF has no sensor, thus the accuracy quoted is that of the instrument alone. The Display will increment by 2 or 3mV, which corresponds to the 0.1% resolution of the instrument.
† Use external power supply when logging to 64K and 128K Datapaks.
PLEASE NOTE: All quoted accuracies with the exception of models TKSFL-S, TKSFH-S and VSF relate to the total system accuracy of instrument, probe and sensor.
All four sockets accept sensor inputs using 5-pin DIN plugs. Side socket 1 is a special 5 pin socket for connection to either a PC, printer or a 'log on request' remote triggering contact. Side socket 2 is for an optional mains adapter. Optional leads are available to drive printers or send data to a remote computer.
DIN plug connections for Logger Board - View from outside end of logger module.
3 o o 1 o o 5 o 4 2
| Pin 1 | 0v |
| Pin 2 | Signal in (0-2500 mV) |
| Pin 3 | Vref. out (2550 mV) |
| Pin 4 | +5V out, max current 100mA |
| Pin 5 | -5V out, limited current (see GE SolidState Intersil Data Catalogue ICL7660 data) |
N.B.: The negatives of the SF12 inputs are common. Therefore to ensure collection of reliable data, all sensors should be electrically isolated from each other, or have a common negative connection.
2 1 o o o 3 o o 4 5
| Pin 1 | TXD |
| Pin 2 | Remote trigger |
| Pin 3 | RXD |
| Pin 4 | 0v |
| Pin 5 | DTR |
LOGGER FIND SAVE
Because of the complexity of the software embodied in the logger design, there are a few effects on the normal operation of the Organiser. Conversely, use of the Organiser in its normal way can in some cases affect the performance of the logger.
The function which reads the analogue-to-digital converter in the logger module is available for use in your own OPL programs, as long as the logger software Datapak is plugged in and 'booted'. This function is named 'CONVERT%' and its use is detailed here.
CONVERT% is called with a parameter STATUS$ which describes the input status of the four channels (i.e. temperature, millivolts etc.,) STATUS$ should be a string of four digits, e.g. "3100" where each digit represents the input status of the corresponding channel:
0: Unused, no conversion
1: Thermocouple, 160°C
2: Thermocouple, 960°C
3: Thermistor
4: Humidity
5: Millivolts
6: Pressure, millibars
7: Binary value (0-1023 bits)
CONVERT% returns a pointer to set of four words (two bytes each) for the converted values for each channel. Note that if the status value is 4 or less (temperature or humidity) the value pointed to will be 10 times the actual value (this avoids using floating point values for temperatures like 45.7°C).
A typical usage might be:
pointer% = convert%:("3050") temp1 = peekw(pointer%)/10.0 mvolts = peekw(pointer% + 4)
which would set the variable 'temp1' to the temperature of the thermistor (status 3) fitted to channel one, and set the variable 'mvolts' to the input voltage (status 5) on channel three. Channels 2 and 4 would not be converted.
A value of $D000 (-12288) in the data block signifies an overrange or unconnected input.
The SF12 module, software, probes and accessories are warranted against faulty workmanship and materials for 12 months from the date of purchase. During the warranty period any defective instrument will be repaired, or replaced at our discretion. This warranty does not cover damage or failure resulting from misuse or accident. Modification, adjustment or any alteration with the internal arrangement of the instrument shall absolve us from any liability in respect of the instrument. Any instrument to be repaired should be forwarded to us carriage paid and at the owner's risk. A brief description of the fault should be included. Please Note: The Psion Organiser II, LZ and LZ64 are covered by Psion Plc manufacturers warranty. Any Organisers to be repaired should be sent to Psion Plc at 17-19 Bristol Road, Greenford, UB6 8UP, U.K.
Digitron Instrumentation Limited.,
Technology House, Mead Lane,
Hertford, Herts, SG13 7AW, UK
Telephone (0992) 587441
International Code: +44 992 Fax: (0992) 500028
An AET Group Company.