EXTECH INSTRUMENTS CORPORATION
150 Bear Hill Road
Waltham, MA 02154
Tel: (617) 890-7440 FAX: (6I7) 890-7864
WARRANTY
EXTECH INSTRUMENTS CORPORATION warrants this instrument to be free of defects in parts and workmanship for a period of ninety (90) days from date of shipment.
If it should become necessary to return the instrument for service during or beyond the warranty period, then contact the Customer Service Department, Extech Instruments Corporation, l50 Bear Hill Road, Waltham, MA 02154. (617) 890-7440. A return Authorization (RA) number must be issued before my product is returned to Extech. The sender is responsible for shipping charges, freight, insurance and proper packaging to prevent damage in transit.
This warranty does not apply to defects resulting from action of the user such as misuse, improper wiring, operation outside of specification, improper maintenance or repair, or unauthorized modification. Extech specifically disclaims any implied warranties of merchantability or fitness for a specific purpose and will not be liable for any direct, indirect, special, incidental or consequential damages. Extech's total liability is limited to the repair or replacement of the product.
The warranty set forth above is inclusive and no other warranty, whether written or oral, is expressed or implied.
Organiser II is a trademark of Psion PLC
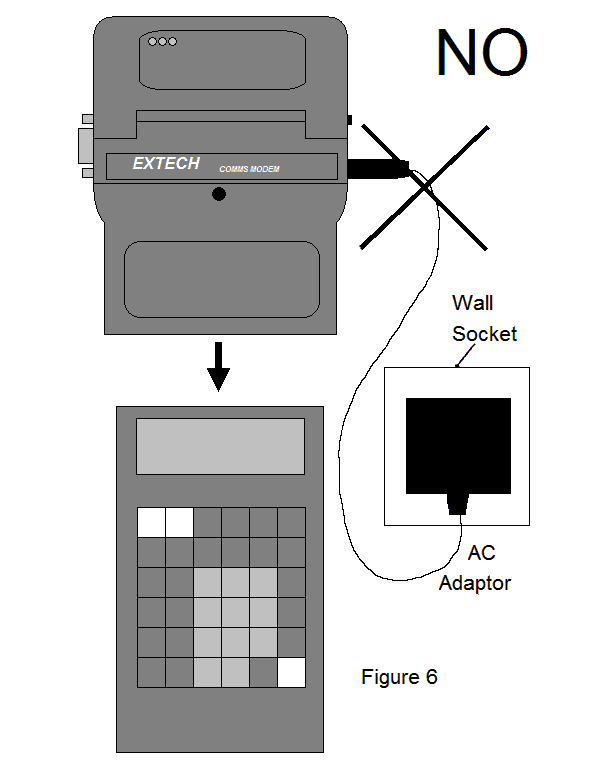
WARNING!
Do not install Comms Modem
With AC adaptor plugged in.
Connect AC adaptor only
after installation.
The Comms Modem is designed for use exclusively with the Psion Organiser II computer. Features include:
This manual is intended to provide the user with information to begin operation of the Comms modem. Since the Comms modem contains a complete Comms Link, we have included in this manual only the basic information required to use the Comms functions. This manual contains information required for both users and programmers which pertains to the modem function.
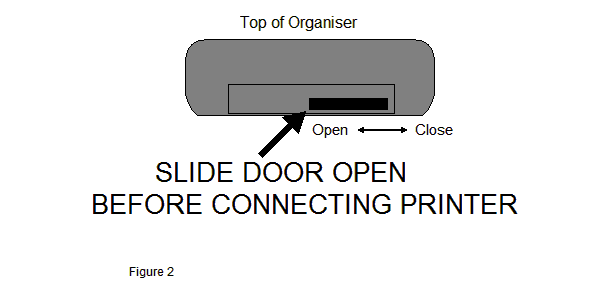
Before attempting to attach the Comms modem to the Organiser, slide open the door at the top of the Organiser. See Figure 2.
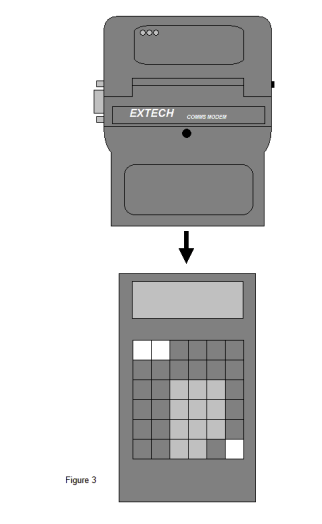
After removing the modem from the packaging, slide it over the top of the Organiser until the Organiser display shows through the widow of the modem. See Figure 3.
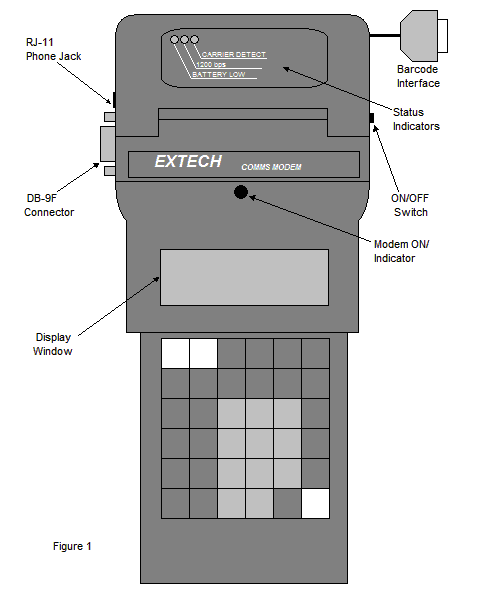
The Comms Modem is powered by its own 9 volt battery. The "BATTERY LOW" light (see Figure 1.) will come ON to indicate that the battery needs replacement.
To change the battery:
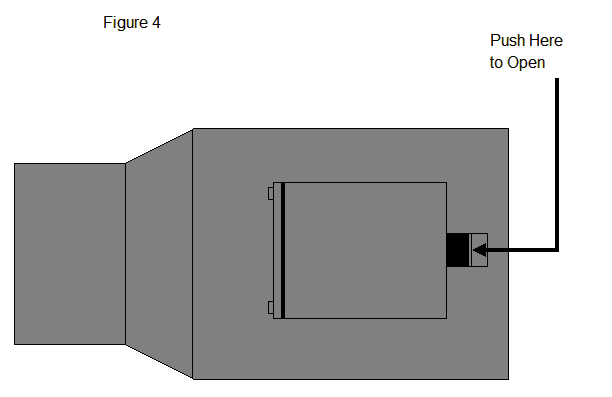
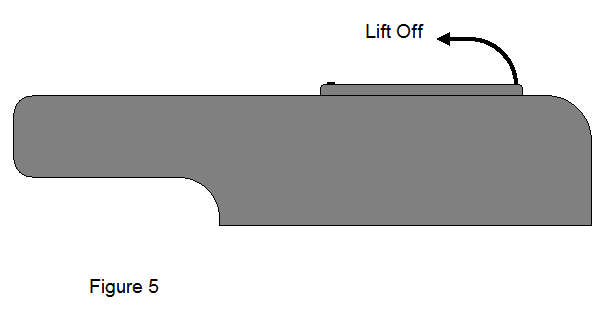
Open the battery door by pushing on the tab towards the door and lifting the door open. See Figures 4 and 5. Replace the battery and close the door until it snaps shut.
This procedure need not be repeated each time the Organiser is turned on, unless a new battery is installed in the Organiser. The setup procedure can be performed with the Comms modem off. However, the Comms Modem must be attached to the Organiser. For a more detailed description of the communications parameters, refer to the Organiser II Comms Link Manual, pages 11-18.
| Desired Parameters in Bold | |
| Press | Display |
|---|---|
| ON (2-3 TIMES) | FIND SAVE DIARY CALC PROG ERASE |
| C (3 TIMES) | TIME INFO ALARM COPY RESET COMMS |
| EXE | TRANSMIT RECEIVE SETUP TERM AUTO |
| S | BAUD → 9600 |
| ← until | BAUD → 1200 |
| ↓ | PARITY → NONE |
| ↓ | BITS → 8 |
| ↓ | STOP → 1 |
| ↓ | HAND → XON |
| ↓ | PROTOCOL → NONE |
| → | PROTOCOL →XMODEM |
| ↓ | ECHO → HOST |
| ↓ | WIDTH → NONE |
| EXE | WIDTH → 16 (Organiser Xp, CM) or 20 |
| MODE | EXIT ABANDON EDIT SAVE LOAD |
| EXE | TRANSMIT RECEIVE SETUP TERM AUTO |
The Organiser can be operated as a remote terminal. When using this mode with the Comms Modem, all characters typed will be sent to the Comms Modem.
Turn the Comms Modem ON. To enter TERMinal mode, press EXE at COMMS from main menu of Organiser. If your screen is still at the TRANSMTT RECEIVE SCREEN, just move cursor to TERM by typing the letter "T" or by using arrow keys, then press EXE. To exit TERM mode, press ON. If you have made a connection to a remote modem and need to exit terminal mode to access other Organiser functions, you may do so. Pressing the ON key will not disconnect the phone line. A complete description of TERMinal mode can be found in the Comms Link Manual, Chapter 5.
Since the Organiser keyboard is limited, some characters have to be generated using the ← and → keys in combination with letters when in TERMinal mode. A list of these characters and how to generate them can be found in the Organiser Comms Link Manual, page 118.
NOTE: It is best to turn the Modem on before entering terminal mode. If you enter terminal mode first, you will see blocks across the Organiser screen. To eliminate the blocks, type AT then press EXE.
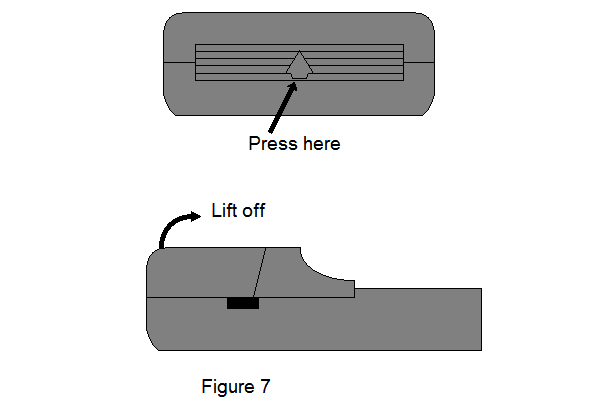
A 2 position DIP switch located inside the Comms Modem selects the mode of operation. To open the case and gain access to the switches. see Figure 7.
| Switch | Position | Function |
|---|---|---|
| 1 | ON | CCITT V21, V22 |
| OFF | Bell 103/212A | |
| 2 | ON | Auto answer disable |
| OFF | Auto answer enable |
Off it Comms Modem battery level is OK, on if low. The Comms modem draws no power from the Organiser 9V battery.
On when Comms modem operates at 1200 baud. Off for 0-300 baud.
On when Comms Modem detects a carrier signal from remote modem.
ON indicates that power is applied to Comms Modem.
NOTE: When Comms Modem is switched OFF, unit may be operated as a Comms Link. ON/OFF switch disconnects power from modem function only. Comms function is powered by Organiser.
Your Comms Modem includes a speaker for monitoring the phone line. Speaker volume is settable by commands from the Organiser. See the "L" and "M" commands, section 4.1.3.
The Comms Modem, when used in the Modem mode, has two modes of operation. In Command mode, the modem accepts command from the Organiser to perform functions such as dialing and setting the speaker. In Data mode the modem transmits and receives data via the phone line.
The Comms Modem will be in or revert to command mode whenever:
when sending commands to modem, be sure that the communication parameters for your Organiser are the same as those of the remote system with which you want to communicate with.
Commands must be centered at 110, 300, or 1200 bps. See Table 4-1 for the valid character formats under each speed
Table 4-1. Valid Character Formats for Commands
| Data Speed | Bits | Stop Bits | Parity |
|---|---|---|---|
| All Speeds | 7 | 2 | None |
| (up to 1200) | 7,8 | 1,2 | Odd, Even, Mark, Space |
| 8 | 1,2 | None |
The modem is set to 1200 bps when it is first turned on or reset. The parameters will change if you change the speed of your organiser by programming the communications port (COM port).
When you issue a command, the AT (or at) prefix (see section 4.1.3) entered at the beginning of the command line informs the modem or your computer's speed, character length, and parity format. The Comms Modem then uses this speed and data format to connect with the remote modem.
A data connection between any two modems can be maintained only when both modems use the same protocol (e.g., Bell 103, Bell2l2A. CCITT V.22). The protocol determines the transmission speed (0-300 or 1200 bps) and the transmission standard (Bell or CCITT).
When the modem answers an incoming call, it determines the speed of the remote modem by analyzing the carrier it receives. Then, after it sends you the CONNECT response, the modem changes automatically to that speed. However, your Organiser's communication parameters must match those of the remote modem.
The A command puts the modem off-hook immediately and waits for a carrier. As a result, it will not execute any command which appears after A.
This command instructs the modem to re-execute the last command line stored in the command buffer. This is the only command that does not need the AT prefix and the return key. A/ command is generally used to redial a telephone number after receiving a busy signal.
Typing an AT prefix command line, rescuing, or turning off the modem clears the command buffer.
The AT or at command informs your modem of the computer's transmission speed, data format, and parity. Any command line, except A/, to be acceptable by the modem, must be preceded by AT.
The B command switches the modem to either Bell or CCITT mode.
Your modem defaults to Bell 103/212A mode (B1). To switch the modem to CCITT v.21, V.22 protocol, just type ATB0.
The default C1 enables the modem to turn the carrier signal on or off automatically. The carrier is on when the modem dials, answers, or is connected to a remote modem; otherwise, the carrier is off.
Command C0 disables carrier transmission. It turns off its carrier signal forever until it receives ATC1 or has been reset (by ATZ). Use C0 when you need to receive without the transmitter carrier.
The ',' command makes the modem pause before it processes the next command. It is mostly used with PBX system to pause for outside dial tone. The duration of pause (default 2 seconds) is determined by register S8. To lengthen the pause time, either type multiple commas or change the value in S8.
Entering the D command causes the modem to dial the number following it and then go into data mode after connected.
Following the D command could be digits 0 though 9 (the telephone number), symbols * and # (for tone dial only, and also dial modifiers such as P, T, R and others. EXAMPLE: to dial the number 5551212 using tone dialing, enter the command ATDT5551212.
Sets default E1, modem echoes command characters to your screen. This echo lets you verify that the command line you sent is error-free and correct.
Use the E0 command when your Organiser is in half-duplex (LOCAL) mode. Otherwise, the characters will appear doubled on your screen.
When you are in data mode, use the following sequence to escape to command mode;
Upon acknowledging three consecutive characters as well as the guard times, the modem sends you an OK response and escapes the command mode. After receiving the OK response, you can type any command in this section. See ATO command.
The modem defaults to full-duplex, F1. If it is connected to a remote modem and no characters are displayed on your screen, switch to half-duplex by the following procedures:
After CONNECT response, the character you now type is echoed back to your screen.
If your computer is set for half-duplex and the characters you type appear doubled on your screen, switch to full-duplex by ATF1.
The H or H0 command is used to disconnect (hang-up) the modem. This command is the modem equivalent of hanging-up the telephone.
If either command H1 or command H2 are used, the modem will open the phone line connection. This is the modem equivalent of taking a telephone "off the hook." The H1 command places both the phone line and the auxiliary modem relay "off-hook." The H2 command only places the line relay "off-hook."
A typical hanging-up sequence would go like this: After completing communication, enter the escape command +++. When the Comms Modem responds with OK, enter ATH followed by the EXE key to terminate connection. The CONNECT LED should go off.
The modem responds to the I0 command by displaying its product code.
Upon receiving the I1 command. the modem returns its firmware version number.
This value is used solely for factory testing.
If it receives the I2 command, the modem will execute its internal memory test.
When the speaker has been turned on, using command M, the L command can be used to adjust the speaker volume. L1 sets the volume to its lowest level. L2 sets the volume to medium. L3 sets the volume to its maximum level. EXAMPLE: To set the speaker to loudest volume and dial 555-1212, use the command ATL3DT5551212
The modem's internal speaker allows you to monitor the progress of a call. The default setting of M1 leaves the speaker on until a connection is established.
To keep the speaker on, even after a connection is established, send the M2 command. This command can assist in troubleshooting transmission difficulties. If, for example, the modem hangs up after displaying the CONNECT response, you could use the M2 command to keep the speaker on to help you determine the problem. If you do not want to use the speaker at all issue the M0 command.
If you are connected to the remote modem and have escaped from data mode to command mode, you can return on-line by entering the ATO command. You may then resume communication with the remote modem. See +++ command.
Command O2 begins the remote digital loopback test. Command O1 terminates the test.
Typing ATDP before the phone numbers ensures that your calls will be pulse dialed.
Type P command anywhere, even between digits, in a dial command line to have the modem pulse dial the following digits. Pulse dialing is fixed at 10 pulses per second. EXAMPLE: Use pulse dialing to call 555-1212; enter the command ATDP5551212
Your modem defaults to Q0, where result codes are displayed so you can keep updated with the modem's operation.
If you do not want result codes displayed. send command Q1. This feature may be useful when the modem is connected to a printer which may print out the result codes.
Attaching the R command at the end of a dial command line tells the modem to make calls by using the answer mode. This feature is a must when you are to call an originate-only system.
Ending a dial command line with a ';' (semicolon) instructs the modem to return to command mode after dialing, rather than go on-line.
Typing ATDT before the phone numbers ensures that your calls will be tone dialed.
Typing T command anywhere, even between digits in a dial command line, tells the modem to tone dial the following digits.
EXAMPLE: Use tone dialing to call 555-1212; Enter the command ATDT5551212
Your modem defaults to V1, where result codes are displayed as words such as OK or CONNECT.
Command ATV0 displays result codes as digits which you may find convenient if the modem is controlled by a software that does not efficiently handle strings.
The W command in your dial command line causes modem to with for 3 seconds of continuous tone before dials the next digit. It responds NO DIALTONE - when it fails to detect the second dial tone, or BUSY when it detects a busy tone. The W command is used where you must first dial an access code (such as 9) to access an outside line. EXAMPLE: To dial 5551212 from a phone system which requires an access code 9, use the Command: ATDT9W5551212
The default of X1 selects the extended response set. While X0 tells the modem to us the basic response set. Use the X0 if the CONNECT response is enough for all data connections, regardless of speed. If the command ATX1 is issued, expanded command set will operate. This will produce a connect response of "CONNECT 1200" for 1200 bps connections.
The X2 command uses extended response set with the detection or dial tone while you are dialing.
The X3 command uses extended response set with the detection of busy tone when the modem is waiting for carrier.
The X4 command uses extended response set with the detection of dial tone and busy tone.
In its default the long space disconnect feature is enabled by Y1, modem disconnects if it receives 1.6 seconds of a break signal from the remote modem. Furthermore, the modem sends 4 seconds of break signal before it disconnects.
The Y0 command disables the long space feature.
Sending the reset Z command causes modem to:
The / command causes your modem to pause for 1/8 second.
The @ command in your dial command line causes modem to wait for one or more rings followed by 5 seconds of continuous silence before dials the next digit. It responds NO ANSWER when fails to detect the continuous silence, or BUSY when detects a busy tone.
The ! command causes the modem to on-hook for l/2 second then off-hook for another l/2 second. This command is often used when transferring calls. The ! character is generated by using the ↓ key with F.
After issuing the CONNECT response, the modem switches from command mode to data mode. When it is in data mode, the modem assumes everything it receives from your computer is data to be transmitted. Therefore, if you type modem commands while in data mode, the modem will not respond to the commands, but will transmit them as though they were data.
The modem lets you use a standard +++ escape sequence to switch from data mode to command mode without losing the connection with a remote modem. This is convenient when you want to leave data mode temporarily to check or change a register setting and then return to data mode.
Normally, a modem breaks the data connection when it enters command mode. However. by following the steps below you can enter command mode while maintaining the data connection:
The modem then responds with an OK and enters command mode while maintaining the data connection (provided that the remote modem doesn't fail, disconnect, or drop the carrier).
To resume transmitting data, type ATO and press the return key. Alternatively, you can terminate the call by typing ATH and pressing the EXE key.
It is possible to access the other functions of the Organiser (such as calculator) while the Comms Modem is "on-line." For example, suppose you are communicating to a remote station and need to perform some calculations and do not wish to break connection. Simply press the ON key. The Organiser will exit terminal mode but the CONNECT LED on the Comms Modem will remain on. Upon completion, enter COMMS menu and TERMinal mode again and you can pick up where you left off.
Once connection to the remote modem is made, you can exit TERMinal mode to transmit or receive files or procedures (OPL programs). Before making connection, the Organiser communications setup menu should have PROTOCOL →XMODEM. Press the ON key from terminal mode to exit, connection will be maintained. Follow the procedures in sections 5.4.1 and 5.4.2 for transmitting or receiving files. More detail on transferring files using XMODEM, refer to the Comms Link Manual, page 60.
In addition to being a modem, the Comms Modem also has full RS-232 communications capabilities identical to the Psion Comms Link. To switch from modem to Comms mode, simply turn the Comms Modem OFF. The Comms Modem now activates the RS-232 (DB-9F) connector.
The Comms modem is equipped with a built-in DB—9 female connector for interfacing to other RS—232 devices. Pin Configuration is as follows:
| Signal | Pin | |
|---|---|---|
| RxD | Receive data (to Comms model) | 2 |
| CTS | Clear to Send (to Comms model) | 8 |
| TxD | Transmitted Data (From Comms model) | 3 |
| RTS | Ready To Send (from Comms model) | 7 |
| COM | Signal Common | 5 |
The Comms Cable is available for connecting the Comms modem to any serial port such as a PC using a 25 pin male connector. The cable's 25 pin female connector will make a direct connection. See Appendix A for wiring diagrams for connecting to other devices.
In order for any two serial devices to properly communicate, the communications parameters of both devices must match. The following is an example of how to set your Organiser to the following parameters: Desired Parameters in Bold
| BAUD: | 9600 |
| PARITY: | EVEN |
| DATA BITS: | 7 |
| STOP BITS: | 1 |
| HANDSHAKE: | XON |
| ECHO: | LOCAL (half duplex) |
| Press | Display |
|---|---|
| ON (2-3 TIMES) | FIND SAVE DIARY CALC FROG ERASE |
| C (3 TIMES) | TIME INFO ALARM COPY RESET COMMS |
| EXE | TRANSMIT RECEIVE SETUP TERM AUTO |
| S | BAUD → 9600 |
| ↓ | PARITY → NONE |
| → until | PARITY → EVEN |
| ↓ | BITS → 8 |
| ← or → | BITS → 7 |
| ↓ | STOP → 1 |
| ↓ | HAND → XON |
| ↓ (2 times) | ECHO → HOST |
| ← or → | ECHO → LOCAL |
| MODE | EXIT ABANDON EDIT SAVE LOAD |
| EXE | TRANSMIT RECEIVE SETUP TERM AUTO |
ASCII files can be transferred to and from the Organiser via the Comms function. In order to transfer files to or from a PC, you will need a PC serial communications program. Such programs are readily available. For more detail on transferring files, refer to the Comms Link Manual, p. 33
1. Set all communications parameters for both PC and Organiser to the same values. Be sure to set HAND to XON. For more detail, see Comms Link Manual, p. 11.
2. Set up your Organiser to receive a file by the following procedure:
| Press | Display |
|---|---|
| ON (3 TIMES) | FIND SAVE DIARY CALC PROG ERASE |
| C (3 TIMES) | Cursor on COMMS |
| EXE | TRANSMIT RECEIVE |
| → | TRANSMIT RECEIVE (cursor on "R") |
| EXE | FILE PROCEDURE |
| DEL | RECV B: |
| FILENAME | RECV B:FILENAME (enter name of file) |
| EXE | RECV B:FILENAME FROM:FILENAME (change if filename to be transferred is not correct) |
| EXE | Receiving... |
3. Set your computer to transmit the file. When file transfer is complete, Organiser screen will return to:
TRANSMIT RECEIVE press ON to exit COMMS mode.
| Press | Display |
|---|---|
| ON (3 TIMES) | FIND SAVE DIARY CALC PROG ERASE |
| C (3 TIMES) | Cursor on COMMS |
| EXE | TRANSMIT RECEIVE (Cursor on "T") |
| EXE | FILE PROCEDURE |
| EXE | SEND A:MAIN (use MODE to change to B, C) |
| → | until cursor is one block to right of MAIN_ |
| DEL | SEND B: |
| FILENAME | SEND B:FILENAME (enter name of file) |
| EXE | SEND B:FILENAME |
| EXE | Sending... |
For more detail, consult the Organiser Comms Link Manual, page 38.
Communications parameters can be set by using OPL, the Organiser Programming Language. To set the parameters as shown above, use the following command in your program: LSET:(1200,0,8,1,1,1,16,CHR$(13)+CHR$(10),CHR$(26),"", CHR$(13}+CHR$(10),CHR$(26),"",20,1) Note: change the "16" to "20" if you have an Organiser LZ or LZ-64 and your Comms Modem supports the 4 x 20 character screen.
When using OPL to access the Comms Modem, it is possible for an error message such as "DEVICE LOAD ERROR" to occur. The error usually occurs only when running OPL programs more than once without pressing the ON/CLEAR button in between runnings of the program. A Program called REBOOT will initialize the Comms Modem each time your program is run. We suggest entering this program onto a datapack for permanent storage.
REBOOT should be entered immediately prior to the first LSET, LPRINT or LINPUT command in your OPL Program. For example
TEST: PRINT "PHONE HOME" REBOOT: LSET:(1200,0,8,1,1) LPRINT "ATDT5551212"
reboot: rem boots any devices into memory LOCAL I%,Code$(4) I%=ADDR(Code$)+1 :Rem Skip the size byte of the string POKEB I%,$3F :Rem The SWI instruction POKEE I%+1,23 :Rem The DV$BOOT vector number POKEB I%+2,$39 :Rem a return instruction USR(I%,0) :Rem Call the machine code
Comms Printers built with barcode option will not have the COMMS section on the Organiser main menu. In order to transfer data files using the Comms Port, it is necessary to write a program which accesses the XTSEND or XTRECV commands.
Run the CL program by typing "CL" from DOS. When you do this, the system will assume 9600 baud and comm port 1. If you are using a different baud rate and comm port, you can enter: CL 2400, 2 This will set up your PC for 2400 baud and comm port 2.
You will mod to write an OPL program to transfcr data files. For example. suppose you have a file called SALES located on a datapack in the upper side slot of the Organiser and you want to sent it to your PC. The program we will use will be called PCSEND. The format for XTSEND and XTRECV is:
XTSEND: (remoteS. local$, type%) XTRECV: (remote$, loca1$, type%)
XTSEND sends the Organiser file with the file name "local$" and of the type "type%" to the PC, giving it the pathname "remote$". Type% can have the value from 0 to 5 which refer to me following:
| type% | type of file | PC filename extension |
|---|---|---|
| 0 | data file | .ODB |
| 1 | procedure file (source only) | .OPL |
| 2 | diary file | .OB2 |
| 3 | procedure file | .0B3 |
| 4 | Comms link setup file | .0B4 |
| 5 | spreadsheet file | .0B5 |
NOTE: Comms link setup files cannot be generated on printers or modems with barcode interface option.
EXAMPLE: send an Organiser file called "SALES" located in a datapack in the top side slot to a PC and store it on floppy disk drive A.
Note: The PC file path name remote$ may either give the full pathname of the file or just the file name, in which case the current directory (when CL was run) will be used. Any "/" character in remote$ is translated to a "\" character by CL, allowing pathnames to be easily specified. If the file name does not contain an extension, an extension is generated from the type% parameter given in the above chart. EXAMPLE: send a file called "sales" located in Organiser slot B (upper side slot) to the PC under a file called "sales1" in directory C:\COMMS\SALES. Use the command:
XTSEND:(C:/COMMS/SALES/SALES1,B:SALES,0)
The following program is an example of a program using XTSEND.
PCSEND: REM SENDS A FILE CALLED "SALES" TO PC AND STORES AS "A:SALES1" REBOOT: REM SET COMMS PARAMETERS FOR 9600 WITH PSION PROTOCOL LSET:(9600,0,8,1,0,1,0,CHR$(13)+CHR$(10),CHR$(26),"" ,CHR$(13)+CHR$(10),CHR$(26),"",20,2) XTSEND:(A:SALES1,B:SALES,0) :REM SEND DATA FILE TO PC LSET:(1200,0,8,1,1,0,16,-1,-1,-1,—1,-1,-1,20,0) REM RESET COMMS PARAMETERS
The Bar Code Interface makes your Organiser II and Comms Printer or Comms Modem into a powerful and versatile data capture unit. It will read a wide variety of Bar Code types, quickly and efficiently. These codes may then be stored, either in the internal memory of the Organiser or one Datapak fitted to one of the two slots at the back of the Organiser.
The Bar Code Interface consists of a DB-9 male connector. The connector has a latching shell to prevent the Bar Code Wand from being accidentally removed. The Wiring for the D89 is as follows:
| Pin No | Signal |
|---|---|
| 2 | Barcode signal |
| 7 | Common |
| 9 | +5 VDC |
Connect the Bar Code Wand to the DB-9 MALE connector (Figure 1). Turn on the Organiser by pressing the ON/CLEAR button twice. It is not necessary to turn the Comms Printer on for Bar Code operation. The Comms/Printer Switch can be in either position. The software which operates the Bar Code Interface Module is resident in the Comms Printer. This software occupies around 4K of memory, so if the internal memory of the machine is already nearly full, the OUT OF MEMORY message may be displayed. If this happens, delete any non-vital files or records or use the TIDY option in the DIARY to clear some memory space.
When the Comms Printer with Bar Code has been installed to the Organiser and the ON/CLEAR key pressed, a new function will be automatically added to OPL. This new function is BAR$, and may be used like any other function within your own programs. The syntax for the function is as shown in the following example:
b$=BARS:(type%,mode%,options$)
The value of type% will determine which of these types, or which combination of types, will be recognized by the software. Just one type may he read, or any combination of types, so that certain types can be excluded if different product categories, say, have different types of bar code.
If, with the type% parameter, you specify more than one type of code, the software will automatically recognize the type and then decode it accordingly. If the bar code encountered is not one of the types you have allowed then the code will be ignored and no successful read will take place. To find out which value to give to the TYPE parameter. simply add together the values in the table below which correspond to the bar code types wish to allow.
| VALUE | ID CHAR | BAR CODE TYPE |
|---|---|---|
| 1 | A | EAN |
| 2 | B | UPC |
| 4 | C | CODE39 |
| 8 | D | ITF |
| 16 | E | CODABAR |
| 32 | F | TELEPEN |
| 64 | G | MODIFIED PLESSEY |
| 128 | H | PLESSEY |
| 256 | I | CODE128 |
The type of code read will be included as the first character of the string which is returned from the function. This may be read using OPL's LEFTS function and then removed leaving the returned string containing the contents of the bar code itself.
For example, if you wish to allow EAN and ITF bar code types to be read, the value for the TYPE parameter should be 9, produced by adding 1 (for EAN) and 8 (for ITF). It is advisable to limit the set of valid bar code types to those needed for your application to maximize reading security. If you use an illegal value (such as 0) for the TYPE parameter, a DEVICE CALL ERROR will be displayed.
The second parameter required by the BARS: function is mode%. The possible values of this integer parameter are shown in the table below:
| VALUE | MODE |
|---|---|
| 0 | Waits until a successful read is made |
| -1 | Waits for a good read or a key press |
| >0 | Waits for a good read or for mode% twentieths of a second |
| <-1 | Waits for a good read or a key press or for mode% twentieths of a second |
Where a time is specified or a key press allowed, if the specified time elapses or any key is pressed before a good read is made then a null string is returned, Note that if a key is pressed, the ASCII code for that key will be retained in the keyboard buffer. A subsequent use of the GET function will return that ASCII value.
The third parameter to the BAR$: function, the OPTIONS parameter, may be used to specify any or all of the options in the table below.
| VALUE | OPTION |
|---|---|
| 1 | Use Low current mode |
| 2 | Return TLEPEN codes in numeric format, not ASCII (checksum excluded ) |
| 4 | Use two checksum digits for MODIFIED PLESSEY, not one. |
| 8 | Use one checksum digit for CODE39 (modulo 43), not zero. |
| 16 | Use full-ASCII CODE39, not 43-character CODE39 |
To specify more than one option, simply add together the values in the table to produce the value for the OPTIONS parameter. If you do not wish to use any of these options, you can omit the OPTIONS parameter completely.
The Low current mode can considerably increase battery life, although it may occasionally reduce the first read rate. For example, with one Datapack installed. the consumption while using the Bar Code Interface may be reduced to as little a one sixth of the normal current consumption. This reduction is achieved by switching packs on and off at various times. This can cause problems if other hardware is connected to the Organiser. Future Psion hardware may disable this low current mode, but it is perfectly safe to use if you only attach Datapacks or Rampacks (or nothing at all) to your Organiser at the same time as the Bar Code Interface.
When a successful read is made, the first character of the string returned by BARS: will be an ID character. The table in the section on the TYPE parameter lists the ID character returned for the different types of bar code. If your TYPE parameter allowed more than one type of bar code to be read the ID character tells you which type was in fact encountered.
A successful read of, for example, an EAN type bar code might return a string like "A5012672905007". The first character, "A", signifies that the bar code encountered was an EAN type, and the last character is the EAN checksum digit. The rest of the digits make up the code itself. To split up the returned string, use the OPL string-slicing functions LEFT$, RIGHTS, and MID$. Note that some types of bar code return non-printable ASCII characters, so displaying them directly on the screen may have unpredictable results.
Start and stop characters are only returned for CODABAR and CODE128 types. For CODABAR a capital letter A, B, C, or D will be returned as the start character. This will be the second character in the string. immediately after the ID character. The stop character T, N, * or E will be returned as the last character in the string. For example. "EA1234T" is a valid CODABAR bar code. For CODE128 the start character will either be lowercase g, h or i; no stop character will be returned.
Any checksum digits will always be at the end of the returned string. PLESSEY has 2 checksum digits while MODIFIED PLESSEY has either 1 or 2, depending on the value of the OPTIONS parameter. Note that the TELEPEN checksum digit remains in ASCII even if you use the OPTIONS parameter to specify numeric TELEPEN mode.
The four function codes in CODE128 are returned as characters with ASCII values 128, 129. 130 and 131, for functions 1 to 4 respectively.
This version of the Bar Code Reader Interface software has a direction flag at address $E0. After a successful read, this byte will contain 0 if the bar code was read forwards, or a non-zero value otherwise. Also, there is a flag at location $21A8 which is set if UPCE code is successfully read. This flag is cleared if the code was a UPC A code. Use the OPL function PEEKB to look at the contents of these locations. These bytes should only be read after a call to the BARS: function, and before any calls to other OPL language extensions.
Even if more than one type is specified, an increased delay will only be noticed when CHANGING to another type, since the last successful decoding algorithm is always kept in RAM. This is not true in versions below 3.0.
ERROR MESSAGES RETURNED
| ERROR | MESSAGE |
|---|---|
| 194 | BAD DEVICE CALL |
| 205 | ARG COUNT ERR |
| 224 | TYPE MISMATCH |
| 230 | DEVICE MISSING |
| 231 | BAD DEVICE CALL |
The first of these two programs will only read l3 digit (not 8 digit) EAN bar codes and will wait until a successful read is made. To exit from the program, press the [ON/CLEAR] key.
DEMO1: LOCAL A$(65) ESCAPE OFF PRINT " READY" DO A$=MID$(BARS:(1,-1),2,255) :REM EAN ONLY IF LEN(A$)=13 :REM CHECK EAN-13 BEEP 200,80 CLS :PRINT A$ ENDIF UNTIL KEY=1
This program will read any of the bar code formats supported by the Bar Code Interface software and will end if a successful read is not made before 30 seconds has elapsed.
DEMO2: LOCAL B$(65),T$(1),R$(10),K% ESCAPE OFF R$=" READY" PRINT R$ DO B$=BAR$:(15,-600) :REM READ ALL TYPES, EXIT AFTER 30 SECS OR KEY IF B$="" :REM MUST BE TIMEOUT OR KEY K%=KEY IF K%=0 :CLS :PRINT "TIMEOUT EXPIRED PRESSANYKEY" :GET :CLS :PRINT R$ ENDIF ELSE CLS T$=LEFT$(B$,1) :REM GET TYPE DECODED IF T$="A" :PRINT "EAN" ELSEIF T$="B" :PRINT "UPC" ELSEIF T$="C" :PRINT "CODE39" ELSEIF T$="D" :PRINT "ITF" ENDIF PRINT MID$(B$,2,255) BEEP 200,80 ENDIF UNTIL K%=1
To read a Bar code, position the reader so that it can be drawn across, or can read across in the case of beam scanners, the full length of the code (across all of the bars) in one movement.
A wand may typically be used at a variety of angles, refer to the wand product manual for the exact limits of this range. The wand may be used at any speed from 3 to 30 inches a second, but a speed somewhere near the middle of the range will be most successful. Depending upon whether or not the OPL program in the Organiser has been set to do so, the Organiser will emit a BEEP to signify success when a successful read has been made.
Most wands and laser scanners use a red light, so you may have difficulty reading codes printed in red or on a red background.
After using the Bar Code Interface, switch off the machine and un-plug the cable. The software will still be stored in memory however, so this must be removed by switching the machine back on and pressing the [ON/CLEAR] again. The bar$: function will then be removed from the language, and the 3K of memory freed again for other uses. If the cable is unplugged during use, a DEVICE MISSING error will be reported.