- Home /
- Psion II /
- FileMaster IV Manual
FileMaster IV Manual
The 1988 FileMaster manual is also available from this site.
That manual has a completely different text, and is relevant only to the older version
of FileMaster for 2-line machines. The manual below is for FileMaster IV, which works
on both 2-line and 4-line machines.
Below is a page of amendments and additions, followed by the manual itself.
FileMaster IV
Amendments and additions
Printing Prompts p30
Prompts are only printed when the format is set to Label or
Column Format. This is in flat contradiction to the last paragraph
of page 30 but then, no manual is perfect.
Autoloading a file p47
The autoload feature will only work if the device letter (A, B, or
C) is in capitals. If you type in the procedure as
DISPLAY:("c:main")
it will return the message "BAD DEVICE NAME".
Datestamp p42
Many people have commented that this very powerful feature of
FileMaster is only mentioned in passing on this one page of the
manual.
If you create prompts for a file and end one of the names of the
fields with the asterisk character (for instance if you call one field
DATE* ) that field will always be set to the system date when
you create a new record.
The ability to set upper and lower numeric limits on the numbers
input is also described on pages 42 and 43, and is consequently
missed by many people.
March 1991
FILEMASTER IV
Data management for the Psion Organiser II
© 1988, 1989 Widget Software Ltd
All rights reserved.
This manual and the programs referred to herein are copyrighted works of Widget
Software Ltd, Knebworth, Herts, UK. Copyright registered with the US Copyright
Office at the Library of Congress.
Limitation of liability
If, within 12 months of purchase this software can be shown to the reasonable
satisfaction of Widget Software Ltd to be faulty and not the function substantially as
described in the user manual, Widget Software Ltd will refund the purchase price or
replace the product.
Apart from this warranty, Widget Software Ltd will not in any event be liable for loss,
including consequential loss, caused by any error, defect or failure of the software, or
howsoever otherwise arising, including but not limited to loss of use, loss of stored
data, loss of profit or loss of contracts.
Acknowledgements
Cartoons by John Redmond, Leicester, UK
Printed by Horace Weaver, St. Anne's, Lancs, UK.
Paralink is a trademark of Widget Software Ltd.
Psion Organiser II, Datapak and Rampak are trademarks of Psion plc.
IBM is a trademark of International Business Machines, Inc.
Crosstalk is a trademark of Digital Communications Associates.
Mirror is a trademark of SoftKlone Distributing Corporation.
CONTENTS
1. Introduction
2. What is a file ?
3. Starting with FileMaster IV
4. Getting around the file list
5. The File menu
6. Selection
7. Using Print
8. Opening a file
9. The record menu
10. Other ways into FileMaster
11. DPRINT
12. Copying FileMaster, Using memory
INDEX
Introduction
FileMaster IV is the latest version of the popular FileMaster
package for the Psion Organiser II.
The new version works on both the four line screen of the
Psion Organiser Model LZ or LZ64 and the two line screen of
earlier models. The program will automatically detect whether
you are using a two line or four line model and adjust its
screen display accordingly.
FileMaster IV also includes several very powerful
improvements over previous versions including
2. What is a file ?
Every trade has its own jargon, and computer programming is
famous (or infamous) for it. In general, FileMaster attempts to
protect the user from computer terminology. However,
learning the exact meaning that programmers give to the
words field, record and file, will help you a great deal in
reading this manual, and that of any other database program
you use.
D. W. Smith
202 3456
24 Rosslyn Hill
Hampstead
an example record
| Suppose that you have saved
this name and address,
illustrated on an LZ screen.
On an XP, only two lines of the
address would be shown.
|
Each line is called a field. The first field is the name D. W.
Smith. The second field is the telephone number 202 3456.
The illustration shows the first four fields. There may be other
fields which are not displayed on the screen.
The whole address is called a record. A record does not
have to be an address - it could just as easily be one of the
items on a price list or a parts list. On the Organiser you can
have up to 16 fields in each record.
Records are grouped into files. An address list is a file of
address records. A price list is a file of records each of which
store details about certain items for sale. You can keep
adding records to a file until the pack on which the file is
kept is full. There is no limit on the number of records you
can have, other than the size of Datapak or Rampak you
have.
2.1. File Names
Every file which is created must have a name. That name
must start with a letter and can have up to eight characters.
For example, DATABASE, FILE2, and MYFILE are all
examples of valid file names. A file name may include a
number, as in FILE2, but is cannot begin with one.
On the Organiser, files can be stored either on the A: drive
(which is part of the RAM inside the Organiser) or in the B:
or C: drives in the side of the machine.
When FileMaster needs to know what file you are going to
use, you must tell it which drive the file is on as well as the
file name.
For example, if you have a file called DATABASE on a
Datapak which is in drive B:, FileMaster will refer to it as
B:DATABASE. If you take the Datapak out of B: and put it in
C:, the file will become C:DATABASE.
2.2. The MAIN file
Each Datapak or Rampak comes with one file already set up.
This file is called MAIN. You have probably been using the
MAIN file already without realising it.
When you use the FIND and SAVE options on the
Organiser's top level menu, you are finding and saving
records in the MAIN file on each pack.
For instance, if you FIND WIDGET on A:, the Organiser will
look for all the records containing the word WIDGET in the
file A:MAIN.
The top level FIND and SAVE will not look in any other file
on A:. Suppose you use FileMaster to open a new file called
A:STOCK and you save a number of stock records in it. If
you then leave FileMaster, go to the top level menu and use
the FIND command, you will not find anything in your stock
file. This does not mean that the items in the stock file have
been lost - it just means that the top level FIND command is
not looking in the right place.
Summary
up to 16 fields in each records
as many records as you like in each file
FileMaster allow you to keep up to 110 files on each Datapak
3. Starting with FileMaster IV
To start FileMaster for the first time
- press [ON/CLEAR], repeatedly if necessary, until the top
level menu (FIND, SAVE etc) appears on the screen
- place the blue FileMaster pack in one of the slots in the
side of your Organiser
- press [ON/CLEAR] once more. The word VU should
appear in the list of options on the top level menu, usually
in first place. This will only work when the original blue
FileMaster pack is in the machine.
- move the cursor until it is on top of the word VU and press
[EXE].
When you start FileMaster for the first time the screen should
look like this: -
|
A:MAIN 5
MODE SPACE EXE
|
VU 2:30p
File A:MAIN 5
MODE SPACE EXE
|
| 2 line screen | 4 line screen |
This screen is the start of the file list.
FileMaster always starts by showing you the list of files on
your Organiser. This lets you decide which file you are going
to work on.
When you start FileMaster for the first time, A:MAIN will be
the first file name displayed. All Organisers should have a file
called A:MAIN. The figure 5 signifies that, in this example,
there are five records saved in this file.
When you start FileMaster again, it will start by displaying the
name of the file you looked at most recently.
3.1. How to enter data
This section is written for impatient people who like to get on
and try using a program before reading all the details. It
shows you how to start a new file and enter a record. More
methodical people, might like to read the next couple of
chapters before coming back to this section.
One of the first things that many people want to do with
FileMaster is to create a new file and enter some data in that
file.
Run VU, as described above, and when the file list appears
on the screen
- Press [N]. This is a short cut to pressing the [MODE] key
and then choosing Newfile.
- Enter the name of the new file. If you want to change the
drive letter, press [MODE]. Press [EXE] when you have
finished.
If FileMaster accepts your name, you go straight into the
new file. As you have just created the file, it is empty. The
screen should show the message ****EMPTY FILE****.
- Suppose you want to store a parts list. You want to store a
part number on the first line, the selling price on the
second line and the buying price on the third.

A new file will be empty
Press [P] for Prompt. (again this is a short cut for pressing
the [MODE] key then choosing the Prompt option on the
record menu).
You should be on the first line of a list of line numbers.
These numbers are the default prompts.
- To change the default prompts to PART, SELL AT and
BUY AT -
Press [ON/CLEAR] to remove the repeated number 1 on
line 1 and type in PART instead. Press the [↓] key to
move to line 2.
Press [ON/CLEAR] to remove the repeated number 2 and
type in SELL AT. Press [↓] to move to line 3.
Press [ON/CLEAR] to delete the repeated number 3, and
type in BUY AT.
Press [EXE] and the program will set the new prompts and
return to the ***EMPTY FILE*** message.
|
PART:
SELL AT:
|
PART:
SELL AT:
BUY AT:
4:
|
| 2 line screen | 4 line screen |
- Next press [S] to save a new record. The screen should
look like one of the diagrams above.
Type in a part number on the first line. Press the [↓] key
to move onto the second line and then enter a selling
price.
Press [↓] again to move onto the third line and enter a
buying price, then press [EXE] to save the record.
Until you press [EXE] you can go back and change
anything you have entered.
When you have saved the record, FileMaster will return to
the input screen, in case you want to save another record
If you do not want to save another record, press
[ON/CLEAR] once.
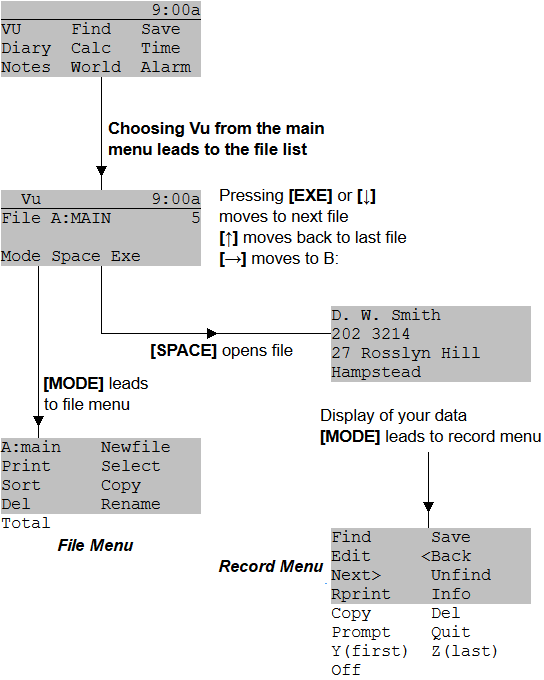
4. Getting around the file list
[MODE] [SPACE] and [EXE] are three of most important
keys which you can press to lead to different functions. The
effect of these keystrokes are shown on the map of
FileMaster IV on page 12.
- Pressing [MODE] leaves the file list and displays the file
menu, which is discussed in detail in chapter 5.
- Pressing [SPACE] opens the file shown. In the example
screen on page 5, the file shown is A:MAIN. When the file
is opened, the first record will immediately be displayed on
the screen. If there are no records in the file, the message
***Empty file*** will be displayed.
- Pressing [EXE] moves on to display the name of the next
file.
You can also use the arrow keys to move up and down
through the file list. The [↓] key moves on to the next file,
the [↑| key moves back to the last file. [→] moves on to the
first file in the next pack and [←] moves back to the first file
in the last pack.
Before you start opening or using files, try moving up and
down through the file list just to get used to it.
4.1. The File and Record menus
FileMaster does too many things for all its commands to be
listed on one menu. The different commands, are split into
two menus - the File menu and the Record menu.
To reach the File menu -
- if the file list is on the screen, pressing the [MODE] key
will bring you to the File menu. Alternatively, pressing the
initial letter of one of the options on the File menu will take
you straight there. For example, pressing [P] will take you
straight to the Print command.
- if the screen is showing actual data or you are in the
record menu, you can get to the file menu by pressing
[ON/CLEAR].
To get to the Record menu, you must have opened a file.
You open a file by pressing [SPACE] when the its name
appears on the screen in the file list.
When you have opened a file and the screen shows the
contents of a record, pressing [MODE] takes you to the
Record menu. As with the File menu, you can go directly to
one of its options by pressing the initial letter of the option.
The file list, the File menu and the Record menu are all
shown on the FileMaster structure map.
Forgotten your filename ?
If you have forgotten which file contains the information you
want, use the special SEARCH program, described in chapter
10.2.
FileMaster IV
5. The File menu
The options on the file menu are: Opening the current file,
Newfile, Print, Select, Sort, Copy, Delete, Rename and
Total. They are all operations which are performed on a
whole file.
5.1. To open the current file.
The first item on the menu is the name of the current file.
If you press [EXE] when the cursor is on top of the name
of the current file you will open the file. You are then in the
record display part of FileMaster.
Choosing the first option on the file menu is equivalent to
pressing [SPACE] when the name at file is displayed on
the file list.
5.2. Newfile
allows you to open a file other than the current file or to
create and open a file which does not exist.
When you choose Newfile, FileMaster asks for the name
of the file you want to use. Pressing [MODE] will change
the drive letter for the file from A: to B: to C:. The rest of
the name must be entered from the keyboard.
If there is no file with the new file name you have given,
FileMaster will assume you want to open a file of that
name. When you start a new file, it will be empty.
If the filename you have given does exist, the existing file
will be opened. You are then in the record display part of
FileMaster.
For example, suppose the current file is A:MAIN and you
want to get into a file called C:XXX without going through
the whole list of files one by one. Choosing Newfile, then
entering C:XXX as the name will go directly into the record
display part of FileMaster in file C:XXX.
5.3. Print
allows selected records to be printed in a range of formats.
When you first select the Print option, the word PRINT:
appears on the screen. If you want to print all the records
in the current file, just press [EXE]. If you want to specify
which records to print, refer to the next chapter which
describes how you can tell FileMaster the selection criteria
you want.
5.4. SORT
sorts the current file into alphabetical or numeric order. You
can sort on a primary and a secondary field within your
file.
First choose which field you want to be the primary key.
For example, suppose your file contains a list of names
with the surname on the first field and the Christian (or
given) name on the second field. To sort in alphabetical
order by surname, choose field 1 as the primary key by
moving the cursor on top of the field number 1 and then
pressing [EXE]. Then choose ascending order.
Now suppose there are seven people called SMITH on
your list. You want SMITH, ADAM to be sorted before
SMITH, JOHN. Choose field 2, the Christian (or given)
name, as the secondary sort field, again in ascending
order.

Sort leaves records in alphabetical or numerical order
When FileMaster finds two primary fields are equal, as
happens when two people both have the surname SMITH,
FileMaster will then look at the secondary field, where it
will sort SMITH, ADAM before SMITH, JOHN.
In sorting, no distinction is made in FileMaster between
upper and lower case. Numbers are sorted before letters -
i.e. 1st Class Motors will be sorted before A1 Motors.
Punctuation marks and spaces are considered to come
before both numbers and letters, so that #1 Motors will be
sorted before 1st Class Motors.
5.5. Select
allows selected records to be copied to another file. The
next chapter tells you how you can specify which records
are selected.
Once you have said which records are to be selected, you
must then say which file they are to be copied to.
COPY or TRANSFER -
asks if the records should only be copied (leaving the
original copies in the current file)
or whether they should be transferred, in which case all the
records will be moved from the current file to the new file.
If you choose TRANSFER, the records in the current file
will be deleted after they have been copied to the new file.
5.6. Copy
copies all of the current file to another file. You will need to
enter the name of the file you want to copy the records to.
COPY or TRANSFER
As with Select, COPY leaves the original records in place,
whereas TRANSFER copies the originals across then
deletes them from the current file.
5.7. Del
deletes the current file. You are given a chance to change
your mind. If you delete a MAIN file, all the records in the
file will be erased, but the file itself will immediately be re-
created with no records inside.
You can also delete a file directly from the file list by
pressing the [DEL] key.
Warning: this command deletes all the records in a file. If
you only want to remove one record, use the Delete
command on the record menu instead.
5.8. Rename
renames the current file. Note that you cannot rename a
MAIN file.
5.9. Total
will add up all the figures on one field of the current file. If
you have not set any field names the next screen will be a
menu with the following options:-
TOTAL_1: 2: 3:
4: 5: 6: 7: 8:
TOTAL menu on 2 line screen
|
If you choose the TOTAL_1:,
FileMaster will work of the
total all the numbers in field 1
of every record in the file. If
you choose 2:, FileMaster will
work out the total of every
number in field 2.
|
Example
Suppose you had only two records in a file :-
| Record 1 | Record 2 |
| Field1: | 1 inch nails | 2 inch nails |
| Field2: | 22 | 30 |
If you use the Total option on field 2, the answer given will
be 52.
Total will ignore all characters after the first character
which is not part of a number.
If you totalled field one in this example, the answer would
be 3, as FileMaster would ignore the part of the record
containing the text ' inch nails'.
6. Selection
When you use Select or Print from the file menu, or Find
from the record menu or the separate Search command, you
can specify the range of records you want to see very
accurately, using a range of logical commands.
This chapter illustrates how the you tell FileMaster to select
records with the Select command. Print, Find and Search
specify which records to choose in exactly the same way.
6.1. Text selection
Lets take Select as an example. Suppose you want to copy
all selected records from the file C:MAIN to file B:MAIN.
Make C:MAIN the current file in the file list by pressing the
arrow keys to move up or down through the list. Press [S] as
the short cut to Select on the file menu, then press [EXE].
The screen will now show the word SELECT on the top line.
The simplest type of selection is to select all the records
containing a word or phrase.
For example, if you type LONDON next to SELECT and
press [EXE] when the word AND: appears on the screen,
and FileMaster will copy all the records containing the word
LONDON to the other file.
FileMaster can also copy all the records containing the word
LONDON and the name SMITH. Simply enter SMITH on the
second line next to the AND: on the screen.
Now suppose you wanted to copy all the records containing
the word LONDON or the word EDINBURGH. Enter
LONDON on the first line, then when the word AND: appears
on the screen, press the [MODE] key. AND changes to OR,
then you can enter EDINBURGH on the OR line.

SELECT PRINT and FIND look through a
file using up to five search clues.
Up to five words or phrases can be used as search clues in
this way. FileMaster continues asking for clues until you
press [EXE] without entering another search clue. You can
mix AND and OR in one search as many times as you like.
If you search for LONDON AND SMITH OR EDINBURGH,
FileMaster will find all the records containing LONDON and
SMITH and all the records containing EDINBURGH, whether
or not they contain SMITH. In mathematical terms, it will find
(LONDON AND SMITH) OR EDINBURGH. FileMaster will
always evaluate joint AND and OR statements from the front.
6.2. Numeric example
FileMaster can also select records numerically. For example,
suppose C:PRICE is a price list file. The first field of each
line contains the name of a product and the second contains
its price.
If you make C:PRICE the current file and enter
SELECT :2>20
then press [EXE] to ignore the AND, FileMaster will copy all
the records in C:PRICE where the price (the second field) is
greater than twenty.
Similarly
SELECT :2=20
will copy all the items with a price (the second field) equal to
twenty.
You can use
= equals
< less than
> greater than
<= less than or equals
>= greater than or equals
<> not equals
in any combination of AND and OR. The number on the left
hand side of the sign must be the field number, between 1
and 16.
6.3. Numeric example
Suppose you are selecting from a file listing all the
microcomputers used in one organisation. Each record
contains details about one microcomputer.
The structure of each record is as follows:
Field 1: Brand name of computer
Field 2: Location
Field 3: Internal RAM
Field 4: Hard Disk capacity (if any).
A typical record might be
1: Olivetti M24
2: Reception desk
3: 512 KB
4: 20 MB
Even though there are letters as well as numbers on lines 3
and 4, you can use Select to copy numerically specified
groups of the computers.
For instance SELECT :3>256 will select all computers with
an internal RAM grater than 256 KB.
If Select is looking for a number, it will ignore all characters
after the first character which is not part of a number. In this
case, the space is the first character which is not a number,
and Select will evaluate the characters on line 3 before the
space.
6.4. Comparing letters
You can also select records by comparing letters.
SELECT :1<M
will copy all the records where the first field begins with letter
below M in the alphabet.
Numbers, spaces and most punctuation marks are considered
to be less than the alphabetic letters, so a record which
started with a number would be selected as well.
In FileMaster, no distinction is made between upper and
lower case letters, so that SELECT :1<m will have the same
effect as SELECT :1<M.
Equals or includes
If you use equals in comparing letters, the entire length of
the fields is used when deciding whether which are exactly
equal to the letters given will be selected.
SELECT :1=M will only find records where the first field has
only the one letter M. It would not select a record where the
first field was "MICKEY MOUSE".
If you want to find all records which include the name
MICKEY at any point on the first line you must use the +
sign.
SELECT :1+MICKEY will find all records in which MICKEY
appears at any point on the first line. It does not have to be
at the beginning of the line.
Similarly, the minus sign is used to select all records which
do not contain a certain string on a given line.
SELECT :1-MICKEY would find all records which do not
have MICKEY on the first line.
Summary:
Although all the examples given are for the Select function
on the File menu, FileMaster's Print, Find and Search
commands use exactly the same rules.
SELECT :MICKEY
finds all the records containing the name MICKEY, whichever
line it appears on
SELECT :1=MICKEY
finds all records where the first field is exactly MICKEY, no
more no less. MICKEY MOUSE will not be found.
SELECT :1+MICKEY
finds all records where the name MICKEY is on the first line.
MICKEY MOUSE will be found, as will be MOUSE, MICKEY.
SELECT :1-MICKEY
finds all records without MICKEY in the first record.
SELECT :1<MICKEY
finds all records where the first field is below MICKEY in
alphabetical order. M MOUSE will be included in this
selection, because the space between M and MOUSE is
counted as coming before the I in MICKEY.
SELECT :1<100
finds all records where the first field is a number less than
100. If the field is a mixture of numbers and letters, select
will evaluate all the digits before the first non-numeric
characters.
You can also use <=, >, >=, = and <> (not equals) in
numeric expressions.
At any point, you can press [ON/CLEAR] to leave the
selection criteria and go back to the last menu.
The Search command, described on page 45, uses the same
method of joining search clues, but it looks for them in every
record in every file on your Organiser. It can be very useful if
you want to find a record, but cannot remember which file
the record is in.
7. Using Print
FileMaster can print out to a printer, either through Widget's
Paralink or through a Psion Comms Link. FileMaster's print
options can also be used to send data to another computer.
7.1. Print and Rprint
There are two different print commands in FileMaster
- The Print option on the File menu is used to print a
number of records out at once.
- The Rprint option of the record menu prints only the
current record.
FileMaster allows you to print out selected data in a variety
of different formats. You can only set the format to be used
from the Print command on the File menu, but the format
you choose affect printouts made from both print commands.
7.2. Rprint
Suppose you want to print out a single record which is in the
file A:MAIN. The simplest way to do it is as follows:-
- Start VU from the top level Organiser menu and go though
the file list. Press [EXE] until the file name A:MAIN
appears.
- Press [SPACE] to enter the file A:MAIN. The first record of
the file will be shown on the screen. If there are no records
in A:MAIN the message ***EMPTY FILE*** will be
displayed.
- If you want to print the first record in A:MAIN, press [R] for
Rprint. If you want to print another record, to move to the
record you want, then press [R] for Rprint.
If you want to change the format in which the printout
appears, you will have to go into the format options of the
main Print command.
7.3. Print command
If you want to print out more than one record at a time, use
the Print command on the File menu. (If you cannot find
your way to the File menu, look at the map on page 12
which explains the structure of FileMaster).
When you first choose the Print command the screen shows
only the word PRINT. Print waits for you to say whether you
want to select which records to print, or whether you want to
print all the records in the current file.
PRINT:
Waiting for selection criteria
(2-line screen)
|
If you press the [EXE] key
without entering a search clue
Print will assume that you
want to print all records in the
current file.
If you want to define which
records to print, you can
select using all the text and
numeric selection clues shown in chapter 6.
|
For example, you could at this point enter PRINT :3>100
which would print all the records where the third field started
with a number greater than, 100. Refer back to chapter 6 if
you want further details of how the selection criteria work -
although all the examples given use the Select command,
the Print command uses the same rules.
7.4. PRINT FORMAT TO-FILE
When the selection criteria have been entered the screen
shows another menu. This menu allows you to change the
format of the printout and to send the output to a file.
7.4.1. PRINT
The first option takes you straight to printing. It is put first on
the menu so that you can just press [EXE] and go through to
printing quickly.
7.4.2.FORMAT
allows you to change the format of the printout. If you choose
the FORMAT option from this menu, the format menu comes
on to the screen. Choosing one of these items decides how
the records you print will appear when they are printed out.
For example, if you go to the format menu, move the cursor
until it is over the word Commas, then press [EXE], you will
have chosen Commas format. Until you go into the format
menu again, everything printed out would come out in the
form listed in the first example below.
Each time you go into the format menu, you can choose a
different format. FileMaster will not change the format of its
printouts until you go into the format menu again - there is
no 'home' format to which printouts automatically return.
7.5. The format options
Commas format would print out the example record used on
page 22 like this:-
Olivetti M24,Reception Desk,512 KB,10 MB
Spaces format would print out the example with spaces
instead of the commas:-
Olivetti M24 Reception Desk 512 KB 10 MB
Newline format would print the record with each field on a
new line rather than across:-
Olivetti M24
Reception Desk
512 KB
10 MB
Labels format would also print the record down the page,
rather like Newline format. The differences between labels
and newline format are
- labels are always printed out to a set length. Normally this
is 10 lines. With Newline format, longer records use more
lines than short ones.
- you can re-arrange labels so that some fields are missed
out or so that the order of the fields are re-arranged.
If you try printing in label format and only blank lines appear
on your printer, it probably means that you have not created
a label layout. Before you can use label format, you have to
create the layout of your label using Editlabl. This is
described in the next section.
Columns format would print out the example record in
columns of equal width across the page. This format is useful
if you are printing a table of values.
Olivetti M24 Reception Desk 512 KB 20 MB
Page is not a format option of its own - it simply amends the
size of page used to display records printed out in the main
format you have chosen.
On most printers, A4 paper is usually 70 lines long, and
continuous computer listings paper is usually 66 lines long.
At normal print sizes, most computer printers are usually 80
or 132 characters wide, although some portable printers
(including the Psion printer) are only 40 or 20 characters
wide.
Prompt is another option which amends the main format
rather than being a format in its own right.
The prompt option on the Record menu allows you to give
names to each field, to remind you what each field is.
If you choose the prompt option on the format menu, the
message "Prompts on" will be displayed. Next time you print
out, these prompts will also be printed out, whichever format
you choose.
If you want to remove the prompts from the printout, just
choose the prompt option on format menu again and the
message "Prompts off" will be shown.
7.6. Editlabl
Before you can print out in label format you need to design
the structure of the label you are going to use. You need to
choose the Editlabl option to do this.
First the program asks the length of the label you are
designing. The default length for a label is 10 lines, but you
can set the label to be any length between 1 and 16 lines
inclusive.
01:Blank...
02:Blank...
03:Blank...
04:Blank...
Editlabl - 4 line screen
|
When you first edit a label, all
the lines will be set to blank.
The list of blank lines is actually
a menu. To start creating your
label, move the cursor onto the
first line (the one starting 01:)
and press [EXE].
|
FileMaster will then ask you to enter the number of the field
which you want to print out on the first line of the label. If
you want the first field to appear on the first line, enter the
number '1' and press [EXE]. You will then return to the list of
lines, with the number 1: on the first line.
1:
02:Blank...
03:Blank...
04:Blank...
Field 1 on line 1 of label
|
If you have set up prompts for
the current file, the prompt for
the first field will appear instead
of the 1: on the top line.
For example, if the prompt for
field 1 was "name", the word
"name" would appear on line 1.
|
You can continue to build up the layout of the label by
landing the cursor on a line of the layout, pressing [EXE] and
entering the number of the field you want. You can change
lines which you have already set in the same way.
If you enter 0 for the field number, the line will be blanked.
If you want to blank all the lines and start again, press C for
Clear-All (one of the options at the bottom of the menu).
When you are happy with the layout you have set, either
press [ON/CLEAR] or E for Exit. This label layout will remain
in force for all files until you enter the Editlabl option to
change it again.
7.7. Sending data to another computer
The Print command also allows you to send the selected
records to another computer rather than to a printer.
You may want to do this so that you can use the formatted
output from FileMaster on your other computer.
If you only want to send an unformatted file to another
computer, you can already do this using the Transmit option
of from the Comms menu. The Comms Link manual
describes how to transmit files in this way.
This section describes how to send the formatted data which
FileMaster can produce to another computer. How you do
this, depends upon which communications program you are
using on the other computer.
The standard Psion Comms Link includes a disk containing a
program for an IBM PC called CL. Psion also manufactures a
version of CL for the Apple Mac. Widget Software Ltd sell a
program called Transfile ST CL, which performs the
equivalent functions for an Atari ST.
7.7.1. Using a program other than CL or Transfile
For the most popular microcomputers, there are many
communications programs available which can be used to
communicate with the Psion Organiser II. There are several
hundred on the market for IBM PC compatible computers,
including CrossTalk, Mirror and Procomm Plus.
If you are using a communications program other than the
PC or Mac version of CL or Transfile ST CL, then FileMaster
can send data to your computer in exactly the same way as
it sends data to a printer.
If you are using another communications program, set your
program to receive ASCII text, choose the PRINT option on
the PRINT FORMAT TO_FILE menu and FileMaster will
send data to your computer.
7.7.2. Using CL or Transfile
The IBM PC and Mac version of CL and Transfile ST CL are
not set up to receive plain ASCII text. They need to receive
information controlled by the Psion protocol.
If you want to send data to a computer using CL or Transfile
you have to save the formatted data on to one of the
Organiser's packs, then transmit that file from the Comms
Menu.
- Use the TO_FILE option on the Print form. FileMaster
will ask you the name of the file you want to save data
in.
You will need to give the name of a file which can be
used for storage. Use a new file or one which you know
is empty.
Since the data is only temporary, we suggest that you
store it either on a Rampak or the main RAM of the
Organiser. If you are going to use the main RAM of your
Organiser you will need to check how much space you
have left.
When you have entered the file name, FileMaster will
display a message saying that it is printing, but in fact it
is sending the formatted output to the file, not the printer.
Instead of sending the data you have selected to the
printer, FileMaster is storing it in a file on a pack.
- When FileMaster has finished sending the output to file,
press [ON/CLEAR] until you are out of FileMaster.
If you have the Comms Link in place, select the Comms
option on the top level menu. Your Comms Link should
be set up so that it is using the Psion protocol (see your
Comms Link manual for further details).
Run CL or Transfile on your other computer and use the
Transmit option on the Comms menu to send the file you
created earlier to the other computer. Details of how to
transmit a file are given in the Comms Link manual.
- When the file has been successfully transmitted, we
suggest that you go back into FileMaster and delete it
from the Organiser - it will probably be using up space
on your Rampak or in your internal RAM.
8. Opening a file
When using FiIeMaster, you can only alter or change data on
one file at a time. Before you can type in data you must let
FileMaster know which file will contain this data. Indicating
which file you want to work on is called opening a file.
When you run FileMaster by selecting VU, you start by
viewing the file list.
Pressing [EXE] steps onto the next file.
Pressing [SPACE] in the file list tells FileMaster to open the
file currently shown at the top of the screen.
Pressing [MODE] takes you to the file menu, which is
described in chapter 5. The Newfile option will open a file.
For example, if the current file on the screen was A:MAIN,
and you knew that you wanted to use file C:DATABASE, you
could
| either | or |
Press [EXE] repeatedly until
file name C:DATABASE
appears on screen then
Press [SPACE]
|
Press [N] for Newfile.
Enter name of file
C:DATABASE
Press [EXE]
|
The arrow keys will also help you move up and down the file
list until you get to the file you want to open. In the example
above, it might be quicker to press [←] once (which would
move from A:MAIN to C:MAIN in one go) then press [EXE]-
until the right file appeared.
You can also open a file from the file menu, by selecting the
first option on the menu, which is always the name of the
current file.
8.1. Inside a file
When you have opened a file, the first record of the file is
shown on the screen. if the first record in your file was the
example record on page 22, a four line screen would show:-
Olivetti M24
Front desk
512 KB
20 MB
A typical record
If there is nothing on the screen this means you must have
saved a record with nothing in it. Try pressing [→] to move
on to the next record.
If there are no records in the file, the message "empty file" is
displayed.
When you are displaying a record pressing
[ON] leaves the file, going back to the file list
[→] moves to the next record
[←] goes back one record
[MODE] leads to the record menu
[EXE] repeats the last key you pressed
[O] turns the Organiser off without leaving FileMaster
Pressing the initial letter of any command on the record
menu goes directly into that command, e.g. Pressing R goes
directly to Rprint.
9. The record menu
Commands on the record menu:- Find Save Edit ←Back
Next→ Unfind Rprint Info Copy Delete Prompt Quit
Y(first) Z(last) Off mostly relate to operations on individual
records.
The quick way to use an option on the record menu is to
press the initial letter of the command while a record is
displayed on the screen. This is a short cut through the
record menu. For example, pressing [O] turns the Organiser
off, using the Off command.
9.1. Find
Find looks through the records in the current file, using
up to five search clues, linked with AND or OR and
using FileMaster's powerful test and numeric
comparisons, as described in chapter 6.
9.2.Save
Use Save to input new data. Use Edit if you want to
amend existing records.
When you choose Save, unless you have set alternative
prompts using the Prompt command, the lines numbers
(1:, 2: etc) are displayed on the left hand side of the
screen. These are to remind you where you are while
you are typing in data from the keyboard.
When you have entered everything you want to enter on
line 1, use the [↓] key to enter line 2. You can go back
to line 1 by pressing the [↑] key.
When you press [EXE] the record will be saved and
FileMaster will expect another record to be entered. If
you do not want to enter another record press
[ON/CLEAR].
9.3 Edit
If you choose Edit, the current record will appear on the
screen, together with either the line numbers (1: 2: etc)
or any prompts you have set with the Prompt command.
You can then delete any of the characters on the first
line by pressing the [DEL] key or [SHIFT] and [DEL].
You can add new characters from the keyboard. If you
press the arrow keys, you can move up, down, right or
left within the record.
When you press [EXE] you finish editing the record and
the menu Replace Add appears.
If you Replace, the new version of the record will be
saved in preference to the old one.
If you Add, the old version of the record will be left
untouched and the new text will be saved as well.
9.4. ←Back
moves back one record in the file. For example, if you
are currently looking at record 3 on the screen, choosing
this option will move you back to record 2.
Pressing the [←] key has the same effect as choosing
←Back
9.5. Next→
moves the record display on to the next record in the
file, for example from record 3 to record 4.
Pressing the [→] key has the same effect as choosing
Next→.
9.6. Unfind
goes back to the last record you found with FileMaster's
Find command.
For example, suppose you choose the Find command
from the record menu, enter FIND:Birmingham. Suppose
that when you press [EXE], FileMaster finds the word
Birmingham in the 40th record.
If you then press another key to move forward or
backwards in the file you can move to another record.
If you then press [U] for Unfind, FileMaster will move
back to the 40th record.
9.7. Rprint
prints the current record to a printer, using Paralink or a
Comms Link. If you want to change the way the printout
is laid out, you will have to leave the file and use the
main Print command from the file menu. This is
described in detail in chapter 7.
9.8. Info
displays information about the current Datapak or
Rampak and the current file.
9.9.Copy
copies the current record to another file. Like the Copy
command on the file menu (see page 16), this command
asks which file you want to copy the record to.
When the record has been copied, you will go back to
the record display. The only way to see the result of
what you have done is to leave the current file and open
the other file you specified.
9.10. Delete
deletes the current record, after asking you if you are
sure. You can also use the Delete command by pressing
[DEL] while the record is being displayed.
This is the record delete command. It only removes one
record. This makes it less dangerous to use than the
delete command on the file menu, which deletes a whole
file of records.
9.11. Prompt
allows you to change the prompts given at the left hand
side when you use Save, Edit or Print.
Before you use the Prompt command, line numbers (1:,
2: etc) will be used as the default prompts. Editing the
prompts is just like editing any other record in FileMaster.
When you use the Prompt command the existing
prompts will be displayed on the left hand side of the
screen, followed by colons. To the right of the colons the
prompts are repeated. To change the prompts, edit the
repeated version on the right hand side.
The original prompts remain on the left hand side to
remind you what they were. The colons cannot be
removed - they are always put in to keep the text and
the prompts apart. .
The example on page 6 shows you how to change the
prompts.
Changing the last character of the prompts allows you to
specify whether you want the input to be a letter or a
number, and if a number what range it should be in. The
section at the end of this chapter explains how this
works.
9.12. Quit
Pressing [ON/CLEAR] or selecting Quit from the record
menu, closes the current file and takes you back to the
file list.
9.13. Y(first)
takes you to the first record in the current file. The [F]
key is already used by the Find command, so this
command uses [Y] as its initial letter.
9.14. Z(last)
takes you to the last record in the current file. To select
this option while you are looking at the record display,
press [Z].
9.15. Off
If you find yourself using FileMaster most of the time you
are using your Organiser, you may find it more
convenient to turn the machine off from within the
program. If you turn your Organiser off from the record
menu, you will immediately be able to start work on the
same file you were last using.
9.16. Range checking
Range checking allows an experienced user to set up data
input so that the data entered is automatically checked to see
if it is in a certain range.
Adding the symbols % . $ and * to the end of the prompt
strings specifies the type of input expected.
As explained above, the Prompt command in the
record menu can be used to change the field prompts
displayed for data input. The print format can also be set so
that these prompts are printed out.
The prompts cannot, however, be set to appear when a
normal record appears on the screen.
The examples given previously only demonstrate changing
the text of the prompts. If you add the following symbols to
the end of the text of the prompt, the corresponding type of
input will be forced.
| Symbol | Type of Input |
| % | integer |
| . | floating point number |
| $ | monetary (2 dp) |
| * | date stamp |
For example, if you give a field the name Partnumber%, you
will be prompted for the upper and lower limits which the
inputs can take. These limits, and the input, must be
integers.
If a user tries to enter a figure which is not an integer or
which is outside the limits specified, FileMaster will beep and
refuse to accept the input.
If you specify a field as a date stamp, when you move onto
the line for that field, the date set on the Organiser will
appear on that line. This date can be edited in the same way
as any text field. The date appears in numeric, European
format. This is the only format supported on FileMaster.
10. Other ways into FileMaster
FileMaster is designed to be a flexible program which can
adapt to your way of working. So far, we have assumed that
you will want to use FileMaster by running VU from the top
level menu. There are, however, several other ways to get
into FileMaster.
This chapter shows you how you can use Sort, Select and
Print direct from the Organiser's top level menu, how you
can write your own OPL program to go directly to a file which
you use frequently, and how to search for a record when you
do not even know which file it is in.
10.1. SORT, SELECT and PRINT
The Sort, Select and Print commands on the file menu can
also be called directly from the Organiser's top level menu
(the one which normally begins Find Save Diary etc).
When these commands are called directly from the top level
menu, they will act only on the files A:MAIN, B:MAIN and
C:MAIN. A file other than a MAIN file, can only be sorted,
selected or printed by going into VU.
To install Sort on the top level menu
- Press [ON/CLEAR] until you are looking at the top level
menu.
- Move the cursor round the top level menu until it is at
the position you want the word Sort to appear.
- Press the [MODE] key. The Organiser will ask you to
"insert item". Enter the word Sort then press [EXE].
- If you have an Organiser with a four line screen, an
additional one line menu "Opl Notes Files" will be
displayed. Press [EXE] to accept Opl.
Now you should be able to run Sort direct from the top level
menu. The same procedure can be used to add Print,
Select, Dprint or Search to the top level menu.
When you first run Sort it asks which file you want to sort by
giving you a menu - "A:MAIN B:MAIN C:MAIN". Move the
cursor until it is on top of the file you want to sort, then press
[EXE], as with any other menu selection. Sort will then work
exactly as described on page 14.
Select and Print can also be run from the top level menu in
the same way. Sort, Select and Print are the only three
options from the file menu which can be run in this way.
10.2. SEARCH
Search is another program in FileMaster which can be
installed and run from the top level menu, as with Sort
above.
Search can be used to find a record, even it you do not
know which file it is in.
Search will look for up to five search clues, linked with AND
or OR as described in chapter 6, going though every file until
it find a record which fits.
To use Search, install it on the top level menu, and enter the
search clues just as you would for Select or Print.
When Search has found the first record which fits your
search criteria
Pressing [EXE] goes on to look for another suitable
record
Pressing [MODE] once leads into the record display area
of VU, from whence you can press [MODE] again to get
the record menu, or press any of the other keys which
work from the record menu.
FileMaster's Search is similar to the Search on the LZ's utility
menu. FileMaster's version has the advantages that it uses
FileMaster's advanced searching abilities and can skip
straight from Search into the record display part of
FileMaster.
10.3. Autoloading a file
If you use one file many times, you may want to be able to
go directly to it from the Organiser's top level menu, rather
than having to scroll though the file list each time.
FileMaster allows you to do this through OPL, the
programming language built in to every Psion Organiser II.
For example, suppose your most important data is kept on
the file C:MAIN. You can, of course, find information in the
file directly from the Organiser's built-in Find function, but
then you would not be able to use the advanced features on
FileMaster on that data.
To write an OPL program to go directly to the file C:MAIN
- Press [ON/CLEAR] until you are at the Organiser's top
level menu (the one which normally begins Find Save
Diary etc).
- Press [P] for Prog. The Organiser should show a new
menu starting with the word Edit.
- Press [N] for New. The message New A: should appear
on the screen. If B: or C: appears instead of A:, press
the [MODE] key until A: is shown.
- Type in JUMP and press [EXE]. JUMP is now the name
of the program we are going to write - because it is
going to jump right in to the file we want, bypassing the
file list.
- JUMP: should appear on the screen of your Organiser,
with the cursor flashing to the right of it. Press [EXE] to
move on to the next line - it is very important that
nothing should appear to the right of the colon on the
first line.
- Type in DISPLAY:("C:MAIN") on the second line. There
should be no spaces on the line. It does not matter
whether it is in upper or lower case letters, but the quote
marks and the colons are important.
- Press [MODE] then [EXE] to translate JUMP. If you
have made a mistake in entering the program, the
Organiser will report an error and you will have to go
back and edit the program again.
- When the screen says Save A:JUMP press [EXE] again,
which will return you to the program menu. Press
[ON/CLEAR] to go back to the Organiser's top level
menu.
- Now you can install the program JUMP on the top level
menu. If you do not know how to do this, follow the
example of installing Sort on the top level menu given
on page 44.
10.4. Running FileMaster on a POS model
Psion produce a number of specialised versions of the
Organiser for corporate applications, These machines are
usually called the POS range.
If you use FileMaster on a POS Organiser, it will
automatically load and run VU.
An alternative way to use FileMaster on a POS machine is to
put the FileMaster pack into C:, and put a bootable pack in
B: which runs a program along the lines of the JUMP
program in the previous section.
Summary
Sort, Select, Print can be run directly from the Organiser's
top level menu, where they act only on the three MAIN files.
Search can also be put on the top level menu. It searches
all files on all packs and allows you to go directly into the
record display part of FileMaster when you have found what
you are looking for.
FileMaster's record display and record menu can be
accessed directly from an OPL program of the form
PROG:
DISPLAY("X:filename")
You can also use the DISPLAY call in the middle of a more
complicated program, but remember that FileMaster is a
copyright program and an original copy of FileMaster must be
bought for each machine any it is used on.
11. DPRINT
FileMaster also includes a separate program, Dprint, which
prints out the contents of the diary between two dates.
The simplest way to run Dprint is to install it on the top level
menu in exactly the same way as Sort is installed on the top
level menu on page 44.
When you run Dprint, FileMaster asks
Enter Starting
day dd ? _
This is the starting date of the diary entries you want to print.
By default the program will show today's date. The program
then asks for the starting month and year. The day, month
and year must all be entered as numbers.
For example, March must be entered as 3, 1988 must be
entered as 88.
To clear the number which is displayed for day, month or
year, press [ON]. If you press [ON] twice, or press the [↑]
key, you will go back to the starting day.
Entering the end date is similar.
All diary entries between the two dates (including the start
day and end day) will be printed. The improved diary in the
Organiser versions LZ and L264 already includes software to
print diary entries, duplicating the function of Dprint.
12. Copying FileMaster, Using memory
Unlike many other software manufacturers, we allow our
customers to make one copy FileMaster onto their own
Datapaks or Rampaks or into A:, for their own use only.
We make life easier for you by allowing you to make this
copy. Please respect our copyright. Copies of the program
should only be used by the original purchaser of FileMaster,
not be given to anyone else. No copies should be made of
this manual.
The descriptions below all assume that you have the blue
FileMaster pack in drive B:, the upper slot in the Organiser,
and are copying the program to a Datapak in slot C:.
You can, of course, also copy FiIeMaster into A:, but as it
will take up 16k of memory and then need another 8k in
order to run, we only recommend this if you have an LZ64.
The last section in this chapter deals with memory usage.
FileMaster IV is written in a combination of OPL and machine
code. How you copy these different parts of FileMaster
depends upon which version of the Organiser you use.
Only the original FileMaster pack will automatically install the
word VU on the top level menu - copies will not have this
ability.
12.1. Copying on the LZ and LZ64
- Press [ON/CLEAR] until you are at the top level menu of
the Organiser, the one which usually starts Find Save
Diary etc.
- Press [U] for Utils, then [C] for Copy. The screen
should now be asking you to select which type of file
you want to copy. Press [EXE] when the cursor is over
the All option.
- The screen should now show
COPY ALL
From B:
If a drive letter other than B: shows, press [MODE] until
B: appears on the screen. Type in the star character *,
and press [EXE] twice.
- The Organiser now asks which drive you want the
program to be copied to. If C: is not displayed, press
[MODE] until it is shown, then press [EXE] again.
The Organiser should now copy everything on the FileMaster
pack in B: to C:.
12.2. On the XP or CM
Copying on the XP and CM involved two operations, one to
copy the machine code files and one to copy the OPL files
across.
First of all, install the word XCOPY on the Organiser's top
level menu, using the same method described for installing
Sort described on page 44.
- Run XCOPY. It will only work if the blue FileMaster pack
is present in the machine and automatically installed on
the top level menu, as described in chapter 3.
- Press [EXE] when XCOPY: appears on the screen. The
drive letter which appears on the bottom line is the drive
to which the programs are to be copied.
If the drive letter is not C:, press [MODE] until C:
appears, then press [EXE]. XCOPY should announce
that it is XCOPYING.
XCOPY copies the machine code parts of FileMaster.
Now you have to copy the OPL parts of FileMaster.
- Return to the Organiser's top level menu by pressing
[ON/CLEAR]. Press [P] for PROG, followed by [EXE] if
need be and the screen should show a menu
EDIT LIST DIR
NEW RUN ERASE
- Press [C] for Copy and the Organiser will ask
COPY
OBJECT ONLY Y/N
Press [Y]. If this question does not appear then you are
in the wrong part of the Organiser's operating system.
Go back to stage c) and try again.
- Copy from B: to C:, making sure you get the right drives
by pressing [MODE] then [EXE] as for XCOPY above.
12.3. Main memory full
There must be at least 6K of RAM free before you can use
the file list and file menu of FileMaster. In order to use the
record display and most of the options on the record menu,
you need 7K of RAM free.
In order to use the Save, Edit and Prompt options from the
record menu you need 8.2K of free RAM. This means that
you cannot use the Save, Edit and Prompt options on a CM.
If you do not have enough free RAM, you will meet the
message "Main Memory Full". You will then have to delete
something from the Diary, from the A: drive or, on the LZ or
LZ64, from the Notepad in order to use FileMaster.
You can use the Info option from the top level menu on a
CM or XP, or from the Utils menu on an LZ or LZ64 to find
out how much free memory you have.
On a CM you will need the A: drive to be empty in order to
run any part of FileMaster. On an XP or LZ you need
approximately 34% of A: to be free. (The A: drive can only
use 23K of the XP and LZ's memory). On an LZ64 you need
approximately 15% free.
Summary
Although FileMaster is a copyrighted program, we allow you
to make one additional copy for the use of the purchaser
only.
Both the OPL and machine code parts of File-Master must be
copied in order for the program to work from another pack.
On the LZ and LZ64 both parts can be copied from the Utils
Copy menu. On the XP and CM, the OPL part of FileMaster
has to be copied from the Prog menu, and the machine code
parts copied by a utility called XCOPY.
FileMaster needs 8.2K of free RAM memory to run properly.
If this is not available, the message "Main memory full" is
displayed.
INDEX