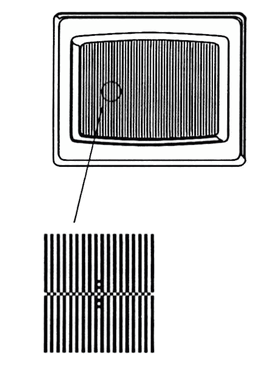
This manual is about using the Psion organiser and the Sony LISA interface to control the settings of a particular Sony camcorder. Go to the Sony LISA Manuals page for a list of all similar manuals available on this site.
SONY
K. Michielsen
User Manual
1. INTRODUCTION 2. HARDWARE INSTALLATION 3. STARTING THE PROGRAM 4. PREPARATION 5. MAIN MENU 6. PIXEL REPAIR 6.1. Number of defects 6.2. Setting up the cursor 6.3. Searching for the correct coordinates 6.4. The colour of the defect 7. CALCULATIONS 8. REMARKS
With this software for the Psion Organiser and the LISA interface, it is easy to repair defective pixels. By a combination of LANC data and a special camcorder chart, a cursor can be seen on the monitor. This cursor can be moved across the screen with the Psion's arrow keys. As soon as the cursor is positioned on the defect, you have to remove the camcorder chart to make the defect visible again. The cursor now changes into a correction point that can be moved with the arrow keys until the defect disappears. Afterwards the colour of the defect can be checked. This procedure can be repeated for all the defects in the CCD. The software performs all further calculations and sends the correction data back to the camcorder (depending on the factory corrections and the coordinates of the upmost defect).
This software must be used with the LISA interface. Plug the interface into the Psion's top slot and connect a 9V power supply (recommended AC adaptor: AC-D468, part number 9-101-2350).
Note: Never unplug the interface, or remove the datapack while the Organiser is switched on.
Connect the video out of the camcorder to a monitor and mark all the defects accurately on the screen (an erasable board marker or a pencil is very useful for this). Defects vary from white to black dots, so some can be seen when the camcorder is placed before a white background, others are visible by putting a black cap in front of the lens. Most of the time the green CCD produces white defects, defects in the red or blue CCD are slightly visible.
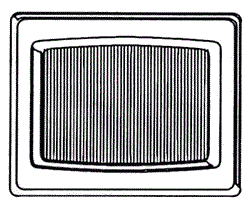
Put the vertical stripe pattern in front of the camcorder. Adjust zoom and focus to obtain a clear pattern on the screen, the stripe pattem should cover the whole screen from left to right.
Choose "PIXVX1" from the Psion's top level menu and press <EXE>. Press any key when the title screen is shown. At this moment, be sure that the camcorder is powered on and connected to the LISA interface.
The Main menu of this software consists of two parts :
Refer to the next chapter for the first option. The second option can be used to set all the CCD-Defect-Addresses to 00.
The Psion first reads out the number of defects that are already corrected in the factory. The camcorder will now power off and on automatically, which is necessary to bring up the cursor in the next step (you will be asked to switch the LISA interface to <NORM> and afterwards back to <SERV>).
Enter the total number of defects (using the numeric keys). Entering 0 brings you back to the main menu. Mind that the factory corrections + the user corrections may not exceed fifteen, because for every CCD a maximum of 5 corrections can be made. If there are more than five defects in one CCD, they cannot be repaired.


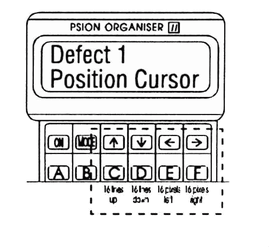
After entering the number of defects, a cursor will appear on the screen. The small vertical line cannot be seen without the chart, but the horizontal one can! If the small vertical line cannot be seen, you should move the camcorder slightly from left to right, or adjust focus. The cursor can now be moved using the arrow keys for small movements, and the letter keys C to F for larger movements. Move the cursor in order to position it on one of the places you have marked. The vertical position can already be accurately found, because you can position it while the defect is visible. Do not press a key continuously, because each time a key is pressed, 15 addresses have to be changed. The Psion produces a small beep every time the addresses have been changed, wait for this beep before you press another key !
Press "EXE" when the position is OK
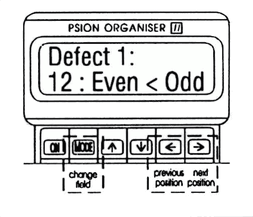
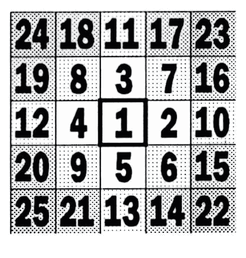
Remove the camcorder chart and make the defective pixel visible again (by putting the camcorder in front of a white background or by putting a black cap over the lens). The cursor now changes into a correction point with the same coordinates as the cursor (position 1) This correction point is inserted in every CCD. It can be moved to several positions (1..25) according to the drawing, using the right arrow key. Every correction point makes corrections in the even and the odd field. Three relations are possible : if a correction is made on line X in the even field, then it can be on line X-1, line X or line X+1 in the odd field. Use the <MODE> key to switch between these relations. The current position and the relation between the fields is shown on the Psion's display. A total of 25 positions can be scanned around the starting point.
Repeat the following until the defective pixel disappears:
With the <←> key, you can always go back to the previous position.
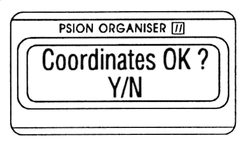
As soon as the defective pixel has disappeared, press <EXE>. After confirmation, the (absolute) coordinates of the correction point are stored in the internal memory of the Psion. If, after 25 steps, the pixel has not disappeared yet, just press <EXE> and answer with <N> when the Organiser asks you to confirm. Steps 6.2 and 6.3 will be repeated then for the current defect.

In the previous step, the correction was made in every CCD, so the colour of the defect did not matter. In this step, the correction is first made in the red CCD. Pressing the right arrow key moves the correction from the red to the green CCD, pressing it again moves to the blue one. Repeat pressing the right arrow key until the defect disappears, then press <EXE>. The coordinates and the colour of the defect are now stored in the internal memory of the Psion. If more than five corrections have to be made in one CCD, the Organiser does not store this information into its memory and will display e.g. "GREEN: more than 5 defects". If this is the case, the coordinates of this last defect are not stored.
Steps 6.2 until 6.4 will be repeated until all the defective pixels are marked. If all the defects are marked, all further calculations will be done by the Psion Organiser.
The correction data for the factory corrections will be transformed in exact absolute coordinates. The software now sorts all the correction points. The absolute coordinates of the upmost defect will be transformed into the three bytes, necessary for the camcorder. The information of the other defective pixels will be recalculated to relative positions, depending on the upmost defect. These calculations are made for every CCD imager. All this information will then be sent back to the camcorder.

Customer Relations & Service Europe
European Technical Support
Technologielaan 7
B-1840 Londerzeel
Belgium
Printed in Belgium