
PLUG
The Psion Organiser and the plug-in Program Packs and Datapaks form a sophisticated pocket computer system containing digital electronic components. They have been designed for ease of use, but to ensure that you make the most of their capabilities we suggest that you read this booklet, in conjunction with your basic Organiser handbook.
To avoid any possible damage your Organiser, Program Packs and Datapaks should not be exposed to extremes of temperature or humidity. Do not subject them to hard knocks or excessive force, nor immerse in liquids or use volatile fluids when cleaning the case.
© PSION PROCESSORS LTD 1984
DESIGN REGISTRATION APPLICATIONS
NOS. 1019736 AND 1019737
PATENT APPLICATION NO. 8412628
1. INTRODUCTION 2. TWO PACKS Connector pack, software pack 3. CONNECTING THE ORGANISER RS232 Interface 4. INSTALLING THE SOFTWARE 5. USING 'SETUP' Baud rate, parity, data bits, handshaking, EOL, EOF, translation 6. SENDING AND RECEIVING DATA 'SENDL', 'SENDF', 'SENDP', 'RECL', 'RECF' 7. EXAMPLES IMP PC, ACT Apricot, Sinclair QL, BBC Model B, Epson FX 80 8. PSION AFTER SALES SUPPORT APPENDICES A. ASCII Character Set B. ORGCOMM.BAS C. DTE and DCE wiring
The Psion Organiser Link-Up pack connects your Organiser to the rest of the world.
It has been designed to communicate with
equipment which has communication software
and an RS232 or RS423 port.
It enables you to:
You can use the Organiser to collect and carry information wherever you travel yet still share a central database.
Link-Up consists of two units:
the Connector pack
and the Software pack.
The Connector pack looks like a datapak with a multi-coloured ribbon lead emerging from it. As you would expect, it is used to physically connect the Organiser to another device. This pack must be in place whenever data transfer takes place.
The Software pack looks like an ordinary datapak. It contains the programs needed to control the flow of data to and from your Organiser. Once these programs have been loaded, the Software pack does not have to be in the Organiser for data communication to take place.
You may wish to use the Link-Up pack to
communicate with another computer or a printer.
For simplicity's sake, let us call the machine you
wish to communicate with the target.
Information can travel from your Organiser to
the target, or from the target to the Organiser.
There are three operations which you must perform before communication between your Organiser and the target can take place.
| Step 1. | The Organiser must be physically connected to its target. The Connector pack must be slotted into the Organiser and the RS232 interface cable must be plugged into the target. Chapter Three explains how to connect the RS232 interface. |
| Step 2. | The Software pack must be fitted and the communications software read into the Organiser. Chapter Four describes how to load and unload these programs. |
| Step 3. | The Organiser and target must be set up with compatible values of certain essential transmission parameters. Chapter Five describes what these parameters are, and how to match those on your Organiser link-up pack with those of your target device. |
After these operations have been performed, you are ready to send and receive data with the commands described in Chapter 6.
Chapter 7 is devoted to a series of examples which show all these steps.
When the link-up pack is first used it can take some time to match the communication needs of your target computer to those of the Organiser. The link-up software is designed to let you store the settings you need so that they can be automatically loaded the next time you want communication to take place.
The Connector pack can be fitted to either solid state drive of your Organiser. The socket at the other end of the Connector pack cable is designed to connect to equipment using the RS232C and RS423 communications standards. The rest of this chapter shows you how to make sure that the wiring of your target device is compatible with the Connector pack socket.
Part of the fascination of the microcomputer industry is that it was started and has been fuelled mainly by the invention and industry of talented individuals. The disadvantage of this is that talented individuals can rarely agree on a standard. So it is with the RS232 interface. There are differences even between connectors which are supposed to be standard. This chapter describes the wiring of the connector supplied with the Link-Up pack, using as little jargon as possible. Read through this chapter carefully and compare the wiring of the Link-Up pack with that of your target device.
The Connector pack cable is terminated with a 25 way 'D' type socket. (It has been wired so that it will connect directly into an IBM PC.) The socket has receptacle contacts and must be connected to a plug, with pin contacts. Figure 3.1 illustrates both connectors.
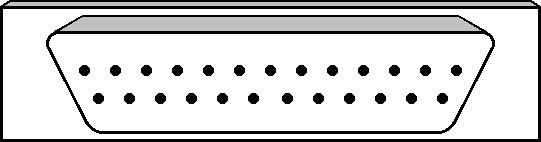
Plug and Socket
Figure 3.1
The wiring of the Connector pack socket is shown in figures 3.2 and 3.3. Figure 3.2 is a table, showing the functions and positions of the socket contacts. Figure 3.3 is a diagram of the socket, with each contact labelled. The wiring pattern of the socket is known as its pinout.
| PIN | NAME | FUNCTION | SIGNAL DIRECTION | COLOUR | |
| 2 | TxD | - | TRANSMITTED DATA | INPUT TO ORGANISER | BLUE |
| 3 | RxD | - | RECEIVED DATA | OUTPUT TO TARGET | RED |
| 4 | RTS | - | READY TO SEND | INPUT TO ORGANISER | GREEN |
| 5 | CTS | - | CLEAR TO SEND | OUTPUT TO TARGET | BROWN |
| 6 | DSR | DATA SET READY | - | ||
| 20 | DTR | DATA TERMINAL READY | - | ||
| 7 | GND | - | SIGNAL GROUND | YELLOW |
Link-Up Pack pinout Figure 3.2
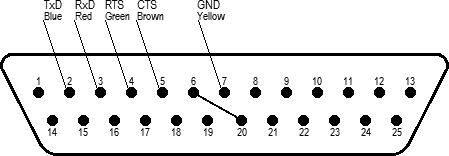
Link-Up Pack pinout diagram Figure 3.3
To connect up the Organiser to the target equipment you must check that the pinout of the target RS232 connector matches that of the Link- Up socket pinout.
If the wiring is compatible then there is no problem — simply plug the link-up pack in and proceed to use the 'SETUP' command.
If the wiring is different or the target connector does not fit the Link-Up pack connector, you will have to make up an interconnection cable to go between the Link-Up socket and your equipment. (Your dealer may be able to supply one). If you buy an interconnection cable, make sure that it ends with a 'D' type plug, as shown in figure 3.1.
Although there are 25 contacts on the D type socket, only five are needed for the Link-Up pack. Two are used for data, two for control signals and one is signal ground.
Data travels from the target to the Organiser on the TxD line, and from the Organiser to the target on the RxD line.
The direction in which your target expects data to travel depends upon whether it is wired as Data Communication Equipment (DCE) or Data Terminal Equipment. A signal which is output for a DCE will be input for a DTE.
The Link-Up pack connector is wired as a Data Communication Equipment (DCE) interface. Diagrams showing how to connect it to both DTE and DCE are in Appendix C.
TxD is for serial data transmitted to the Organiser from the target. RXD is data received from the Organiser. These will normally be used, though for some printers, RxD only need be connected.
The signals on these lines control when data is sent on the TxD and RxD lines. This control is known as handshaking, and is described in chapter 5. The Link-Up pack only uses them if the RTS/CTS protocol is selected.
The signal from the Organiser to the target is on the CTS (clear to send) line of the Link-Up pack. The signal from the target to the Organiser is on the RTS (ready to send) line of the Link-Up pack.
If your target is wired as Data Terminal Equipment the connections run as you might expect. CTS on the Link-Up pack socket is connected to CTS on the target connector, and similarly for RTS. If, however, your target is wired as Data Communication Equipment, CTS of the Link-Up pack must be connected to the RTS pin of the target, and vice versa. This is all shown in the diagrams of Appendix C.
These signals are not used by the Organiser, but the relevant pins are connected together on the Link-Up socket, so that equipment which requires a 'data set ready' signal will get one whenever it generates a 'data terminal ready' signal.
Slot the Software pack into either of the solid state drives in the back of your Organiser. You should not have any other program pack (such as the Finance pack) in your Organiser at the same time. When you switch on, software to offer two new commands is automatically loaded.
You can test to see that it has been loaded by pressing the MODE/HOME key repeatedly. The commands available should be
Every time you turn on the Organiser with the Link- Up Software pack in place you will be offered these commands.
The CALC option is not available when using the Link-Up pack.
If 'SETUP' is not displayed, this means that the communications software has not loaded properly. Try turning the Organiser off and on again, and check that the Software pack is properly slotted into position.
'SETUP' and 'RESET' can only be executed when the Software pack is in place. 'SETUP' is described in detail in the next chapter.
Once the 'SETUP' command has been used, turning the Organiser off does not dislodge the communications software. The Organiser can be turned off and the Software pack removed without affecting the communications software.
'RESET' clears the communications software from
the Organiser and returns it to its normal state.
Select 'RESET' , press EXECUTE, then remove
the Software pack.
Removing the battery or using any other
specialist program pack (such as the Psion
Finance pack) also clears the communication
software.
When the communications software has been cleared, you must re-install it before any further communications can be undertaken.
Imagine you are tuning in your radio. Out there on
the airwaves, the station you want is transmitting
at a certain frequency on a certain waveband. In
order to hear it you must do two things. You must
find out what this frequency is, then you must
locate it on your dial.
Likewise, before communication can take place
between the Organiser and a target device you
must find out various things about the way in
which the two machines can transfer data, then
use the 'SETUP' command to tell the Organiser
what they are.
Setting up communication between the Organiser and a target device is more complicated than tuning in a radio receiver. The transmission frequency (or Baud rate) is only one of the settings you have to make. Because information can be sent both ways between Organiser and target, you must set the controls which determine when data will travel (known as handshaking). Also, since different machines transmit data in different ways you must set the pattern of bits sent in each group of information.
Because you are in control of both ends of
communication, you must set all these things on
both the Organiser and the target.
Collectively, the settings which must be agreed
between Organiser and target are called
transmission parameters. You must first discover
or set these transmission parameters on the target
machine, then use the 'SETUP' command to tell
the Organiser what they are.
A brief description of each one of these
parameters is given later in this chapter, but it is
not necessary to understand what each one does
in order to use the Link-Up pack. It is important,
however, to make sure that the settings are the
same on both machines.
If your target device is another computer, you
will need to run some sort of communications
program on it to set these parameters. On printers,
these parameters are often set on banks of
switches.
Chapter 6 includes examples of setting these
parameters on certain common computers and
printers.
Once the parameters you need have been set on the Organiser they can be saved on the Software pack so that they automatically appear next time the communications software is loaded.
To get into 'SETUP' press the MODE/HOME key until 'SETUP' appears on the display, then press the EXECUTE key. The Organiser searches the Software pack for the last set of parameters saved. It loads them into its memory, and displays the first of these on its screen.
If you are using the Link-Up pack for the first time the parameters settings will be those shown below. If you have already used the 'SETUP' command, the parameters Will be set to the values you last saved.
| BAUD | 9600 |
| PARITY | NONE |
| BITS | 8 |
| STOP BITS | 1 |
| HANDSHAKING | NONE |
| EOL | CRLF (i.e. carriage return, line feed) |
| EOF | 1A (ASCII character control-Z) |
| TRANA | BLANK |
| TRANB | BLANK |
If these default values suit your immediate target, press the ↓ key until the 'EXIT' command is displayed then press EXECUTE. You will then leave 'SETUP' and be ready to send and receive data as described in Chapter 5. If these settings are not suitable, they must be edited from within the 'SETUP' command.
Within 'SETUP' the FIND and SAVE keys take on their alternative meanings, becoming ↓ and ↑ respectively, as indicated by the blue arrows below the keys. Use these keys to move up and down through the list of parameters and their current values. Figure 5.1 lists the parameters you can set in this way, and the values you can choose from in each case. TRANA and TRANB are the Link-Up pack's translation commands. They are described below. Don't worry if there is no equivalent on your target machine.
| PARAMETER | INDICATOR | OPTIONS |
| BAUD RATE | BAUD: | 150 300 600 1200 2400 4800 9600 |
| PARITY | PAR: | ODD EVEN MARK SPACE NONE |
| NO. OF DATA BITS | BITS: | 7 8 |
| NO. OF STOP BITS | STOP: | 1 2 |
| HANDSHAKING | HAND: | RTS/CTS XON/XOFF NONE |
| END OF LINE | EOL | } Up to 3 characters. See Text for details. |
| END OF FILE | EOF: | |
| EXTRA TRANSLATION | ||
| ORGANISER VERSION | TRANA: | } 1 character. See Text for details. |
| TARGET VERSION | TRANB: | |
| EXIT | EXIT: | NO SAVE SAVE |
Transmission Parameters
Figure 5.1
The parameters are, effectively, arranged in a loop. For instance, you can move from BAUD to TRANB either by pressing ↑ twice or by pressing ↓ eight times. The values of most of the parameters are set by a multiple choice system, where you use the << and >> keys to move left and right through a row of options for that parameter until the one you want is displayed. The value is now fixed until you alter it again. For instance, to change the BAUD rate from 9600 to 4800, press the << key once until the display shows 'BAUD:4800'. Now, you can press ↑ or ↓ to move on to another parameter.
The EOL, EOF, TRANA and TRANB parameters cannot be handled by the multiple choice approach. To set these you must type in a new setting from the keyboard. When you have set the new value, press ↑ or ↓ to move on to the next parameter.
You can set the parameters in any order you
choose. When you wish to accept the setup as it
stands move to the 'EXIT' command and press
EXECUTE. Until you do that, there is no limit to
the number of times you may alter the value of
each parameter.
When you execute 'EXIT' the parameter values
set become effective and remain so for all ensuing
communications, until you replace the setup with
another, or clear the communications software.
The BAUD rate measures the speed at which lines of data are transferred. It is sometimes called bits per second by other communications packages.
If the BAUD rate is high, the probability of transmission errors increases. if some of your characters are not being transferred correctly, try lowering the BAUD rate on both Organiser and target.
It is not always best just to use the highest BAUD rate available. Many printers print at a much slower speed than the maximum BAUD rate available with the Link-Up pack. There is little point in trying to increase the rate of transfer if the printer cannot print any faster than it is doing.
The Organiser can transmit data in groups (known as frames) of ten or eleven bits. One character of data is included in each frame.
The first bit of each group is the start bit. The next seven or eight bits contain the actual data. Then there may be a bit known as the parity bit. Lastly, there will be one or two stop bits.
The 'PARlTY', 'BITS' and 'STOP' commands allow you to specify the data frame you need.
Figure 5.2 shows all the possible ways of combining start, data, parity and stop bits in a frame of ten or eleven bits.
Simple addition will reveal that two combinations are not allowed. Seven data, no parity and one stop bit is an illegal combination. It would leave only nine bits in the data frame. Similarly eight data bits, two stop bits and a parity bit is an illegal combination, because it would lead to a data frame of twelve bits. The Link-Up pack will not allow either of these combinations to be set.
| START BIT |
7 DATA BITS |
PARITY BIT |
1 STOP BIT |
|
| Total 10 |
||||
| START BIT |
7 DATA BITS |
PARITY BIT |
2 STOP BITS |
|
| Total 11 |
||||
| START BIT |
7 DATA BITS |
2 STOP BITS |
||
| Total 10 |
||||
| START BIT |
8 DATA BITS |
PARITY BIT |
1 STOP BIT |
|
| Total 11 |
||||
| START BIT |
8 DATA BITS |
2 STOP BITS |
||
| Total 11 |
||||
| START BIT |
8 DATA BITS |
1 STOP BIT |
||
| Total 10 |
||||
Legal Data Frames
Figure 5.2
A parity bit is a bit added to the data frame by the
transmitting device. It helps the receiving device
check whether the data has arrived correctly.
There are several different types of parity
checking in use. The four which the Link-Up pack
can understand and accept are shown in figure
5.1.
If your target device uses parity checking, make
sure that your Organiser 'SETUP' uses the same
type of parity checking as the target device. Select
the appropriate type using >> and <<.
If your target does not allow parity checking, select parity NONE on your 'SETUP'. If you do not use parity checking, the parity bit is not included in the data frame, allowing you to include one more data or stop bit.
This command allows you to set the number of
data bits, in each frame.
As stated above, the length of each frame may
be ten or eleven bits. Of these only seven or eight
contain the information you want to transfer. The
others are the start bit, stop bit(s) and the optional
parity bit. With the >> and << keys you may set
the number of data bits to be seven or eight.
Some manufacturers include the parity bit in their definition of the data bits. This means that they would call seven data bits and a parity bit eight data bits. Check the definition of data bits used by your target device in its documentation.
Seven bits of data (not including the parity bit) is
the most common number of bits used in data
communication. All characters used in the
Organiser can be represented with seven bits.
Some systems are set up to expect eight bits
per character, and to allow communication with
such devices the Link-Up pack will accept and
transmit data frames with eight data bits.
In the Organiser, as in all computers, the
characters which appear on the screen are
represented by numbers inside the machine. For
instance. the letter 'A' is represented by the
number 65, 'B' by 66 etc. The most common code
by which characters are represented is known as
the American Standard Code for the Interchange
of Information; ASCII. All ASCII characters can be
represented with seven bits.
When the Organiser stores characters the data
is compressed. Only ASCII characters between 32
(20 hex) and 95 (5F hex) can be saved on the
Organiser. (Because of this data compression, the
Organiser actually stores up to 10,900 characters
on an 8k datapak). The character set used by the
Organiser is shown by the table in Appendix A.
When data is received by the Link-Up pack,
lower case ASCII characters will be transferred to
upper case, and any other characters not in the
specified range are filtered out.
Stop bits mark the end of the data frame. Some systems use one stop bit, others require two. The Link-Up pack allows you to choose either option using the >> and << keys. Remember, however, that the total number of bits in a frame must be ten or eleven. The six combinations of bits which satisfy all the conditions are shown in figure 5.2.
Data can only be transmitted when one device is
ready to transmit and the other is ready to receive.
Handshaking is a technique which ensures that
this happens. It is another safety check on data
transfer.
Three handshaking options are offered by the
Link-Up pack. They are RTS/CTS, XON/XOFF or
NONE. Choose the type of handshaking used by
your target device. If it does not support RTS/CTS
or XON/XOFF you will have to choose NONE.
Organiser marks the end of each record saved so
it will be able to tell where that one ends and the
next begins. Whether it is sending or receiving
data, the Organiser must know which character or
characters is to be used as the end of line marker.
The end of line marker may be up to three
characters long. The most common characters
used may be specified by typing in a standard
abbreviation for them. Other characters may be
specified by their 2 digit hexadecimal ASCII code
Hence you may enter up to three pairs of digits
from the keyboard in the EOL option of the
'SETUP' command.
The Characters for which abbreviations exist
are:
CR (ASCII code 0D hex) -carriage return;
LF (ASCII Code 0A hex) -line feed;
FF (ASCII code 0C hex) -form feed;
Most computers use the combination CRLF (carriage return, line feed) to end a line. If you are in doubt what to enter for EOL, use this combination.
This is the signal that the Organiser and target will
interpret as the end of the file or batch of data it is
transmitting. As with the EOL marker, you can
enter up to three pairs of ASCII codes or the
abbreviations CR, LF and FF.
ASCII value 1A (character control-Z) is used as
the end of file marker by most microcomputer
systems. If you are in doubt as to what to enter for
EOF, then use 1A.
In most data communications, information is
transferred literally. In some cases however, you
may wish to substitute one character for another
while data transfer is taking place. The translation
commands 'TRANA' and 'TRANB' allow you to do
this.
Enter your chosen character(s) (specified in
ASCII as for EOL and EOF) next to the 'TRANA:'
indicator, and move on to 'TRANB:' by pressing ↓.
When the Organiser is sending data to a target, it
looks for any occurrences of the character you
entered for 'TRANA' and transmits the 'TRANB'
characters instead. Conversely, whenever it
receives your 'TRANB' character(s) the Organiser
replaces them with those you entered in 'TRANA'.
For example.
If you had saved an address on the Organiser
with its street, town etc. separated by colons you
might enter a 3A in 'TRANA' and CR in 'TRANB'
so that any colons in a record would be
transmitted as a carriage return. If the EOL marker
is CR on the target device, the name, street, town
etc will be displayed on the target on separate
lines.
You can of course leave the 'TRANA' and 'TRANB' sections blank if you do not need an extra translation.
The 'EXlT' command leaves 'SETUP'. 'EXlT' has two options: 'SAVE' and 'NO SAVE'.
When you come to the 'EXIT' command, the 'NO
SAVE' option will be displayed. if you are likely to
use your 'SETUP' several times, use the >> or
<< key to select the 'SAVE' option before
pressing EXECUTE. If you save your setup, it will
appear as the default next time the
communications software is loaded.
If you have not changed the settings of any
parameter or if the setup you have created will
only be used once, select the 'NO SAVE' Option.
After using the 'EXIT' command you can turn on the Organiser and remove the Software pack without disturbing the parameter settings you have made.
When you have matched the hardware connections and software parameters as described in the previous two chapters you are ready to transmit data. The Link-Up pack's communication options are easy to select and self-explanatory in use. However, you must make sure that your target device is instructed to receive or send at the correct time.
If you are talking to someone on the telephone, you
rely on the other person to say the right words at
the right time, in order to smooth the path of
communication between you.
If the other person became totally silent, or
worse, suddenly started incanting curses in a
foreign language, you would become confused and
your ability to communicate would disappear.
The Link-Up pack also expects certain things
from its target. You may have to type in some sort
of receive command on your target before using a
send command on the Organiser. If you type in the
wrong command, or no command at all, the Link-
Up pack may find itself trying to send information
to a machine which does not want to listen, or
waiting for information from a machine which has
not been instructed to send. In these
circumstances it may get stuck.
If this happens, press the ON/CLEAR key to
free the Link-Up pack software, then find out what
command is needed at your target. If you are
communicating with another computer, you will
usually have to type in a command on your target
to match each sending or receiving command
used on the Organiser.
Press the MODE/HOME key several times. If the
Connector pack is in place the commands 'SENDL'
and 'RECL' should be displayed, along with the
normal 'ENTER' and 'OFF' commands. 'SENDL'
stands for send line. 'RECL' stands for receive
line.
If the Software pack has been removed and
replaced with a datapak, 'SENDF', 'SENDF' and
'RECF' should also be displayed in the command
cycle. 'SENDF' stands for send file, 'SENDP' for
send program and 'RECF' for receive file.
Even if the Software pack has been removed.
the communications software is still resident in the
Organiser until removed with the 'RESET'
command. It checks which packs are fitted to the
solid state drives before offering commands to the
user. If no datapak is in place, files cannot be sent
or received. If the Connector pack is not in place
you cannot send lines or files and only the 'OFF'
and 'ENTER' commands can be selected.
This command is for sending the current line of information. First make sure your target is ready to receive. Type the line or find the record you want to send. Press the MODE/HOME key until 'SENDL' appears on the screen, then press EXECUTE. You can edit the line before or after the transmission, though of course you will only transmit the version that is current when you press EXECUTE.
'SENDF' allows you to send all the records, or a selected group of records from a datapak.
If you execute 'SENDF', you will be offered a
choice of ALL (press A) or QUERY (press Q. If you
choose ALL, all the records on your datapak will
be transmitted without interruption. In this case
the records will not be displayed as they are found,
since that would delay the transmission, but they
will flash past as they are transmitted. If you select
QUERY by pressing Q, the Organiser displays
each record it finds and waits for you to press
EXECUTE to confirm the instruction before it
sends that record to the target. Press N if you do
not wish to transmit the record which is displayed.
The next record is presented for your confirmation
in the usual way. With the QUERY option you can
read through each record and stop and start the
progression of characters across the display just
as you can with any retrieved record in 'FlND'.
You can stop the process by pressing ON/CLEAR.
If you press ON/CLEAR while the Organiser has
just finished sending a record, the Link-Up pack
software will return to the main command loop
immediately. While the Organiser is in the middle
of sending a record, it cannot look to see if the
ON/CLEAR key has been pressed. You must keep
pressing the key until the end of a record is
reached. The Organiser will then be able to read
the clear signal and stop transmission.
This is not all that the 'SENDF' command can do.
After selecting 'SENDF', you can enter a string of
characters in the display area. If you then press
EXECUTE, the Organiser will send records
containing that string to the target device. Once
again you are asked if you want to send ALL
records containing this string, or whether you want
to scrutinise each record individually with the
QUERY feature.
The 'SENDF' command has similarities with the
normal 'FIND' command. If you press EXECUTE
without specifying a search string, it acts on all the
records in the datapak. If you enter a search
string, it acts on all the records containing that
string.
This command enables you to transmit programs
or procedures that you have written and saved in a
datapak.
As with the 'SENDF' command, you are allowed
to send ALL programs saved on a datapak (type A)
or QUERY each program before it is sent (type Q).
Alternatively, you may select 'SENDP' and type
the name of the program you wish to transmit.
before pressing EXECUTE.
'SENDP' can only be used to send programs on
the currently fitted datapak. You cannot use the
Connector pack and a specialist Program pack
together. Indeed, fitting one of the specialist
Program packs containing the programming
language POPL will clear the communications
software from your Organiser as soon as you
switch on.
If you wish to send a program contained on a
program pack, you must first save that program
onto a datapak. You cannot save a program twice
under the same name, so you will have to save it
under a different name on the datapak.
This command enables the Organiser to receive
up to two hundred characters of information from
the target device. The data sent must be specified
by a command from the target. When the target
starts to transmit, the Organiser receives the
transmitted information as the current line, and you
can choose to save it, using the SAVE key (editing
it first if you wish), or clear it.
Once 'RECL' has been executed, the Organiser
will continue to expect to receive data until it
receives an end of line character. If your target
device does not transmit the correct end of line
character, press ON/CLEAR to reset the
Organiser software.
If you execute this command the Link-Up pack will receive a file from the target and store it on a datapak. Again the data to be transmitted will be specified at the target and must end with a proper end of file-character. If the target device does not transmit the end of file character correctly, try typing the EOF character in at its keyboard (if it has one), or use the ON/CLEAR key to reset the Organiser software.
If more than two hundred characters appear without an EOL code amongst them, the Organiser will start a new record in the datapak at the 201st character. For instance, if your 'SETUP' defines EOL as the ASCII code for a full stop, it is wise to ensure that the file does not contain any unusually long sentences before you transmit it to the Organiser. Any sentences containing more than two hundred characters will overflow into at least two records in the datapak.
When the data transfer is complete, the RECF indicator reappears.
This chapter consists of examples which show how to connect the Link-Up pack to various target devices. Obviously it has not been possible to include every computer and printer in this chapter, but even if your target is not described in this chapter, you may still find the examples helpful.
On most microcomputers you will need to run some sort of program which performs a similar function to the 'SETUP' command. it will set the parameters such as baud rate, parity checking etc. This may be a commercially marketed communications package or a program you have written yourself. Alternatively the commands to set the transmission parameters can often be accessed from the operating system, and can be executed one by one.
The Link-Up pack interface is wired so that it connects directly with the PC Asynchronous Communication card.
Appendix B includes the full listing of a BASIC program called "ORGCOMM.BAS". When run, ORGCOMM.BAS sets up the PC as follows:
| BAUD | 9600 |
| PARITY | NONE |
| BITS | 8 |
| STOP BITS | 1 |
| HAND | RTS/CTS |
| EOL | CRLF |
| EOF | 1ACRLF |
Alternatively, if you already possess a communications package for the PC, you may wish to use that. Many different communication packages are available for the PC. One well known package is "Crosstalk" produced by Microstuf. This section describes data transfer using Crosstalk with the Link-Up pack.
Using Crosstalk, the communication parameters which must be matched are displayed on the left hand side of the Crosstalk status screen. To change the baud rate (line speed) type the command 'SP 9600'. Crosstalk must be set to half duplex. A possible 'SETUP' would be
| BAUD | 9600 |
| PARITY | NONE |
| BITS | 8 |
| STOP BITS | 2 |
| HAND | NONE |
| EOL | CRLF |
| EOF | 1A |
Carriage return and line feed are the characters
used for delimiting the end of a line on almost all
microcomputers. Similarly the control-Z character
(ASCII 1A) is normally used for end of file.
The transmission parameters of the IBM may be
set at any time while Crosstalk is running. The
transmission parameters of the Organiser must be
set with the 'SETUP' command. before
communication takes place.
ORGCOMM.BAS show the options to send and receive files on the screen of your PC. Remember to use the receive option of ORGCOMM before the send command on the Organiser, and vice versa.
If no previous command has been entered on the
PC, Crosstalk is ready to receive. If the status
screen is not displayed, all data received will be
displayed on the screen of the PC. If you want to
save data to disk, use Crosstalk's capture
command. Send lines and files from the Organiser
to the PC by executing the relevant commands on
the Organiser.
To send a line of data from the PC to the
Organiser, execute the RECL command on the
Organiser, then type a line at the PC keyboard.
When the return key of the PC is pressed, the line
should appear on the Organiser screen.
Much of the following description of communication with the Apricot, also applies for communication with Sirius or Victor computers.
The centre port of the ACT Apricot is an RS232 interface. The pin settings of this port and the Link- Up pack interface are identical but both have socket connectors. An interconnection cable with a plug connector at both ends is needed.
The ACT Apricot comes with a standard
communications package — "ASYNC". Run ASYNC
while you are creating a setup, and you will be able
to set the software parameters on both the Apricot
and the Organiser.
To use Link-Up with the Apricot, you must
choose the user specified terminal option of
ASYNC's main menu. You can then set the Baud
rate (line speed), the parity convention, the number
of data and stop bits and whether you want
XON/XOFF handshaking.
Note that if you want XON/XOFF handshaking
on the Apricot, you must set the receive and send
parameters separately. On the Link-Up pack,
handshaking for both sending and receiving is set
with one command. XON/XOFF is the only form of
handshaking possible with ASYNC.
Apricot already accepts ASCII 1A as an end of
file, and CR, LF as an end of line marker.
Start terminal operation by selecting the relevant
option of ASYNC. Press MODE/HOME on the
Organiser until 'SENDL' appears on the screen,
then type a few characters on the keyboard. Press
EXECUTE and the characters will be displayed on
the screen of the Apricot.
If you have replaced your Software pack with a
datapak, you will be able to send and receive files
as well as lines of information. In order to send
files from the Apricot, set the Organiser to receive,
then select the send option from the microscreen
menu.
The QL has two serial ports. Use the second serial port, SER2, for communications with the Link-Up pack. Sinclair supply a cable which connects the QL port to a 'D' type plug. One change must be made to the wiring. Pin 20 on the QL must be connected to pin 4 on the Link-Up pack socket.
Use the following setup on the Organiser:
| BAUD | 1200 |
| PARITY | NONE |
| BITS | 8 |
| STOP BITS | 2 |
| HAND | RTS/CTS |
| EOL | CRLF |
| EOF | 1A |
The baud rate on the QL can be set by a QDOS
command. Type 'BAUD 1200' to set the baud rate
to 1200.
The QL defaults to no parity, 8 data bits, 2 stop
bits and RTS/CTS handshaking, so you do not need
to do anything in order set these.
In order to set the end of file marker to control-Z
and the end of line marker to CR, use the 'c' option
of the open or copy command, as shown in the
next section.
Example One — to send a line from the QL to the Organiser.
Setup the Organiser with the parameters listed above. Execute the 'RECL' command on the Organiser.
On the QL, type:
OPEN #5, SER2C
PRINT #5,"Information"
The word "Information" will be displayed on the
screen of the Organiser. A named string may also
be sent to the Organiser: e.g.
PRINT #5,a$
The extra 'c' after ser2 specifies the EOL and EOF
characters for the QL. Do not forget to close
channel five when you have finished
communication.
Example Two — to send a file from the Organiser to the QL.
The QDOS copy command can be used to read
in a file without opening a channel. To send the
whole contents of a datapak to a file named FRED
on microdrive 2 on the OL, type in the QDOS
command:
COPY SER2C TO MDV2_FRED_EXP
then execute 'SENDF' on the Organiser.
The BBC micro has an RS423 serial port with five contacts. A special lead must be made up to connect this port with the Link-Up pack. A diagram of the BBC RS423 port pinout is given in the BBC user guide. The pins must be connected as follows:
| Link-Up pack | BBC RS423 |
| RxD | Data in |
| TxD | Data out |
| RTS | RTS |
| CTS | CTS |
| 0v | 0v |
Use the following 'SETUP':
| BAUD | 9600 |
| PARITY | NONE |
| BITS | 8 |
| STOP BITS | 1 |
| HAND | NONE |
| EOL | CRLF |
| EOF | 1A |
If you wish to transmit data from the Organiser to
the BBC type:
*FX7,7
*FX2,1
If you wish to transmit data from the BBC to the
Organiser type:
*FX8,7
*FX3,1
Data can then be transferred between the Organiser the BBC screen.
The Link-Up pack always uses serial data
transmission. Some dot-matrix printers only have
parallel ports as standard.
In contrast, daisywheel printers almost always
use serial transmission. On most printers,
transmission parameters are set by DIP switches
which are small switches commonly found under
the front cover of the printer.
Your Epson needs an optional serial interface card to communicate with Link-Up.
A special interconnection cable must be made up to join the Link-Up pack and the Epson FX 80. The Epson only needs three connections to be made.
These are:
| Link-Up pack | Epson |
| 3 | 3 |
| 4 | 11 |
| 7 | 7 |
The transmission parameters of the Epson are set by dip switches on the serial interface card. As the meanings and settings of these switches may vary between different versions of the serial interface card, you must consult the manual to your interface. It should be possible to set the switches to match the following 'SETUP':
| BAUD | 2400 |
| PARITY | NONE |
| BITS | 8 |
| STOP BITS | 1 |
| HAND | RTS/CTS |
| EOL | CRLF |
| EOF | 1A |
When this 'SETUP' has been created you can send lines, files or programs to the printer using the usual commands.
Many purchasers will want to use the Link-Up pack
with devices which have not been covered in the
last chapter. If you want to communicate with a
machine which we have not described, and after
reading its documentation you still cannot discover
the correct hardware and software connections
you have two options. Either you can go back to
the dealer who sold you the machine and ask him
how to set up your target, or you can write to Psion
Software Support.
Psion Software Support aims to help users of
Psion software with any problems they may have
with our equipment. The address
Psion Software Support Ltd.
22 Dorset Square
London NW1 6QG
Your Psion Organiser Link-Up Pack carries a one year warranty against mechanical or electrical failure other than in the case of misuse or damage arising from negligence. There are no user- serviceable parts within your Link-Up Pack, and any attempt to dismantle or repair your Link-Up Pack other than by an Appointed Psion Service Agent will invalidate this warranty.
Should you experience any problems consult your Organiser manuals with particular reference to the troubleshooting sections. If you find no solution to your problem, send your Link-Up Pack in suitably protective packaging to:
Service Department
Psion Processors Ltd.
22 Dorset Square
London NW1 6QG
We can accept no responsibility for goods damaged in transit to us. This warranty does not affect your statutory rights.
Like most microcomputers the Organiser
represents characters internally with ASCII code.
The following table shows the decimal and
hexadecimal representations of each character
used by the Organiser.
Lower case letters received by the Link-Up pack
will be translated into upper-case. Other
characters outside the range 32 (20 hex) and 95
(5F) hex will be filtered out.
Note that ASCII character 95 (5F hex) is used
internally by the Organiser as an end of line
marker. It cannot be read by the Link-Up pack.
| ORGANISER CHARACTER SET | |||||||||||||||||||||||||||||||||||||||||||||||||||||||||||||||||||||||||||||||||||||||||||||||||||||||||||||||||||||||||||||||||||||||||||||||||||||||||||||||||||||||||||||||||||||||||||||||||||||||||||
|
| ||||||||||||||||||||||||||||||||||||||||||||||||||||||||||||||||||||||||||||||||||||||||||||||||||||||||||||||||||||||||||||||||||||||||||||||||||||||||||||||||||||||||||||||||||||||||||||||||||||||||||
The following is a listing of a BASIC program written to communicate between the IBM PC and the Organiser Link-Up pack.
10 REM program to exchange data 20 REM between PC and ORGANISER 25 REM 30 RS232$="com1:9600,n,8,1,cs65535,ds65535" 40 Z$=CHR$(26) : REM eof character 50 CLS 52 PRINT "press A or B to see directory ,"; 54 PRINT " any other key to continue" 60 A$=INKEY$ :IF A$="" THEN 60 70 IF INSTR ("aAbB",A$) THEN FILES A$+":" 80 PRINT 82 PRINT "Press S for sending to PC, "; 84 PRINT "or R to receive from PC"; S$ 90 K$=INKEY$ 95 IF K$="" OR INSTR("sSrR",K$)=0 THEN 90 100 LINE INPUT "enter file name "; FILE$ 110 IF K$="s" THEN 150 ELSE 250 120 REM 130 REM *** read a file from organiser 140 REM 150 I=0 152 DIM L$(16000) 154 PRINT "set the Organiser up" 160 OPEN FILE$ FOR OUTPUT AS #2 170 OPEN RS232$ AS #3 180 I=I+1:INPUT #3,L$(I):IF L$(I)<>Z$ THEN 180 190 PRINT "Saving to file "; FILE$ 200 FOR X=1 TO I : PRINT X,L$(X) 205 PRINT #2,L$(X) : NEXT X 210 GOTO 330 220 REM 230 REM *** write a file to the organiser 240 REM 250 REM 260 OPEN FILE$ FOR INPUT AS #2 270 OPEN RS232$ FOR OUTPUT AS #3 280 K$=INKEY$ 285 IF EOF(2) OR K$<>"" THEN 310 290 INPUT #2,L$ : PRINT L$ : PRINT #3,L$ 300 GOTO 280 310 PRINT #3, z$ 320 REM *** close files 330 CLOSE #2 : CLOSE #3 340 END
The Link-Up pack is wired as Data
Communications Equipment. This means that the
RxD and CTS connectors are output for the
Organiser. The convention is designed so that DCE
connectors join directly to DTE connectors.
If your target is wired as Data Terminal
Equipment, RxD and CTS will be inputs for your
target.
If your target is wired as Data Communication
Equipment, the RxD and CTS of the Organiser
must be connected to the TxD and RTS of the
target.
The diagrams below show the direction of data
flow and the connections to be made between the
Organiser and DTE or DCE ports.
| CONNECTING THE ORGANISER TO A DTE | ||||||
| ORGANISER (DCE) |
TARGET DTE |
|||||
| 2 | ← | TxD | - | TRANSMITTED DATA | ← | 2 |
| 3 | → | RxD | - | RECEIVED DATA | → | 3 |
| 4 | ← | RTS | - | READY TO SEND | ← | 4 |
| 5 | → | CTS | - | CLEAR TO SEND | → | 5 |
| 6 | DSR | - | DATA SET READY | → | 6 | |
| 20 | DTR | - | DATA TERMINAL READY | ← | 20 | |
| 7 | - | SIGNAL GROUND | - | 7 | ||
| CONNECTING THE ORGANISER TO A DCE | ||||||
| ORGANISER (DCE) |
TARGET DCE |
|||||
| 2 | ← | TxD | TxD | → | 2 | |
| 3 | → | RxD | RxD | ← | 3 | |
| 4 | ← | RTS | RTS | → | 4 | |
| 5 | → | CTS | CTS | ← | 5 | |
| 6 | DSR | DSR | ← | 6 | ||
| 20 | DTR | DTR | → | 20 | ||
| 7 | ------------- | 7 | ||||