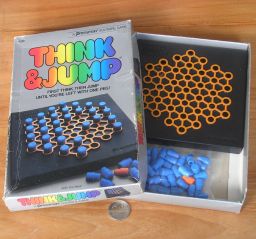


Think & Jump by Pressman is a peg solitaire puzzle played on a hexagonal board. The board has 37 holes, arranged in the shape of a hexagon with 4 holes along each side. At the start, all but one hole contains a peg, and the empty hole can be anywhere but is often chosen to be the centre hole. A move consists of jumping one peg over another to land in a vacant hole, and then removing the peg that was jumped over. At the start of the move, the jumping peg, the peg jumped over, and the landing hole must be adjacent and lie in a straight line. The board has lines on it showing you which pegs are considered to be adjacent. The middle line segment on each side of the hexagon is missing, so you are not allowed to make a jump along the side of the board. The aim of the puzzle is to remove all but one of the pegs.
For further analysis techniques, see the Analysis of Peg Solitaire page.
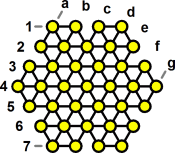
Hold the board so that there are horizontal edges at the top and bottom. I will label the rows from top to bottom with the numbers 1 to 7. The columns that go from the top right down to the bottom left will be labelled from left to right with the letters a to g. Every board location then can be denoted by its coordinates, e.g. d4 is the central hole, the top row is a1 to d1, and the bottom row is d7 to g7. Any jump can be described by two coordinates, of the start and end hole of the jump, e.g. b4-d4 for a jump to the right into the centre hole.
If the board is given a 3-colouring, such that any 3 holes in a row have three different colours, then we find that there are 13 holes (including the centre) of one colour, and 12 of each of the other colours.
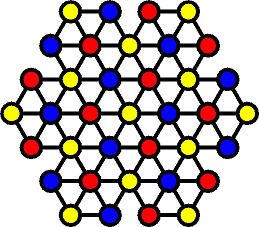
For any arrangement of the pegs we can count the number of pegs in holes of each colour, giving us three numbers for that arrangement. Every move changes the parity of all three numbers. At a finish with a single peg, one of the numbers is odd, and two are even. This means that at the start, 35 jumps earlier, we have one even number and two odd ones. If the starting hole is in the centre (or any other hole that is coloured yellow in the picture), then the three numbers are all even, so it is not possible to finish with a single peg. The best you can do is two pegs, which will have to be in the same colour hole. For the other two colours, if you start with an empty spot at one colour, you can finish with a single peg in a hole of the other colour. It is not possible to finish with a single peg at the same spot as the starting hole.
There is a useful resource count for this board, shown below.
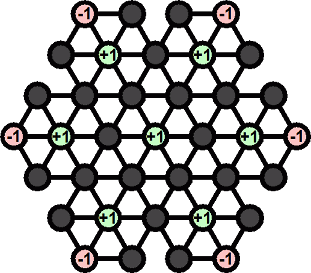
Depending on where the starting hole is chosen to be, the value of this resource count is 0, 1, or 2 at the start of the game. The final position with a single peg will have a resource count value of -1, 0, or 1, but of course it cannot be larger than the starting value because by design there is no move that increases it.
What this resource count captures, is this: There are 7 locations marked +1, and these form a complete set - any peg that starts at a +1 location can only jump to another one, or be removed. So you start with a resource of 6 or 7 pegs at those +1 locations. The pegs at the corners cannot be jumped over, so before you can remove one it has to jump elsewhere and in doing so it removes one of the +1 pegs. To remove the six corners you already lose 6 of the +1 pegs so you can scarcely afford to allow other pegs to jump over them.
All possible locations of the starting hole and final peg that the 3-colouring allows are shown in the table below. It is assumed that the board is rotated so that the starting hole is in the top-left region.
| Starting Hole Location |
Starting Resource Count |
Final Peg Location |
Final Resource Count |
Resource Count Reduction |
|---|---|---|---|---|
| a2, c3 | 1 | c1, e2, a3, d3, c4, b5, e5, g6, f7 | 0 | 1 |
| a2, c3 | 1 | b2, f4, d6 | 1 | 0 |
| a3 | 1 | b1, a2, c3, f3, e4, d5, g5, c6, e7 | 0 | 1 |
| a3 | 1 | d2, b4, f6 | 1 | 0 |
| b2 | 0 | b1, a2, c3, f3, e4, d5, g5, c6, e7 | 0 | 0 |
| b2 | 0 | d2, b4, f6 | 1 | -1 |
For any combination of starting hole location and final peg location listed in the table, the last column shows how often a move can be performed that decrements the value of the resource count. Clearly the combinations on the last row are impossible.
Here are solutions to all of the solvable combinations. The moves that decrement the resource count are bold.
| Starting Hole Location |
Main Solution |
Final Moves |
Final Peg Location |
|---|---|---|---|
| c3 |
a3-c3, d5-b3, a2-c4, b5-d5, d5-b3, a4-c4, b3-d5, e5-c5, c6-c4, d7-d5, e7-e5, e4-e6, g6-e4, g7-e5, e5-c5, f7-d5, c5-e5, d3-f5, g4-e4, f3-d3, c3-e3, d1-d3, c1-c3, c4-c2, a1-c3, e4-e6, g5-e5, e6-e4, e3-e5, c3-e3, e2-e4, b1-d3 |
e5-e3, d4-d2, e3-c1 | c1 |
| e5-e3, e3-c3, d4-b2 | b2 | ||
| e5-c3, c3-e3, e4-e2 | e2 | ||
| d3-f5, f5-d5, d5-d3 | d3 | ||
| e4-e6, d3-d5, e6-c4 | c4 | ||
| e5-e3, d4-d2, d2-f4 | f4 | ||
| e5-e3, e3-c3, c3-e5 | e5 | ||
| d3-f5, f5-d5, d4-d6 | d6 | ||
| d3-d5, d5-f5, e4-g6 | g6 | ||
| e4-e6, d3-d5, d5-f7 | f7 | ||
| Do mirror image of c3 to c1 solution | a3 | ||
| Do mirror image of c3 to e2 solution | b5 | ||
| a2 |
c4-a2, c6-c4, c3-c5, a4-c4, d5-b3, b5-d5, a2-c4, d5-b3, a3-c3, d3-b3, a1-c3, b1-d3, d7-d5, e5-c5, g7-e5, f7-d5, e4-e6, e7-e5, g6-e4, d3-f5, d1-d3, e2-e4, c3-e3, f3-d3, e4-c2, c1-c3, b3-d3, g4-e4, e4-e6, g5-e5, e6-e4, c5-e5 |
e5-e3, d4-d2, e3-c1 | c1 |
| e5-e3, e3-c3, d4-b2 | b2 | ||
| e5-c3, c3-e3, e4-e2 | e2 | ||
| d3-f5, f5-d5, d5-d3 | d3 | ||
| e4-e6, d3-d5, e6-c4 | c4 | ||
| e5-e3, d4-d2, d2-f4 | f4 | ||
| e5-e3, e3-c3, c3-e5 | e5 | ||
| d3-f5, f5-d5, d4-d6 | d6 | ||
| d3-d5, d5-f5, e4-g6 | g6 | ||
| e4-e6, d3-d5, d5-f7 | f7 | ||
| a2 |
c4-a2, d3-b3, a1-c3, a2-c4, b1-d3, e4-c2, d1-d3, d3-b3, a3-c3, e2-e4, e5-e3, g5-e5, g4-e4, f3-d3, d3-b3, c1-c3, d5-f5, f7-d5, g7-g7, e4-e6, g6-e4, e7-e5, c4-e6, d7-d5, c6-c4, c3-c5, a4-c4, c5-c3, e5-c5, b5-d5, e6-c4, b3-d5, |
d5-d3, e4-c2, c3-c1 | c1 |
| d5-d3, c3-e3, e4-e2 | e2 | ||
| c3-e5, d5-f5, f5-d3 | d3 | ||
| d5-d3, e4-c2, c2-c4 | c4 | ||
| e4-c4, d5-b3, c3-a3 | a3 | ||
| e4-c4, c3-c5, c5-e5 | e5 | ||
| e4-c4, c3-c5, d5-b5 | b5 | ||
| c3-e5, d5-f5, e4-g6 | g6 | ||
| c3-e5, e4-e6, d5-f7 | f7 | ||
| a3 | Do mirror image of a2 to b5 solution | b1 | |
| Do mirror image of a2 to a3 solution | a2 | ||
| Do mirror image of a2 to c4 solution | c3 | ||
| Do mirror image of a2 to f7 solution | f3 | ||
| Do mirror image of a2 to e5 solution | e4 | ||
| Do mirror image of a2 to d3 solution | d5 | ||
| Do mirror image of a2 to g6 solution | g5 | ||
| Do mirror image of a2 to c1 solution | c6 | ||
| Do mirror image of a2 to e2 solution | e7 | ||
| Do mirror image of a2 to d6 solution | d2 | ||
| Do mirror image of a2 to b2 solution | b4 | ||
| Do mirror image of a2 to f4 solution | f6 | ||
| b2 |
d4-b2, c1-c3, e4-c2, d1-d3, e2-e4, e5-e3, g4-e4, g5-e5, d5-f5, g7-e5, f7-d5, c4-e6, d7-d5, c6-c4, c3-c5, a4-c4, a3-c3, d3-b3, a1-c3, b1-d3, c4-c2, a2-c4, e3-c3, e5-e3, f3-d3, d5-b3, b5-d5, e7-e5, g6-e4, c2-c4, e5-c5 |
e4-c2, c5-c3, b3-d3, d3-b1 | b1 |
| e4-c2, c5-c3, c2-c4, c4-a2 | a2 | ||
| e4-c2, c5-c3, b3-d3, c2-e4 | e4 | ||
| e4-c2, c5-c3, c2-c4, b3-d5 | d5 | ||
| b3-d5, c5-e5, e5-e3, d3-f3 | f3 | ||
| b3-d5, c5-e5, e5-e3, e3-c3 | c3 | ||
| b3-d5, c5-e5, d3-f5, e5-g5 | g5 | ||
| Do mirror image of b2 to f3 solution | c6 | ||
| Do mirror image of b2 to g5 solution | e7 | ||
For further analysis techniques for this and other peg solitaire games, see the Analysis of Peg Solitaire page.