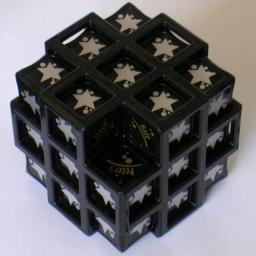
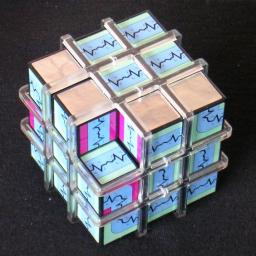
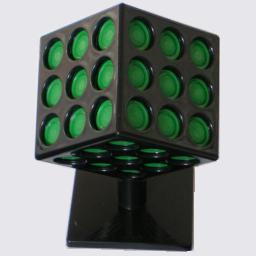
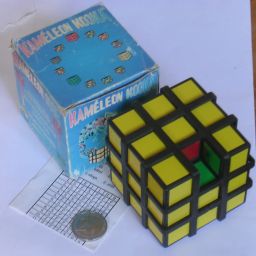


The four puzzles Peter's Black Hole, Magic Jack, IQube, and Chameleon Cube, are essentially exactly the same puzzle. They consist of a cubical cage in which there is room for 3×3×3 small cubes. There are only 26 cubes inside though, leaving one space so that the cubes can slide around. It is very much the three-dimensional equivalent of the Fifteen puzzle.
Peter's Black Hole:
The starting position shows silver stars on the outside facelets of the puzzle. The
hole is at a corner, and the three exposed facelets at the hole each show one word of
"Peter's Black Hole".
The solved position will show only black facelets, except at the corner hole
which again shows the puzzle's title.
The other internal facelets all have coloured stars.
Magic Jack:
One solved position shows a silver colour on each outside facelet.
The second solved position has all the light green facelets on the outside, with a blue
path traversing them and forming a closed loop.
The third solved position has all the red facelets on the outside, again with a blue
path traversing them and forming a closed loop.
The final solved position will show a mix of red and green facelets. Some facelets have
letters on them, and if you follow their blue path the letters spell out a hidden phrase.
Chameleon Cube:
One solved position shows green on all outside facelets, in another solved position all outside
facelets are red, and in the last solved position they are all yellow. In all three cases the
hole ends in the middle of an edge of the cube, and the exposed facelets there will not match.
IQube:
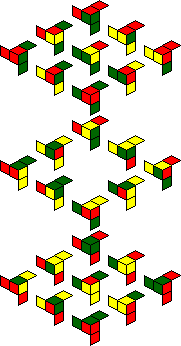
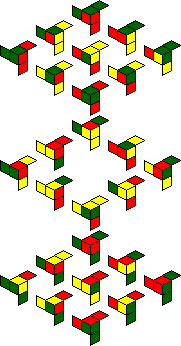
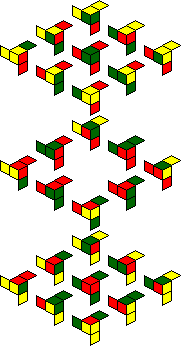
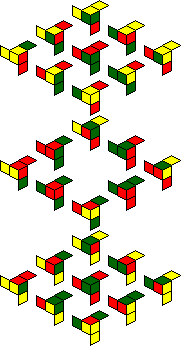
One solved position shows all green facelets, with the hole in the centre of the cube.
A second solved position shows all red facelets, with the hole in the centre.
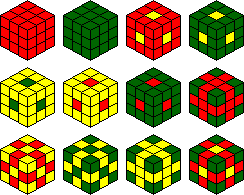
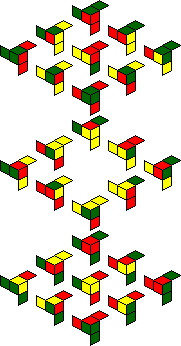
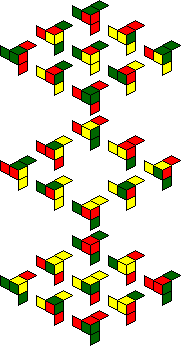
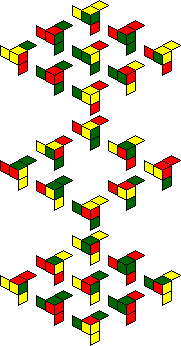
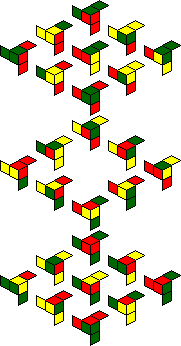
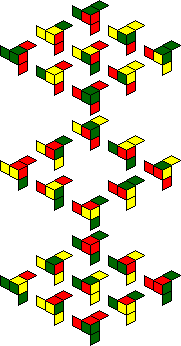
The internal facelets also include yellow ones, and the packaging shows several
other symmetric patterns of red, green and/or yellow that you can make, for example green
with yellow dots on the face centres, or red with yellow dots in the face centres. The
twelve patterns are shown below.
This puzzle comes with a nice stand on which you can balance the puzzle on one corner.
The facelets have different textures, and the puzzle was marketed as suitable for the blind,
and some of the profits apparently went to the World Blind Union.
These puzzles differ from the Varikon 3×3×3 and Inversion in that the cubes at the face centres and in the centre of the cube can move too. The Varikon 2×2×2 is the 2×2×2 analog of these.
I will not describe a full solution method here, as it is easy once you understand the simple technique for inserting a piece that is also used on the Fifteen puzzle. With that technique you can build up the solved position layer by layer, piece by piece.
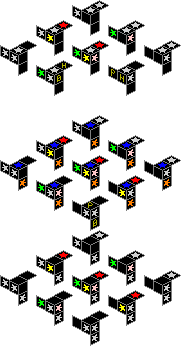
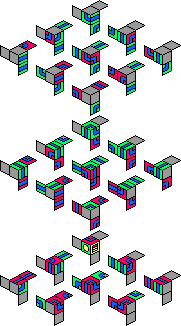
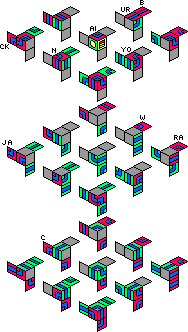
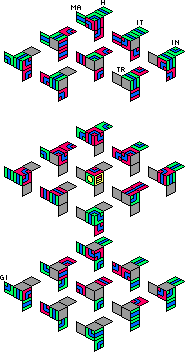
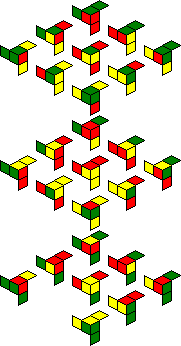
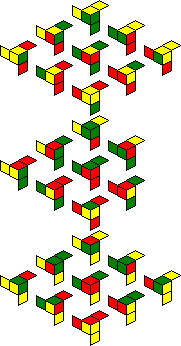
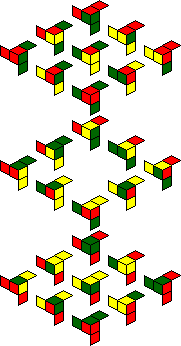
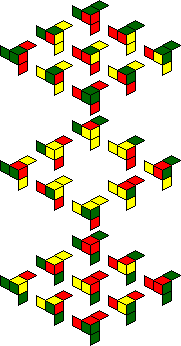
The main difficulty with these puzzles is recognising which piece is which. To this end I have drawn some pictures showing the inside facelets of each puzzle in the starting positions and the solved positions.
Peter's Black Hole:
 |
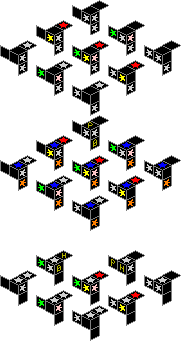 |
Note that the internal planes of the starting position each have one colour. This makes it possible to identify any piece from seeing just three sides. In fact, if we ignore the six facelets with writing on them, opposite a silver star is a black facelet, and opposite a coloured star is another coloured star. In particular, if you see a piece with coloured stars on three adjacent faces, it must be the one that belongs in the centre. Also, the colours make it easy to orient your puzzle to match the orientation used in the pictures above.
Note that because of this regularity, going from the starting position to the solved position involves moving nearly every piece to the position directly opposite. The only exceptions to this are two of the pieces with writing on them. Due to the parity constraint it is not possible to swap every piece with its opposite, which is why those two exceptional cubies are given an extra swap.
I have written a program to solve this puzzle. It managed to show that it is not possible
to go from the start position to the solved position in 118 moves or less (where a move is
a shift of a single piece, and the centre piece is not moved). It is likely that the two
positions are close to being antipodes. Using a different program, I found a sub-optimal
solution of 150 moves. Start with the space at the upper back left (UBL) corner, and the
piece with writing on opposite sides ("Peter's" opposite "Hole") at
the back left edge. The following lists the directions the space is moved around the
puzzle, using the standard abbreviations U,D,L,R,F,B for Up, Down, Left, Right, Front,
and Back.
DD FF RR B L B L FF R U L BB D FF UU BB DD F R B UU L DD R U R U LL D (Upper layer, back row solved)
RR FF D L U R D L BB U R FF D BB L U R FF LL BB RR F (Middle layer, back row solved)
D L F UU R D B D L F UU R DD L U L D BB R FF R BB L FF L BB R F (Bottom layer, back row solved)
R UU L F R DD B UU F D LL U B RR F (Upper layer, middle row solved)
D L D L UU R D (Upper layer, front row solved)
L B D RR U F (middle layer, middle row solved)
L D L B RR F (remainder solved)
You can read a general description of the techniques I used in the program on my Computer puzzling page, in the section on Multi-phase algorithms.
I then changed my program to count each 'push' as a single move, whether it is one piece
or two cubes in a row. The previous solution had 113 such moves. Also, I now allowed the
program to move the centre by such a push as well. It found the following 105 move solution.
Again, start with the space at the UBL corner, and the piece with writing on opposite sides
("Peter's" opposite "Hole") at the back left edge.
RR DD FF LL BB RR F L F UU R BB DD L F UU R B DD LL UU RR DD LL UU RR DD (Upper layer, back row solved)
FF LL B U RR D B L FF R UU B DD LL UU RR DD LL UU RR D (Upper layer, middle row solved)
B D FF LL U RR BB D FF L UU R DD LL UU RR D (Upper layer, front row solved)
BB D F L F U BB D FF U BB R D LL U RR D (Middle layer, back row solved)
LL FF R BB L FF U B D (Middle layer solved)
F RR B LL F RR BB L FF R BB LL FF RR (Bottom layer solved)
Magic Jack:
 |
 |
 |
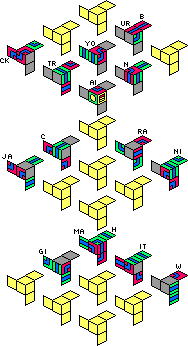 |
The red solution exposes only silver facelets at the hole, and the silver solution
exposes only red facelets. You can switch from red to silver or vice versa, by using the
following move sequence, starting with the space at the UBL corner.
F D RR U LL DD B R UU F R B LL F R DD B UU FF (Upper layer, back row solved)
D L U RR D B LL U F R DD B UU F R B L F (Upper layer, middle row solved)
BB D L FF R BB R FF L BB U FF DD R UU L D BB L FF U R DD (Upper layer, front row solved)
L BB RR F L B U R D F U LL B RR D (Middle layer, back row solved)
FF U L D B R U F LL B RR F (Middle layer, middle row solved)
LL D RR U LL D BB RR FF U LL D (Middle layer, front row solved)
B RR F (Bottom layer solved)
In the green solution there are two silver facelets exposed by the gap, though
the third facelet there forms part of the path of the solution. You can go from
the green solution to the red by the following move sequence, starting with the
hole at the DLF corner with the exposed green facelet on the FL piece.
R BB R FF L BB L FF U R D BB UU FF DD BB R UU FF L DD L UU R D (Upper layer, front row solved)
BB D FF U R B D LL UU RR DD L UU R DD LL UU RR DD (Upper layer, middle row solved)
F U BB D FF L BB R UU L DD L UU R DD R UU L D (Upper layer, back row solved)
L F RR B D FF L U BB L FF R BB (Middle layer, front row solved)
R F LL B (Middle layer, middle row solved)
D F R B L U R D (Middle layer, back row solved)
FF L BB RR FF LL BB RR FF LL B R B R (Bottom layer solved)
With the final solution the hidden phrase is "Train your brain with Magic Jack". This is visible on one path loop, but unlike the other solutions not all facelets are part of this path. If you find a way to arrange them on a loop that includes all the outside pieces, let me know.
Chameleon Cube:
 |
 |
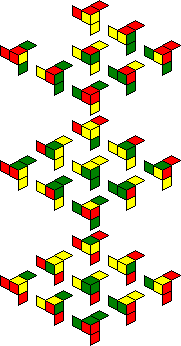 |
Unfortunately it is hard to know whether the orientation of your puzzle matches the orientation used in the pictures above. With the previous two puzzles it is obvious due to the coloured stars or the letters. On the Chameleon Cube, the cage and the pieces have no obvious markings telling you which side belongs at the top or the front.
IQube:
 |
 |
 |
 |
 |
 |
 |
 |
 |
 |
 |
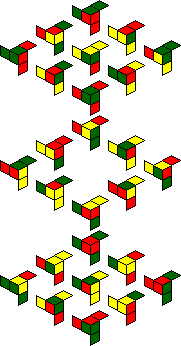 |
As with the Chameleon Cube, it is hard to know whether the orientation of your puzzle matches the orientation used in the pictures above, as the pieces and the cage have no obvious markings telling you which side belongs at the top or the front.