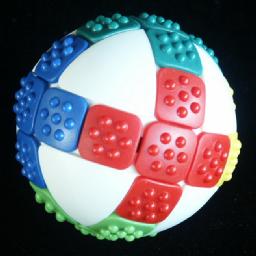
This Massage Ball (not to be confused with the 7-colour
massage ball) looks very much like the Equator/Hungarian
Globe puzzles. It too is a ball with three intersecting rings of
moving pieces which divide the ball into eights. There are 12 square shaped
pieces each ring, making 30 pieces in all because there are 6 places where
the rings intersect. There is no space so the pieces do not move singly.
Instead, all 12 pieces of a ring are shifted as one. What differentiates
this puzzle from the Equator is not just the tile colouring, but the fact
that the ball is in two halves that can twist about one axis. It is
therefore related also to the Mozaika, though
that one twists about all three axes like a Rubik's Cube.
It is only recently that I realised this puzzle could twist on one axis. It
was not easy to turn at first, but soon loosened up. It is made in Taiwan,
and all its pieces have small bumps on them which supposedly are good for
the meridian points on the hands. Each piece is of a single colour, and when
the puzzle is solved the five pieces of each colour form a small cross at
each intersection point. The pieces have no visible orientation, and
there is no set position of the colours.
This puzzle was invented by Tsun Ding Chen. Its patent,
US 5,836,584 was
published on 17 December 1998.
The number of positions:
There are 30 pieces, 5 pieces of each colour. This gives 30!/5!6
= 88,832,646,059,788,350,720 positions, or approx. 88.8 · 1018,
which is about twice that of the Rubik's Cube.
Notation:
 Hold the puzzle so that the halves of the ball that twist lie on the top
and the bottom. The six crossings are on the left, right, front, back, top
and bottom.
The equatorial ring can be moved Left or Right, denoted by L and R. The
vertical ring going through the front goes Up or Down, denoted by U and D,
while the other one goes Clockwise or Anti-clockwise, denoted by C and A.
These letters are followed by a number indicating how many squares to move,
so R3 means rotating the equator to the right a quarter turn.
Twisting the top half of the ball through 180 degrees is denoted by T.
Note that we will only need to do half turns.
Solution:
Phase 1: Make opposing pairs
- Choose two colours that you want to be on opposite sides when it is solved. Lets call them Colour A and Colour B.
- Find any colour A tile which does not have a colour B tile on the opposite side of the puzzle.
- Slide the A tile to the front, and place it just below the front intersection.
- Find any colour B tile which does not have a colour A tile on the opposite side of the puzzle.
- Slide the B tile to the front, and place it also just below the front intersection, shifting the A tile down one step in the process.
- Find any tile which is not yet matched to an opposite colour tile on the other side of the puzzle.
- Slide this unmatched tile at the front intersection, without disturbing the A and B below it.
- Do U T R D L U T, and the A and B tiles should now be matched.
- Repeat steps b-h until all A and B tiles are matched.
- Repeat steps a-i for another pair of colours.
- Repeat steps b-i for the last pair of colours, but with one minor change. If there are no unmatched pairs to be found in step f, then put a matched A tile at the front instead.
Phase 2: Solve the top cross
- It does not matter which colour the cross will be, so you might as well
assume that the north pole piece is already correct. Note its colour.
- Find a piece of the same colour as the north pole piece, preferably one
that lies on the equator somewhere.
- If the piece does not lie on the equator, then move the vertical ring
containing it until the piece does lie on the equator. Shift the equator
left or right one step, and then move the vertical ring back to its original
position, so that the north pole is restored.
- You now have a piece on the equator which you want to bring to a position
next to the north pole piece. Hold the puzzle so that the position you want to
bring the piece to is at the top front.
- Turn the equator to bring the piece to the front, and to R D2 L U2.
- Repeat steps b-e above until the cross is solved.
Phase 3: Solve the front cross
- It does not matter what colour the front cross will be, so we might as well assume that the piece just above the front intersection is correctly positioned, so that its colour is the one we will use for the front cross.
- If the piece just below the front intersection is already of the correct colour, then skip ahead to step e.
- Turn the equator to bring a piece of the correct colour to the front intersection.
- Do R U L D, so that now the pieces just above and below the equator at the front are solved.
- Find another piece of the correct colour that lies on the equator, and then turn the equator to bring the piece to the front intersection. We have now solved the vertical bar of the front cross.
- Find a fourth piece of the correct colour, preferably on the equator. If it does not lie on the equator, then do C R A2 R C L2, which dislodges all non-equatorial pieces in the left and right crosses.
- Do R3 C, turn the equator to bring the fourth piece to the intersection on the right, and do L A L3.
- Find the final piece of the correct colour, and if it does not lie on the equator then do the same as in step f.
- Turn the equator to bring the fourth piece to the intersection on the right, do C, turn the equator to bring the two previously solved pieces adjacent to the right intersection and do A to make it a row of three solved pieces. Finally turn the equator again to bring them to the front, solving the front cross.
Phase 4: Solve the final pair of crosses.
I will assume you are holding the puzzle so that the final unsolved crosses are at the front and back.
- There will be two colours in the front cross. The colour of which there are an odd number of pieces will become the colour of the front cross. Find out which colour this is.
- If there are two wrong pieces in the front cross which both lie on the equator, then they can be solved as follows:
1. One of the wrong pieces should be at the front intersection - if not then turn the equator a little to make it so.
2. Do U6.
3. Move the equator to bring the other wrong piece to the front intersection.
4. Do U6 again.
5. Move the equator back to the original position.
- If there are two wrong pieces in the front cross in the vertical ring, then turn the whole puzzle so that that ring becomes the equator, and do the same as in step b.
- If there are two wrong pieces in the front cross that are not in the same ring, then hold the puzzle so that one of the wrong pieces is at the top of the front cross, and do L D R U. Then go back to step b.
- If there is one wrong piece in the front cross, then look again at step a - there are actually 4 wrong pieces, and fix those.


 Hold the puzzle so that the halves of the ball that twist lie on the top
and the bottom. The six crossings are on the left, right, front, back, top
and bottom.