This is an early version of the Extech Comms Printer which was rebranded by Psion Inc., the American business arm of Psion. It seems likely that they dropped support for this printer once the standard Psion II Printer became more available.
Version 1.0
April 19, 1989
To avoid any possible damage to your Psion products, they should not be exposed to extremes of temperature or humidity. Do not subject them to hard knocks or excessive force and do not immerse them in liquids or use volatile fluids when cleaning.
If within 90 days of purchase this product can be shown to the reasonable satisfaction of Psion to be faulty and not to function substantially as described in the user manual, Psion will at its option refund the purchase price or replace the affected product. Apart from this warranty, Psion will not in any event be liable for any loss, including consequential loss, caused by any error, defect or failure of the computer system, or howsoever otherwise arising, including but not limited to loss of use, loss of stored data, loss of profit or loss of contracts.
There are no user serviceable parts within this Psion product, and any attempt to dismantle or repair it, other than by an Appointed Psion Service Agent, or any damage arising from misuse or negligence will invalidate this warranty.
If you encounter difficulty using this Psion product, consult the manuals supplied with your system to verify that you are using it correctly. If after thoroughly checking the documentation the difficulty persists, return the affected item with proof of purchase to:
Psion Inc. Service Dept.
118 Echo Lake Road
Watertown , CT 06795
Please note that all items must be sent insured and have enclosed proof of purchase with dates. Packaging should secure and protect the devices against damage during transit. If you are returning a computer, ensure that all datapaks and program packs have been removed.
Psion accepts no responsibility for loss or damage of equipment in transit to us, nor will we be held responsible for any loss of data held in any of the devices returned to us. It is the user's responsibility to ensure that his data has been adequately backed-up prior to shipment to Psion.
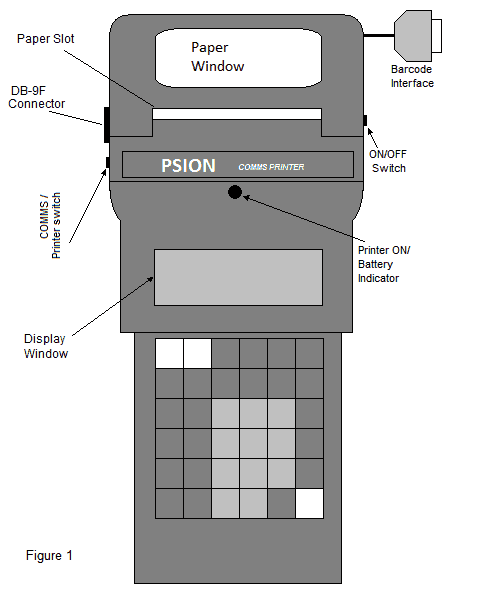
The Comms Printer is designed for use exclusively with the Psion Organiser II computer. Features include:
This manual is intended to provide the user with information to begin operation of die Comms Printer. Since the Comms printer contains a complete Comms Link, we have included in this manual only the basic information required to use the Comms functions. This manual contains information required for both users and programmers which pertains to the printing and barcode functions.
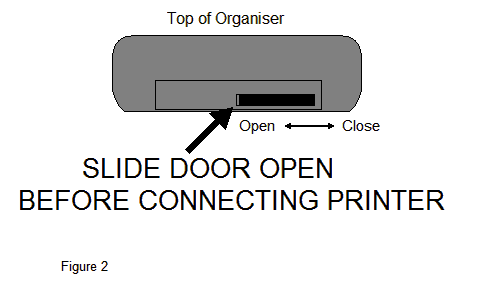
Before attempting to attach the Comms Printer to the Organiser, slide open the door at the up of the Organiser. See Figure 2.
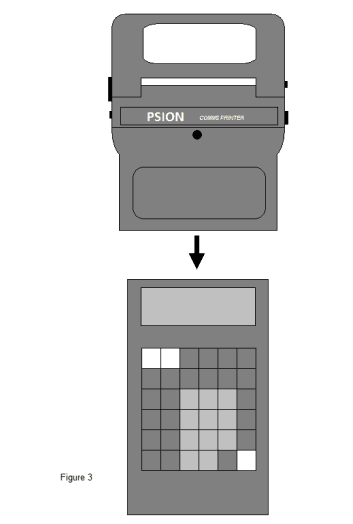
After removing the printer from the packaging, slide it over the top of the Organiser until the Organiser display shows through the window of the printer. See Figure 3.
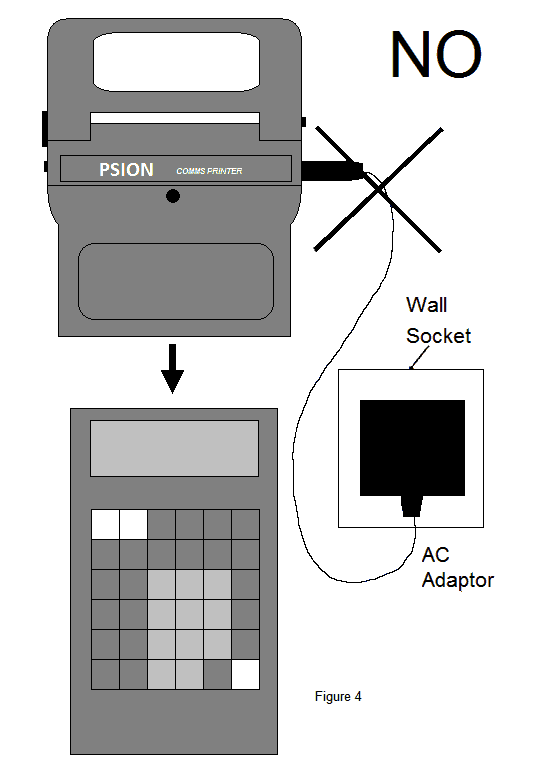
The Comms Printer is capable of delivering about two hours of continuous printing on a full charge. To charge battery, plug the AC (P/N 152117) or 12 VDC adaptor (P/N 151129) into 110 VAC or 12 VDC and connect the plug to the AC adaptor socket. The Comms Printer may be operated with the adaptor connected. The Comms Printer should be charged overnight prior to its first use, unless you wish to operate using the AC or DC adaptors. Always charge the unit overnight when charging to obtain a full charge. NiCad batteries have an inherent "memory." Unless fully charged each time, the battery pack's charge life will be limited.
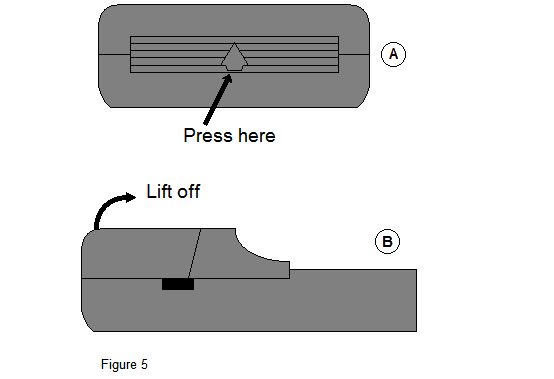
Remove the Paper Cover by pressing at the point shown in Figure 4A. Lift the cover off by tilting it towards the Organiser as shown in Figure 4B.
Set the Printer/Comms Switch to the Printer position. The LED should come on. If it does not, battery may be discharged. Plug in AC or DC adaptor. Feed the paper into the slot shown in Figure 5. Press the blue Paper Feed button until the paper comes out through the top of the print head and ribbon. Drop paper roll into paper guide. Replace the paper cover and snap it into place. Turn printer off.
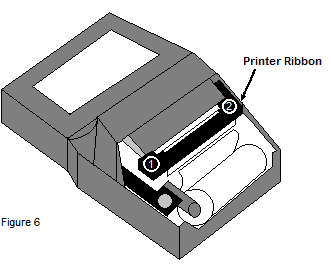
Remove Paper Cover as described in section 1.2. Push down on ribbon at location (1) shown in Figure 6. When end of ribbon pops up, remove ribbon by grabbing both ends and lifting up. Insert ribbon in place and press down at locations (1) and (2) until ribbon is firmly in place. With your thumb rotate the wheel at location (2) clockwise one full turn to insure that the ribbon is in place. Paper must pass through exposed ribbon and ribbon case in order to print.
NOTE: If you purchased your COMMS printer as part of a package which includes a pre-programmed data pack, the program may set communications parameters for you. Check with your supplier.
This procedure need not be repeated each time the Organiser is
turned on, unless a new battery is installed in the Organiser. The
setup procedure can be performed with the Comms Printer off.
For a more detailed description of the communications parameters,
refer to the Organiser II Comms Link Manual, pages 11-18.
NOTE: The ←, →, ↓, refer to the Organiser arrow keys.
Desired Parameters in Bold
| Press | Display |
|---|---|
| ON (2-3 TIMES) | FIND SAVE DIARY CALC PROG ERASE |
| C (3 TIMES) | TIME INFO ALARM COPY RESET COMMS |
| EXE | TRANSMIT RECEIVE SETUP TERM AUTO |
| S | BAUD→ 9600 |
| ← until | BAUD→ 2400 |
| ↓ | PARITY→ NONE |
| ↓ | BITS→ 8 |
| ← or → | BITS→ 7 |
| ↓ | STOP→ 1 |
| ↓ | HAND→ XON |
| → | HAND→ RTS |
| ↓ (2 times) | ECHO→ HOST |
| ← or → | ECHO→ LOCAL |
| ↓ | WIDTH→ NONE |
| EXE | WIDTH→ |
| 4 0 EXE | WIDTH→ 40 |
| MODE | EXIT ABANDON EDIT SAVE LOAD |
| EXE | TRANSMIT RECEIVE SETUP TERM AUTO |
NOTE: If your printer has a barcode option, the COMMS menu will not appear on the organiser screen. All COMMS and Printing functions are accessible through OPL only. See sections 4 and 5.
The Psion Organiser can be operated as a remote terminal. When using this mode with the Comms Printer, all characters typed will be printed. The printer will print following each time the EXE key is pressed or whenever 40 characters have been typed. Note: Unless you set WIDTH→40, if you type 41 or more characters without pressing EXE, then the 41st character will be lost.
To enter TERMinal mode, enter COMMS from main menu of Organiser, move cursor to TERM by typing the letter "T" or by using the arrow keys, then press EXE. To exit, press ON. A complete description of TERMinal mode can be found in the Comms Link Manual, Chapter 5. Turn the Comms Printer ON and set the Comms/Printer switch to Printer position. Wait at least 10 seconds for the printer to initialize before sending any characters for printing.
Since the Organiser keyboard is limited, some characters have to be generated using the ← and → keys in combination with letters when in TERMinal mode. In addition, special printer commands are attainable using the arrow keys.
| Right Arrow (→) with: | yields |
|---|---|
| → A | ^[ (ESC) |
| → D | ^ |
| → F | ! |
| → G | # |
| → H | & |
| → I | ' |
| → J | ? |
| → K | @ |
| → L | [ |
| → M | ¥ |
| → N | ] |
| → P | _ |
| → R | { |
← N Double width print (20 Columns). All following characters printed double wide until a CR (EXE key) is entered.
← T Cancels Double wide prim in the middle of a line.
← X Cancel all entered characters since last line terminator. If you are typing in a message to be printed and make a mistake, you cannot use the DEL key correct errors. Use ← X and re-enter entire line.
Printing a file is just like transmitting a file via Comms Link. Refer to Organiser comms link manual, page 20.
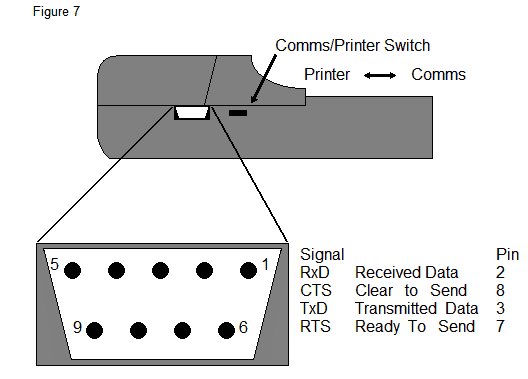
In addition to printing the Comms Printer also has full RS-232 communications capabilities identical to the Psion Comms Link. To switch from print to Comms mode, set the Printer/Comms switch to the "COMMS" position. See Figures 1 or 7.
The Comms Printer is equipped with a built-in DB-9 female connector for interfacing to other RS-232 devices. Pin Configuration is as follows:
The Comms Cable is available for connecting the Comms Printer to any serial port such as a PC using a 25 pin male connector. The cable's 25 pin female connector will make a direct connection.
If your Organiser uses a datapack containing a program which automatically sets the communications parameters, skip this action.
In order for any two serial devices to properly communicate, the communications parameters of both devices must match. Follow the example in section 2.0 on how to set up parameters, substituting your desired parameters for those shown. Refer to the Organiser Comms Link manual, page 27.
ASCII files can be transferred to and from the Organiser via the Comms function. For more detail on transferring files, refer to the Comms Link Manual, pages 58 to 64.
Just as the Psion Organiser Programming language (OPL) can be used with the Comms Link, it can also be used with the Comms Printer.
The LSET command is used to set the communications parameters. The Comms Printer is designed to operate at 2400 baud using CTS/RTS handshaking for printing functions. We suggest using the following parameters:
| Baud: | 2400 |
| Parity: | NONE |
| Bits: | 8 |
| Stop: | 1 or 2 |
| Handshake: | RTS |
| Protocol: | NONE |
| Width: | 40 |
| Timeout: | 30 |
| Echo: | LOCAL |
| Receive End Of Line: | don't care |
| Receive End Of File: | don't care |
| Receive Translate: | NONE |
| Transmit End Of Line: | <CR><LF> |
| Transmit End Of File: | <SUB> |
| Transmit Translate: | NONE |
To set these parameters, use the following statement:
LSET:(2400,0,8,1,2,1,40,-1,-1,-1,CHR$(13)+CHR$(10), CHR$(26),"",30,0)
If you prefer to use hex codes in place of decimal codes, substitute the following:
CHR$($0D) for CHR$(13)
CHR$($0A) for CHR$(10)
CHR$($1A) for CHR$(26)
Standard ASCII characters not attainable through the keyboard must be generated using the CHR$ statement with LPRINT command.
For example, the question mark (?) is generated using the following commands:
LPRINT CHR$(63) (decimal) or
LPRINT CHR$($3F) (hex)
Below is a list of keyboard characters accessible through OPL
| Char | Decimal Code | Hex Code |
|---|---|---|
| ! | 33 | 21 |
| " | 34 | 22 |
| # | 35 | 23 |
| & | 38 | 26 |
| , | 39 | 27 |
| \ | 47 | 2F |
| ? | 63 | 3F |
| [ | 91 | 5B |
| ¥ | 92 | 5C |
| ] | 93 | 5D |
| ^ | 94 | 5E |
| _ | 95 | 5F |
| ' | 96 | 60 |
| { | 123 | 7B |
| | | 124 | 7C |
| } | 125 | 7D |
| ~ | 126 | 7E |
| ° | 223 | DF |
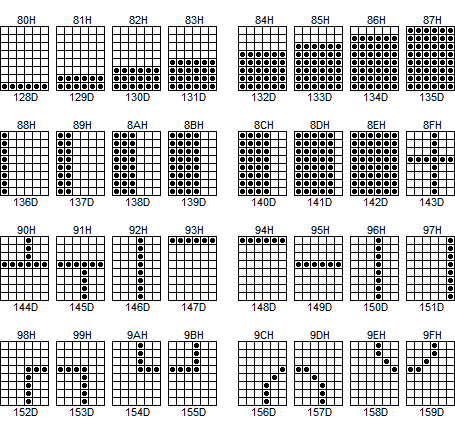
Additional graphic characters are shown below. Hex codes are shown above each block, decimal codes below each block. Note: 8 data bits with either 1 or 2 stop bits must be used for all characters above decimal code 127 (hex code 7F).
EXAMPLE: A Program to print the following:
GREG
would look like:
LPRINT CHR$(152)+CHR$(149)+CHR$(149)+CHR$(149)+ CHR$(149)+CHR$(149)+CHR$(149)+CHR$(153) LPRINT CHR$(150)+" GREG "+CHR$(150) LPRINT CHR$(154)+CHR$(149)+CHR$(149)+CHR$(149)+ CHR$(149)+CHR$(149)+CHR$(149)+CHR$(155)
The Comms Printer can be programmed to print enlarged (double width) characters. This changes the printer from 40 to 20 columns.
The code for enabling enlarged print is cntrl-N which is decimal 14 or hex 0E. The code for disabling double width is decimal 20 or hex 14 (cntrl-T). Example
LPRINT "Single "+CHR$(14)+"Double"+CHR$(20)+" Single"
yields:
Single Double Single
An equivalent statement is:
LPRINT "Single "+CHR$($0E)+"Double"+CHR$($14)+"Single"
The enable double width print command is also terminated with a <CR>. Therefore, if you desire to print more than one line with double-width characters, the cntrl-N command must be entered at the beginning of each line.
The Bar Code Interface makes your Organiser II and Comms Printer or Comms Modem into a powerful and versatile data capture unit. It will read a wide variety of Bar Code types, quickly and efficiently. These codes may then be stored, either in the internal memory of the Organiser or one Datapak fitted to one of the two slots at the back of the Organiser.
Note: The bar code Interface will not operate with an Organiser Model CM
The Bar Code Interface consists of a DB-9 male connector. The connector has a latching shell to prevent the Bar Code Wand from being accidentally removed. The wiring for the DB-9 is as follows:
| Pin No. | Signal |
|---|---|
| 2 | Barcode signal |
| 7 | Common |
| 9 | +5 VDC |
Connect the Bar Code Wand to the DB9 MALE connector (Figure 1). Turn on the Organiser by pressing the ON/CLEAR button twice. It is not necessary to turn the Comms Printer on for Bar Code operation. The Comms/Printer Switch can be in either position. The software which operates the Bar Code Interface Module is resident in the Comms Printer. This software occupies around 4K of memory, so if the internal memory of the machine is already nearly full, the OUT OF MEMORY message may be displayed. If this happens, delete any non-vital files or records or use the TIDY option in the DIARY to clear some memory space.
When the Comms Printer with Bar Code has been installed to the Organiser and the [ON/CLEAR] key pressed, a new function will be automatically added to OPL. This new function is BAR$, and may be used like any other function within your own programs. The syntax for the function is as shown in the following example:
b$=BAR$:(type%,mode%,options%)
The value of type% will determine which of these types, or which combination of types, will be recognized by the software. Just one type may be read, or any combination of types, so that certain types can be excluded if different product categories, say, have different types of bar code.
If, with the type% parameter, you specify more than one type of code, the software will automatically recognize the type and then decode it accordingly. If the bar code encountered is not one of the types you have allowed then the code will be ignored and no successful read will take place. To find out which value to give to the TYPE parameter, simply add together the values in the table below which correspond to the bar code types wish to allow.
| VALUE | ID CHAR | BAR CODE TYPE |
|---|---|---|
| 1 | A | EAN |
| 2 | B | UPC |
| 4 | C | CODE39 |
| 8 | D | ITF |
| 16 | E | CODABAR |
| 32 | F | TELEPEN |
| 64 | G | MODIFIED PLESSEY |
| 128 | H | PLESSEY |
| 256 | I | CODE128 |
The type of code read will be included as the first character of the string which is returned from the function. This may be read using OPL's LEFT$ function and then removed leaving the returned string containing the contents of the bar code itself.
For example, if you wish to allow EAN and ITF bar code types to be read, the value for the TYPE parameter should be 9, produced by adding 1 (for EAN) and 8 (for ITF). It is advisable to limit the set of valid bar code types to those needed for your application to maximize reading security. If you use an illegal value (such as 0) for the TYPE parameter, a DEVICE CALL ERROR will be displayed.
The second parameter required by the BAR$: function is mode%, The possible values of this integer parameter are shown in the table below:
| VALUE | MODE |
|---|---|
| 0 | Waits until a successful read is made |
| -1 | Waits for a good read or a key press |
| >0 | Waits for a good read or for mode% twentieths of a second |
| <-1 | Waits for a good read or a key press or for mode% twentieths of a second |
Where a time is specified or a key press allowed, if the specified time elapses or any key is pressed before a good read is made then a null string is returned. Note that if a key is pressed, the ASCII code for that key will be retained in the keyboard buffer. A subsequent use of the GET function will return that ASCII value.
The third parameter to the BAR$: function, the OPTIONS parameter, may be used to specify any or all of the options in the table below.
| VALUE | OPTION |
|---|---|
| 1 | Use Low current mode |
| 2 | Return TELEPEN codes in numeric format, not ASCII (checksum excluded) |
| 4 | Use two checksum digits for MODIFIED PLESSEY, not one. |
| 8 | Use one checksum digit for CODE39 (modulo 43), not zero. |
| 16 | Use full-ASCII CODE39, not 43-character CODE39. |
To specify more than one option, simply add together the values in the table to produce the value for the OPTIONS parameter. If you do not wish to use my of these options, you can omit the OPTIONS parameter completely.
The Low current mode can considerably increase battery life, although it may occasionally reduce the first read rate. For example, with one Datapack installed, the consumption while using the Bar Code Interface may be reduced to as little as one sixth of the normal current consumption. This reduction is achieved by switching packs on and off at various times. This can cause problems if other hardware is connected to the Organiser. Future Psion hardware may disable this low current mode, but it is perfectly safe to use if you only attach Datapacks or Rampacks (or nothing at all) to your Organiser at the same time as the Bar Code Interface.
When a successful read is made, the first character of the string returned by BAR$: will be an ID character. THe table in he section on the TYPE parameter lists the ID character returned for the different types of bar code. If your TYPE parameter allowed more than one type of bar code to be read, the ID character tells you which type was in fact encountered.
A successful read of, for example, an EAN type bat code might return a string like "A5012672905007". The first character, "A", signifies that the bar code encountered was an EAN type, and the last character is the EAN checksum digit. The rest of the digits make up the code itself. To split up the returned string, use the OPL string-slicing functions LEFT$, RIGHT$ and MID$. Note that some types of bar code return non-printable ASCII characters, so displaying them directly on the screen may have unpredictable results.
Start and stop characters are only returned for CODABAR and CODE128 types. For CODABAR a capital letter A, B, C, or D will be returned as the start character. This will be the second character in the string, immediately after the ID character. The stop character T, N, * or E will be returned as the last character in the string. For example, "EA1234T" is a valid CODABAR bar code. For CODE128 the start character will either be lowercase g, h or i; no stop character will be returned.
Any checksum digits will always be at the end of the returned string. PLESSEY has 2 checksum digits while MODIFIED PLESSEY has either 1 or 2, depending on the value of the OPTIONS parameter. Note that the TELEPEN checksum digit remains in ASCII even if you use the OPTIONS parameter to specify numeric TELEPEN mode.
The four function codes in CODE128 are returned as characters with ASCII values 128, 129, 130 and 131, for functions 1 to 4 respectively.
This version of the Bar Code Reader Interface software has a direction flag at address $E0. After a successful read, this byte will contain 0 if the bar code was read forwards, or a non-zero value otherwise. Also, there is a flag at location $21A8, which is set if UPCE code is successfully read. This flag is cleared if the code was a UPC A code. Use the OPL function PEEKB to loot at the contents of these locations. These bytes should only be read after a call to the BAR$: function, and before any calls to other OPL language extensions.
Even if more than one type is specified, an increased delay will only be noticed when CHANGING to another type, since the last successful decoding algorithm is always kept in RAM. This is not true in versions below 3.0.
| ERROR | MESSAGE |
|---|---|
| 194 | BAD DEVICE CALL |
| 205 | ARG COUNT ERR |
| 224 | TYPE MISMATCH |
| 230 | DEVICE MISSING |
| 231 | BAD DEVICE CALL |
The first of these two programs will only read 13 digit ( not 8 digit ) EAN bar codes and will wait until a successful read is made. To exit from the program, press the [ON/CLEAR] key.
DEMO1: LOCAL A$(65) ESCAPE OFF PRINT " READY" DO A$=MID$(BAR$:(1,-1),2,255) :REM EAN ONLY IF LEN(A$)=13 :REM CHECK EAN-I3 BEEP 200,80 CLS :PRINT A$ ENDIF UNTIL KEY=1
This program will read any of the bar code formats supported by the Bar Code Interface software and will end if a successful read is not made before 30 seconds has elapsed.
DEMO2: LOCAL B$(65),T$(1),R$(10),K% ESCAPE OFF R$=" READY" PRINT R$ DO B$=BAR$:(15,-600) :REM READ ALL TYPES, EXIT AFFER 30 SECS OR KEY IF B$="" :REM MUST BE TIMEOUT OR KEY K%=KEY IF K%=0 :CLS :PRINT "TIMEOUT EXPIRED PRESS ANY KEY" :GET :CLS :PRINT R$ ENDIF ELSE CLS T$=LEFT$(B$,1) :REM GET TYPE DECODED IF T$="A" :PRINT "EAN" ELSEIF T$="B" :PRINT "UPC" ELSEIF T$="C" :PRINT "CODE39" ELSEIF T$="D" :PRINT "ITF" ENDIF PRINT MID$(B$,2,255) BEEP 200,30 ENDIF UNTIL K%=1
The following program will read a barcode, store it, along with a description and quantity, in memory, and print the data.
prtbar: LOCAL item$(60),desc$(20),qty%,i%,opt%,pos%,code$(4) ESCAPE OFF REBOOT: LSET:(2400,4,7,2,2,0,40,CHR$(13)+CHR$(10),CHRS(26),"",CHR$(13)+CHR$(10),CHR$(26),"",30,0) LOOP:: PRINT " BARCODED ITEMS";chrS(9);" INVENTORY DEMO" PAUSE 30 IF EXIST("A:bartest") OPEN "A:bartest",A,item$,qty%,desc$ ELSE CREATE "A:bartest",A,item$,qty%,desc$ ENDIF AGAIN: CLS DO opt%=MENU("INPUT,VIEW,PRINT,RESET,QUIT") IF opt%=1 LPRINT DO cls print "INPUT ITEM #"; item$=BAR$:(511,-400) IF item$="" GET GOTO AGAIN: ENDIF cls print "ITEM#";LEFT$(item$,10) beep 400,800 prit"ENTER QTY "; input qty% if qty% break endif if find(item$) a.qty%=qty% LPRINT item$,a.desc$,"QTY=",qty% LPRINT LPRINT UPDATE ELSE CLS AT 1,1 PRINT "Part # not Found Add Y/N?" KSTAT 1 do i%=get until i%=%Y or i%=%N IF i%=%Y cls at 1,1 Print " Description? " input desc$ a.desc$=desc$ a.item$=item$ a.qty%=qty% append LPRINT item$,desc$,qty% endif LPRINT ENDIF UNTIL qty% ELSEIF opt%=2 FIRST IF a.qty% DO CLS AT 1,2 PRINT "QUANTITY=",a.qty% i%=view(1,a.item$+" "+a.desc$) IF i%=1 BREAK ELSEIF i%=2 cls pos%=pos edit a.item$ edit a.desc$ CLS PRINT "ENTER QTY:" input a.qty% update position pos% ELSEIF i%=8 KSTAT 1 at 1,2 print "ERASE Y/N?" DO i%=GET UNTIL i%=%Y or i%=%N IF i%=%Y ERASE ENDIF ENDIF NEXT UNTIL EOF ELSE CLS BEEP 200,100 PRINT "Nothing in the file yet!" PAUSE -30 FNDIF ELSEIF opt%=3 FIRST IF a.qty% CLS PRINT " PRINTlNG";CHR$(9);" REPORT" LPRINT LPRINT LPRINT LPRINT CHR$(14);" INVENTORY REPORT" LPRINT LPRINT LPRINT "Date:",datim$ LPRINT LPRINT "ITEM# QTY DESCRIPTION" DO LPRINT LEFT$(a.item$,10),FIX$(a.qty%,0,-4);" ";a.desc$ NEXT UNTIL EOF LPRINT LPRINT PAUSE -30 ELSE CLS BEEP 200,100 PRINT "Nothing in the file yet!" PAUSE -30 ENDIF ELSEIF opt%=4 CLS PRINT " All data";chr$(9);" will be lost!" PAUSE -30 CLS PRINT "Are you Sure (Y/N)?", DO i%=GET UNTIL i%=%Y OR i%=%N PRINT CHR$(i%) PAUSE 10 IF i%=%Y CLOSE DELETE "A:bartest" CLS GOTO LOOP:: ELSE CLS GOTO AGAIN:: ENDIF ENDIF UNTIL opt%=0 or opt%=5 CLOSE
To read a bar code, position the reader so that it can be drawn across, or can read across in the case of beam scanners, the full length of the code (across all of the bars) in one movement.
A wand may typically be used at a variety of angles, refer to the wand product manual for the exact limits of this range. The wand may be used at any speed from 3 to 30 inches a second, but a speed somewhere near the middle of the range will be most successful. Depending upon whether or not the OPL program in the Organiser has been set to do so, the Organiser will emit a BEEP to signify success when a successful read has been made.
Most wands and laser scanners use a red light, so you may have difficulty reading codes printed in red or on a red background.
After using the Bar Code Interface, switch off the machine and unplug the cable. The software will still be stored in memory however, so this must be removed by switching the machine back on and pressing the [ON/CLEAR] again. The bar$: function will then be removed from the language, and the 3K of memory freed again for other uses. If the cable is unplugged during use, a DEVIUE MISSING error will be reported.
NOTE: The Bar code Interface Module and an attached reader (wand or scanner) acts as an extra drain on the Organiser's battery, so allowance should be made for the slightly shorter expected battery life when the Bar Code reader is in heavy use. To reduce the effects of this problem, remove any Datapaks which are not being used, as these also drain the Organiser's power.
PSION INC., 118 Echo Lake Road, Watertown, CT 06795