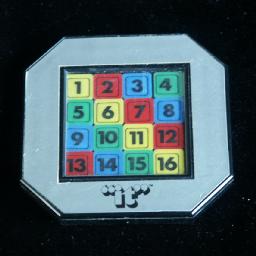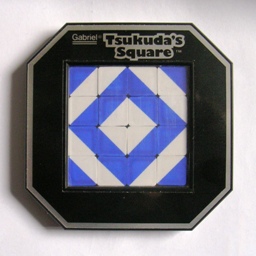


Tsukuda's Square, also known as 4x4 or "It", is a very difficult type of sliding piece puzzle. It consists of 16 tiles in a 4x4 square. On the left of each row is a plunger, which pushes that row one tile to the right. At the top is a large plunger which pushes the three rightmost columns down one tile. Springs push back the plungers as soon as they are released. If the top plunger is pushed in, the first row plunger can no longer move.
There are several different designs (see also Cubic Circular Issue 2 p9). The version that was marketed in Britain was called "It", and it had tiles that were numbered 1 to 16, and the tiles were also made of four different colours plastic, four each of the colours green, red, yellow, and blue. In the USA the puzzle was marketed by Gabriel under the name "Tsukuda's Square", and it apparently came in several different versions. The most difficult version has black tiles numbered from 1 to 16. A version in which the tiles are split diagonally half-red and half-white is shown above as well. There are 4 sets of 4 identical tiles in that version. That design was also done in blue and white. I believe the third version simply has four tiles of four colours.
Tsukuda's Square is closely related to Rubik's Fifteen, but much more difficult because it has fewer plungers. It was invented by Toshihisa Suga, patented on 26 January 1983, GB 2,101,897.
If your browser supports JavaScript, then you can play the 'It' puzzle by clicking the link below:
I have calculated God's Algorithm to find out how many moves each position needs to get solved. This is for the version with diagonally split tiles. A move in this context is any of the 12 ways of cycling seven tiles, as explained in the solution. The solved position has a pattern of concentric diamonds. It shows that it can always be done in at most 13 such cycles (10.005 on average).
| Depth | Positions |
|---|---|
| 0 | 1 |
| 1 | 12 |
| 2 | 93 |
| 3 | 636 |
| 4 | 4,174 |
| 5 | 26,808 |
| 6 | 165,092 |
| 7 | 917,693 |
| 8 | 4,071,834 |
| 9 | 12,552,545 |
| 10 | 23,737,340 |
| 11 | 18,619,383 |
| 12 | 2,938,388 |
| 13 | 29,001 |
| Total | 63,063,000 |
| 1a. Cycle all but top left tile clockwise: | TBtb | |
| 1b. Cycle all but top left tile anti-clockwise: | BTbt | |
| 2a. Cycle all but top right tile clockwise: | ATBtba | |
| 2b. Cycle all but top right tile anti-clockwise: | ABTbta |
These sequences can also be performed on any other pair of adjacent rows.
Phase 1: Solve the first tile of the top row.
Note that the method used in b-c above to bring up a tile to the desired row will be used whenever necessary in later phases without further explanation.
Phase 2: Solve the rest of the top row.
In this phase we will use 1a to successively place tile 4, 3 and 2 at the
second position of the first row.
Phase 3: Solve the second row.
This is done using exactly the same method as the first row.
Phase 4: Solve tiles 15 and 16.
Phase 5: Solve tile 13.
Depending on its position, do one of the following:
Row 3, column 1: Do 1a, 2b.
Row 3, column 2: Do 1b three times, 2a twice.
Row 3, column 3: Do 2b twice, 1a three times, 2b once.
Row 3, column 4: Do 2a twice, 1a twice, 2a twice.
Row 4, column 1: Do nothing.
Row 4, column 2: Do 1a twice, 2b twice.
The final phase below uses three new sequences on the bottom two rows:
| 3a. |
Do 1b three times, 2a twice, 1a twice, 2b twice:
[Swaps pieces (3,1)-(3,2) and (3,3)-(4,2).] |
DTdt DTdt DTdt C TDtd TDtd c TDtd TDtd C DTdt DTdt c |
 |
| 3b. |
Do 1b three times, 2b three times, 1b once, 2b once:
[Swaps pieces (3,1)-(3,3) and (3,2)-(4,2).] |
DTdt DTdt DTdt C DTdt DTdt DTdt c DTdt C DTdt c |
 |
| 3c. |
Do 1a once, 2a once, 1b twice:
[Swaps pieces (3,2)-(3,3) and (3,1)-(4,2).] |
TDtd C TDtd c DTdt DTdt |
 |
These sequences do not move the tile at row 3 column 4, and make two swaps amongst the remaining four unsolved tiles.
Phase 6: Solve the remaining tiles.
It is always possible to get one of the positions in the table below (or
if you're lucky even to solve it) by doing one of the sequences 3a-c. Then
do the sequence shown in the table.
If this places tile 12 correctly, then you can now solve it by applying
one of 3a-c.
If tile 12 was correctly placed before, then the sequence from the table
will have moved it out, and you will have to repeat this phase once more
to solve the puzzle.
 14 10 11  9    11  9 14 10    10 14  9 11     9 11 10 14
    12             12             12             12

 14 10  9 12    14  9 11 12
11 10 |
Perform TCtc, 3a, CTct. |  |
 10 12 11  9     9 12 14 10    14 12  9 11    11 12 10 14
    14             11             10              9

 10 11  9 12    10 14 11 12     9 14 10 12     9 11 14 12
14 9 11 10 |
Perform TCtc, 3b, CTct. |  |
 11 10 12  9    14  9 12 10     9 14 12 11    10 11 12 14
    14             11             10              9

 11  9 10 12    11 10 14 12
14 9 |
Perform TCtc, 3c, CTct. |  |