Rubik's Ufo


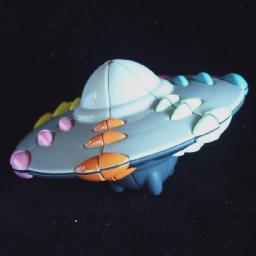
The Rubik's Ufo puzzle is in the shape of a flying saucer. It consists of two disks,
each with six segments. There are two types of moves - the disks can turn with respect
to each other (by multiples of 60 degrees), or any half can be given a 180 degree twist
so that three segments of the top disk are swapped with three segments of the bottom. The top
disk is light grey, the other disk dark grey. The segments have colours along their sides
so that adjacent segments should have matching colours.
The Ufo is based on a simpler early puzzle by Rubik, called Rubik's Cheese. That puzzle
has only one circular layer of six pieces, so it is like a Ufo that is restricted to do
only twists and not disk turns. The Rubik's Cheese is discussed further on the page
about a related puzzle called Kep Korong.
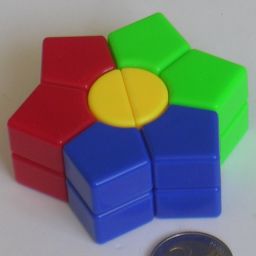
The second picture above shows a puzzle that is based on a two-layer Square-1,
but with only corner pieces in each layer so that it has a six-pointed star shape. The
pieces come in three different colours of plastic, four of each colour. In the solved position,
each third of the puzzle has a single colour.
If your browser supports JavaScript, then you can play Rubik's Ufo by clicking the link below:
The number of positions:
There are 12 segments giving a maximum of 12! positions. Since rotations of the
puzzle do not matter, we can consider any single piece as already solved and just
arrange the other 11, so there really are only at most 11! = 39,916,800 positions.
All these positions are indeed possible.
In the three-coloured puzzle there are four pieces of each colour. This means that
there are 12! / 4!3 = 34,650 positions if rotations are considered different.
There are therefore approximately 34,650/12 = 2,887 positions, but this is a slight underestimate
because some positions are symmetric and so do not give 12 distinct patterns when the puzzle
is reoriented. To get the exact number, we need to use Burnside's Lemma,
which gives 2,940 positions. If you include the orientation of the seam of the centre, then
there are 8,731 positions (with three of them being solved positions).
I have used a computer to calculate God's algorithm for the Rubik's Ufo puzzle, and the table below
shows how many positions there are for each number of moves. It shows that it can be solved in
14 moves (11.126 on average), or 16 (12.965 on average) if every 1/6th turn is counted as a separate
move.
Click to show full table.
| Depth | Face turn metric | Sixth turn metric |
|---|
| 0 | 1 | 1 |
|---|
| 1 | 8 | 5 |
|---|
| 2 | 36 | 20 |
|---|
| 3 | 189 | 79 |
|---|
| 4 | 870 | 306 |
|---|
| 5 | 4,182 | 1,185 |
|---|
| 6 | 19,502 | 4,550 |
|---|
| 7 | 89,508 | 17,240 |
|---|
| 8 | 390,114 | 64,582 |
|---|
| 9 | 1,623,294 | 236,713 |
|---|
| 10 | 6,100,151 | 841,951 |
|---|
| 11 | 16,424,349 | 2,825,790 |
|---|
| 12 | 14,501,714 | 7,998,476 |
|---|
| 13 | 762,762 | 14,330,740 |
|---|
| 14 | 120 | 11,028,854 |
|---|
| 15 | | 2,546,648 |
|---|
| 16 | | 19,660 |
|---|
| Total | 39,916,800 | 39,916,800 |
|---|
Click to hide full table.
| | Face turn metric | |
|---|
S
i
x
t
h
t
u
r
n
m
e
t
r
i
c |
| 0 | 1 | 2 | 3 | 4 | 5 | 6 | 7 | 8 | 9 | 10 | 11 | 12 | 13 | 14 | Total |
|---|
| 0 | 1 | | | | | | | | | | | | | | | 1 |
|---|
| 1 | | 5 | | | | | | | | | | | | | | 5 |
|---|
| 2 | | 2 | 18 | | | | | | | | | | | | | 20 |
|---|
| 3 | | 1 | 12 | 66 | | | | | | | | | | | | 79 |
|---|
| 4 | | | 6 | 66 | 234 | | | | | | | | | | | 306 |
|---|
| 5 | | | | 45 | 312 | 828 | | | | | | | | | | 1,185 |
|---|
| 6 | | | | 12 | 234 | 1,389 | 2,915 | | | | | | | | | 4,550 |
|---|
| 7 | | | | | 84 | 1,230 | 5,856 | 10,070 | | | | | | | | 17,240 |
|---|
| 8 | | | | | 6 | 597 | 5,910 | 24,151 | 33,918 | | | | | | | 64,582 |
|---|
| 9 | | | | | | 126 | 3,555 | 27,103 | 94,002 | 111,927 | | | | | | 236,713 |
|---|
| 10 | | | | | | 12 | 1,098 | 18,872 | 117,413 | 356,388 | 348,168 | | | | | 841,951 |
|---|
| 11 | | | | | | | 168 | 7,500 | 91,511 | 498,632 | 1,313,774 | 914,205 | | | | 2,825,790 |
|---|
| 12 | | | | | | | | 1,692 | 41,890 | 423,505 | 2,065,275 | 4,160,160 | 1,305,954 | | | 7,998,476 |
|---|
| 13 | | | | | | | | 120 | 10,684 | 191,394 | 1,715,544 | 6,631,890 | 5,615,412 | 165,696 | | 14,330,740 |
|---|
| 14 | | | | | | | | | 696 | 40,056 | 606,240 | 4,112,022 | 5,889,386 | 380,382 | 72 | 11,028,854 |
|---|
| 15 | | | | | | | | | | 1,392 | 51,150 | 604,212 | 1,678,970 | 210,900 | 24 | 2,546,648 |
|---|
| 16 | | | | | | | | | | | | 1,860 | 11,992 | 5,784 | 24 | 19,660 |
|---|
| Total | 1 | 8 | 36 | 189 | 870 | 4,182 | 19,502 | 89,508 | 390,114 | 1,623,294 | 6,100,151 | 16,424,349 | 14,501,714 | 762,762 | 120 | 39,916,800 |
|---|
In Sloane's On-Line Encyclopedia of Integer Sequences
these are included as sequences
A079819
and
A079820.
The 3-colour puzzle gives the results shown in the table below.
It shows that it can be solved in 10 moves (6.7520 on average),
or 15 (10.665 on average) if every 1/6th turn is counted as a separate
move.
Click to show full table.
| Depth | Sixth turn metric | Face turn metric |
|---|
| 0 | 3 | 3 |
|---|
| 1 | 6 | 18 |
|---|
| 2 | 13 | 43 |
|---|
| 3 | 21 | 147 |
|---|
| 4 | 45 | 297 |
|---|
| 5 | 90 | 876 |
|---|
| 6 | 159 | 1,716 |
|---|
| 7 | 276 | 2,931 |
|---|
| 8 | 474 | 2,292 |
|---|
| 9 | 870 | 390 |
|---|
| 10 | 1,455 | 18 |
|---|
| 11 | 2,034 | |
|---|
| 12 | 1,974 | |
|---|
| 13 | 1,098 | |
|---|
| 14 | 201 | |
|---|
| 15 | 12 | |
|---|
| Total | 8,731 | 8,731 |
|---|
Click to hide full table.
| | Face turn metric | |
|---|
S
i
x
t
h
t
u
r
n
m
e
t
r
i
c |
| 0 | 1 | 2 | 3 | 4 | 5 | 6 | 7 | 8 | 9 | 10 | Total |
|---|
| 0 | 3 | | | | | | | | | | | 3 |
|---|
| 1 | | 6 | | | | | | | | | | 6 |
|---|
| 2 | | 3 | 10 | | | | | | | | | 13 |
|---|
| 3 | | 3 | 9 | 9 | | | | | | | | 21 |
|---|
| 4 | | 3 | 6 | 21 | 15 | | | | | | | 45 |
|---|
| 5 | | 3 | 9 | 18 | 39 | 21 | | | | | | 90 |
|---|
| 6 | | | 9 | 36 | 30 | 60 | 24 | | | | | 159 |
|---|
| 7 | | | | 39 | 72 | 48 | 99 | 18 | | | | 276 |
|---|
| 8 | | | | 18 | 75 | 156 | 93 | 120 | 12 | | | 474 |
|---|
| 9 | | | | 6 | 48 | 234 | 276 | 222 | 84 | | | 870 |
|---|
| 10 | | | | | 15 | 219 | 471 | 534 | 204 | 12 | | 1,455 |
|---|
| 11 | | | | | 3 | 114 | 489 | 852 | 522 | 54 | | 2,034 |
|---|
| 12 | | | | | | 24 | 219 | 804 | 831 | 96 | | 1,974 |
|---|
| 13 | | | | | | | 42 | 357 | 555 | 132 | 12 | 1,098 |
|---|
| 14 | | | | | | | 3 | 24 | 84 | 84 | 6 | 201 |
|---|
| 15 | | | | | | | | | | 12 | | 12 |
|---|
| Total: | 3 | 18 | 43 | 147 | 297 | 876 | 1,716 | 2,931 | 2,292 | 390 | 18 | 8,731 |
|---|
Notation:
Mentally label the segments of the disk clockwise from A to F. Any twist of three segments
can then simply be denoted by the letter of the middle segment. A single clockwise turn of the
top layer will be denoted by a u, and an anti-clockwise turn by u'. Turns of the bottom layer
are denoted by d for a clockwise turn (when looking from underneath directly at the bottom half)
and d' for an anti-clockwise turn.
Rubik's Ufo Solution 1:
Phase 1: Pair up the pieces of the top layer with those of the bottom layer.
Each piece that belongs in the top layer has a twin piece belonging in the bottom layer which
has the same two colours. This phase will match up such pairs.
- First do a disk turn to try and match up as many pairs of pieces as possible.
- Find any unmatched pair of pieces. If at all possible, find an unmatched pair
that lies in adjacent or in opposing segments. If you cannot find such a pair,
then hold the puzzle such that segment A has one piece of an unmatched pair and
do the sequence uCu'd'Cd.
- Do any twists to bring the unmatched pair in opposite segments, and in the same disk.
- Assuming the unmatched pair are in the top disk at segments A and D, then do uCu'.
- Repeat steps b-d until all segments have matching pairs.
Phase 2: Orient the segments
- If more than three segments are flipped, then turn over the Ufo.
- If any half of the Ufo has two or three flipped segments, then twist that half.
- If there are still segments flipped, for example segment A, then do CDE and turn
over the puzzle. If necessary, repeat until no flipped segments are left.
Phase 3: Arrange the segments
- Find a segment that is incorrectly positioned. It can be put in place using a single
swap, by one of the following move sequences:
1. To swap adjacent segments A and B, do: C uCu'd'Cd C.
2. To swap opposing segments A and D, do: D uCu'd'Cd D.
3. To swap other segments A and C, do: u DC u'u' B uu D u'.
Another useful sequence (which works on the Cheese as well) is CDECDE, which cycles the segments B->D->F.
- Repeat step a until the Ufo is solved.
Rubik's Ufo Solution 2:
This method was devised by Bram Cohen, who kindly allowed me to include it here.
Phase 1: Solve the top layer.
This is fairly easy so most details will be omitted.
- Solve three adjacent pieces of the top layer,
i.e. build a block of three light grey pieces so that their colours match.
- Put the three solved pieces on the left of the top layer. Note that
you can still turn over the right half of the puzzle and turn the bottom layer without
disturbing the three pieces at all.
- Without disturbing the three solved pieces, put the other
three light-grey pieces together in one block on the bottom layer, so that their colours match.
- Bring the two blocks of light-grey pieces together
in the top layer. The top layer has now been solved.
Phase 2: Solve the bottom layer.
Remember that we mentally labelled the segments A-F clockwise. During this phase I will
assume that B is at the front, so that A is just to its right.
- Turn the bottom layer so that as many pieces as
possible are matched up with those in the top layer.
- The bottom layer pieces that are matched up
are now considered to be solved. The other pieces in the bottom layer will
be solved relative to these. Note that since in a moment the top layer will
be temporarily mixed, these bottom layer pieces will be your guide points.
If however two adjacent pieces in the bottom layer seem to be exchanged, then
choose one of these to be your guide instead, and consider the other 5 pieces
to be incorrectly positioned with respect to that piece. It may seem that this
is more work, but this is due to a parity restriction - only even permutations
are possible by the steps below, so a 5-cycle is possible while a 2-cycle is
not.
- If the top layer contains no bottom layer
pieces (which is the case the first time you do this step), then turn the
bottom layer so that one of its incorrect pieces is in the front (in
segment B). If there is a bottom layer piece in the top layer, then
find out where in the bottom layer that piece belongs, and turn the
bottom layer to bring that to the front.
- Do the sequence A u' A u' A u A. This mixes the
top layer somewhat, but leaves the bottom layer intact except for the front
piece, which has been replaced.
- If the bottom layer is now solved, then turn the
puzzle upside down, and go back to step a to solve the other layer.
- This step is exactly the same as step c:
If the top layer contains no bottom layer pieces, then turn the
bottom layer so that one of its incorrect pieces is in the front (in
segment B). If there is a bottom layer piece in the top layer, then
find out where in the bottom layer that piece belongs, and turn the
bottom layer to bring that to the front.
- Do the sequence A u' A u A u A. This unscrambles
most of the top layer again, and only affects the front piece of the bottom
layer. Note that this sequence is the inverse of the one in step d.
- If the bottom layer is solved, then the top layer
will be correct too and you are finished. Otherwise, go back and repeat steps c-g.
Three-colour puzzle Solution:
Notation:
Hold the puzzle so that the seam in the centre goes from front to back. A twist of the right
hand half of the puzzle will be denoted by R. A single clockwise turn of the top layer will be
denoted by a u, and an anti-clockwise turn by u'. Turns of the bottom layer are denoted by d for
a clockwise turn (when looking from underneath directly at the bottom half) and d' for an anti-clockwise
turn.
Phase 1: Bring the blue pieces together in one layer.
This is fairly easy so most details will be omitted.
- Put the biggest block of blue pieces in the left half of the top layer.
- Put a loose blue piece into the bottom layer if it does not already have any.
- Turn u however much is needed to bring the solved blue block to the back of the left half, adjacent to the seam.
- Turn d however much is needed to bring a loose blue block to the front of the left half, adjacent to the seam.
- Do R to bring the blue pieces together.
- Repeat a-e until all the blue pieces are together in the top layer.
Phase 2: Solve the rest.
- Turn the u so that the two non-blue pieces are at the back, one on each side of the seam.
- If the non-blue pieces are of different colours, then
- Do the moves R d' R.
- Turn d until the piece at the front to the left of the seam is the same colour as the non-blue piece at the back of the top layer.
- Do the moves R d R
- Turn over the puzzle so that the blue pieces are on the bottom layer, with the two identical non-blue pieces at the back.
- In the top layer there are two pieces in the u layer that have a different colour to the others. Turn the top
layer so that one of them lies at the back of the left half, and the other lies somewhere in the right half.
- Depending on the location of the odd piece on the right, do one of the following:
- At the back: R u u u
- In the middle: uuu R u'd'd' R u' R u
- At the front: R uu R u'u' R u'u' R uuu
