This Psion LZ/LZ64 Operating manual is also available in Dutch, French, German, and Italian.
© Copyright Psion PLC 1989
All rights reserved. This document and the programs referred to herein are copyrighted works of Psion PLC, London, England. Repeoduction in whole or in part including utilisation in machines capable of reproduction or retrieval, without the express permissino of Psion PLC, is prohibited. Reverse engineering is also prohibited.
The information in this document is subject to change without notice.
Psion and the Psion logo are registered trademarks of
Psion PLC.
Psion Organiser II, Datapak and Rampak are
trademarks of Psion PLC.
Lotus and 1-2-3 are registered trademarks of Lotus
Development Corporation.
Part no. 6100-0065
V1Apr89
1 The battery Fitting the battery Replacing the battery 2 Getting started Switching on Setting the time 3 Saving data Getting used to the keyboard Saving a record 4 Finding and changing records Finding a record Changing, copying and deleting a record 5 Alarms Setting an alarm 6 Month - the calendar 7 The diary Entering an appointment The diary menu options 8 The calculator Doing a calculation Using a result again Editing a calculation Calculator memories 9 The notepads Using the main notepad The notepad menu options Using more than one notepad 10 World dialling codes and times Resetting the home location Finding out codes and times 11 Time Putting the clock forward or back one hour Stopwatch Timer
12 Files Selecting a file 13 Storage devices Devices A: B: and C: Datapaks, Rampaks and internal memory 14 Xfiles: extra data files The MAIN data file Xfiles The current file 1 Find 2 Save 3 New 4 Print 5 Open 6 Sort 7 Dir 8 Copy 9 Delete 15 Utils: general utilities 1 Search 2 Info 3 Sound 4 Dir 5 Copy 6 Delete 7 Password protection 8 Lang 9 Reset 10 Format 16 Customising the main menu Deleting main menu items Restoring main menu items Adding a data file notepad or OPL procedure name 17 Printing Printing from the Organiser 18 Troubleshooting
The Psion Organiser II Models LZ and LZ64 come with a powerful set of utilities including:
The Organiser also has its own built-in programming language called OPL. The language is designed to exploit all the machine's facilities to the full and to let you tailor the Organiser to your own specific needs.
The Organiser has an internal memory and two external devices which are the equivalent of disc drives on a desk-top computer. Each one can hold a Datapak for you to store information on, or a program pack containing a program such as the Pocket Spreadsheet.
The internal memory of the Model LZ holds around 32000 characters and that of the LZ64 around 64000 characters. In addition, one or more Datapaks can boost the storage capacity considerably - by up to 128000 characters per Datapak.
Organiser peripherals allow you to print out information stored in your Organiser, connect it to another computer, send information over a telephone line, and much more. The range available includes:
Peripherals:
Printer
Mains adaptor
Comms Link - to link to a desk-top computer, modem or another printer
Organiser Developer - to debug OPL programs on a desk-top computer
Bar-code reader and card-swipe reader
Formatter - to clear and reformat Datapaks
Pager
Program packs:
Pocket Spreadsheet. (Lotus 1-2-3 compatible)
Oxford English Spelling Checker
Finance Pack
Maths Pack
Formulator
Storage packs:
Datapaks - EPROM 8,16.32,64 and 128K
Rampaks - RAM 32K
The range is constantly expanding, so contact PSION or your local distributor for a full list of available products.
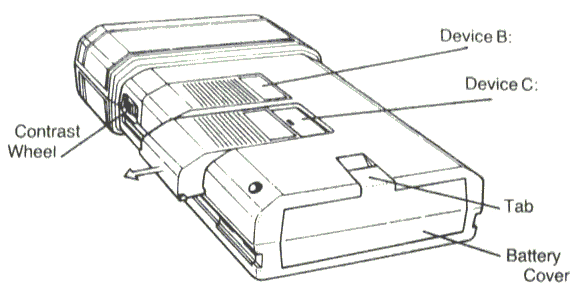
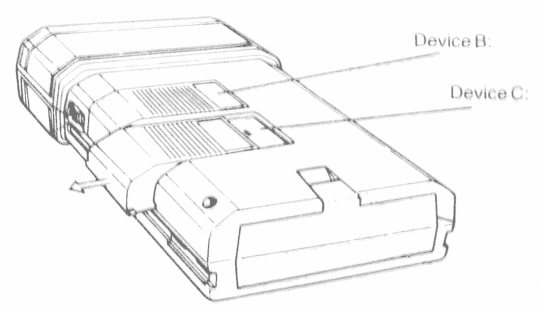
This is a rear view of the Organiser with the protective case removed. Devices B: and C:, which are protected by sliding covers, can each be fitted with a Datapak, a Rampak or a program pack.
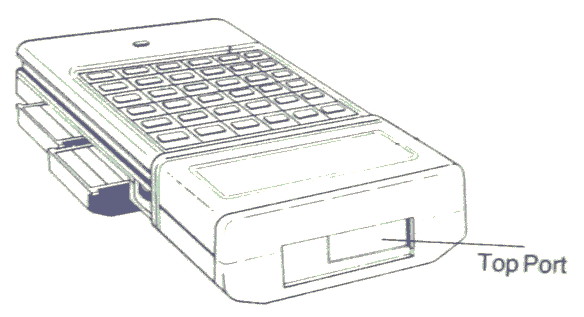
This is a top view of the Organiser showing the top port which can be fitted with peripherals such as the Psion printer or the Comms Link.
The manual is divided into two parts:
The Organiser Programming Language (OPL) is covered in the Programming Manual which also contains more technical information.
The data in the internal memory of the Organiser relies on the presence of the battery. It is therefore very important that you know how to fit the battery and what to do when it runs low. It is advisable to have a replacement battery ready for when this happens.
The Organiser uses one 9 volt PP3 size battery. We recommend alkaline batteries as the use of any other kind may result in a loss of data. To fit the battery:
If you are a heavy user, you can expect to change the battery about every 3 months. This message warns you when the battery is low:
BATTERY TOO LOW
The message is displayed for 4 seconds and then the machine switches itself off. You should replace the battery with a new one as soon as possible.
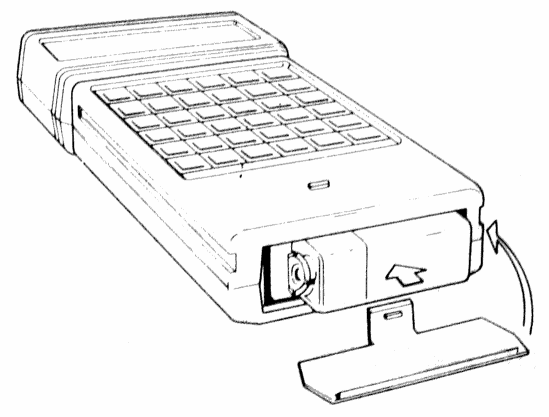
While you are replacing the battery, the Organiser must be off. Be careful not to press ON/CLEAR while the battery is removed. To replace the battery:
You can use the Psion Mains Adaptor to power your machine while you change batteries.
Data on Datapaks and Rampaks does not rely on the battery.
This covers how to switch on, choose an option from a menu, set the home location and time, and switch off again. There is a summary at the end.
To switch the Organiser on:
If you can't see anything on the screen, adjust the contrast wheel on the side of the case. You may need to do this again - for example if you switch between using the Organiser flat on a desk and in your hand. The first time you switch on you are shown a copyright message and then asked to choose a language:
SELECT LANGUAGE .................... English Francais Deutsch
This is a menu. In this case, the options on it are different languages and you select the language you want to work in. Notice that the first character of the first word is covered by a flashing block, the cursor:
SELECT LANGUAGE .................... English Francais Deutsch
The next page explains how to move the cursor around a menu and make selections.
To move the cursor around a menu use the arrow keys:
To select an option from a menu you can do one of two things:
When you have selected the language you want, the main menu is displayed. From this menu you can get to all the main Organiser functions. It looks like this:
0:00a
Find Save Diary
Calc Time Notes
World Alarm Month
Notice the Organiser symbol in the right-hand corner of the top line of the main menu.
You can already see nine of the options available on the Organiser main menu. There are four more options available off the screen like this:
0:00a
Find Save Diary
Calc Time Notes
World Alarm Month
Prog Xfiles Utils
Off
Find and Save access the main database file where you store information.
Diary selects the diary.
Calc selects the calculator.
Time selects the clock, stopwatch and timer.
Notes selects the notepad.
World provides the dialling codes to all major cities and the time there.
Alarm selects the alarm setting function.
Month selects the month-at-a-view calendar.
Prog takes you to OPL, the programming language.
Xfiles allows you to create and use extra database files
and sort these and your main one into alphabetic order.
Utils provides a range of utilities including information
on storage space and password protection.
Off switches the Organiser off.
Many of these utilities, such as the diary and world times, depend on the internal clock. So you should set this straight away.
To select the Time option:
You have now entered the Time option, which shows the date, time, and home location like this:
Sun 1 Jan 1989 Wk52 0:07:25 am London United Kingdom
To set the clock you need to display the Time menu.
Sun 1 Jan 1989 Wk52 0:07:25 am .................... Stopwatch Timer Set→ Daylight-saving
If you want the times in different cities in the World option to be accurate relative to G.M.T., you must specify if daylight saving is in operation in your country. For example, in Britain from March to October the clocks go forward an hour. So, if you are in Britain and it is summer:
To set the clock to the current time and date:
When two menu options, here Stopwatch and Set, start with the same letter, pressing the letter key just moves between them and you press EXE to select one.
Note that the day of the week and week number change automatically as you change the date. The day may not be correct if you're not yet in the right month or year. So, to change the month, year and time:
To set the clock going:
Now the screen clock will show the correct time. If you need to reset it you can select Time again. There is more about the clock in Chapter 11.
Note: Midnight is shown in 12 hour mode as 0:00a and in 24 hour mode as 00:00.
You can only switch off the Organiser on the main menu. So, if you are not there, press ON/CLEAR once or twice to get there.
Just press ON/CLEAR to switch on again.
If you leave the Organiser on for five minutes without pressing any keys, it will switch itself off to conserve battery power. Just press ON/CLEAR once and the Organiser will come on again at the exact place it was when it went off. All your data is intact and you can carry on where you left off.
If there is more than one option with the same first letter, e.g. Stopwatch and Set, press the letter, here S, to move between the options and press EXE on the one you want.
The Organiser comes with a database for storing all manner of information. This chapter shows you how to save a record in the main data file. It also introduces you to the keyboard.
A record is a any piece of information you store in the Organiser, such as a name and phone number, or an account name and number.
To save a name, address, and phone number:
9:30a Save on A: >_
You could now start to type in a record like this one:
S HOLMES 01 006 7171 221B BAKER ST LONDON W1
But as you're doing so, look through the keyboard section on the next page and take time to experiment and get the feel of the keys.
Letters
The letter keys normally produce capital (uppercase) letters
on the screen.
Numbers
When typing letters the cursor is a flashing block.
When typing numbers the cursor is a line.
Delete
New line
Join lines
Insert line
Looking at all the lines
Scrolling
9:30a
Save on A:
←LLANFAIRPWLLGWYNGYLLGOGER_
When you are satisfied with what you have entered:
You return to the main menu. You can find the record you saved at any time with the Find option.
If you wish to abandon a half-finished record, and not save it:
If you have fitted a Datapak to your Organiser, you can save the record there.
The internal memory is device A:. If you have any Datapaks fitted, they are devices B: and C: Normally, device A: is current so the screen looks like this:
9:30a Save on A: >S HOLMES 01 006 7171
If you press MODE, and you have fitted a Datapak to
the upper slot, the second line of the screen changes to:
Save on B:
Or, if you have fitted the Datapak to the lower slot:
Save on C:
If you have no packs, pressing MODE has no effect.
Each record may be up to 16 lines long and each whole record may contain up to 254 characters. Each line may contain any number of characters.
If you want to save a lot of records at once you may find it better to use Save in Xfiles. See Chapter 14.
This chapter shows you how to find a record which you have saved, then how to change it, copy it or delete it.
The Find prompt is displayed:
9:30a Find in A: >_
To find a record you just type in a search-clue, consisting of a few of the characters in the record. For example, if you saved Holmes' address:
The screen then shows the record like this:
S HOLMES 01 006 7171 221B BAKER ST LONDON W1
Or, if the record found is not the one you want:
When there are no more records containing your search
clue, the Find prompt reappears and this message is
shown:
NO MORE ENTRIES
You can now do any of the following:
Note: To search backwards from the end of the file of records, hold SHIFT and press EXE instead of just EXE, after typing in the search-clue.
When a record is found, the cursor is on the first line:
When the cursor is on any line which is too long for the screen, you can't see the cursor and the line scrolls so that you can read all of it.
If you have a lot of related records you can include a code in each one in order to find them all with the same search- clue. For example, if you had the numbers of several agencies you could include the code AGN in each record.
When you have a lot of records stored in the Organiser you
may need to use more precise search-clues. There are two wild
cards, * and +, to help you in this:
* Matches any group of characters
+ Matches any single character
Examples
AGN is really *AGN* so finds records with AGN anywhere:
AGN PETER WOOD AGN WILSONS Champagne: 1981 Reg No. F602 AGN Agnes Littlehampton
AGN*HAM finds only records containing AGN and HAM in that order:
Agnes Littlehampton
HAM*AGN finds only records containing HAM and AGN in that order: Champagne: 1981
JAMES RE+D finds:
JAMES REID James Read JAMES REED
If you wish to browse through an the stored records:
After the last one, the NO MORE ENTRIES message is shown. Press EXE once more to return to the first one or press ON/CLEAR to return to the main menu.
When you want to change a record - for example, when someone's telephone number changes:
Save on A: >S HOLMES 01 006 7171
You can now make changes, just as you can when you first save a record. See the Keyboard section in Chapter 3 if you are not used to the keys.
Cancelling your changes
If you make a mess of your changes, you can cancel them all before you press EXE by just pressing ON/CLEAR. The changed version disappears.
Press ON/CLEAR again to return to the main menu. The original record is still in memory.
If you wish to copy a record from, for example, the internal memory A: to Datapak B:
The record is copied to the Datapak and the original is kept in the internal memory.
If you want to delete a record:
You are asked to confirm like this:
Dr JEKYLL 01 002 8888 .................... Delete? Y/N/All
Press N (or ON/CLEAR) if you change your mind and A to delete all the records, from here to the end of the file, which match your search-clue. As this is rather drastic, you are asked to confirm your decision.
* Matches any group of characters.
+ Matches any single character.
Organiser alarms ring even when the machine is switched off.
You can set them to ring once only or every day like an alarm clock. In addition, you can have alarms that ring every hour, every week or every working day.
To set an alarm:
If you have no alarms set, the screen looks like this.
11:30a
1) Free
2) Free
3) Free
4) Free
5) Free
6) Free
7) Free
8) Free
There are eight separate alarms that you can have set at any one time. Use ↑ and ↓ to scroll through the list of them.
The screen will then look like this:
11:30a 1) Wed 11:30a Once 2) Free 3) Free
The cursor has moved and Were are 4 things you can change on the line if you need to - these are the day, the hour, the minutes and the type.
Once - goes off once only and can be set for any time in the next seven days.
Hourly - goes off every hour.
Daily - goes off every day.
Wrkday - goes off every work day: Monday to Friday.
Weekly - goes off every week.
Notice that the day and time options are removed as appropriate when you change the type - for example the day is removed if you change the type to Daily.
There are 3 to choose from:
Normal Siren Chimes
You return to the list of alarms with the new alarm displayed.
Return to the main menu by pressing ON/CLEAR, or set another alarm by moving to it with and then repeating the process.
If you are using your Organiser when it is time for alarm to go off, it will interrupt what you are doing. If the Organiser is off, it will switch itself on first. Either way, the alarm will sound, and a message like this be displayed:
****** ALARM ******* 11:12 Press ON/CLEAR
To switch off the alarm:
If you are not around to press any keys the Organiser will switch itself off automatically after one minute.
The original setting changes back to a free slot - for example:
1) Free
The alarm is cancelled and you can set a new one or return to the main menu with ON/CLEAR.
You can always change an alarm you have set. Move the cursor to it and press EXE to select it. Change settings and press EXE. If while you are changing alarm you wish to revert to the original setting, you can press ON/CLEAR instead of EXE.
The Month option on the main menu is a calendar which shows you a month at a time. It is useful for quickly checking dates and is also a way into the diary.
Mo Tu We Th Fr Aug89
-- 01 02 03 04 05 06
07 08 09 10 11 12 13
14 15 16 17 18 19 20
21 22 23 24 25 26 27
28 29 30 31 -- -- --
To return to the main menu:
To enter the diary page for a particular day:
The calendar goes up to the year 2155 and back to 1900.
You can press MODE to get a one-line menu from the month calendar. For explanations of the options, see the next chapter on the diary.
There are two ways of getting into the diary:
To see the display of the current week:
You can see when you are free at a glance: The four dashes under each date represent morning, lunchtime, afternoon and evening. If you have made an appointment during one of these time periods the dash is replaced by a solid block.
The cursor is a flashing arrow pointing to the current time, in this example lunchtime on Saturday 7.
Mo Tu We Th Fr Oct89 02 03 04 05 06 07 08 = = = = = →= = = = = = = = =
- Morning - midnight to 12.00 noon.
- Lunchtime - 12.00 noon to 2.00pm.
- Afternoon - 2.00pm to 6.00pm.
• Evening - 6.00pm to midnight - an appointment is set at some time during this period.
Note: If these four time slots don't suit your schedule, you can change their times in the diary Setup option.
To move the arrow to the slot you want:
You now see the page for the day you have chosen. If you haven't made any appointments it looks like this:
Sun 8 Oct 1989 Wk40 <Free Day>
To make an appointment you type in the entry before you set the times.
As long as the start time you set has not passed, you are
now asked whether you want an alarm:
Alarm? Y/N
If you press Y, you are asked how long before the start time
you want the alarm to sound:
Alarm: 15 minutes
The page for the day now changes like this:
Sun 8 Oct 1989 Wk40 6:00a <Free> 12:00p LUNCH WITH BJ 1:30p <Free>
he appointment is now set. A bell before it indicates an alarm. If the entry is too long to fit, it scrolls round.
In the screen above, the entry has been set to last from 12:00 to 1:30. Free slots are available above and below.
You could now return to the week view with ON/CLEAR or you could press --> to see the next day.
You can also make another entry. For example to make an appointment in the afternoon after your lunch date:
The day now looks something like this:
Sun 8 Oct 1989 Wk40 12:00p LUNCH WITH BJ 1:30p <Free> 3:00p TENNIS
Note: If you want to speed up the process of making an entry by suppressing the alarm prompts, you can do this in the diary menu option Setup.
Diary alarms work just like ordinary Organiser alarms, but in addition, your diary entry is displayed like this:
Fri 7 Jul 1989 Wk27 11:15 GROUP MEETING
When you press ON/CLEAR to switch a ringing diary alarm off, this acknowledges that you have seen it. If you miss some diary alarms, you see a message like this the next time you switch on:
YOU HAVE MISSED 02 DIARY ALARMS .................... Review? Y/N
To change an entry:
To delete an entry:
If the entry is not near the current date, the quickest way to get to it is to use the diary menu options Find or Goto.
You can display the diary menu on the week view or the day view. To see all the options, look at the version of the menu available from the day view.
Press MODE and the diary menu appears. On a one-line menu like this one:
Find and Goto are short-cuts to entries and dates.
Copy, Cut and Paste copy and move entries.
Alarm sets or removes alarms.
Tidy deletes or files away out-of-date entries.
Print prints out the diary.
Save and Restore file away and restore whole diaries.
Xrestore restores a diary created on a Model CM or XP.
Setup allows you to tailor the diary slots to suit your
schedule, and to suppress alarm prompts.
You find a diary entry using a search clue.
If it is not the one, press EXE again to see the next matching entry. When NO MORE ENTRIES is displayed, you can change the clue and search again.
When you have found the entry you were looking for:
You can now delete, edit or move the entry as you wish.
Note: A quick way of deleting unnecessary entries is to use DEL in Find. When you confirm with Y, the entry is deleted and you see the next matching entry.
This allows you to go straight to any date to make an entry or change one which is already there.
You can use these functions to move an entry or make multiple copies of it for regular appointments.
To move an entry:
| Wed 2 Aug 1989 Wk31 12:30a <Free> 6:30p 7:30p <Free> | → SQUASH |
To duplicate an entry:
| Wed 2 Aug 1989 Wk31 12:30a <Free> 6:30p SQUASH 7:30p <Free> | → SQUASH |
Once you have cut or copied, you can go to empty days and free slots, press MODE again, select Paste and paste the entry into as many slots as you like:
| Wed 2 Aug 1989 Wk31 12:30a <Free> 6:30p SQUASH 7:30p <Free> | → SQUASH → | Mon 4 Sep 1989 Wk36 12:30a <Free> 8:30p SQUASH 9:30p <Free> |
When you paste the entry in, its duration and alarm time are also copied. You move straight to the time-setting stage. When you've pasted it, the copied entry remains in memory and can be pasted into other slots until you replace it by cutting or copying something else.
You can stop the printing by pressing ON/CLEAR. If there is no printer attached, you get the error message DEVICE MISSING. See Chapter 17 for more details about printing.
Lets you tidy up the diary by deleting out-of-date entries. This can be useful to free memory space.
If you choose to save the entries, you are asked for the name
of a file to put them in:
Save A:_
Filenames can be up to 8 characters long and must start with a letter.
If the file you named already exists, you are shown this message:
Append Delete
Select Append if you want to add the tidied entries to the existing file or Delete if you want to delete the existing file and replace it with a new file containing the tidied entries.
You may want to save your diary in a file on a Datapak at some time so that you can start afresh and free some memory. It is saved as a data file, so you should give it a name which will distinguish it from your other data files. You can restore all or part of it at any time.
Save
This saves, all the entries in your diary in a file.
Filenames can be up to 8 characters long and must start with a letter.
If the file already exists, you are given this choice.
Append Delete
Select Append if you want to add the diary entries to the existing file, or Delete if you want to delete the existing file and replace it with the newly saved one.
If you have saved a diary in a file, you can restore all or part of it with this option.
You are asked for a diary file to restore:
Restore A:_
Press MODE if the diary file is on a pack, then type in the filename or just press EXE and you see a list of all the diary and data files. Choose the diary file you want by moving down with ↓ and pressing EXE on it.
(For more detailed information on selecting a file from a list, see the Files Chapter.)
Choose to restore all or part of the diary file.
Whichever you select, you then specify how the diary file is to combine with the current one:
If there are 2 entries on the same date whose times overlap; The restored entry is added to the end of the current entry after a +. (Unless they are identical, in which case they are not repeated.) If together they are longer than 64 characters a message warns that an entry has been shortened.
If an invalid entry is restored a message like this is shown:
ERROR
record 4
You could fix this by opening the file in Xfiles, then finding the fourth record and editing it.
There is more about diary files in the chapter on handling any type of file in the Programming Manual.
This restores a diary that was created and saved on an Organiser II model CM or XP. You are asked to specify the filename and you select it in the same way as in Restore.
However, you cannot merge a CM/XP diary with the current diary - it will just be overwritten.
This alters the way the diary is set up.
Slot 1 always starts at midnight (00:00a) and slot 4 always ends at 00:00p. However, you can change the three divisions in between.
This example: 1:00p 2:00p 7:00p would give the following slot times:
Slot 1 0.00a to 1.00p
Slot 2 1.00p to 2.00p
Slot 3 2.00p to 7.00p
Slot 4 7.00p to 0.00p
The fourth line of the screen gives you the chance to switch alarm prompts off.
If you do, the Alarm? Y/N prompt never appears but you can still set alarms using Alarm on the diary menu.
To get to the right day:
Then on the day page:
This chapter shows you how to do a simple calculation and then how to use a result again, edit your calculation, and use the 10 memories.
It then goes on to explain how to use the calculator in conjunction with OPL functions and procedures.
In the calculator you don't need to use SHIFT to get numbers and symbols - they are on automatically. You use SHIFT to get letters.
The basic arithmetic operators, +,-,/ (divide), * (multiply) and ** (raise to a power) are used in the same way as they would be in a written calculation. Any number of levels of brackets may be used.
If you have typed something in wrong, you can edit the calculation, by using the arrow keys and DEL.
You might decide to use the result from one calculation as part of another one. Do another calculation and when the result is displayed:
The old result is shown on the calculation line with the new
number or symbol at the end:
Calc:11+_
A useful feature of this calculator is the ability to modify your original calculation. Do another calculation and when the result is displayed:
The result disappears and you can edit the calculation.
Alternative ways to edit the calculation
If you make an error such as typing 7-*5 which the
calculator can't understand, you see this message:
ERROR
SYNTAX ERR
....................
press SPACE key
Percentages are calculated like this:
100+5%=105 100-5%=95 100*5%=5 100/5%=2000 115<15%=15 115>15%=100
Examples
To add VAT (a 15% purchase tax) to 345: 345+15%=396.75
To find out what the price was before VAT: 396.75>15%=345
To find out how much of a total price is VAT: 396.75<15%=51.75
Built into the Organiser are ten memories which can be used either in the calculator or in OPL.
You can store numbers in them for use in calculations. You can then add to them, subtract from them and clear them.
In the calculator and OPL they are referred to by the same names, M0 to M9.
To store the result of a calculation to memory M0:
The name of the first memory, MO, appears on the left of the result,
and above the calculation you are shown the current contents of it:
± 9:30a
<M0=0>
Calc:4+5
M0:=9
To store the result in a different memory slot:
You can now modify the chosen memory in three ways:
EXE Stores this result in the memory, replacing the current contents. + Adds this result to the memory contents. - Subtracts this result from the memory contents.
You can include the figure you stored in memory M0 in calculations, like this: 27*M0/2.
You can operate on lists of numbers using the following functions (from OPL) which find out:
SUM The sum.
MEAN The mean (average).
STD The standard deviation.
VAR The variance.
MAX The largest item in the list.
MIN The smallest item in the list.
The items in the list go in brackets straight after the function and are separated by commas. For example: MEAN(8,9,10)
Remember that you have to use SHIFT to type letters in the calculator.
You can use E as the exponent. For example, 3.6E4 represents 36000.
Do the calculation 4*7/9. Notice that the result 3.11111111111 is displayed with 11 decimal places. This is how the calculator normally works - allowing as many significant digits as will fit in a total of 12 figures. If you work with money, and want to fix the number of decimal places to 2:
Do the calculation 4*7/9 again. The result is 3.11 You can have from 0 to 12 decimal places. To return to normal type only FIX=
In your calculations, you can use any of the numeric functions of the Organiser Programming Language even if you never use OPL otherwise. The numeric functions are listed at the beginning of Chapter 8 in the OPL manual. You can use them to do far more operations than are available on an ordinary calculator. For example: SIN(PI/4)/(3.8*COS(1.2))
Here the SIN, COS and PI functions are used.
Another example might be to find the sine of 30deg. This is typed in like this: SIN(RAD(30))
The RAD function converts from degrees to the radians which the SIN function requires.
When you press EXE, if there is an error in your calculation, you get an error message and should, as the message says, press SPACE and correct it. The cursor flashes on the, unrecognised character.
For instance, if you included a character which was not a function name or an arithmetic operator, like this, the cursor would be flashing on the P: 10*P/(22/7)
If you have typed any OPL procedures into the Organiser, you can include the procedure names in your calculations. All procedure names end in a colon. Put the value you want to operate on in brackets after the procedure name. In this example the procedure name is TAX and the value is 20000: TAX:(20000)
The value you want the procedure to operate on is called a parameter. You can use a memory name as a parameter: TAX:(M1)
Procedure names can be included in quite complex calculations. For example, if you had a procedure called FACT: which worked out the factorial of a number passed to it, then you could include this in your calculation like this: 587*2.883/(4+FACT:(3))
The value 3 is being passed to the procedure. The returned value is then added to 4 and the rest of the calculation performed on the result.
From the calculator, parameters are passed as floating point numbers. To pass an integer to a procedure, you must use the INT function like this: 5/3+PROC:(INT(10))
The OPL manual shows you how to write your own OPL procedures, and there are examples in Chapter 7.
Organiser notepads are the ideal place to keep lists of things to do. The notepad has its own calculator which makes notepads ideal for keeping track of expenses. They can also be password- protected and so are suitable for secret data such as cash card numbers.
This chapter shows you how to use the main notepad, then how to use the options on the notepad menu and how to create extra notepads.
Two things are different from typing in a record:
After you exit, everything you typed in will still be there the next time you enter the notepad and you can then add and delete things as you wish.
Press MODE when you are in the notepad to see the menu.
Find Save Load New->
On a one-line menu like this one:
The fifteen options are:
Find Finds a given search-clue in the notepad.
Save Saves a named notepad file.
Load Loads a different notepad file.
New Creates a new notepad.
Home Takes you to the start of the notepad.
End Takes you to the end of the notepad.
Calc Does calculations on numbers in the notes.
Sort Sorts the lines in the notepad alphabetically.
Number Numbers the lines in the notepad.
Password Provides password security.
Print Prints the notepad.
Dir Provides a directory list of all notepad files
Copy Copies a notepad file
Delete Deletes a notepad file
Zap Clears the current notepad.
Find in a notepad works just like the main menu Find.
Press EXE again if you want to find the next occurrence, or SHIFT EXE to find the previous one.
You clear out the notepad by zapping it.
The functions available in the notepad calculator are the same as the
list functions in the main calculator:
SUM= adds up the numbers.
ITEMS= counts how many items are in the calculation.
MEAN= VAR= and STD= give the mean, the variance and the standard deviation.
MAX= and MIN= give the highest and lowest number.
The results are shown like this:
PHONE CALLS=4.19
LUNCH=37 DINNER=25
HOTEL=57.75
SUM=123.94
ITEM=4
You can add, delete or change numbers and then recalculate the expenses whenever you like. You don't need to delete the results after the = signs each time - they are changed automatically when you recalculate.
The functions operate on all numbers in the notepad, even numbers which come after them.
Normally the results of calculations are rounded to 2 decimal places. The maximum number of characters in the result is 15. You can change this by typing the FIX= functions somewhere in the notepad. The format of the function is FIX=x or FIX=x,y where x is the number of decimal places and y the maximum number of characters up to 15 in the result (including the point). The point of setting a maximum number of characters is to make sums align neatly.
This sorts the lines of the notepad into alphabetical order. All the lines are sorted except the first title line.
The sorted notepad is shown:
ANGELA
JOHN ADAMS
JOHN SMITH
Numbers as well as letters are sorted into order, so if you inserted priority numbers at the beginning of a to-do list you could then sort the lines into priority order.
Sorting requires twice as much free memory space as the size of the notepad.
This adds a number to the start of each line. All the lines are numbered except the first title line.
The numbered list is shown:
1) Alison
2) John
3) John Adams
This prints out the notepad:
If you want to cancel, press ON/CLEAR.
If there is no printer attached, you get the error message DEVICE MISSING. For more details about printing, see Chapter 17.
Password protected notepads are the ideal place to keep your cash card numbers, and other private data.
If you want to set a password on a notepad:
You are asked to type in the password twice. As you type in the password, #'s appear on the screen.
From now on nobody can get into this notepad without first entering this password.
If at any time you want to change it, load the notepad, then select Password again. You first enter the existing password, then the new one twice.
If you no longer want a password, just press EXE as the new one.
Warning: If you forget the password you will never be able to get into this notepad again.
The notes are encrypted which means that nobody can read them even if they copy them to another computer, or have the programming skill to find them where they are stored in memory.
When you first enter Notes, you enter the current notepad which is called NOTEPAD. However, you can also have a number of notepads, each of which is in a file. There are two ways of doing this:
Select New, and if there are notes in the current notepad
which you haven't saved, you are informed that data has
changed since you last saved:
DATA HAS CHANGED
NOTEPAD
....................
New? Y/N
If you want to save the unsaved notes in a file first, press N and you can then select Save. When you've saved the notes in a file, you can select New again. If you want the unsaved notes to be discarded, press Y.
You are then shown an empty notepad with this name.
When you have more than one notepad, you always come into the one you used last. If you wish, you can then select Load to load a different one.
If you have made changes to the notepad you used last
and you haven't saved them, you are warned that
DATA HAS CHANGED. You can then load anyway or go
back and save first, just as when you create a new one.
Then this screen is displayed.
LOAD NOTEPAD
Load A:EXPENSES
Choose a notepad to load in one of the following ways:
For further information on file lists see Chapter 12.
At any time, you can save the current notepad under a different name. For example to save the notes you've got in the main notepad under the name TODO:
You could then zap the notes in NOTEPAD to clear it.
These three menu options work in exactly the same way as they do on the Utils menu, except that you do not need to choose the file type, (notes). See Chapter 15 for more details.
Your notes will still be there next time you come into the notepad.
In World you first set your home location. You can then find out the dialling code from there to any major city in the world. It also provides the time in these cities.
Note: If you want the city times to be accurate relative to GMT, and the clocks are currently forward an hour in your home location, you should have set Daylight-saving in the Time option. See Chapter 2.
The home location is the one displayed on the clock when you select Time from the main menu. Whenever you reset the home location, the time changes on the clock to reflect the different time zone.
To reset the location:
The first time, you are shown a screen showing you how to
dial New York from the current home location. On this screen
you can use ↓ and ↑ to browse through the list of cities and
countries.
New York Manhattan
USA
Sun 1 Jan 9:00a
Dial: 010 1 212
To set your location:
As soon as you start typing, a city or country is displayed on the top of the screen.
For example, if you wanted Amsterdam and just typed in AM the first
name displayed would be Amman:
Amman
Jordan
....................
Set home: AM_
You could then use ↓ to see the others starting with AM or supply another letter - AMS.
You return to a screen which shows you how to dial New York from
the new home location:
New York Manhattan
USA
Sun 1 Jan 9:00a
Dial: 09* 1 212
If you now press ON/CLEAR to return to the main menu you will see that the time on the clock has changed if appropriate. If you select Time, you will see the new home location displayed.
You can now use Find to look up the dialling code from your location to any major city in the world. You are also told the current time in that city.
The Find prompt appears, and a matching city and country are
displayed:
Lisbon
Portugal
....................
Find: LIS_
You are shown the dialling code and the time like this:
Lisbon
Portugal
Wed 31 May 10.00a
Dial: 010 351 1
If you want to see all 650 cities and countries, you can type A then use ↓ to scroll down.
Note: Obviously the time in the country you are dialling may be out by an hour at certain times of the year if the clocks are put forward there. The time given is always relative to G.M.T.
, Indicates that you should pause at this point in the dialling
? Indicates that there may be a way of dialling but it is inconsistent. Ask the operator.
/ Indicates alternative dialling codes.
No code Means you can't dial direct, but only through the operator. (This may change at some time as countries introduce the service.)
Note: No dialling code is shown when you find your home location.
If you find a country rather than a city, you are shown the dialling code to that country and the time in its capital city.
These come after the city or country name. E.g.: Germany West Berlin East Korea North
So, to find North Korea type KOR.
This chapter shows how to put the clock forward or back one hour, and how to use the stopwatch and timer. Setting the clock is covered in Chapter 1.
Forward
A (D) indicator appears next to the time on the clock, and the time goes forward one hour.
Back
The (D) indicator disappears, and the time goes back one hour.
It records in increments of 0.05 seconds. To start the stopwatch, press EXE. Then use the following keys:
Return to the ordinary clock again with ON/CLEAR.
The cursor is on the minutes, ready for you to set the time you want to count down from.
When it gets to zero, the alarm sounds for one minute.
Note: While the stopwatch and timer are counting, no Organiser alarms will go off.
There are three main types of Organiser files:
Data files containing records or saved diaries. Notepad files containing saved notepads. OPL files containing procedures you have typed in.
Whenever you select an existing file, for example when you load a
notepad file, restore a diary file or sort a data file, you are prompted
for a filename like this:
Load A:_ or
Restore A:_ or
Sort A:_
You can then do one of two things:
1 If you know the filename:
2 If you want to select the file from a list of those on the device:
The files are listed in the order you first saved them, starting with the oldest one.
Here Load was selected in the notepad, then ↓ pressed:
LOAD NOTES
Load A:*
Notes EXPENSES 64
Notes TODO 90
To select a file:
When the list is displayed you can press ← or → to get back to the prompt line to change it if you wish - you can clear the prompt line with ON/CLEAR.
The numbers down the side of the list represent:
Instead of pressing ↓ to list the files in the order you first saved them, you can also:
If you are deleting or copying, the first item in the file list is <*>. It represents all the files in the list.
Here Delete has been selected from the notepad menu, then ↓ pressed:
DELETE NOTES
Delete A:*
Notes <*>
Notes EXPENSES 64
You may have other types of files on your Organiser. These are all the possible types; the types you can choose to list in the Dir option in Utils:
All All types.
Files Data files containing records or saved diaries.
Notes Saved notepads.
Opl Opl procedures.
Comms Comms Link setup files.
Plan Spreadsheets.
Pager Pager setup files.
Xdiry XP or CM diary files.
You can save files in the internal memory, A: or on a pack on B: or C:
It is advisable to save a copy of files containing vital information on a Datapak as this is the most secure means of storage. See the next chapter for more details.
The internal memory of the Organiser is known as Device A: the upper external device is known as device B: and the lower as device C:
Devices B: and C: are two external devices in the back of your Organiser. When you first purchase your Organiser, these two devices are fitted with covers to protect the electrical connections. You should always keep a pack or one of the covers on each device.
Devices B: and C: can hold a Datapak, a Rampak or a program pack, such as the Pocket Spreadsheet.
The Organiser checks which devices have Datapaks or Rampaks fitted, so when you go to Save or Find a record and press MODE to change the device, you can choose only the relevant devices. So, if you don't have any packs fitted, pressing the MODE key when using Save Find has no effect - you remain with device A.
Once you have made a device current, you continue using the same one unless you change to another.
The internal memory of the Organiser and Rampaks are RAM:
Datapaks are EPROM:
The advantages of Datapaks are that they are very secure and are not affected when the battery runs low. They are thus excellent places to store data.
The advantages of Rampaks are that they use very little power and that data is really deleted, so you can edit things as many times as you like without using up any space. They are thus the best medium for writing programs. You should always back-up your valuable data to a Datapak or a desk-top computer to keep it more secure.
Avoid pressing any key while fitting or removing a Datapak. This is avoided by placing the machine face down on a flat surface, as the keyboard is recessed.
Datapaks are available with capacities of approximately 8000, 16000, 32000, 64000 and 128000 characters.
Read the important information leaflet provided with your Rampak before you fit or remove a Rampak.
The first time you try to perform any operation on a new or newly formatted Datapak, a message may be displayed to let you know that the Organiser is checking its size.
For example, after typing a record, you could fit a new Datapak
to device B: in order to save the record to that pack. The
screen would be showing:
9:30a
Save on A:
>JOHN SMITH
0962 65431_
If you pressed MODE once to change A: to B:, this
message would be displayed:
SIZING PACK B:
PLEASE WAIT
Then the screen would show:
9:32a
Save on B:
>JOHN SMITH
0962 65431_
You could then press EXE to save the record on the new Datapak in device B:
If you fit a Datapak which has already been sized you can go right ahead and use it.
No matter how careful you are with a Datapak, at some point it will be filled. The next time you try to SAVE any information on that Datapak, the Organiser will display a PACK FULL message.
Although Datapaks store your information permanently, it is possible to clear an entire Datapak using a process called formatting. This is achieved by controlled exposure to ultra-violet light in a machine called the Psion Formatter.
The reformatted Datapak will be completely blank, and when reinserted into the Organiser, will be re-sized as if it were brand new.
If a Datapak is full because unwanted "erased" data is still occupying space, but the pack also contains some data you want to keep, copy all the files to another pack. The erased records and files are ignored, so only real data is copied across. The old pack can then be reformatted in the Psion Formatter.
Instructions on copying files are in the Utils chapter. Note that the white label on the underside of each Datapak is to protect it from excessive exposure to light. It must be removed before formatting can occur.
Use the Format option on the Utils menu.
A data file is a collection of records. When you save a record using the Save option from the main menu, the record goes into a data file called MAIN. This is also where the Find option looks for records. (MAIN is a special data file which always exists on every device.)
If you need a more sophisticated database, you can use the Xfiles option to create extra data files.
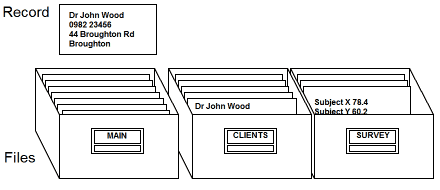
The Xfiles options Find and Save operate on records in the currently open file.
If you haven't created any extra files, the MAIN file is current. When you use New to create a new file, this one becomes current until you change to another one with Open.
The MAIN file is still used by the main menu Find and Save, even though you open a different file in Xfiles.
Find Finds a record with a search clue - looking in the current data file.
Save Saves a record in the current file. After
each save you return to the Save
prompt - useful for saving a lot of
records at once.
New Creates a new data file - and
automatically makes this new file the
current one.
Open Opens a data file. This means that it
makes that file the current file which
is then used by Find and Save.
Print Prints the whole current data file, or
selected records from it.
Sort Sorts the records in a data file into
alphabetical order.
Dir Displays a directory of all the data files
on the device you select.
Copy Copies one or more data files.
Delete Deletes one or more data files.
This is like Find on the main menu. There is only one difference:
This is almost exactly like Save on the main menu. There are two differences, however:
Creates a new data file and makes it current. So, the new data file is the one that Xfiles Find and Save look in until you change the current file with Open.
File names can be up to eight characters long. The first character must be a letter.
You can print the whole of the current data file, or selected records from it.
Select Print and you can then do one of two things:
In the screen below the search-clue given was DR*YORK to
print only records containing these two words:
11:30a
Print A:CLIENTS
>DR*YORK
Print...
You can press ON/CLEAR at any time to stop printing.
If there is no printer attached, you get a DEVICE MISSING message. For more details about printing, see Chapter 17.
The remaining Xfiles options, except Dir, all require you to specify an existing data file.
Sometimes the name of the data file you worked on last is supplied. You can press EXE to accept it, or ↓ to get a list of files to select from. For more detail on file lists, see Chapter 12.
The file you open becomes the current one which is used by Find and Save in Xfiles.
You are asked which file you want to open:
Open A:_
This sorts a data file on device A: into alphabetical order. Choose a file in the same way as for Open.
After you press EXE, messages indicate the sorting. This takes a while if there are lots of records.
Sorting requires a lot of memory space. You need approximately twice the amount of space as the size of the data file being sorted. If there isn't enough space, the error message OUT OF MEMORY is displayed.
When you select Dir you see this screen.
DIR OF FILES
Dir A:_
When you select Copy you see this screen:
COPY FILES
From A:_
This works just like Copy in Utils. See the Utils chapter for more details.
When you select Delete you see this screen.
DELETE FILES
Delete A:_
This works just like Delete in Utils. See the Utils chapter for more details.
If you want to be able to search in one of your extra data files directly from the main menu, you can insert the file name as a main menu option. See the chapter on customising the main menu for instructions.
Press U on the main menu to get the Utils menu. This
has a key symbol:
8:15a
Search Info Sound
Dir Copy Delete
Passw Lang Reset
Format
The eleven options are:
Search Looks everywhere for a search clue; in diary, data files, notes and
procedures.
Info Displays information on memory space.
Sound Turns all sound off and on.
Dir Shows directory lists of all the types of files.
Copy Copies any type of file.
Delete Deletes any type of file.
Passw Provides password protection for your Organiser.
Lang Sets the Organiser to another language.
Reset Resets and clears the Organiser by deleting all data.
Format Formats a Rampak.
This works just like Find on the main menu. The difference is that it searches everywhere, in this order:
1 The current diary
2 The current notepad (unless password-protected)
3 Notepad files on A: B: C: (unless password-protected)
4 Data files on A: B: C:
5 OPL procedure files on A: B: C:
The text found is displayed - here it is in a notepad:
NOTES A:HOLIDAY
~~~~~~~~~~~~~~~~~~~~
CANCEL PAPERS
CANCEL MILK
Info tells you how much storage space is free.
The black bar on the left shows how much space is used up by the application named on the top line, the grey bar on the right shows how much space is being used by other applications. The space in the middle shows the free memory.
In the example below:
If you have a lot of "Others" taking up space you need on Pack A:, try tidying your out-of-date diary entries, or saving the current diary and notepad on a pack.
This option allows you to switch off all sound, including alarms.
The menu is:
On Off
When you select one of these options from within Utils, you must first select the type of file. The types are:
All All types.
Files Data files containing records or saved diaries.
Notes Saved notepads.
Opl Opl procedures.
Comms Comms Link setup files.
Plan Spreadsheets.
Pager Pager setup files.
Xdiry XP or CM diary files.
Dir, Copy and Delete all involve selecting files. For more detail on selecting from file lists see Chapter 12.
When you enter Dir from Notes, Prog or Xfiles, you don't choose
the file type. However, in Utils you must first select the type of
file you want a list of. You then see this prompt:
Dir A:_
You can copy one file or multiple files. In Utils you must first
select the type of file you want to copy. You then see this prompt:
From A:_
You then see this prompt:
To B:_
Note: You can only copy from one device to a different one - if you try to copy from A: to A: or from B: to B: you get a BAD FILE NAME error.
FROM A:MAIN
TO B:
Copies the file called MAIN on A: to the pack on B:.
FROM A:MAIN
TO B:OLDMAIN
Copies the file called MAIN on A: to the pack on device B: - but
gives the copy the name OLDMAIN.
FROM A:C*
TO B:
Copies all the files beginning with the letter C on A: to the pack
on B: - and gives them the same names.
FROM A:*
TO B:
Copies all the files on A: to the pack on device B:
Data files and diaries
So, if you already have some records in the file B:MAIN and in the file A:MAIN, and you choose to copy all of the files from A: to B:, then the records in A:MAIN will be added to those already in B:MAIN.
OPL procedures and notes
So, if you already have a procedure called B:PROC and a procedure called A:PROC, and you choose to copy all of the files from A to B:, B:PROC will be deleted and replaced by A:PROC.
When you enter Delete from within Notes, Prog or Xfiles, you
don't choose the file type. However, in Utils you first select
the type of file you want to delete. You then see this prompt:
Delete A:_
You can delete one file or multiple flies. You select a file in exactly the same way as in Copy.
If you want to delete multiple files, it is best to look down the list of files to check what is going to be deleted, before selecting <*> to delete all of them.
Once you have set a password, you can choose to set password protection on or off. If password protection is on, the password will be requested every time the machine is switched on.
Warning: If you forget your password, you will have to remove the battery in order to reset the machine. In doing this all data will be lost.
If you want to set a password:
You are asked to type in the password twice:
New passwrd:_
Passwords can be up to 8 characters long. As you type in the password, #'s appear on the screen.
Now nobody can use the machine or access any of the data in it without first entering this password.
If you want to switch password protection off, select Password again, then select Off.
If you want to change the password, select Password again, then select Change. You first enter the existing password, then the new one twice. If you no longer want a password, just press EXE as the new one.
Note: It may be a good idea to set a password, even if you set it to Off. This means that no vandal will be able to set a password on your machine and lock you out.
This sets the Organiser to a different European language. Select Lang then select the language.
This erases all data in the internal memory, device A:. Packs are not affected.
Select Reset from the Utils menu and you are given the chance
to cancel. If you do not want to reset, press ON/CLEAR. If you
do, press DEL and you are asked:
DO YOU REALLY WANT
TO DELETE ALL DATA
....................
Confirm? Y/N
If you press N or ON/CLEAR you return to the Utils menu with all data still intact. If you are sure you want to erase all data in the internal memory, press Y.
This formats a Rampak, clearing it of all data.
If the formatting is successful you see the message:
SIZING PACK B:
PLEASE WAIT
If you see the message WRITE PACK ERR, you may have tried to format a Datapak.
Note: To format a Datapak you need the Psion Formatter. See the chapter on Storage Devices.
This is the standard order of the main menu options:
9:30p
Find Save Diary
Calc Time Notes
World Alarm Month
Prog Xfiles Utils
Off
However, you can change the order of the options and delete those you never use. You can also add a data file, notepad or OPL procedure name as a new option.
To move an item, delete it then restore it in a different place.
To delete an item from the menu:
So, to delete Diary in order to restore it at the start of the menu,
press DEL on it and the screen shows:
DELETE MENU ITEM
"Diary"
....................
Confirm? Y/N
The only item you can't delete is Off. Also you can't put any other menu item after it; it's always the last.
To restore a deleted menu item:
You can add the name of an extra data file, a notepad, or an OPL procedure to the main menu. When selected these inserted names work in the following way:
Data file You enter Xfiles with the data file made current
and you get the Find prompt to search in it.
Notepad You go straight into the notepad.
Procedure The procedure is run.
You can't insert a name which is the same as one of the original menu items.
You insert a new name just as you re-insert an original option,
by pressing MODE on the main menu, and then entering the
name. As the name is not that of an original menu item, you
are then asked to specify the type of file the name refers to:
Opl Notes Files
You can print out:
The diary
Notepads
Data files
OPL procedures
You can either print on a Psion Printer II or on any kind of serial
printer via the Psion Comms Link. If you try to print with no printer
attached you get this error message:
ERROR
DEVICE MISSING
....................
press SPACE key
If you have got a Psion II printer or Comms Link connected, and you get this message, make sure that the printer software is loaded in. To do this press ON/CLEAR on the main menu. See the printer or Comms Link manual for more details.
If you are using Comms Link also check that your Comms Link setup is correct. See the Comms Link manual for more details.
There is more technical information in the Programming Manual. All the OPL error messages are in Appendix D.
Switching on
Switching off
Selecting an option from a menu
Some important keys
Setting the time
Resetting the home city
Dialling codes and time zones
Calendar
You can also press EXE on a date to enter the diary page for that day.
Stopwatch
Timer
Saving a record (a piece of information such as a name and phone number)
Finding a record
Changing or deleting a record
Copying a record to a pack
Sorting the main data file alphabetically
Setting an alarm
Switching off a ringing alarm
Cancelling an alarm
Using the main notepad
Clearing the notepad
Keeping expenses in a notepad
Making a diary entry
To get to the right day:
Then on the day page:
Finding an entry to edit or delete
Moving or copying an entry
Doing a calculation
Clearing the calculator
Storing a result to a memory
Using the contents of a memory
Re-using a result
Modifying a calculation
Searching everywhere: In data files, notepads, diaries and procedures on all packs
Password protection
Even if you don't want password protection on, it may be advisable to enter a password and set it Off, because then no-one else can set a password on your machine.
Warning: If you forget the password and it's set on you won't be able to use the Organiser again without removing the battery.
See the manual for full details of all the Organiser applications. Read Chapter 1 about the battery, even if you read nothing else.