The Rubik's Magic Master Edition, or Master Magic, is a 2×6 version.
It is a lot more interesting than the normal 2×4 version. After
playing with the small one you soon find that the same shapes come back
again and again. The large version has a much larger number of shapes and
possibilities. On the other hand, the Master Edition is easier to solve
since there are more hinges and hence more freedom to make small changes.
Usually the front shows a set of 5 linked rings on a silver background.
When solved the puzzle is in the shape of a W, and shows 5 unlinked rings.
There are two versions of the Master Edition. The first one was made by matchbox
in 1987. Recently it has been re-issued and made available from
Rubiks.com. The re-issue
looks about the same (apart from the copyright message along the edge), but tends
to be wired differently. The solutions and moves shown on this page are based on
the old version. To do the same moves on the new version, you have to turn it over
(left to right) and perform the moves on the other side in (left to right) mirror
image. You can of course also take it apart and restring it, see the
Making your Own section.
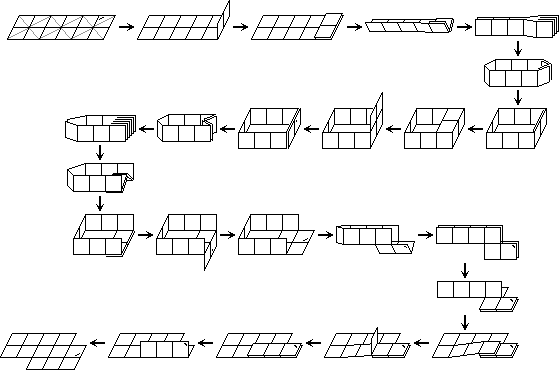
Solution 1:
As mentioned above, I assume you have an original version. To do this solution on
the new differently string version of the Master Edition, you must do it in mirror
image on the other side.
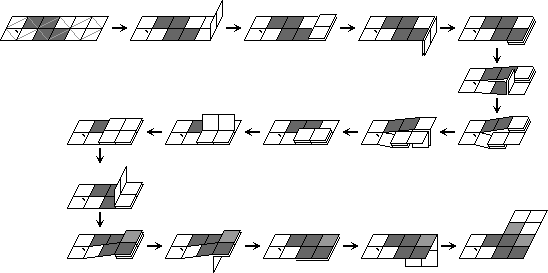
- Hold the puzzle in the starting position (linked rings showing) with the
Rubik signature at the bottom right. Perform the star shift transform, shifting the
pieces in the top row one tile to the left.
- Turn over the puzzle, so that it now shows the side you are trying to solve.
There should be 4 tiles which match each other, with three wrong tiles
on the left side and five wrong ones on the right. The signature on this
side is at the bottom left.
- Now you will perform a sequence that is in effect the mirror image of
the twist transform on the right hand side. In the following description the
tiles are numbered 1-12 clockwise from the top left as usual.
1. Fold the right 2 tiles (6-7) upwards on top of tiles 5, 8.
2. Fold the right block of 4 tiles (5-8) downwards behind 4 and 9.
3. Fold 8, 9 upwards to the left on top of 10.
4. Fold 5, 6 downwards down behind 7.
5. Fold 7, 8 upwards up onto 3 and 4.
6. Fold 8, 9 upwards to the right on top of 6 and 7.
7. Fold 4, 5 downwards to the left behind 3 and 10.
8. Fold 4-7 downwards up to make an L shape.
-
 The six central tiles are correct, with three wrong tiles at the end of
each leg of the L shape. Now perform the six-flip shape changing transform on each of those legs
to make a zigzag shape.
The six central tiles are correct, with three wrong tiles at the end of
each leg of the L shape. Now perform the six-flip shape changing transform on each of those legs
to make a zigzag shape.
Solution 2:
This solution uses a different shape changing transform, which was given
to me by Courtney Farren.
Note again, that to do this solution on the new version of the Master Edition, you must do it
in up-down mirror image, e.g. instead of folding a tile upwards on top of an adjacent tile,
you must fold it downwards behind the adjacent tile.
- Hold the puzzle in the starting position (linked rings showing) with the
Rubik signature at the bottom right. Perform
the loop shift transform, shifting the pieces in the top row one tile to the right.
When the loop is opened up again into a rectangle, the rows will have
been swapped so that the signature tile has moved to the top row next
to the top right corner.
-
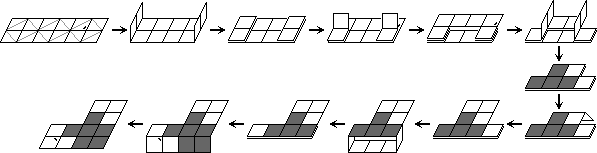 Now you will perform a shape changing transform. In the following description
the tiles are numbered 1-12 clockwise from the top left as usual. The
linked rings side is still showing, with the signature on tile 5.
Now you will perform a shape changing transform. In the following description
the tiles are numbered 1-12 clockwise from the top left as usual. The
linked rings side is still showing, with the signature on tile 5.
1. Fold the right 2 tiles (6-7) upwards on top of tiles 5, 8, and the
left 2 tiles (1,12) upwards on top of tiles 2, 11.
2. Fold tile 1 down on top of 12, and 6 down on top of 7.
3. Fold tiles 1-2 right on top of 3 and 10, and 5-6 left on top of 4 and 9.
4. Unfold 3, 4 upwards, to make an inverted T shape.
5. Separate tiles 8-11 from the rest, forming a loop. Shift the loop one tile
to the left so that 7 goes behind 6 and 8-10 behind 11-12,1.
6. Unfold 7-10 downwards to form the L shape.
-
Now perform the six-flip shape changing transform on each of the legs of the L to make a zigzag
shape.
Solution 3:
This solution was devised by Edward Hordern, and published on page 11 of issue 16
(November 1987) of Cubism for Fun,
the magazine of the Dutch Cubists Club.
Note again, that to do this solution on the new version of the Master Edition, you must do it
in up-down mirror image, e.g. instead of folding a tile upwards on top of an adjacent tile,
you must fold it downwards behind the adjacent tile.
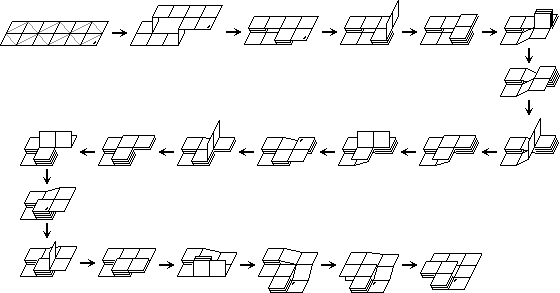
- Hold the puzzle in the starting position (linked rings showing) with the
Rubik signature at the bottom right. In the following description
the tiles are numbered 1-12 clockwise from the top left as usual.
1. Fold tile 2 left on top of tile 1, and simultaneously tile 9 on top of tile 10.
2. Fold tiles 6 and 7 left on top of tiles 5 and 8.
3. Fold tiles 7, 8, 9 up on top of tile 6.
4. Fold tiles 9, 10 left on top of tiles 4 and 11.
5. Fold tiles 8, 9 down on top of tile 10.
6. Fold tiles 7, 8 left on top of tiles 4 and 9.
7. Fold tiles 6, 7 down on top of tile 8.
8. Fold tiles 7 right on top of tile 6.
9. Fold tiles 7,8,9,10 down towards you.
9. Fold tiles 1, 2 down behind tile 12.
- Turn the whole puzzle over.
-
Now perform the six-flip shape changing transform on each of the legs of the L to make a zigzag
shape.
Solution 4:
This solution was devised by Stefan Pochmann, and is very fast. On his website there
are some videos of him doing it in 6 seconds or less.
- Hold the puzzle in the starting position (linked rings showing) with the
Rubik signature at the bottom right. In the following description
the tiles are numbered 1-12 clockwise from the top left as usual.
- Do the six-flip shape changing transform on tile 7 on the right hand side (i.e. fold tile 7
to the left, up, left, down, right, and down).
-
1. Fold tiles 1 and 12 right on top of tiles 2 and 11.
2. Fold tile 1 down on top of tile 12.
- Turn the puzzle over, away from you. The stack of three
tiles is now at the far left, tile 1 at the bottom with 12 and 11 on top.
-
1. Fold tiles 9 and 8 to the right on top of tiles 7 and 6. This pulls along tiles 10, 11
and 12 to the right as well, unfolding the stack of three.
2. Fold tiles 1, 12, 11 and 10 down on top of tiles 2,3,4,5.
3. Fold tiles 8,9,10 to the left.
4. Fold tiles 1, 12, 11 and 10 upwards.
5. Fold tiles 8 and 9 to the right behind tiles 7 and 6.
6. Fold tiles 9 and 10 upwards behind tile 8.
7. Fold tiles 7 downwards on top of tile 6.
8. Fold tiles 7 and 8 to the right.
- Finally perform the six-flip shape changing transform on tiles 1 and 2 to make a zigzag shape.
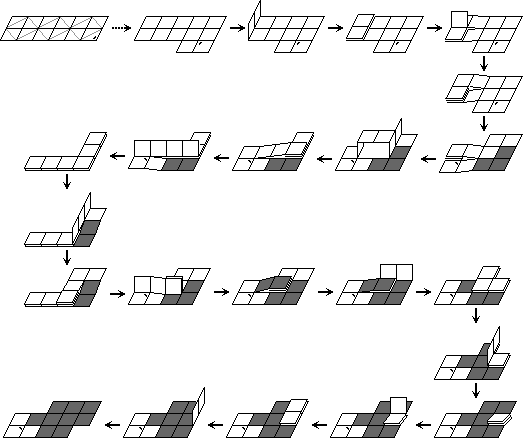
Solution 5:
This solution is by Alexander Ooms.
- From the start position with the signature in the bottom right of the rectangle, do the star shift transform once, shifting the signature tile to the top right.
- Mentally number the tiles from 1 to 12, clockwise from the top left. Thus tile 6 is the signature tile.
- Fold tiles 6 and 7 leftwards onto tiles 5 and 8.
- Fold the bottom half (7-12) and top half (1-6) together.
- Open up the loop of tiles, separating tiles 6 and 7. This gives a loop, with tiles 6 and 7 stuck to the inside on the right.
- Fold up tiles 6 and 7, pushing them up through loop's opening. Push them further, all the way around to the outside onto the right of tiles 5 and 8.
- Fold tiles 5-8 in half inwards, into the loop, creating a stack of six tiles.
- Fold tiles 5-8 open downwards, so that they become a two layer thick base.
- Fold tiles 4,5 (the bottom layer of the base) to the right, creating a 2x2 base.
- Fold the 2x2 base in half downwards. This brings 4 and 5 together, as well as 3 and 6. The result is a two layer thick zig-zag shape.
- Fold tiles 9-12 downwards, putting tile 9 on top of 8 and 5.
- Fold tile 9 to the left, on top of tile 10.
- Fold tiles 7,8,9 down, to create a fully flat position.
- Finally perform shape-changing the six-flip shape changing transform on tiles 1,2,12 to get the solved position.

